- Как убрать недавние документы, последние закрытые сайты и другие элементы в панели задач Windows 10
- Отключение недавних документов в параметрах Windows 10
- Как убрать последние файлы с помощью редактора локальной групповой политики gpedit.msc
- Видео
- How to Disable Recent Files in Windows 10
- How to Disable Recent Files in Windows 10?
- Method 1: Clear Recent Files Manually
- Method 2: Disabling through the Group Policy Editor
- Method 3: Disabling through Control Panel
- Method 4: Disabling through the Registry Editor
- Windows 10 – How to disable Recent Items and Frequent Folders history
- Method 1: Manually clear the Recent Items and Frequent Folders history
- Method 2: Disable the Recent Items list
- Method 3: Disable the Recent Items and Frquent Folders list using the Registry Editor
- How to Disable Recent files in Windows 10 File Explorer
- How to Disable Recent files in Windows 10 Explorer
- 1. Manually Disable Recent Files
- 2. Disable using Local Settings
- 3. Via Group Policy Editor
Как убрать недавние документы, последние закрытые сайты и другие элементы в панели задач Windows 10
 Если в панели задач Windows 10 нажать правой кнопкой мыши по ярлыку какой-либо программы, то для многих из них вы увидите список недавно открытых документов, для браузеров — посещенные сайты. И не всегда их отображение там может быть полезным.
В этой инструкции подробно о том, как удалить недавние документы и сайты по правому клику на значках в панели задач Windows 10 различными способами. На схожую тему может быть полезным: Как убрать часто используемые папки в Проводнике Windows 10.
Прежде чем начать о том, где хранятся последние документы (а точнее ярлыки на них): если открыть проводник и вставить в его адресную строку %AppData%\Microsoft\Windows откроется папка, внутри которой вы увидите служебную папку «Недавние документы», именно она содержит все эти элементы и их можно оттуда удалить (исходные документы не исчезнут, здесь хранятся простые ярлыки).
Отключение недавних документов в параметрах Windows 10

Самый простой способ отключить сохранение последних открытых файлов в программах — использовать параметры Windows 10:
- Зайдите в Параметры (клавиши Win+I, возможно, будут интересны и другие горячие клавиши Windows 10) — Персонализация — Пуск.
- Отключите пункт «Показывать последние открытые элементы в списках переходов в меню Пуск, на панели задач и в окне быстрого доступа проводника».


Готово, сразу после этого недавние файлы, сайты и другие элементы перестанут показываться в панели задач, а также в пункте «Быстрый доступ» проводника, хотя часто используемые папки там продолжат отображаться.
Как убрать последние файлы с помощью редактора локальной групповой политики gpedit.msc
Следующий метод подойдет только для Windows 10 Pro и Enterprise, в Домашней версии системы редактор локальной групповой политики отсутствует:
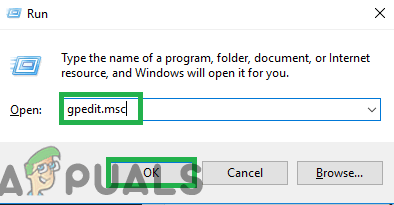
- Нажмите клавиши Win+R на клавиатуре, введите gpedit.msc и нажмите Enter.
- В открывшемся редакторе локальной групповой политики перейдите к разделу Конфигурация пользователя — Административные шаблоны — Меню Пуск и панель задач.
- Дважды нажмите по параметру «Не хранить сведения о недавно открывавшихся документах» и установите значение «Включено».
- Примените настройки и закройте редактор локальной групповой политики.

Внесённые изменения должны вступить в действие без перезагрузки компьютера или ноутбука.
Видео
Надеюсь, для кого-то инструкция оказалась полезной. Остаются вопросы? — задавайте в комментариях.
How to Disable Recent Files in Windows 10
Windows 10 comes with an easy to use interface and better security features than its predecessors. One of the new features added in it is the “Recently Opened Files” feature that displays the user’s recently opened files in the File Explorer. However, this feature generates some privacy concerns if more than one person uses the same Computer. Therefore, in this article, we will guide you with the methods to disable this feature.
 Recent Files feature in Windows 10
How to Disable Recent Files in Windows 10?
The “Recent Files” feature might be a privacy concern for some people and here we will teach you how to disable it permanently. In order to disable it, you can apply three methods that are listed below.
Method 1: Clear Recent Files Manually
Information about the recently opened files is stored in the form of cached data. You can locate this data and manually delete it from time to time. In order to do that:
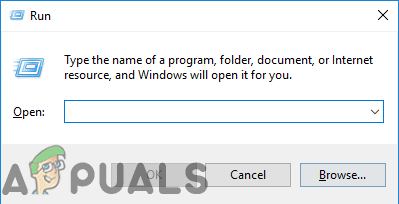
- Press the “Windows” + “R” key simultaneously to open the “Run” Prompt. Opening Run Prompt
- Copy the following address into it Typing the Address in the Run prompt
- Click on “OK“, press “Ctrl” + “A” and then press “Shift” + “Delete” simultaneously. Pressing “Ctrl” + “A” to select all the files
- Click on “Yes” in the prompt.
- All the “Recent Files” displayed in the File Explorer will now be gone.
 Opening Run Prompt
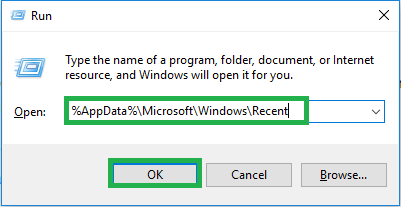 Typing the Address in the Run prompt
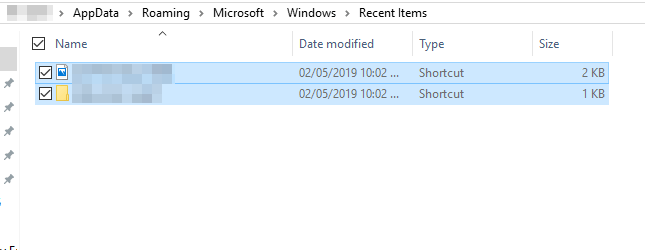 Pressing “Ctrl” + “A” to select all the files
Method 2: Disabling through the Group Policy Editor
If you are using the “Pro” version of Windows 10, then you can access the Group Policy Editor. The Group Policy Editor can be used to modify any type of settings for your Windows 10. In this method, we will be disabling the history of recently open files through the Group Policy Editor. Follow the below steps:
If you are using Windows Home Edition, then skip this method. Check the Registry Editor method, it will work similarly to this method.
- Press “Windows” + “R” on your keyboard to open the “Run” Prompt. Opening Run Prompt
- Type in the following command in it and click on “OK” Typing “gpedit.msc” in the Run prompt
- Click on the “UserConfiguration” option and then on the “AdministrativeTemplates” one. Clicking on “User Configuration” and then on “Administrative Templates”.
- Select the “Startmenuand Taskbar” option and in the right pane select the “Don’t keep the history of recently opened documents” option. Selecting “Start Menu and Taskbar”.
- Doubleclick on it and check the “Enabled” option. Selecting “Enabled”
- Click on “Apply” and then on “OK“.
 Typing “gpedit.msc” in the Run prompt
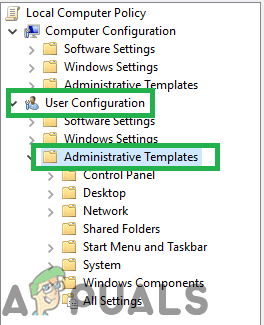 Clicking on “User Configuration” and then on “Administrative Templates”.
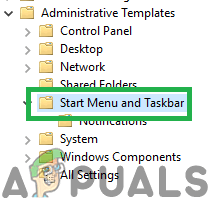 Selecting “Start Menu and Taskbar”.
 Selecting “Enabled”
Method 3: Disabling through Control Panel
Another way to disable the recent files panel is through the Control Panel. In order to disable them from the Control Panel:
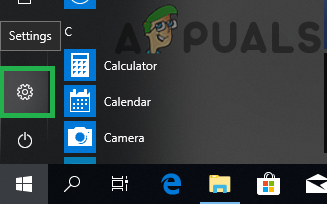
- Click on the “StartMenu” button and select the “Settings” icon. Clicking on the start menu and selecting the settings icon
- Click on “Personalization” and then on “Start” in the left pane. Clicking on “Personalization”
- Scroll to the bottom and click on the “Show recently opened items in Jump Lists on the Start or the Taskbar” toggle to turn it off. Clicking on the toggle to turn it off
 Clicking on the start menu and selecting the settings icon
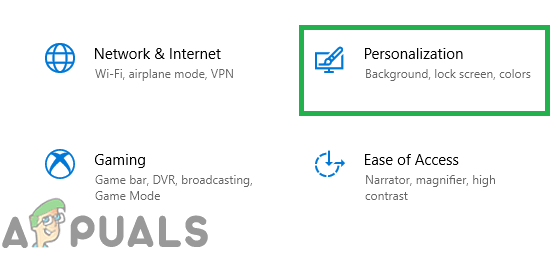 Clicking on “Personalization”
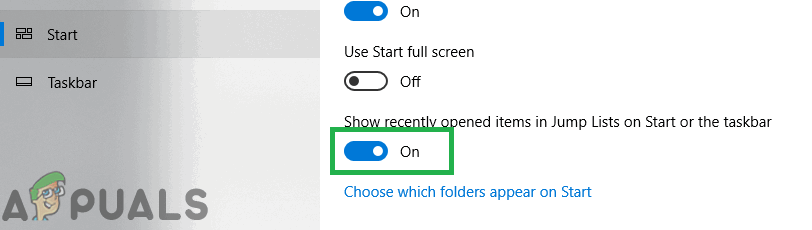 Clicking on the toggle to turn it off
Method 4: Disabling through the Registry Editor
You can also disable the history of the recent files through the Registry Editor. If you used the Group Policy Editor method, then your Registry will automatically update the values for this. However, if you are using this without configuring Group Policy Editor, then you need to create the missing key/value for it to work.
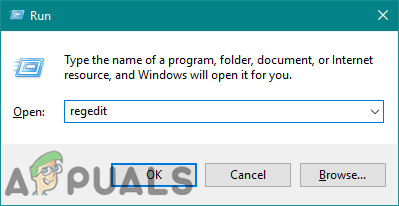
- Press “Windows” + “R” keys on your keyboard to open the Run dialog. Then type “regedit” and click on “Ok” to open Registry Editor.
Note: Choose “Yes” for the UAC (User Account Control) prompt.
 Opening the Registry Editor
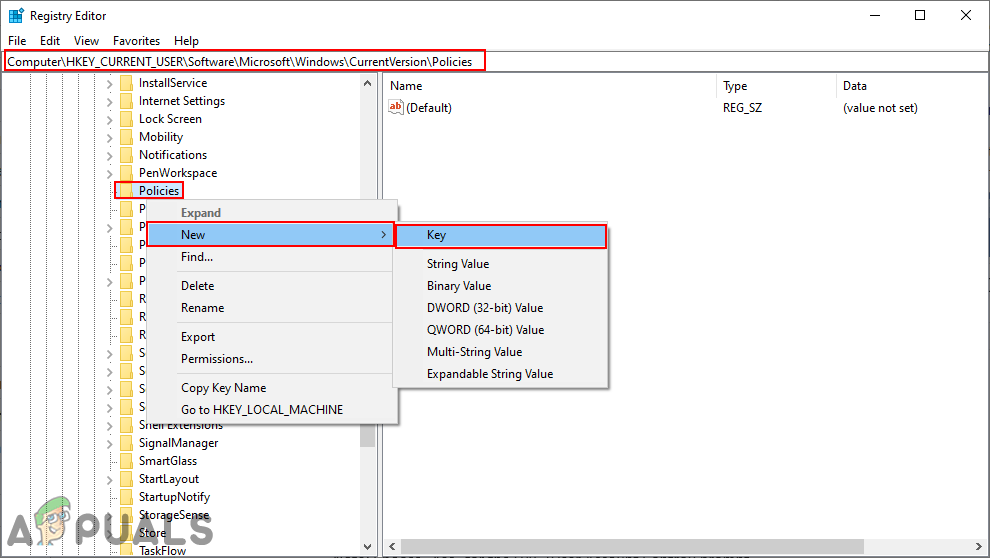 Creating a missing key
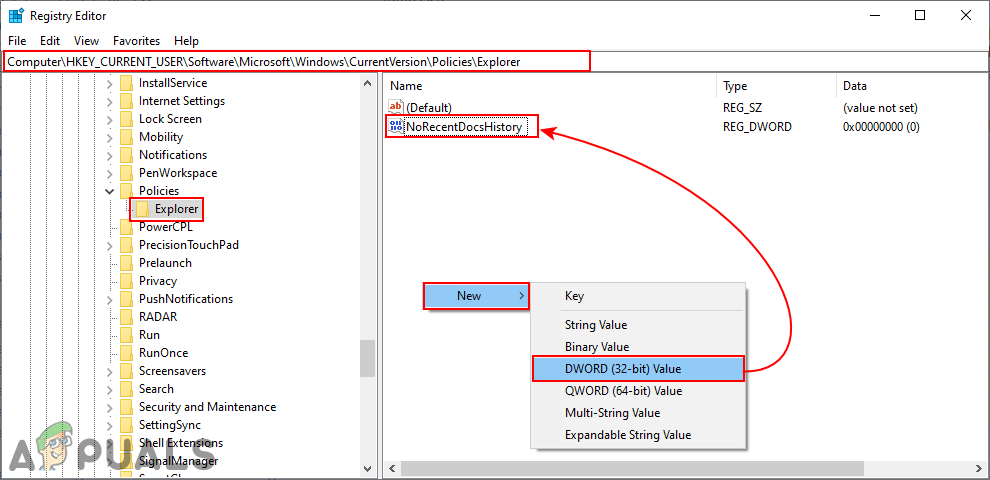 Creating a new value
Note: Value data 1 is for enabling a value and value data 0 is for disabling value.
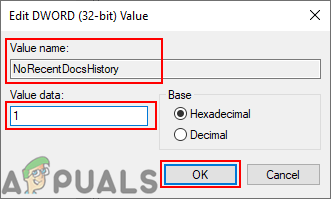 Enabling the value
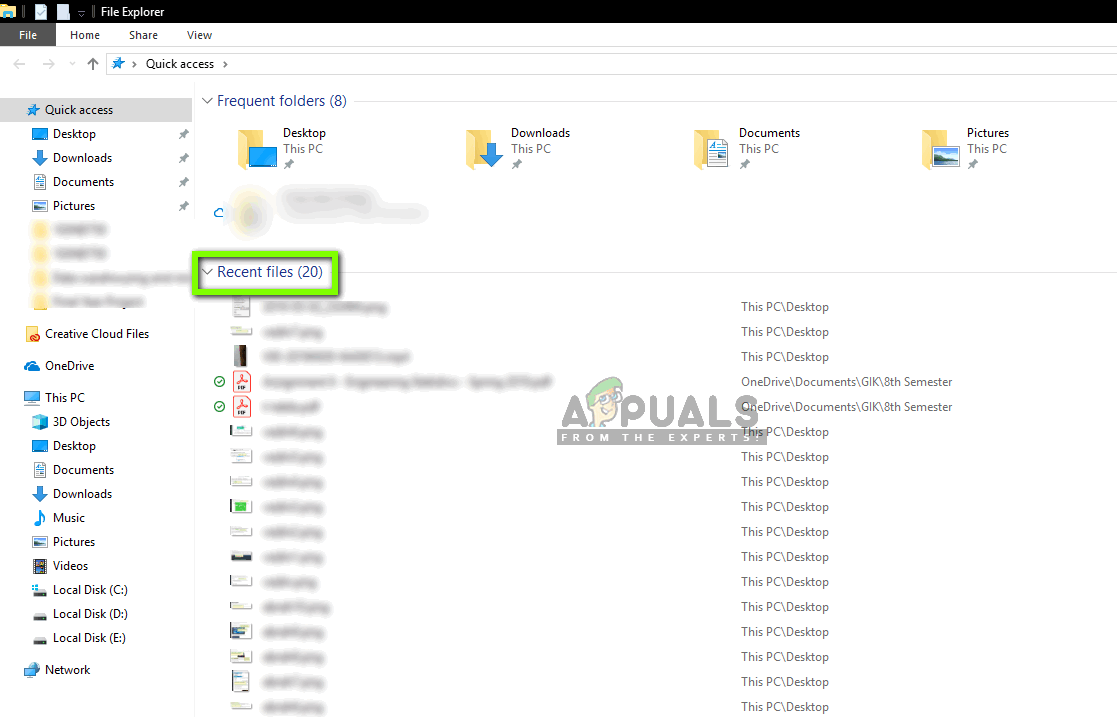
Windows 10 – How to disable Recent Items and Frequent Folders history
When you open files or folders Windows 10 keeps a history so it can list your ‘Recent Items’ (recently opened files) and ‘Frequent Folders’ (folders you use a lot).
These are listed under ‘Quick Access’ in File Explorer– which happens to be the default folder when you open the File Explorer, as well listing the ‘Frequent Folders’ in the navigation pane.
![]()
There are two options available for manging these lists — manually clearing the history (leaving the history still working), completely disabling the feature, and if you have Windows 10 Pro you can completely disable it using the registry editor.
Method 1: Manually clear the Recent Items and Frequent Folders history
To manually clear the history
- Press the Windows button + R on your keyboard — this will open the Run window
- Copy in the following path and click ‘OK’
- Now select all and delete all items — remember to empty the Recycling Bin if you don’t want this history to be easily restored.
Method 2: Disable the Recent Items list
This is the process Windows 10 Home users will need to use.
Note: It will only disable the ‘Recent files’ list — NOT ‘Frequent folders’.
- Click on the Windows Start button then open ‘Settings’ (the cog icon)
- Click on ‘Personalisation’
- Click on ‘Start’ in the left hand menu
- Scroll to the bottom of the list of settings and turn ‘Show recently opened items in Jump Lists on Start or the taskbar’ to ‘Off’
- You can now close the window

Method 3: Disable the Recent Items and Frquent Folders list using the Registry Editor
Note: this will only work for Windows 10 Pro — the registry editor is not built into Home edition.
- Press the Windows button + R on your keyboard — this will open the Run window
- Copy in the following command and click ‘OK’
- Navigate to the following path
- UserConfiguration -> Administrative Templates -> Start Menu and taskbar
- In the list of settings, find ‘Do not keep history of recently opened documents’
- Double click to edit and change to ‘Enabled’
How to Disable Recent files in Windows 10 File Explorer
Today, we explore three different ways to disable Recent files in Windows 10 File Explorer. The company developed this folder so that users can access recent files or folders on their System easily. However, it may arise repercussions when there is more than one person who uses the same system. Hence if you don’t require any such folder so as to safeguard your privacy, you can permanently turn off this attribute on File Explorer.
Users can disable showing recent files on Windows 10 manually. You can also use either local Settings or Group Policy Editor to perform this task. All these workarounds are easy to set and enhance security features on your PC. Let’s discuss them in somewhat more detail-
How to Disable Recent files in Windows 10 Explorer
Below, we discourse 3 different methods to turn off disable recent files or folders on File Explorer-
1. Manually Disable Recent Files
This method is the easiest and quick process to clear recently opened files that are stored as cache on File Explorer. You need to delete these documents frequently using following steps-
Step-1: Right-click on Windows icon using the keyboard and select Run from Power menu.
Step-2: Once the Run dialog box pops up, copy/paste the following code then hit Enter to begin the task.

Step-3: When the list of files appears up, tap Ctrl & A hotkey to select all items.
Step-4: Now press Shift and Delete simultaneously to remove the files permanently.
Step-5: Henceforth, tap Yes on UAC prompt to authorize the changes.
At last open file Explorer and see whether all of the recent files are disappeared or not. If not, move to next solution.
2. Disable using Local Settings
Settings app provides a key feature to disable recent files on Windows Explorer. To avoid these documents from appearing, you should follow the below procedure-
- Press Win logo & I to cite Settings.
- On the next window, select the Personalization category followed by the Start section on the left column.
- Subsequently, move to the right pane and turn off the toggle switch Show recently opened items in Jump Lists on the Start or the Taskbar.

When the above task is over, Reboot your PC and check if all cache files stored in file Explorer vanish or not.
3. Via Group Policy Editor
If the above methods won’t work for whatsoever reasons, you can try Group Policy Editor. Using this tool, you can turn off all the services permanently that are running in the background on your system. In order to accomplish this, follow below processes-
- At first, Press Window & R hotkey to launch Run dialog.
- Type gpedit.msc in the void box then hit OK to initiate Group Policy Editor.
- Here, select the Computer configuration section on the left column followed by Administrator Templates.
- Succeeding after, choose the Start menu and Taskbar folder thereafter locate the following key on its corresponding right section.
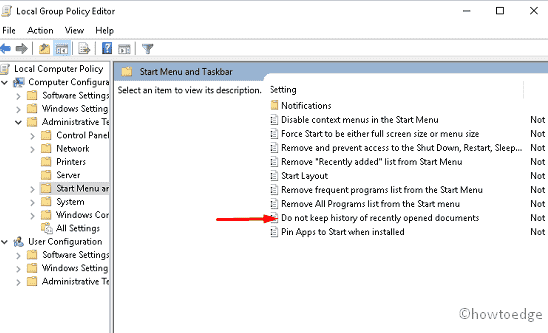
- Once found, Double click to start this then check to Enable radio button.
At last hit Apply and OK button to save the changes made so far.
Once you perform the above steps successfully, Restart your system. There must not lie any files or folders in the recent files section of Windows 10 Explorer.
Note: Disable recent files feature via group policy editor is applicable only for Windows 10 Pro and Enterprise users. This is because Group Policy Editor doesn’t exist on Windows 10 Home version.


