- Get Windows 10 on Mac with Parallels Desktop
- How to Install Windows 10 in Parallels Desktop 11
- Before We Get Started…
- Installing Windows 10 as a fresh installation
- Step 1: Purchase and download Windows 10.
- Step 2: Create a new virtual machine.
- Step 3: Select the installation media.
- Step 4: Enter your Windows product key.
- Step 5: Select how you want to use Windows.
- Step 6: Specify a name, location, and configuration.
- Step 7: Begin the installation.
- Upgrading to Windows 10 from 8.1, 8, or 7
- Before We Get Started…
- Upgrading Windows 7, 8, or 8.1 to Windows 10 in a VM.
- Wait! What if something goes wrong?
- Scenario 1: “Something happened.”
- Scenario 2: The “SAFE_OS” error.
- Scenario 3: The Windows 10 activation issue.
- Windows 10 applications parallels desktop was installed incorrectly
- Прежде чем начать
- Инструкции
- Шаг 1
- Шаг 2
- Была ли эта статья полезной?
Get Windows 10 on Mac with Parallels Desktop
We’ve made it so easy to get Windows 10 in Parallels Desktop®. Here is the easiest the fastest way of getting Windows 10 running on your Mac with Parallels Desktop, even if you do not have a license for Windows 10. You can now purchase and download Microsoft Windows directly from the Parallels Desktop installation with a few simple clicks!
Note: Before you can install Windows 10, please double-check the following requirements to have the best experience with Microsoft Windows 10 in Parallels Desktop:
- Check Windows 10 system requirements that can be found directly from Microsoft
- Make sure you’re running the latest build of Parallels Desktop
As a new user, you will be prompted by the Installation Assistant to download and install Windows 10 as an automatic download, as seen below:
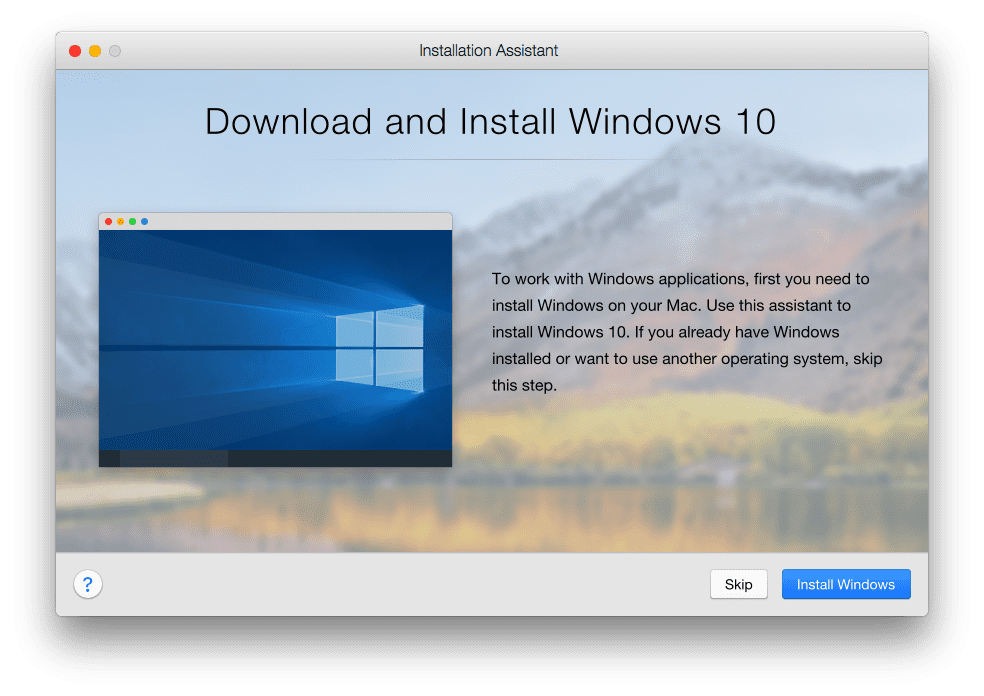 (Figure A)
If you select “Install Windows,” this will begin a download of Microsoft Windows 10 automatically.
If you decide to select “Skip” but still need to download Windows 10, you can manually “Add New” virtual machine by following this pathway:
Parallels Desktop > File > New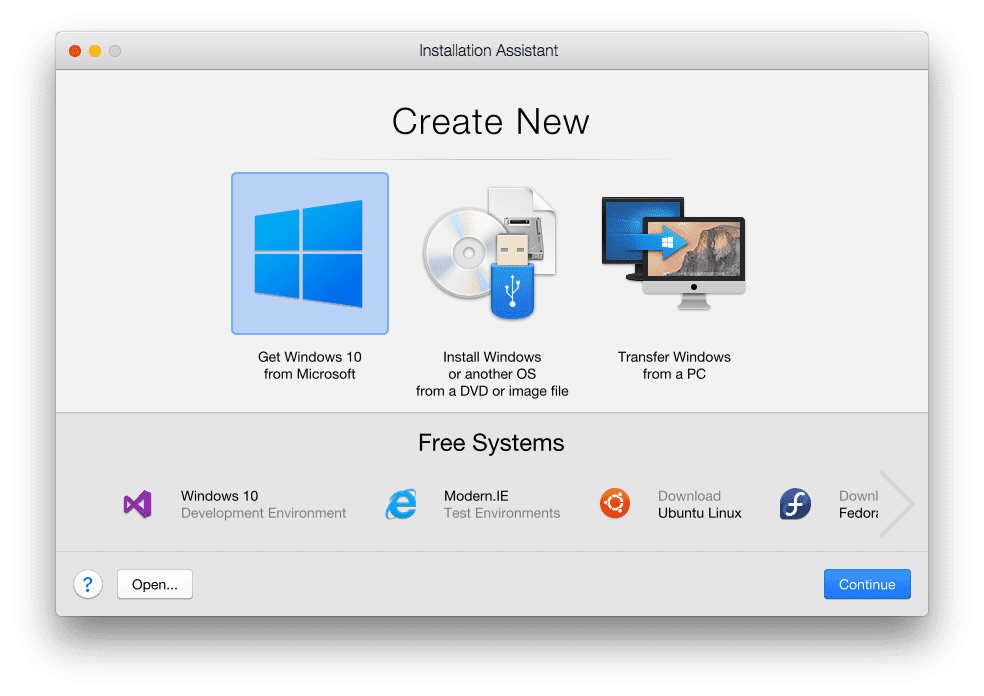
This will bring up the Installation Assistant that will walk you through creating a new virtual machine.
In Figure B , “Get Windows 10 from Microsoft” is selected. Once you hit “Continue,” you will be directed to a new screen that allows you to choose which version of Windows 10 you’d like to purchase. See Figure C below.
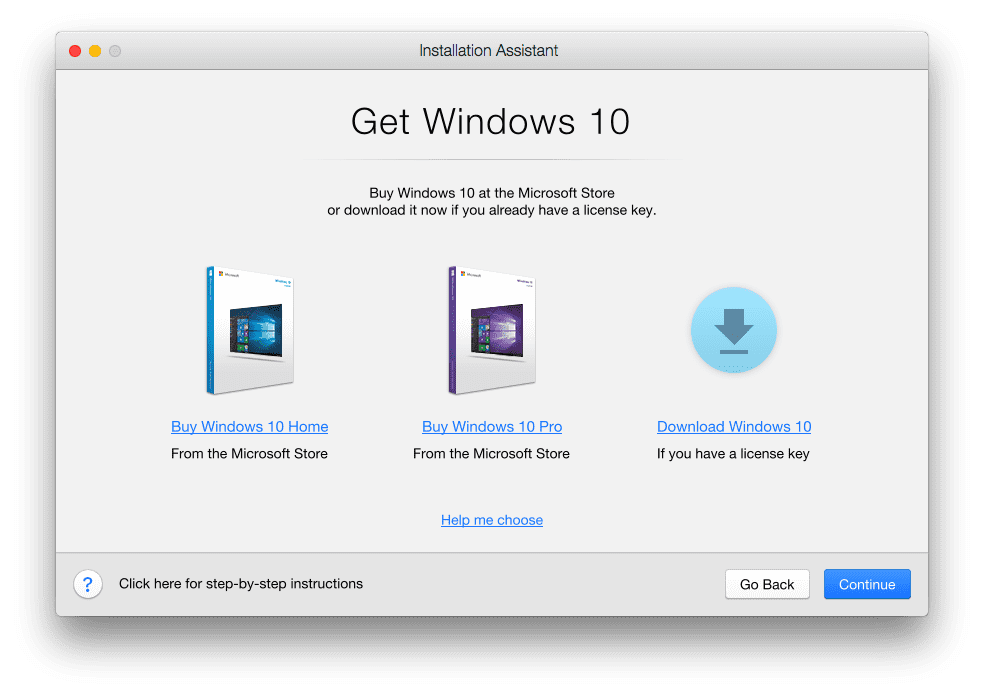
In Figure C, you have an option to purchase Windows 10 Home or Windows 10 Pro edition directly from the Microsoft store.
If you already have a Windows 10 license key, you can download Windows 10 as a virtual machine and enter in the license key directly into the virtual machine to complete set up. In Figure B, you’re able to select “Download Windows 10.” Selecting this option and pressing “Continue” will prompt you to the download page for Windows 10, as seen below in Figure D.
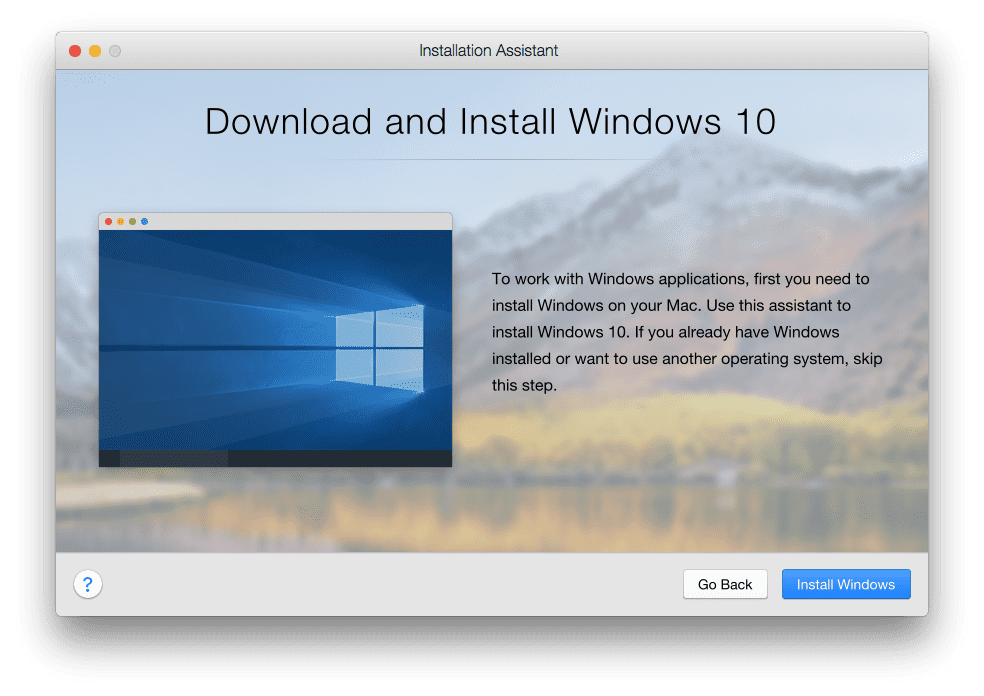
After you select “Install Windows,” your download will begin. This download time is dependent on your internet connection, so it could take anywhere from a few minutes to a couple hours.
Once completed with the above download, you will be able to enter the Windows 10 license key in the screen below:
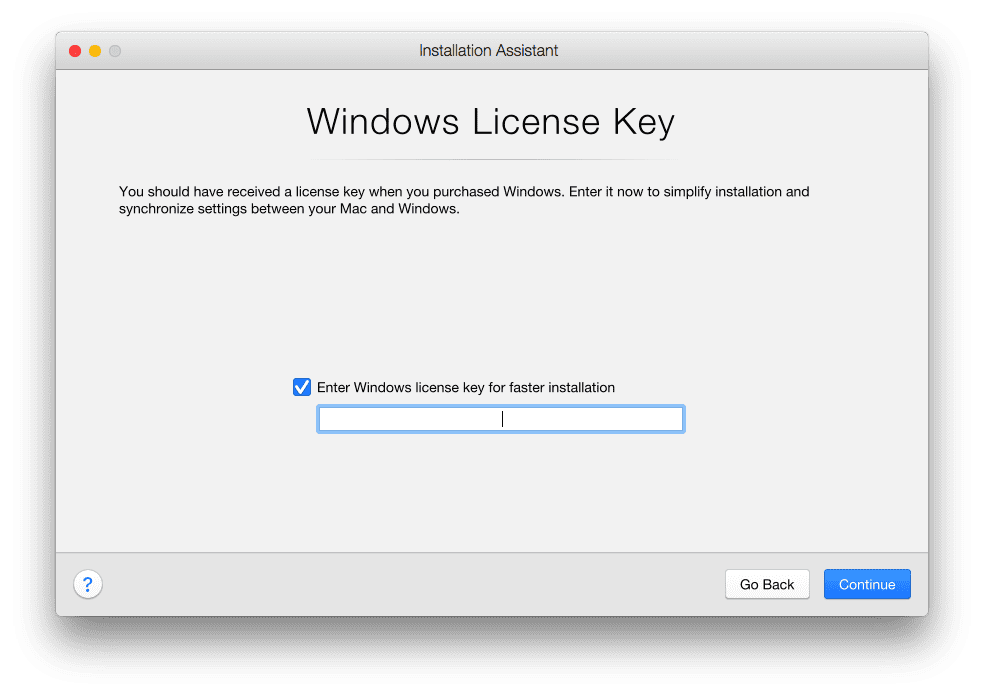
After entering the Windows 10 license key, you will have full access to the Microsoft Windows operating system to meet your needs. The Windows 10 OS will show up in your Control Center as a virtual machine.
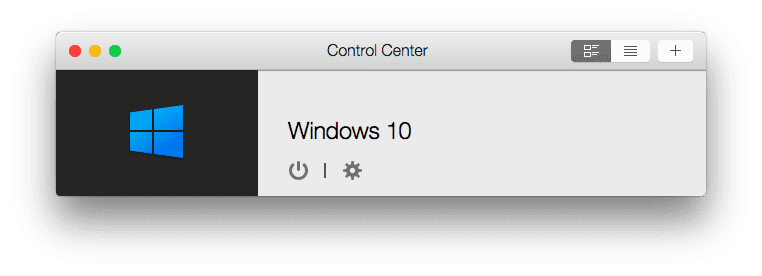
In the above Figure F, you can click to start your virtual machine and run Windows on Mac without rebooting.
You’re done! Easy peasy, right? Enjoy using Windows 10 on your Mac to run popular software such as Microsoft Office, AutoCAD, Adobe Creative Cloud, and thousands more.
Here are a few alternative methods for creating Windows 10 virtual machine using Parallels Desktop:
Migrate your PC as a new virtual machine which can be read about here: http://kb.parallels.com/en/123929
Set up Parallels Desktop based on an existing Boot Camp partition: http://kb.parallels.com/112941
Set up a Parallels Desktop virtual machine using an external USB stick: http://kb.parallels.com/123364
Need a Microsoft Windows operating system to get started with your educational software? Buy directly below:
Looking to make the most out of your Mac by running Windows through Parallels Desktop? Download a free 14-day trial and get started today!
How to Install Windows 10 in Parallels Desktop 11
Guest blog by Manoj Kumar Suresh , Parallels Support Team
Windows 10 has been here for a year, and continues to be much better than Windows 8, period. (Right?!)
Even better, Windows 10 is a free upgrade for most Windows 7, 8 and 8.1 users, so it’s not surprising that many Windows users are upgrading—including users on virtual machines, of course! It’s very easy to install or upgrade to Windows 10 in Parallels Desktop. Let me walk you through the process.
Before We Get Started…
Before you can install Windows 10, please verify the following requirements in order for you to get the best experience on Windows 10 in Parallels Desktop:
- System requirements for Windows 10 can be found here . In addition, you need to allocate two processor cores and 2 GB of RAM memory in your virtual machine configuration for a smooth and seamless performance.
- Make sure that you’re running the latest build of Parallels Desktop 11 for Mac.
Installing Windows 10 as a fresh installation
This is the most simple and straightforward way to get your hands on Windows 10. If you have prior experience installing any other operating system in Parallels Desktop, it’s going to be even easier.
Take the following steps to install Windows on your Mac using the .iso disc image file.
Step 1: Purchase and download Windows 10.
Windows 10 comes as a USB if you purchase it from the Microsoft Online Store or as an online download if you purchase elsewhere. Either way, we advise you to download the image directly from Microsoft .
Step 2: Create a new virtual machine.
If you have just installed Parallels Desktop, you should already be on this screen. Otherwise, click on Spotlight , type Parallels Desktop and click to launch it. It will bring up the following screen:
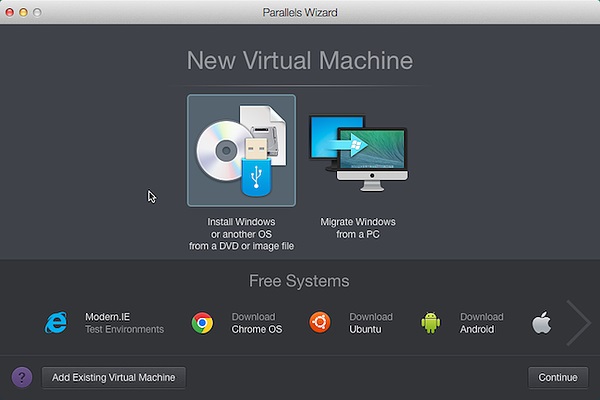
If you already have an existing VM, all you have to do is open Parallels Desktop and press the plus (+) sign at the top right corner of Control Center:
Click Install Windows or another OS from DVD or image file, then click Continue.
Step 3: Select the installation media.
The Parallels Wizard will detect the installation media automatically for installing Windows.
Step 4: Enter your Windows product key.
Click Continue. In the Windows Product Key window, leave Express installation selected.
Note: If Express installation is checked, Parallels Tools will be installed automatically after the Windows installation.
When you’re ready, click Continue.
Step 5: Select how you want to use Windows.
Select how you want to use Windows in Parallels Desktop:
And in Parallels Desktop for Mac Pro and Business Edition:
- Software development
- Software testing
- Design
Step 6: Specify a name, location, and configuration.
You may specify a name for your VM or leave it at the default.
Location:
The default location for Parallels Desktop VMs is in the /Users/username/Documents/Parallels folder.
If you want other user accounts on your Mac to have access to this installation of Windows, select Share with other users of this Mac.
Configuration:
Change your VM settings by selecting Customize settings before installation and configure the VM as per the system requirements I mentioned earlier.
Step 7: Begin the installation.
Click Continue; from here, the Windows installation will begin. Once Windows is installed, launch it by opening a Windows application or by clicking the Power button in the Parallels Virtual Machines list.
There you go! You’ve got your all-new Windows 10 VM loaded and you’re ready to explore the endless possibilities of a brand-new OS.
Upgrading to Windows 10 from 8.1, 8, or 7
Let’s be honest here. The biggest reason behind us even considering this upgrade to Windows 10 is because…it’s free! We might have to sacrifice one or two simple but favorite features (especially if you’re upgrading from Windows 7), but still, who wouldn’t take a chance to get the latest version of Windows at no cost?
Before We Get Started…
Before upgrading, you must check the following steps to make sure that your upgrade to Windows 10 will proceed smoothly.
- Make sure that you have a snapshot of your VM before starting. One of the biggest advantages of a VM over a real PC is the way you can backup/restore the VM, whereas it’s a bigger challenge to do so on a regular computer. So make sure that you take a backup of the PVM as explained here , or at least take a Snapshot as per my co-worker’s blog article so that you can always go back if needed—just in case.
- Make sure your Windows is up-to-date. It’s best to check before you start upgrading to Windows 10.
- I’d also recommend opening your virtual machine configuration and increasing the memory the same way we did earlier in the post.
- Make sure you have at least 10 GB of available space on your virtual hard disk. Add more space for Windows here if required.
Upgrading Windows 7, 8, or 8.1 to Windows 10 in a VM.
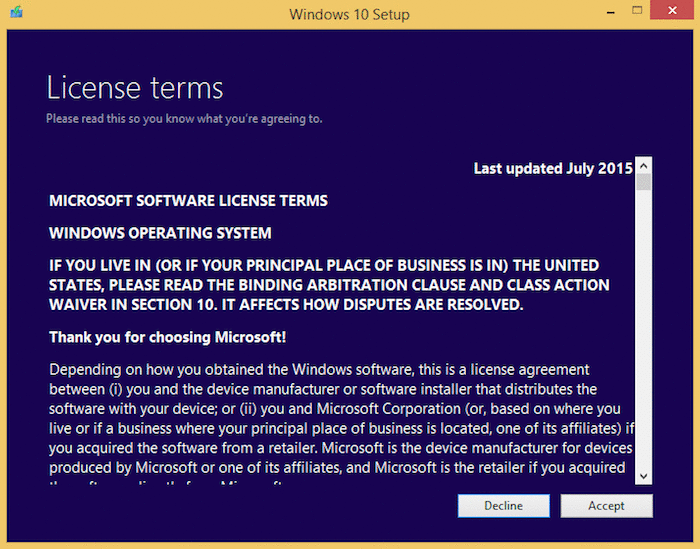
To upgrade your Windows VM to Windows 10, please follow the following steps:
- Check this article to find out whether your Windows version is 32-bit or 64-bit.
- Download one of the upgrade tool files (compatible with your version of Windows) from this Microsoft page .
- Run this file and download the ISO for Windows 10.
In my case, I’m downloading Windows 10 Pro version x64, but you may have a different edition and bit:
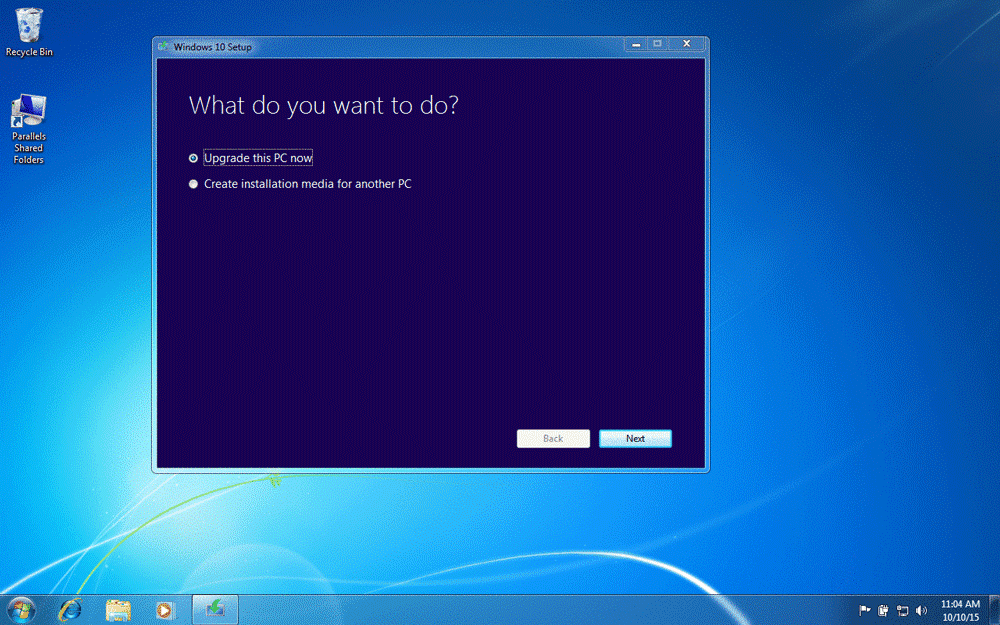
Even though you can click on Upgrade this computer now and continue, it’s better to download the ISO image from the link above. Once you do…
- Connect the ISO file to your VM.
- Open File Explorerand go to This PC, then run Setup from the mounted image.
- Proceed with the installation.
- Restart the VM to continue with the final part of upgrade.
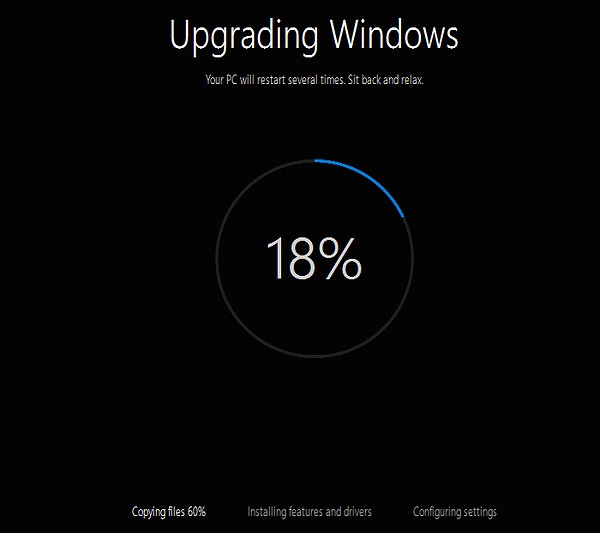
That’s it! Easy! We’ve just upgraded to Windows 10 in a Parallels Desktop virtual machine!
Wait! What if something goes wrong?
I hope you’re not reading this part, but if you are, hopefully you’re just a tech geek who wants to know how to fix things. Even if something went wrong with your Windows 10 installation or upgrade, it’s not over yet! Read on for a few helpful tips and tricks.
Scenario 1: “Something happened.”
Before the release of Windows 10, I’ve heard about this issue and just like everyone, I thought it was a hoax. But as I went through some upgrades, I realized it’s a real error message from the Windows side!
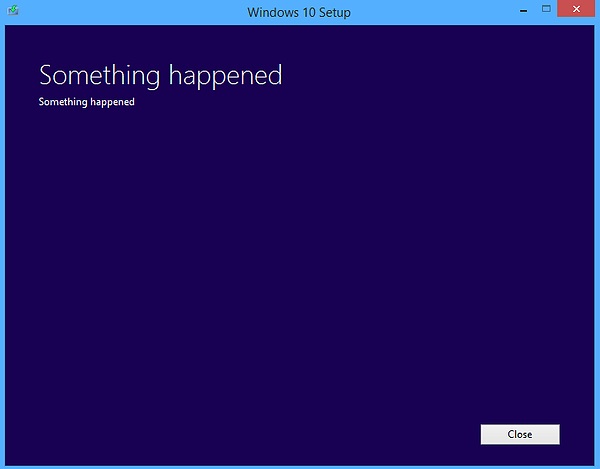
The reason for this happening most of the time is because Windows updates were not installed properly. So the first thing you should do is to check for Windows updates using this Microsoft Fix it tool and run the sfc /scannow command. This should help. If not, contact Microsoft —this issue could happen on real PCs, too.
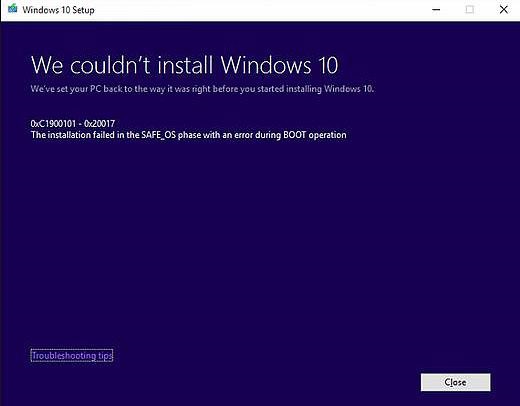
Scenario 2: The “SAFE_OS” error.
This is a critical error, as there is no definite fix for this issue. This happens when the Windows files are corrupted, and we can try to repair them using sfc /scannow and different other options from Microsoft . Still, we can’t be absolutely sure that these steps will fix the issue. The only sure way to fix this issue is to reinstall a fresh copy of Windows and perform the upgrade from scratch.
Scenario 3: The Windows 10 activation issue.
This happens only if your previous Windows was not activated. So the best way to avoid this is to make sure that your Windows 7/8/8.1 is activated before initiating the upgrade process.
That’s it! You’ve just joined the ranks of Windows 10 users, which will bring a lot of surprising features like Cortana on your Mac and more. (Yes, you can use Cortana on your Mac now.) I hope you found this blog useful. Please share it with your friends, and don’t forget to follow Parallels Support on Twitter !
Interested in running Windows 10 on your Mac? Download Parallels Desktop for Mac for a free 14 day trial: Try Now. Want to install Windows 10 with one simple click? More info here.
Windows 10 applications parallels desktop was installed incorrectly
Я хочу обновить виртуальную машину Windows до Windows 10. Как это сделать?
Прежде чем начать
В январе 2020 года расширенная поддержка Windows 7 была прекращена (пакеты исправления больше не будут выпускаться).
Обратите внимание на то, что только указанные ниже версии Windows можно обновить до Windows 10:
- Windows 7 SP1
- Windows 8.1 с обновлением
Более подробную информацию можно получить в службе поддержки Microsoft: Спецификации Windows 10, Вопросы и ответы по обновлению до Windows 10.
ПРИМЕЧАНИЕ. Политика Microsoft по бесплатному обновлению до Windows 10 прекратила действовать 29 июля 2016 г.. Чтобы купить лицензию на Windows 10 от Microsoft, перейдите на следующие страницы:
Инструкции
Чтобы обновить виртуальную машину до Windows 10, выполните указанные ниже действия.
Шаг 1
- Хотя Parallels Desktop автоматически определяет разрядность установленной на виртуальной машине версии Windows (32- или 64-разрядная), рекомендуется проверить это самостоятельно. Для этого в меню Пуск правой кнопкой мыши щелкните Компьютер и выберите пункт Свойства.
- В зависимости от версии Windows, которая отображается в свойствах, выберите одну из ссылок ниже.
ПРИМЕЧАНИЕ. Для установки 64-разрядной версии Windows 10 виртуальной машине должно быть выделено не менее 2 ГБ ОЗУ. Чтобы проверить объем оперативной памяти, выделенной виртуальной машине, откройте меню конфигурации >Оборудование >Процессор и память.
Чтобы увеличить объем памяти, выключите виртуальную машину.
Кроме того, для обновления на виртуальном жестком диске должно быть не менее 10 ГБ свободного места. Объем свободного места можно проверить в проводнике ВМ Windows (C: раздел). Информацию о том, как добавить больше свободного места, см. в статье базы знаний KB 113972.
Шаг 2
- Если у вас активирован пакет инструментов Parallels Desktop Sharing Tools, вы можете запустить скачивание на компьютере Mac с папки Загрузки.
- Запустите MediaCreationTool.exe и следуйте инструкциям по обновлению Windows, которые будут появляться на экране.
- По окончании обновления можно выключить Windows и переименовать ее.
Была ли эта статья полезной?
Как, по вашему мнению, можно улучшить эту статью?


