- How to open multiple windows of the same app in Windows 10
- First things first: Which apps support multiple windows?
- The classic way to open multiple instances of an app in Windows
- Open multiple instances of an app using Shift + Click
- Open multiple instances of the same app with administrative permissions
- Launch multiple windows of the same app using Ctrl + N
- Run multiple instances of an app using the mouse middle-click
- Open multiple windows of the same app with Windows + Shift + 1 to 9
- Which app do you need to run in multiple instances?
- How to Open Multiple Windows / Views Viewing the Same File/ Project? Follow
- Windows 10 —
- Tips for Managing Multiple Windows
- Windows 10: Tips for Managing Multiple Windows
- Lesson 5: Tips for Managing Multiple Windows
- Tips for managing multiple windows
- Task view
- Virtual desktops
- Showing the desktop
- WebKit Objective-C Programming Guide
- Multiple Windows
- Opening Windows
- Entering URLs
- Handling New Window Requests
How to open multiple windows of the same app in Windows 10
In Windows 10, you can open multiple windows of the same app and work with them in parallel. Whether you’re comparing information, transferring files from one location to another, or compiling data from several documents for your homework or report in Microsoft Word or Excel, running multiple instances of the same app can provide a significant boost in productivity. If you want to find out how to open the same app twice on Windows 10 or how to open multiple windows of the same app, this tutorial provides several answers:
NOTE: We created this tutorial using Windows 10 November 2019 Update, but the features presented also work on other versions of Windows 10, as well as in Windows 7 and Windows 8.
First things first: Which apps support multiple windows?
Some apps are developed to run in multiple instances, while others are limited to only one window by design. There are plenty of apps that can run multiple instances at the same time in Windows 10. Browsers, like Google Chrome or Mozilla Firefox, and Microsoft Office apps, like Word or Excel, support multiple windows. So do most desktop apps for Windows.
However, modern apps from the Microsoft Store, including the Store itself, can’t have more instances open in Windows 10. To learn more about the differences between the two types of apps, read What is a Windows app? What is a desktop application? How are they different?.
Other apps limited to one window are Windows Media Player, OneDrive, Dropbox, most games for Windows, antivirus apps, and Skype.
In short, with a few exceptions, if you didn’t download it from the Microsoft Store, you should be able to have multiple windows of the app open at the same time. But, just to be sure, keep on reading and give it a try!
The classic way to open multiple instances of an app in Windows
The most intuitive way to open another window of an app that’s already running is to launch it once more. While clicking or tapping on an app’s taskbar shortcut only provides access to its active window, you can use any other shortcut for the same app available on your desktop or in the Start Menu to run it again. You can even type the app’s name in your taskbar’s search field and open it from there.
Alternatively, right-click (or press-and-hold, on touch-screen devices) on any open app’s taskbar icon. Then, in the contextual menu, click or tap on the app’s name to launch another instance of it.
Open multiple instances of an app using Shift + Click
There are several shortcuts you can use to open multiple instances of an app, the most popular being Shift + Click or Shift + Tap for touch screens.
First, open the application you want to run in multiple instances. Then, hold down the Shift key on your keyboard and click with your cursor – or tap with your finger – on its taskbar icon.
One click or tap opens a new instance, two clicks or taps open two, and so on.
As long as the program allows multiple windows, other instances should immediately open.
Open multiple instances of the same app with administrative permissions
In case you need to open multiple windows of the same desktop app, but with administrative permissions, the keyboard shortcut to remember is similar to the first one. You can use Ctrl + Shift + Click or Ctrl + Shift + Tap for touch screens. Press and hold the Ctrl and Shift keys simultaneously, and then click or tap on the taskbar icon of the app that you want to run as admin in multiple instances.
This triggers a UAC prompt, and you must confirm your choice before another instance of the app is opened. To learn more about running apps as administrator, read 13 ways to use “Run as administrator” in Windows 10.
Launch multiple windows of the same app using Ctrl + N
After opening an app, access it, and use the Ctrl + N shortcut to open another new application window. Just hold down the Ctrl key and press N on your keyboard at the same time.
This shortcut works with File Explorer, programs in the Microsoft Office family, like Word or Excel, and every major browser, such as Google Chrome, Mozilla Firefox, Opera, or Microsoft Edge.
Run multiple instances of an app using the mouse middle-click
If you have a mouse on your Windows 10 computer or device, you can use its scroll wheel to open multiple windows of an app. Open one instance of an application, then middle-click on its icon from the taskbar to launch one more window. Another window of the same program opens every time you middle-click the app’s taskbar icon. Hovering your cursor over an app’s icon shows a preview of all its open windows, letting you choose the one you need.
TIP: If you’re using a touchpad, it is possible to configure it for middle-click by following the instructions in this tutorial: How to configure your touchpad in Windows 10.
Open multiple windows of the same app with Windows + Shift + 1 to 9
If you like keyboard shortcuts, Windows + Shift + 1 to 9 is another one that can open multiple instances of the same app. To begin, launch the program. No matter where you run it from, its icon should be visible in the taskbar. Count the icons on the taskbar from left to right and remember the number of the app you want to have more open copies of. In the image below, 1 corresponds with File Explorer, 2 with Mozilla Firefox, and so on.
Hold down Windows and Shift on your keyboard and press the number key corresponding to the icon of the open app you want to run in an additional window. We used Windows + Shift + 1 to launch another instance of File Explorer, Windows + Shift + 2 for Mozilla Firefox, Windows + Shift + 5 for Microsoft Edge, and Windows + Shift + 7 to open multiple instances of Google Chrome.
If you want to open multiple windows of an app that doesn’t have a taskbar shortcut, keep in mind that the number associated with its taskbar icon may vary depending on what other apps you have open at the time. To use this method efficiently and avoid confusion, you can pin your app’s shortcut to the taskbar.
Which app do you need to run in multiple instances?
We edit texts, do research, and move files around a lot when we write our tutorials. That means we regularly need multiple instances of File Explorer, Microsoft Word, and different web browsers. We also use these apps in split-screen mode, side by side for increased productivity. What about you? What apps are you trying to open multiple times? Let us know in the comment section.
How to Open Multiple Windows / Views Viewing the Same File/ Project? Follow

Dear gentle, kind, empathetic, generous, helpful reader,
I am trying to do something very basic and fundamental which is to open the same file in multiple windows or the same project (preferably in multiple windows).
I can’t believe there is no such option to do that in IntelliJIdea. It was easy to do in Eclipse (New Window option is right there in the menu and the entire project opens so).
I am frankly disappointed with my version of IntelliJIdea Ultimate. I downloaded it because I wanted software engineer metrics and code analysis and UML diagram representation . The UML diagram representation is not at all usable (there is no drilling down from packages to parent classes). I have not tried the software engineering metrics / analytics tool because I can barely import the code from Eclipse.
The most unbelievable thing is that now my copy of Eclipse 4.7 (and older version 4.4) will not start (I am trying to debug it in the eclipse forums). This has caused me hours of delay and lost productivity.
I was hoping to run both the editors and take advantage of the features in one which the other does not have . Netbeans and eclipse work so well together- what is up with intellij idea ? This is really disappointing.
Windows 10 —
Tips for Managing Multiple Windows


Windows 10: Tips for Managing Multiple Windows
Lesson 5: Tips for Managing Multiple Windows
Tips for managing multiple windows
Windows 10 has several features that make it easier to multi-task and work with multiple windows at the same time.
Note: This lesson will focus on using Windows 10 with a desktop or laptop computer. If you’re using a tablet computer with a touchscreen, some of the instructions below will work differently (and some features won’t be available at all). Check out our lesson on Using Windows 10 on a Tablet to learn more.
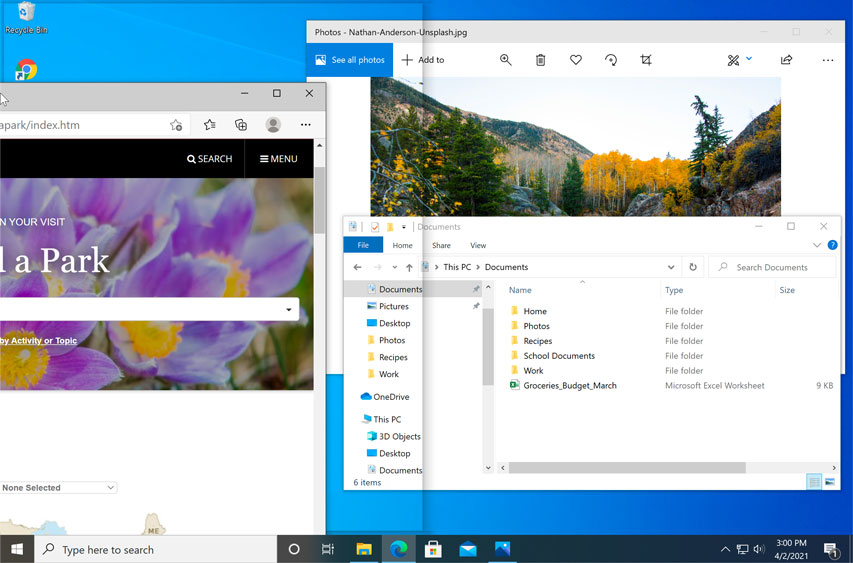
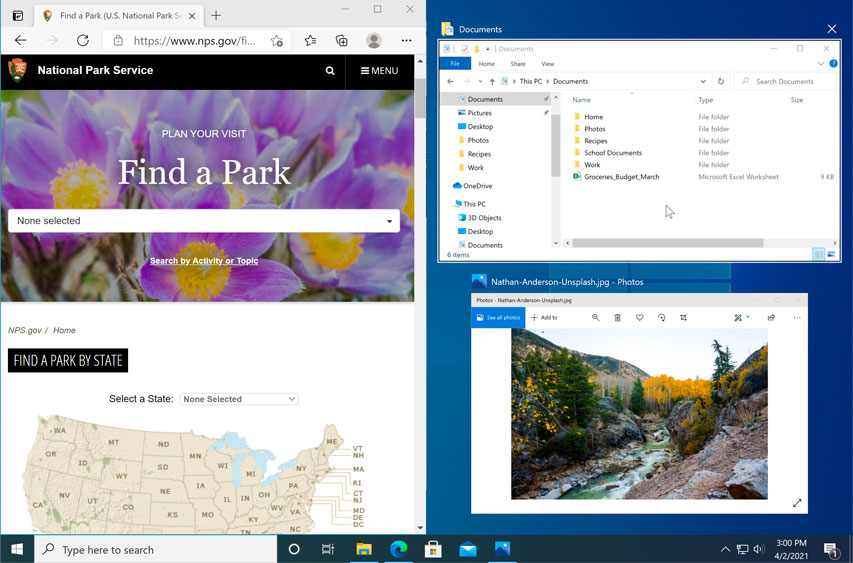
Snap allows you to resize windows quickly, which is especially convenient when you want to see two windows side by side. To do this, click and drag the desired window to the left or right until the cursor reaches the edge of the screen, then release the mouse. The window will snap into place. To unsnap a window, simply click and drag the window down.
Note: If you have more than one window open when snapping, you’ll be able to choose a window to snap to the other side of the screen automatically.
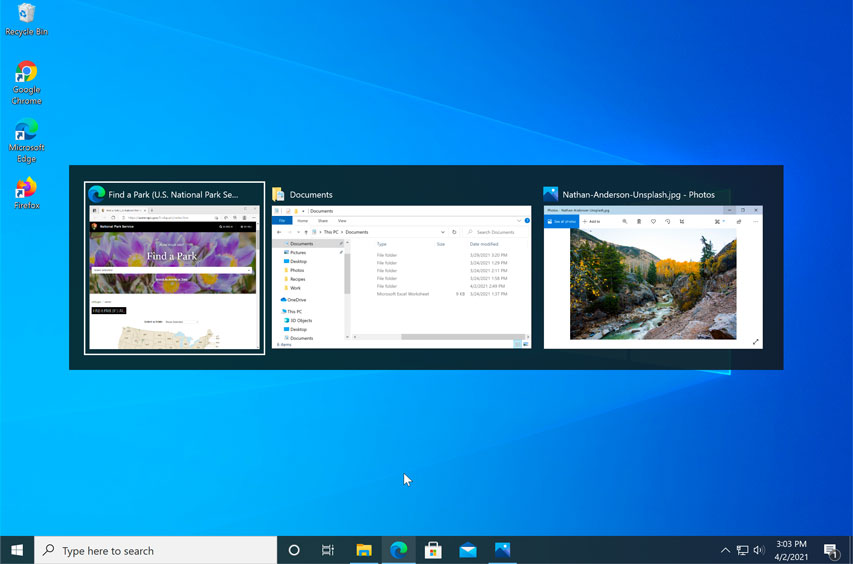
You can use Flip to switch between open windows. To do this, press and hold the Alt key on your keyboard, then press the Tab key. Continue pressing the Tab key until the desired window is selected.
Task view
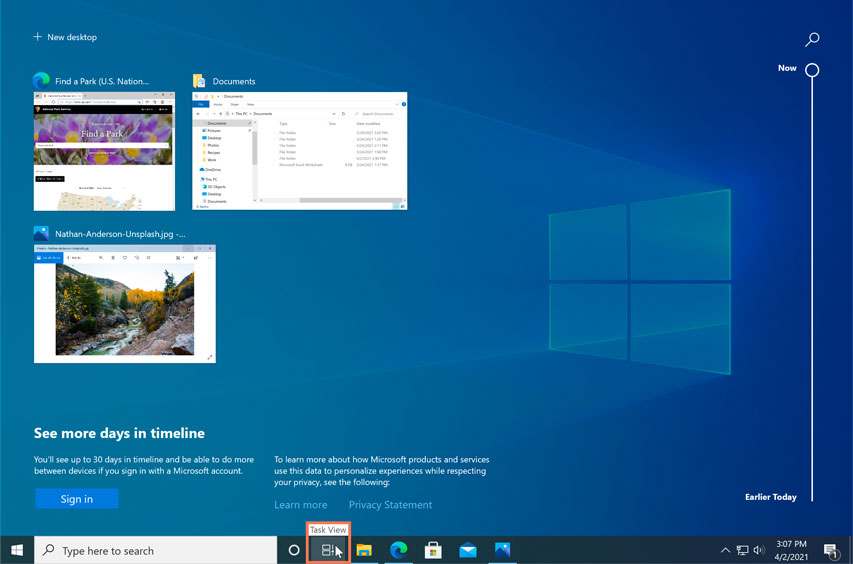
The Task view feature is similar to Flip, but it works a bit differently. To open Task view, click the Task view button near the bottom-left corner of the taskbar. Alternative, you can press Windows key+Tab on your keyboard. All of your open windows will appear, and you can click to choose any window you want.
Virtual desktops
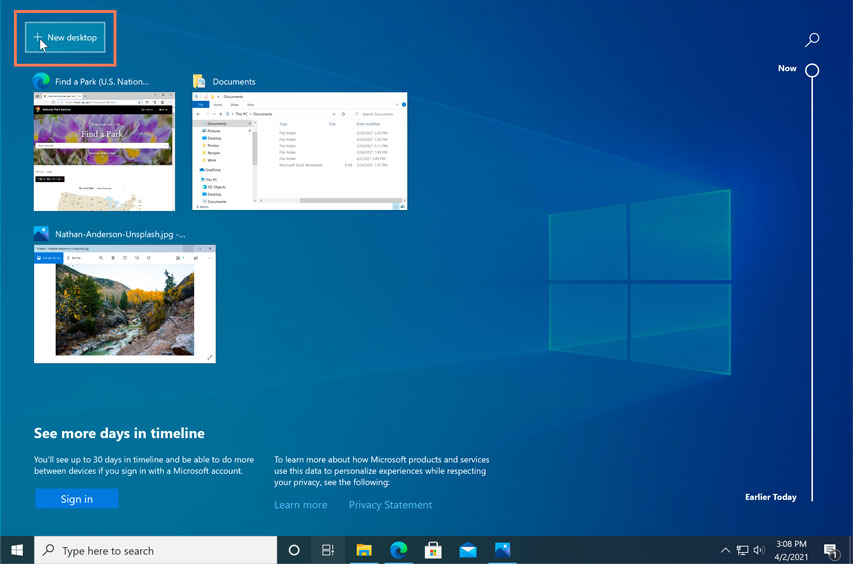
Instead of keeping everything open on the same desktop, you can move some of your windows to a virtual desktop to get them out of the way. This feature wasn’t available in previous versions of Windows, and it’s especially helpful for managing a lot of windows at the same time. To create a new desktop, open Task view, then select New desktop near the bottom-right corner.
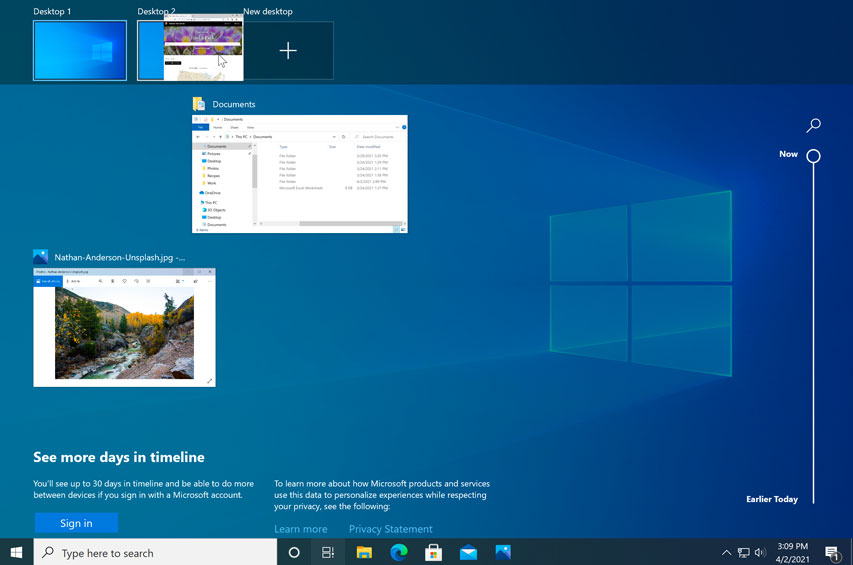
Once you’ve created multiple desktops, you can use Task view to switch between them. You can also move windows between desktops. To do this, open Task view, then click and drag a window to the desired desktop.
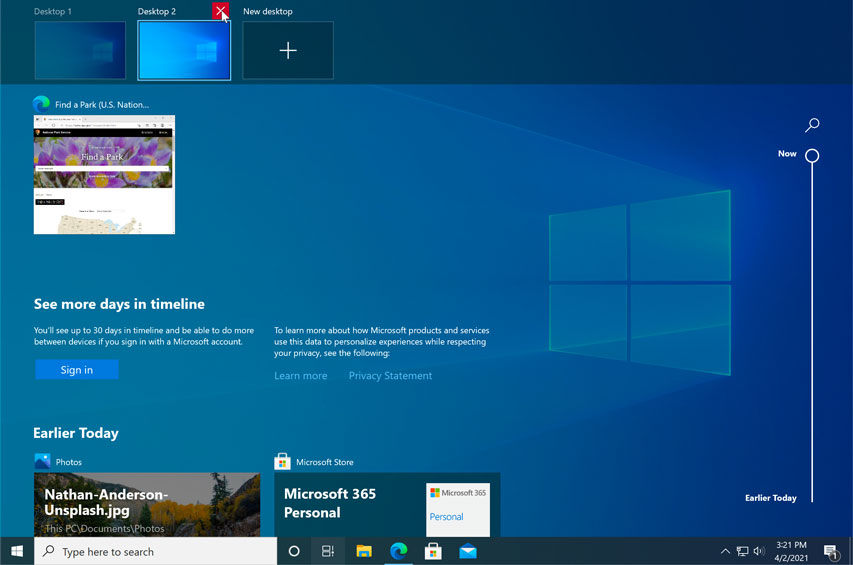
To close a virtual desktop, open Task view and click the X in the upper-right corner of any desktop you want to close.
Showing the desktop
If you have a lot of windows open at the same time, it can be difficult to see the desktop. When this happens, you can click the bottom-right corner of the taskbar to minimize all open windows. Just click it again to restore the minimized windows.
WebKit Objective-C Programming Guide
Multiple Windows
If you are building a simple browser application, you’ll want to allow the user to open multiple windows and type in URLs. You also need to make some policy decisions about how to handle new window requests.
Opening Windows
You can implement multiple windows in a WebKit application easily by beginning with a Cocoa document-based architecture as follows:
Using Xcode, create a document-based Cocoa application. Your new project file will already contain the needed classes and interface files to support multiple windows (namely MyDocument.h , MyDocument.m , and MyDocument.nib ).
Add the WebKit frameworks to your project.
Open MyDocument.nib using Interface Builder and drag a WebView from the Cocoa—GraphicsViews palette to your document window.
Create a webView outlet in MyDocument.h and read the file into Interface Builder. Connect the webView outlet of the File’s Owner to the WebView object you created in the previous step.
Add code to MyDocument.m to load a default page. You can add this code fragment to the windowControllerDidLoadNib: method:
Build and run your application.
When you run your application you should see a window open displaying web content. You can also open multiple windows by selecting New from the File menu. This example demonstrates multiple WebView objects independently displaying web content.
Entering URLs
If you want a user to type in their own URL, add a text field to the window and make a new load request every time the user enters a new URL. Here are the steps you follow:
Add a text field to the window in MyDocument.nib .
Add a textField outlet and a connectURL: action to MyDocument.h . Read in the changes to MyDocument.h from Interface Builder.
In Interface Builder, make a connection from the text field you created to the textField outlet of the File’s Owner and set the action to connectURL: . This method is invoked when the user enters in a new URL.
Implement the connectURL: method to load the URL typed in by the user:
Build and run your application.
Now when you enter a new URL in the text field, a new page is loaded.
Handling New Window Requests
By default, if you click a link that requests a new window be opened to display the content of that link, nothing happens. If you want to change this behavior, your application needs to make a policy decision about new window requests. You need to implement a WebUIDelegate object to handle this case. Again, implement the delegate methods you want. Here are the steps to follow:
Set the delegate after MyDocument.nib is loaded. If you have a Cocoa document-based application, then you can add this code to MyDocument’s windowControllerDidLoadNib: method:
It is good practice for browser-like applications to set the group name of WebView objects after they are loaded from a nib file. Otherwise, clicking on some links may result in multiple new window requests because the HTML code for a link might not use the same frame name. The group name is an arbitrary identifier used to group related frames. For example, you can set the group name as follows:
Implement the webView:createWebViewWithRequest: delegate method to create a window containing a web view, and load the request:
Build and run your application.
Now, when you click a link that requests a new window, a new window is created to display the content of that link. This is just one example of many decisions your application can make about policies and the behavior of the user interface. You use the other WebUIDelegate methods and other WebView delegates to modify the behavior.
Copyright © 2003, 2012 Apple Inc. All Rights Reserved. Terms of Use | Privacy Policy | Updated: 2012-11-09


