- Средства переноса данных в Windows 10
- Перенос данных в Виндовс 10
- Способ 1: PCmover
- Способ 2: USMT
- Заключение
- Windows 10 Easy Transfer Tool
- What is Windows Easy Transfer Tool and How Does it Work?
- The Problem with Windows Easy Transfer
- Not Available on Windows 10В
- No 100% Data Transfer
- A Reliable Alternative to Windows 10 Windows Easy TransferВ
- Steps — Transfer Everything with The Best PC Transfer Software
- 1. PC to PC Transfer via the Connected Network
- 2. Transfer Files, Programs via the Image File
- More Options for Easy Transfer Windows 10: Using Microsoft Account
- It’s Most Straightforward, Fast Speed to Transfer Data!
Средства переноса данных в Windows 10

Перенос данных в Виндовс 10
Первое, что нужно отметить – в «десятке» отсутствует оснастка «Средство переноса данных», поэтому подходящий инструментарий придётся загружать и устанавливать самостоятельно. Таковых решений существует два: консольное приложение USMT, идущее в составе пакета Windows Assessment and Development Kit (Windows ADK), а также программа от стороннего производителя под названием PCmover. Начнём с последней.
Способ 1: PCmover
Решение Microsoft удалить стандартное средство переноса пользовательских файлов вызвало много споров, поэтому компания предложила альтернативу – программу PCmover, созданную сторонним разработчиком, но официально сертифицированную создателями Windows.
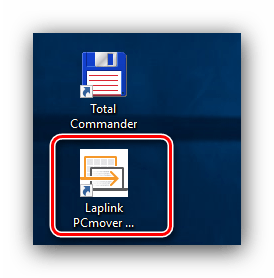
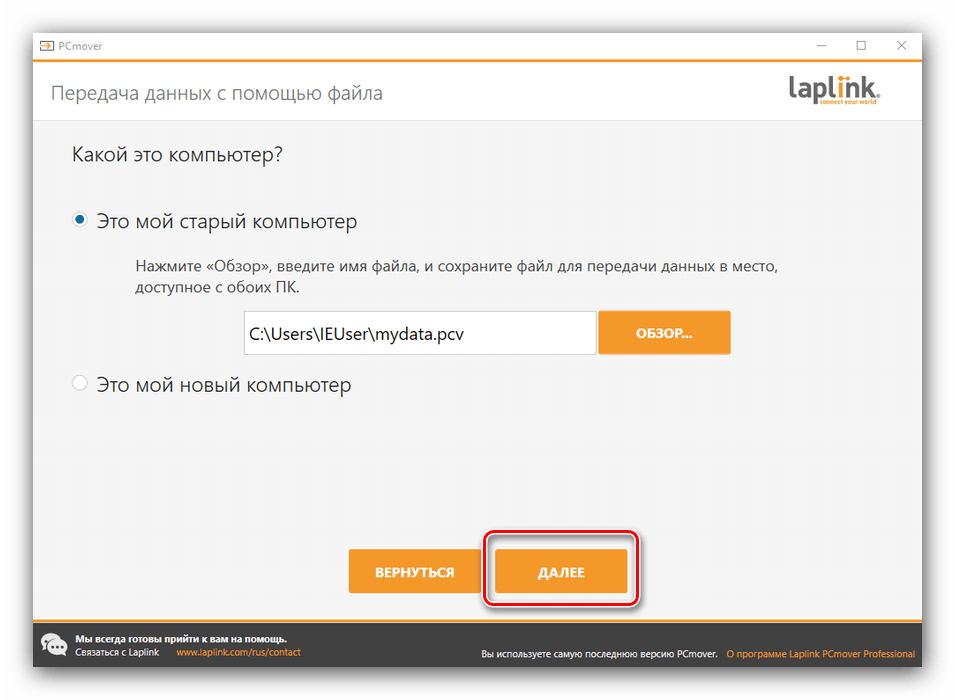
- Начнём операцию со старой машины. После установки приложения запустите его с ярлыка на «Рабочем столе».
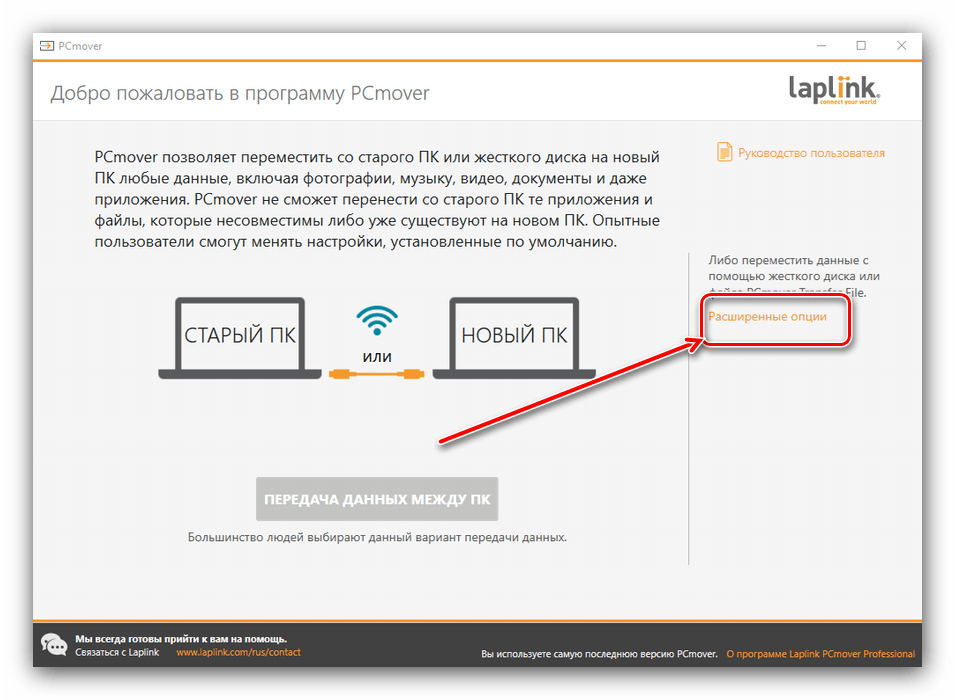
В правой части главного окна кликните по пункту «Расширенные опции».
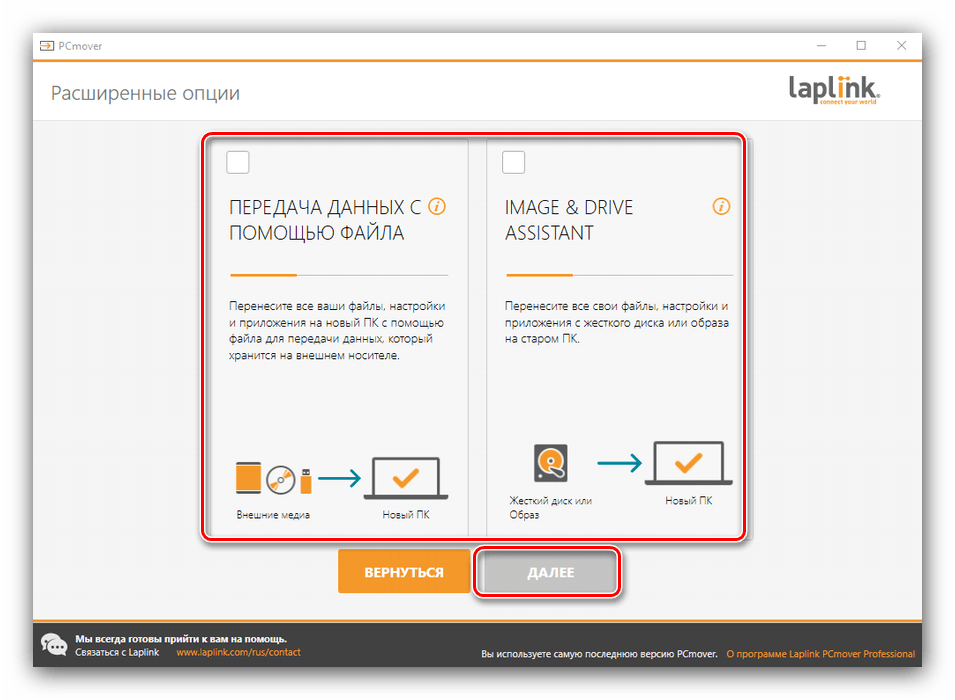
Доступны два варианта переноса: посредством архива в специальном формате и образа жесткого диска. Выберем архив как более совместимый вариант.
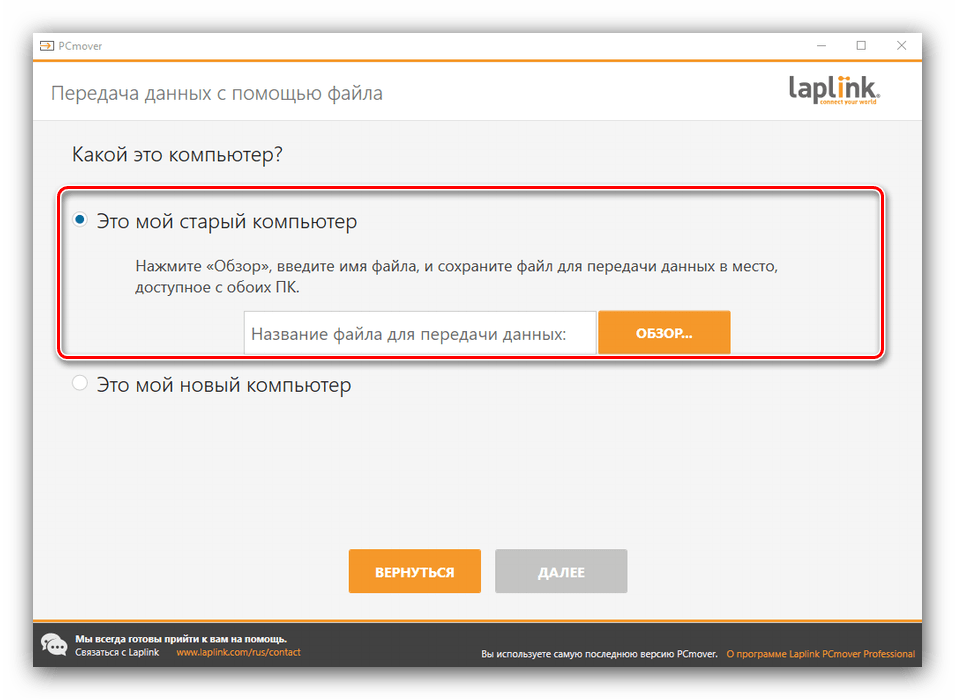
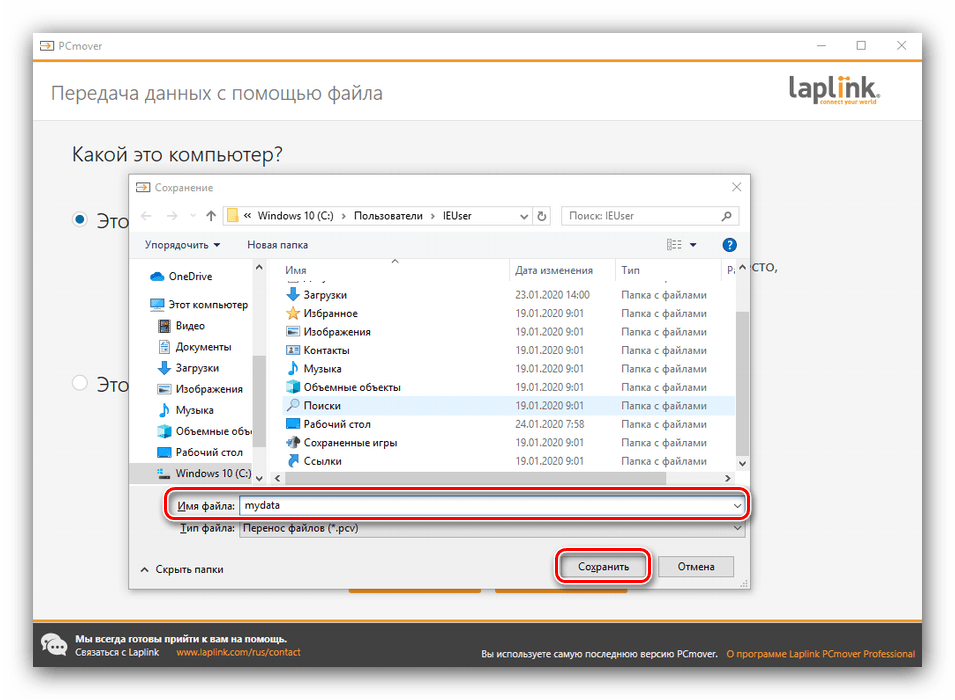
Далее воспользуйтесь кнопкой «Обзор», задайте место на жестком диске (желательно внешнем) и имя архива с информацией. Затем щёлкните «Сохранить» и «Далее».
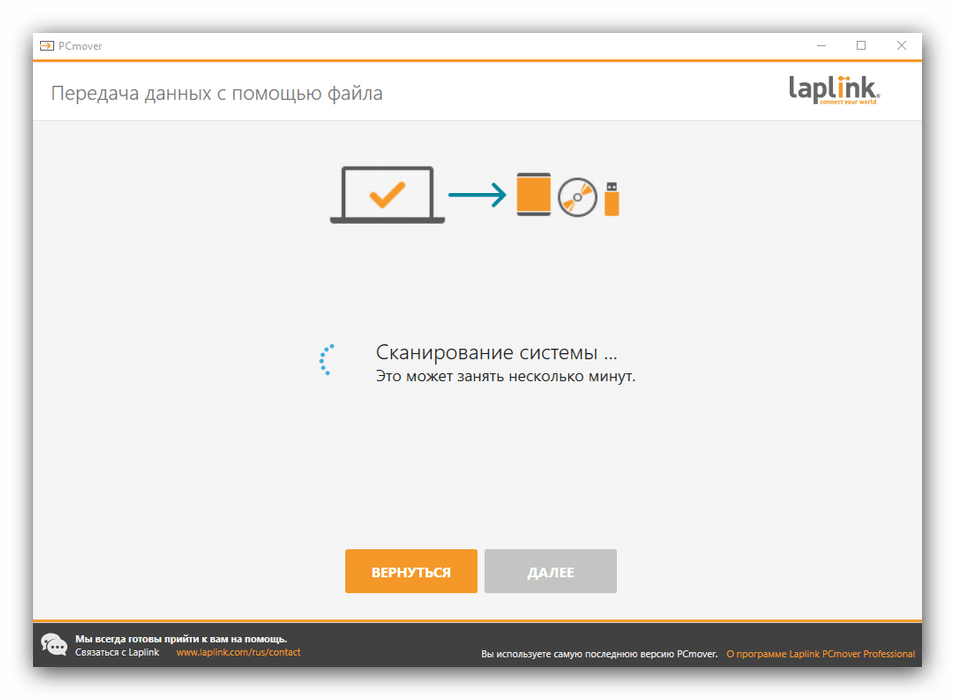
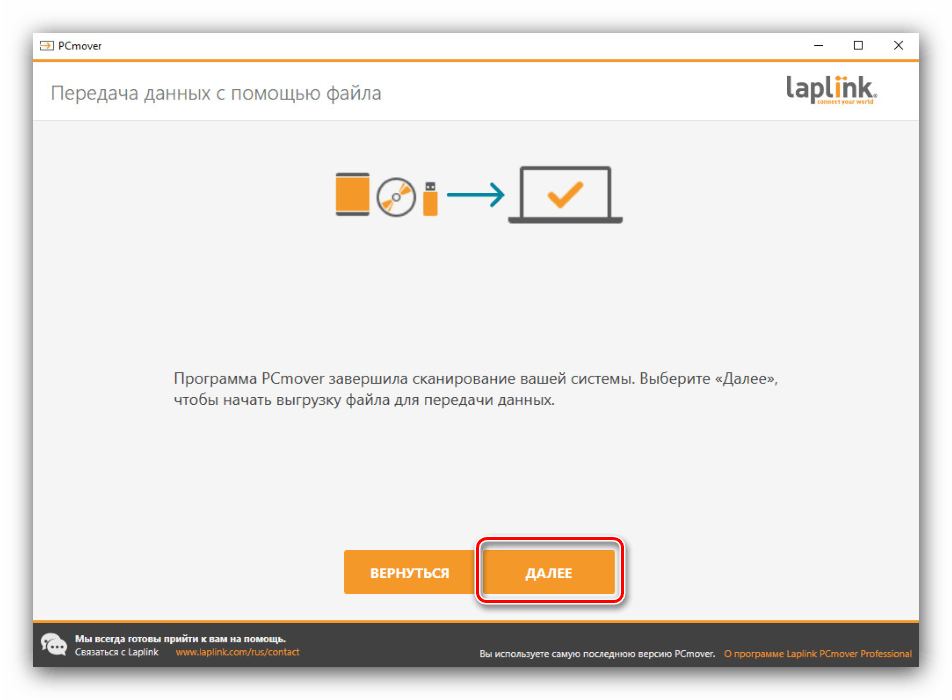
Начнётся проверка системы для поиска данных переноса. Она может занять длительное время. По её окончании нажмите «Далее».
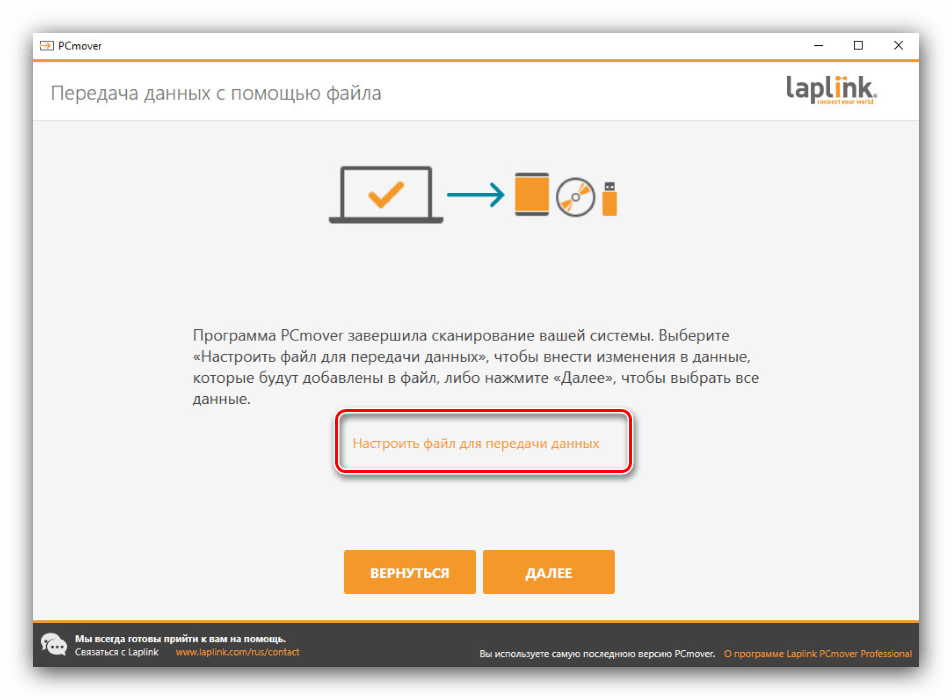
После сканирования вам будет предложено настроить полученный образ.
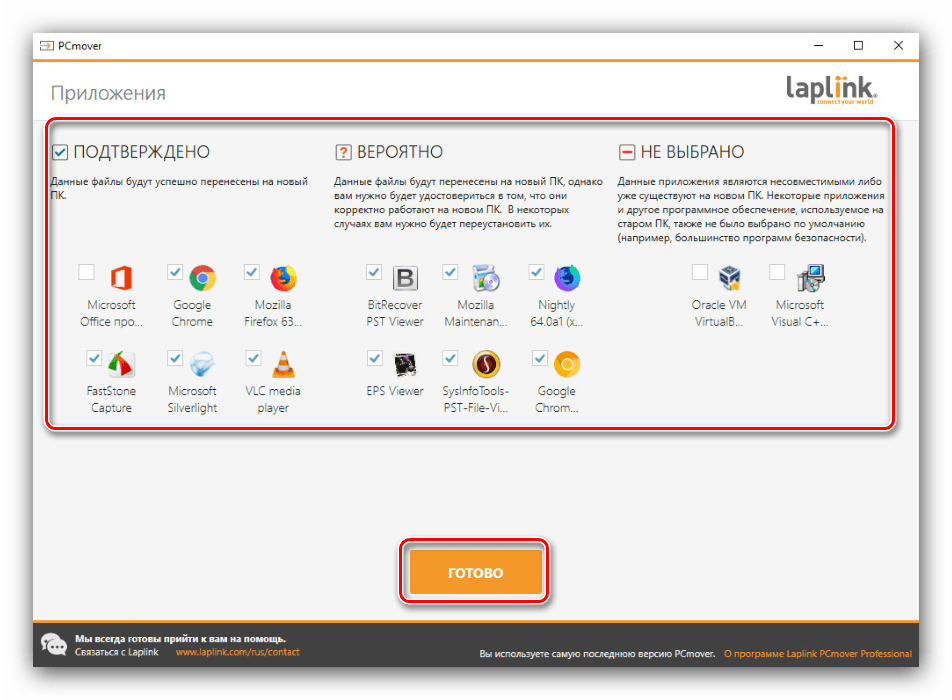
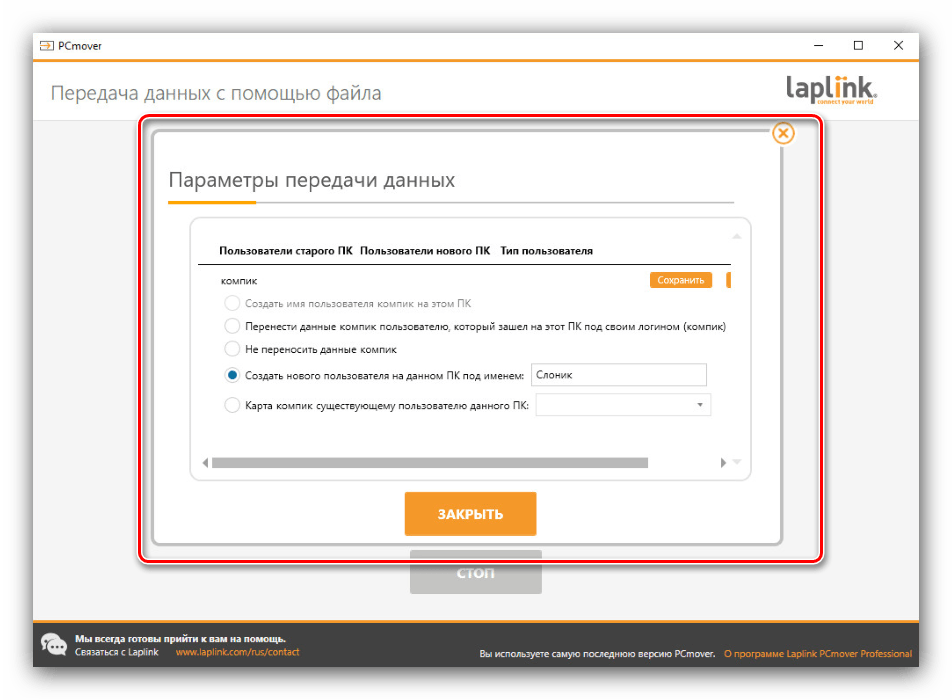
Первым делом обратите внимание на пункт «Приложения».
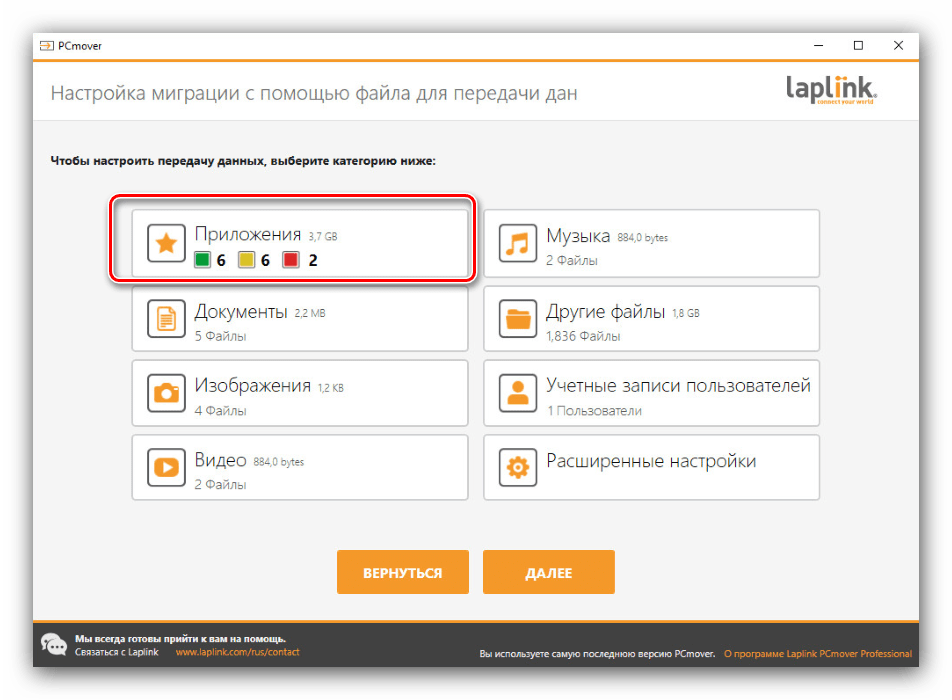
Нажатие на соответствующую кнопку откроет перед вами список из трёх категорий программ – первая, «Подтверждено», означает, что всё ПО из этого списка будет перенесено. Вторая, «Не подтверждено» – информация будет перенесена, но её работоспособность не гарантируется. Третья, «Не выбрано» – приложения из этой категории либо несовместимы, либо уже присутствуют на целевом компьютере.
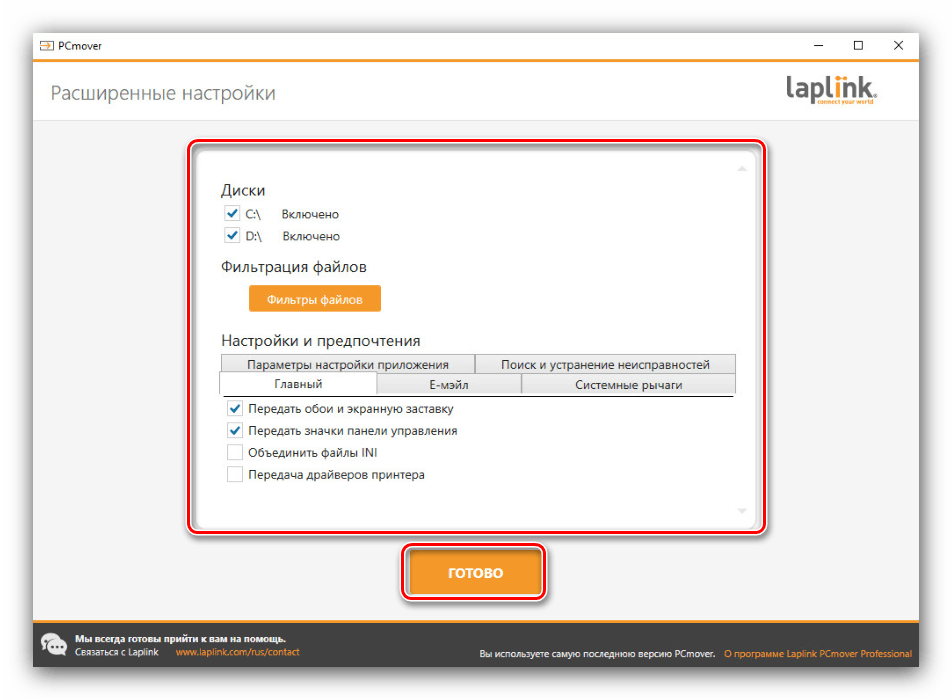
По похожему алгоритму организована настройка остальных категорий, единственное отличие – «Расширенные настройки», в которых можно задать фильтрацию по типам файлов.
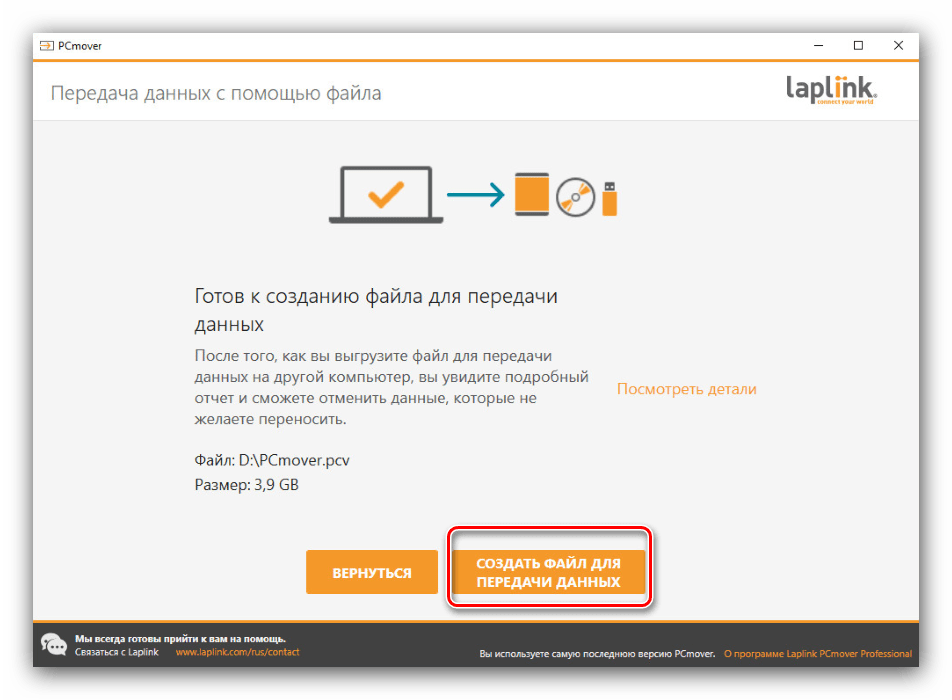
После настройки всего необходимого нажмите «Далее». Затем кликните по кнопке «Создать файл для передачи данных» и подождите, пока операция будет завершена.
Нажмите «Завершить» и переходите к новой машине.
Первым делом повторите шаги 1-4, только на последнем выберите опцию «Это мой новый компьютер».
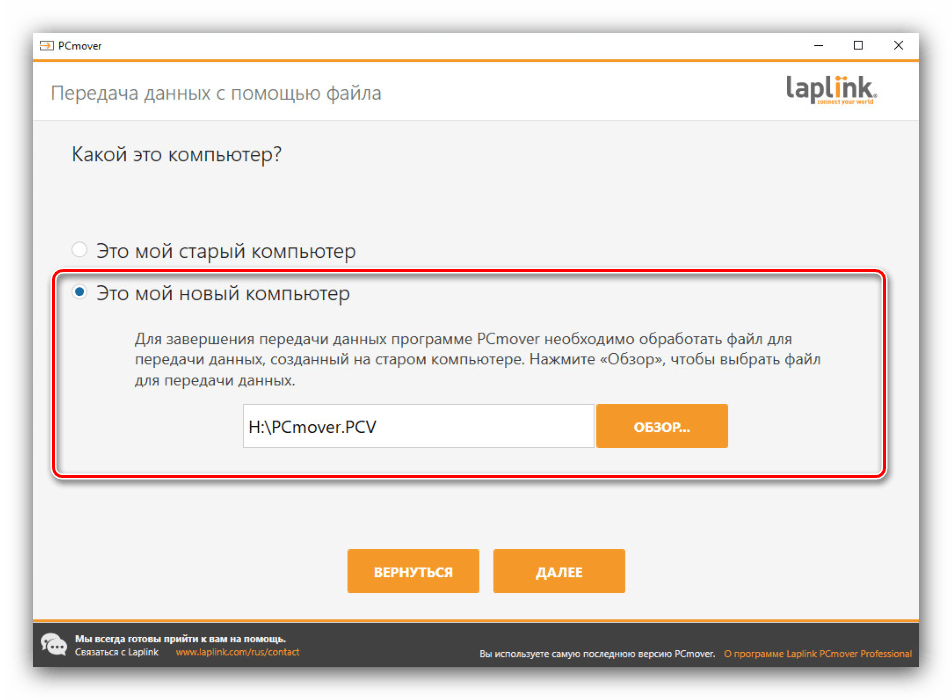
С помощью кнопки «Обзор» выберите созданный ранее файл в формате PCV и нажмите «Далее».
Подождите, пока приложение просканирует систему, затем снова воспользуйтесь кнопкой «Далее».
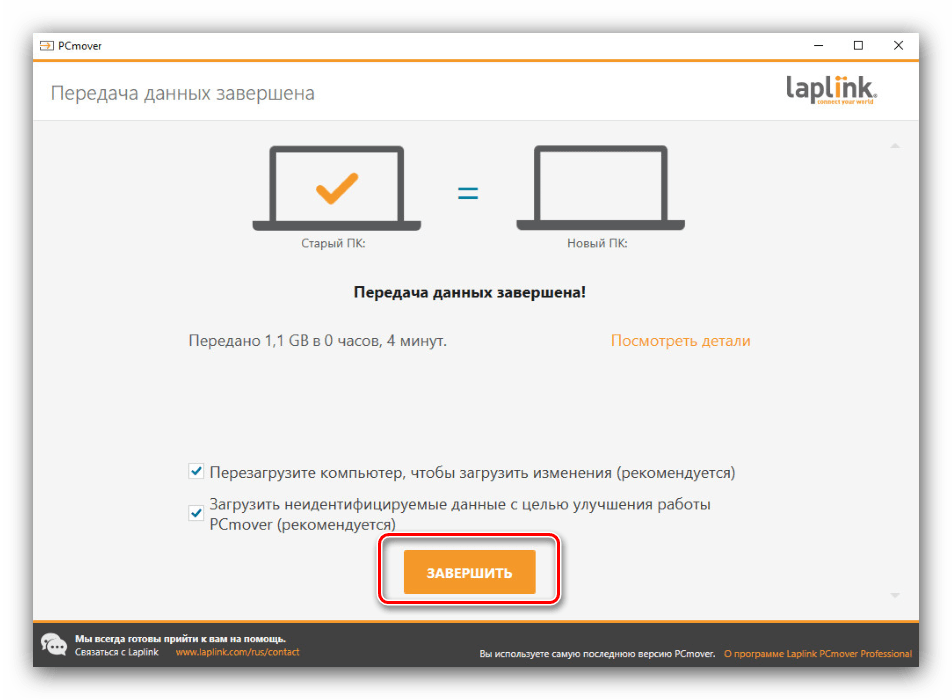
Режим передачи данных лучше оставить по умолчанию, после чего запускайте процесс передачи информации.
По окончании процесса закройте приложение – компьютер автоматически перезагрузится, после чего будет полностью готов к использованию.
PCmover представляет собой мощный инструмент переноса пользовательских профилей, но идеальным его не назовёшь по двум причинам. Во-первых, приложение распространяется исключительно на платной основе без каких-либо ознакомительных или пробных версий. Во-вторых, это пусть и сертифицированная, но сторонняя программа, что некоторые пользователи могут счесть небезопасным.
Способ 2: USMT
Компания Microsoft выпустила пакет миграции пользовательской среды, в комплекте с которой идёт утилита переноса данных.
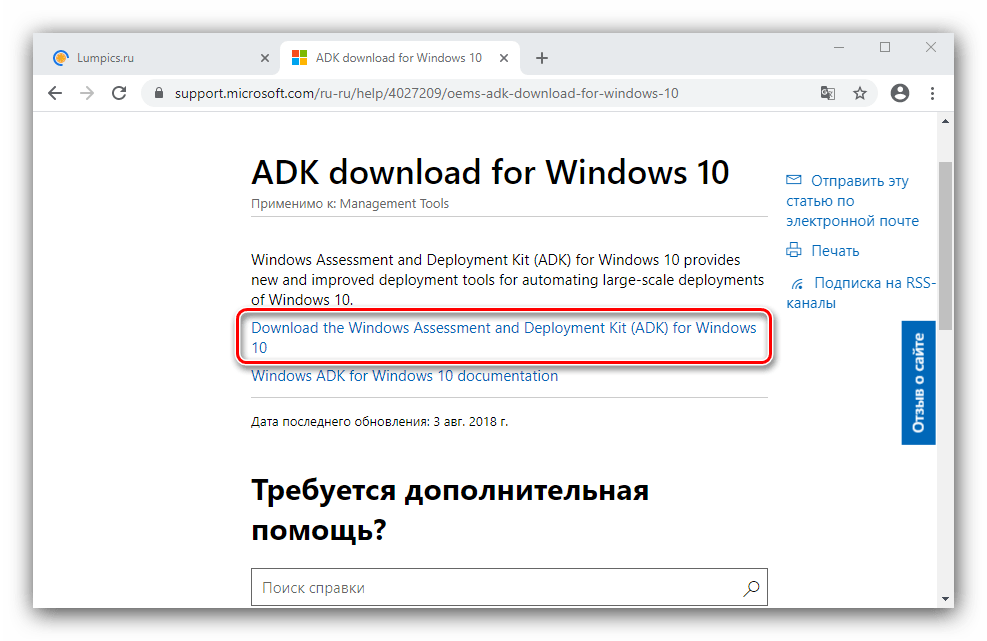
- Откройте ссылку выше. Прокрутите страницу до надписи «Download Windows Assessment and Development Kit» и нажмите на неё.
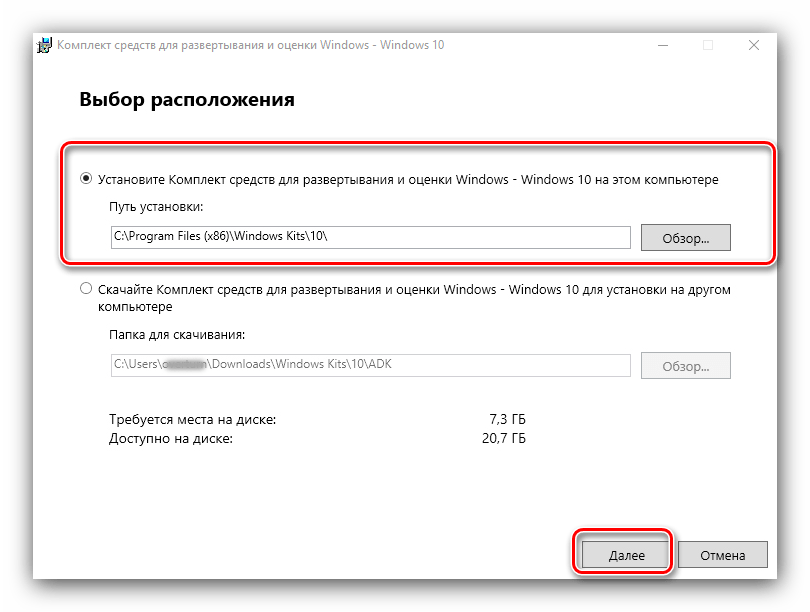
Загрузите инсталлятор на компьютер, затем запустите его. Выберите каталог, в который желаете установить средство.
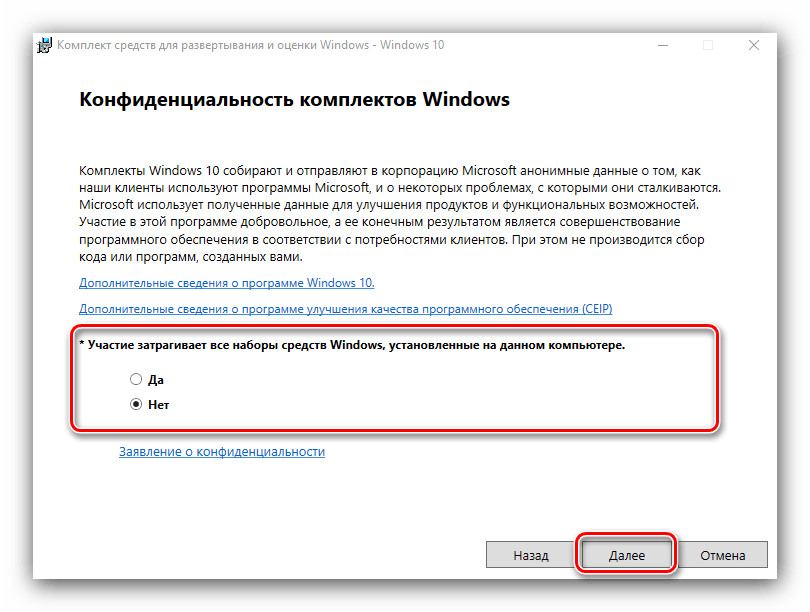
Выберите, хотите ли отправлять в Майкрософт сведения об использовании ADK.
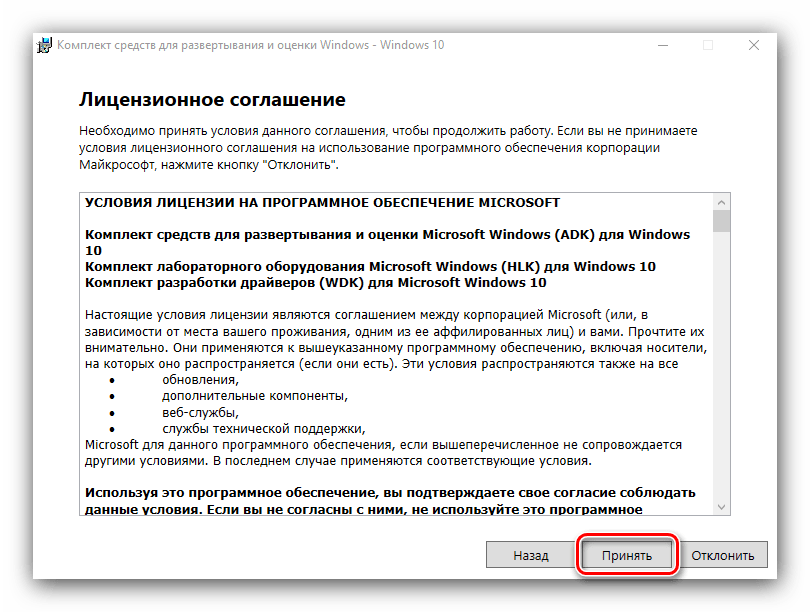
Примите лицензионное соглашение.
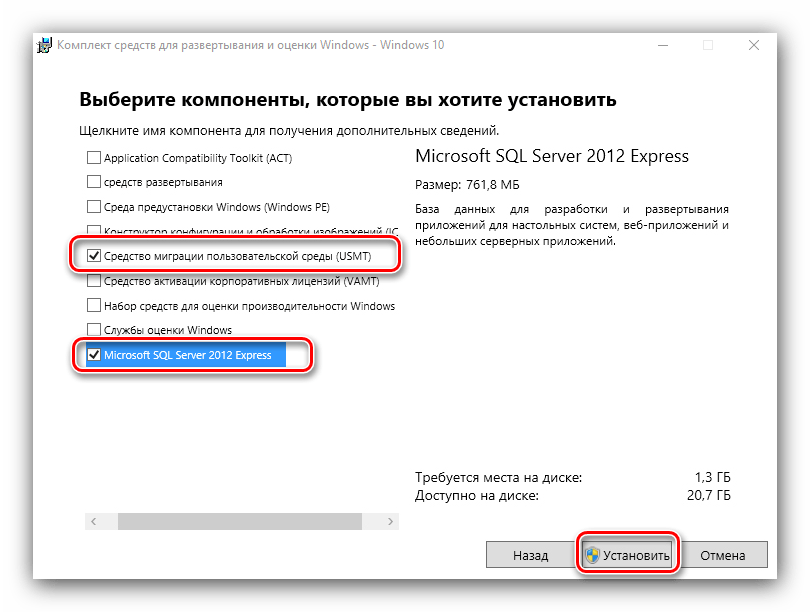
Дождитесь, пока выбранные компоненты будут загружены. Станет доступен список компонентов пакета. Для нашей сегодняшней цели достаточно оставить только «Средство миграции пользовательской среды (USMT)» и «Microsoft SQL Server 2019».
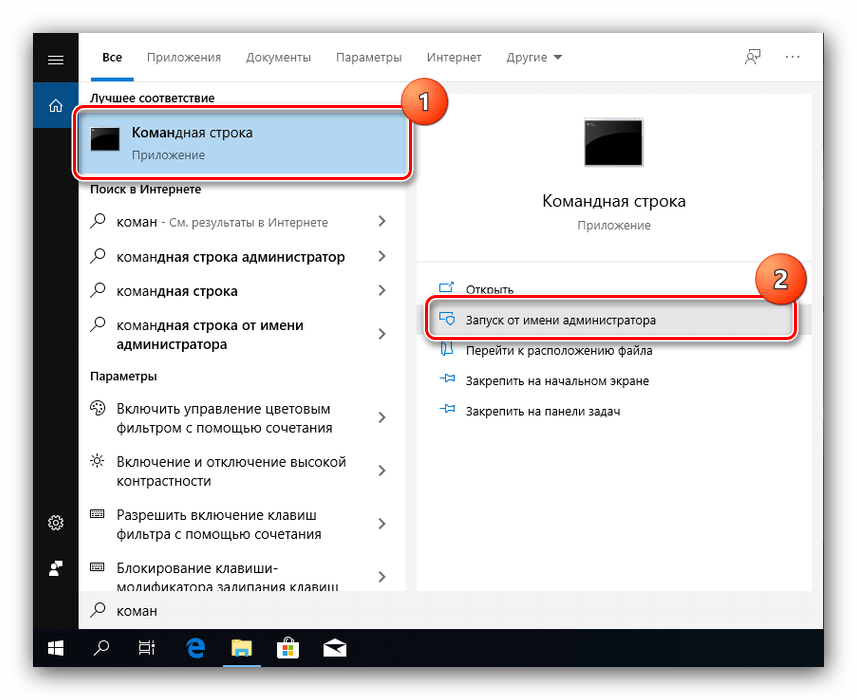
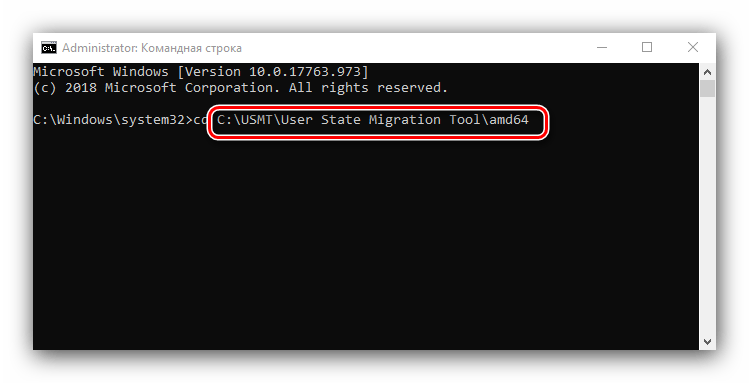
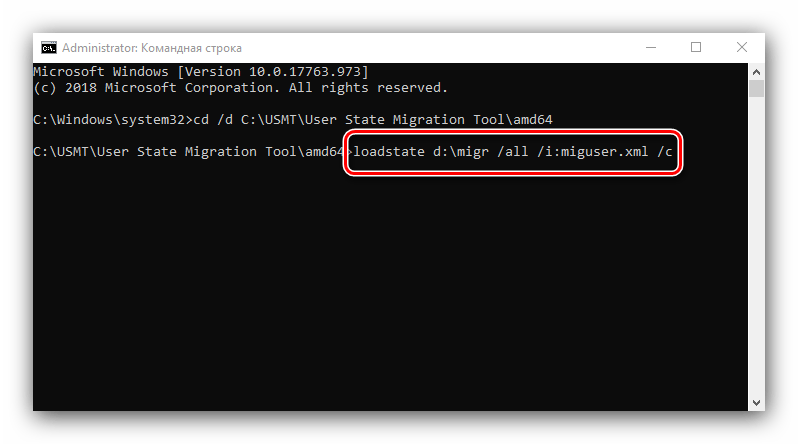
CD /D *местоположение USMT*
Вместо *местоположение USMT* укажите адрес папки, в которой находятся исполняемые файлы средства, по умолчанию это C:\Program Files (x86)\Windows Kits\10\ADK\User State Migration Tool\amd64.
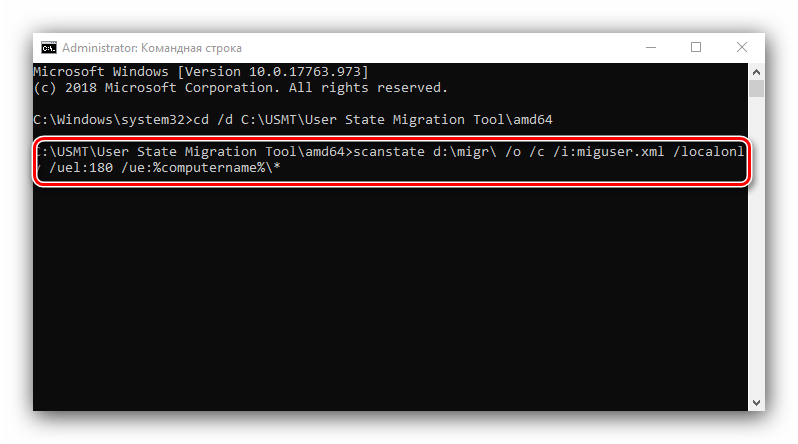
Далее введите следующие операторы:
scanstate d:\migr\ /o /c /i:miguser.xml /localonly /uel:180 /ue:%computername%\*
Эта команда сохранит пользовательскую информацию с основного системного накопителя за последние полгода. Вместо d:\migr можно вписать любое подходящее местоположение и имя каталога.
Дождитесь, пока средство создаст архив с файлами. Далее перейдите по адресу, куда сохранили бэкап, скопируйте его и перенесите на новый ПК или лэптоп.
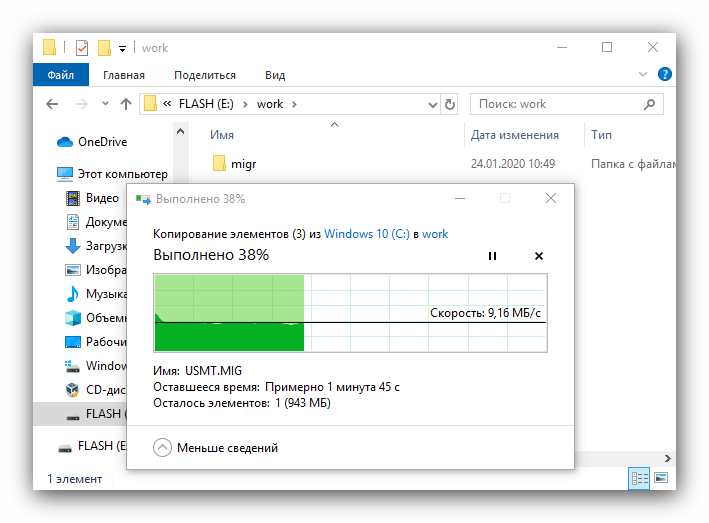
На машине-адресате переноса повторите действия шагов 7-8, после чего введите в «Командной строке» следующее:
loadstate *адрес папки с бэкапом* /all /i:miguser.xml /c
Подождите, пока данные будут загружены, после чего перезагрузите компьютер и зайдите под перенесённой учётной записью. На этом работа со средством миграции окончена.
Использование утилиты USMT чуть более сложное, в сравнение со сторонней программой, однако данное средство совершенно бесплатно.
Заключение
Таким образом, мы разобрались, что произошло со средством переноса данных в Windows 10 и чем его можно заменить. Как видим, альтернатив немного и все они так или иначе не лишены недостатков, пусть и эффективны в решении поставленной задачи.
Windows 10 Easy Transfer Tool
We’re all expecting to upgrade to Windows 10, for its new charming features has built a fire under computer users. Wait! At the same time when you cheer up and applause for Windows 10, don’t leave your old PC or OS behind which holds all your previous applications and data together with various accounts and settings. How to enjoy the new OS but still keep your accustomed applications? It would help if you had a Windows 10 easy transfer tool to achieve the goal.
What is Windows Easy Transfer Tool and How Does it Work?
Speaking of the Windows Easy Transfer tool, the common-used software, Easy Transfer developed by Microsoft, may rank in your search engine’s prime position. The program does well in move user accounts, E-mail, Documents, Internet favorites, Music, Videos, Pictures, and more.
How to use Windows Easy Transfer on Windows 7, 8, 8.1:В On the old PC, choose Start > Getting Started >Transfer Your Files > Next; On the new PC, enter your easy transfer key shown on the old computer > choose what to transfer > Click Transfer
![]()
The Problem with Windows Easy Transfer
Not Available on Windows 10В
If you mentioned the former part, you should know Windows Easy Transfer still suit Windows 7, 8, 8.1.В But the windows easy transfer is not available in Windows 10. On the transferring content, unfortunately, the tool can’t migrate the application itself to another computer.
![]()
No 100% Data Transfer
The Windows 10 Easy Transfer Wizard only let you transfer a few foldersВ and user account to another PC. What about your software on Desktop and more applications?В
So is there an alternative of the windows easy transfer to do data transferring in Windows 10? Move to the next part to get the windows transfer tool.
A Reliable Alternative to Windows 10 Windows Easy TransferВ
Before we find a Windows 10 easy transfer tool, we need to figure out why it is necessary to do the transfer. There are two situations for users to enjoy the latest OS. One, upgrade the current window7/8/XP/Vista to Windows 10 on the same PC as long as the PC hardware meets the requirements of installing Windows 10; two, install Windows 10 on a new PC.
Here comes the necessity of using a PC data transfer tool, especially for the latter situation we mentioned above. For every PC application, account along with the setting, we’ll still use them even changed a new computer using a new operating system. In this case, what bothers us becomes that we need reinstall various applications we get used to and reset the accounts, codes and more.
![]()
What if the third-party software will do all the transfer without any hassle? Will you take it? EaseUS PC transfer software is developed to realize every user’s dream whoВ wants to have a taste of the innovative OS but still desires to keep all the data on old PC.
Thus, speaking of a Windows 10 easy transfer tool, what should it be? Does EaseUS Todo PCTrans meet your demand?
- First, the tool shall facilitate the transfer. It had better require a little technical background of users.
- Second, the tool ought to support any old OS transfer to Windows 10. i.e., Win7/8/XP/Vista to Win10.
- Third, using a transfer tool shall not do any damage to the old or new system.
Concluded from the basics required by a Windows 10 easy transfer tool, EaseUS Todo PCTrans can do the transfer well. No matter it is the transfer of data, software to Windows 10 on a same PC or migration of applications from an old PC to a new one, it ensures a very convenient and smooth intangible move.
Let’s dive into how to use Windows Easy Transfer in Windows 10 with EaseUS Todo PCTrans.
Support Windows 10/8.1/8/7/Vista/XP
Steps — Transfer Everything with The Best PC Transfer Software
There are two methods available to transfer applications from the previous OS to Windows 10 with EaseUS Todo PCTrans, via the network connection or an image file. If the upgrade is performed on one computer, the transfer gets easier. Directly choose either of the methods and select the specific data or applications you want to transfer. While if the transfer happens from the old computer to a new one, let’s see how to do it.
1. PC to PC Transfer via the Connected Network
Run Todo PCTrans on both of the two PCs and choose «PC toВ PC». The programs will detect another PC or click «Add a PC» and input an IP address to connect to another PC. After successfully connecting two PCs, we could select the specific data, folders, applications to transfer.
Step 1. Launch EaseUS Todo PCTrans on your source and target computers, connect both PCs via the internet.
1. At the «PC to PC» section, click «PC to PC» to continue.В

2. Select your target computer via its device name, then enter its account password or verification code and select the transfer direction. Then click «Connect» to continue.
You can check the verification code on the right top of «PC to PC» mainscreen on the target computer.

Step 2. Select the categories Applications, Files, and Accounts to transfer via the internet.
If you want to transfer data selectively, click «Edit» under each category, and choose the specific items.

Step 3. Click «Transfer» to start transferring your apps/files/accounts from one computer to another computer via the Internet.

2. Transfer Files, Programs via the Image File
Launch Todo PCTrans, click «Backup and Restore» and «Data Backup», choose the folders, programs to create the backup file. Then copy the file to the targeted computer, run Todo PCTrans on the new system, choose «Backup and Restore» and «Data Restore».
You may need more details about how to use EaseUS Todo PCTrans to do Windows 10 transfer. Please click how to use EaseUS Todo PCTrans and learn more.
Support Windows 10/8.1/8/7/Vista/XP
More Options for Easy Transfer Windows 10: Using Microsoft Account
This method is easy to operate.В Microsoft account will automatically back up your Desktop, Documents, Music, Videos, and Pictures. Unfortunately, it can not transfer any program files like Office, Adobe, Outlook, etc. And the transfer speed may slower than the third-party software.
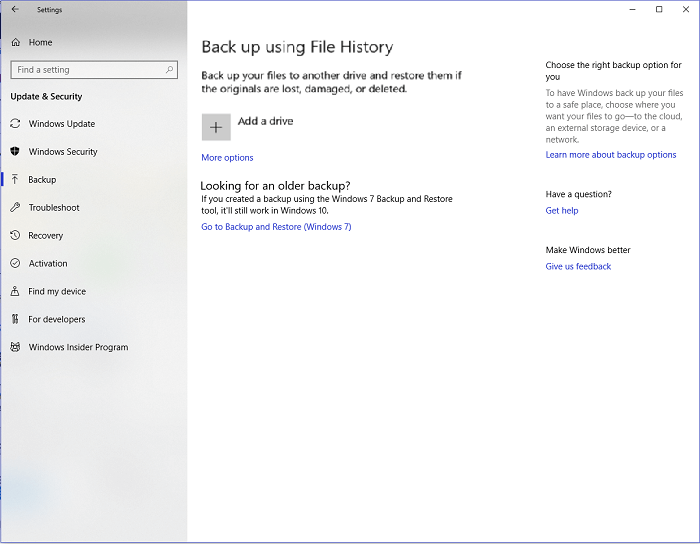
Step 1. Choose Settings > Update & Security > Backup > Choose Add a drive (Select your external hard drive)
If you want to transfer more folder, click More options, and choose what you want.
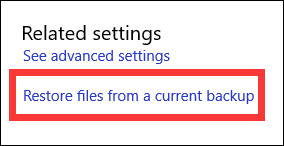
Step 2. Connect the external hard drive to the new PC.
Move to Settings > Update & Security > Backup > Choose More options > Scroll down to the bottom of the page and select Restore files from a current backup
Step 3. Check your recent backup and choose what you want to restore.
It’s Most Straightforward, Fast Speed to Transfer Data!
Windows Easy Transfer owned by Microsoft does not cover data transfer in Windows 10. Why not use EaseUS Todo PCTrans to do the 100% data transfer? For its newest feature, you can also transfer your user folder to another PC. Enjoying the fast transfer speed when you run the PC transfer tool, even your computer turns out broken. You can always transfer everything!


