- What is Windows Terminal?
- Multiple profiles supporting a variety of command line applications
- Customized schemes and configurations
- Custom actions
- Unicode and UTF-8 character support
- GPU accelerated text rendering
- Background image support
- Command line arguments
- Terminal Server commands: MSG
- Summary
- Syntax
- Parameters
- Security restrictions
- Additional notes
- Examples
- What is terminal session in windows? — (FAQ)
- How to open terminal in windows?
- How to open Terminal on Windows 10?
- What is Windows Session 0 Isolation and Interactive ?
- How to Use tmux on Linux (and Why It’s Better Than Screen)?
- Terminal Service Session
- Related terms:
- Presentation virtualization (Terminal Services)
- TS Session Broker
- The Optional Windows Components and Application WMI Providers
- 5.2.3.2.8 The Terminal Services connection session settings
- MCSA/MCSE 70-294 Working with User, Group, and Computer Accounts
- Terminal Services Tabs
- Security Guidance for Citrix XenApp Server
- Controlling through User Account Properties
- Configuring Shadow Auditing and Logging
- MCSE 70-293: Planning Server Roles and Server Security
- Terminal Servers
- Terminal Services and XenApp Server Deployment
- Horizontal vs. Vertical Scaling
- Service Enablement of Client/Server Applications
- Sizing for Performance and Scalability
- COMCOM 40 years
- 1 Introduction
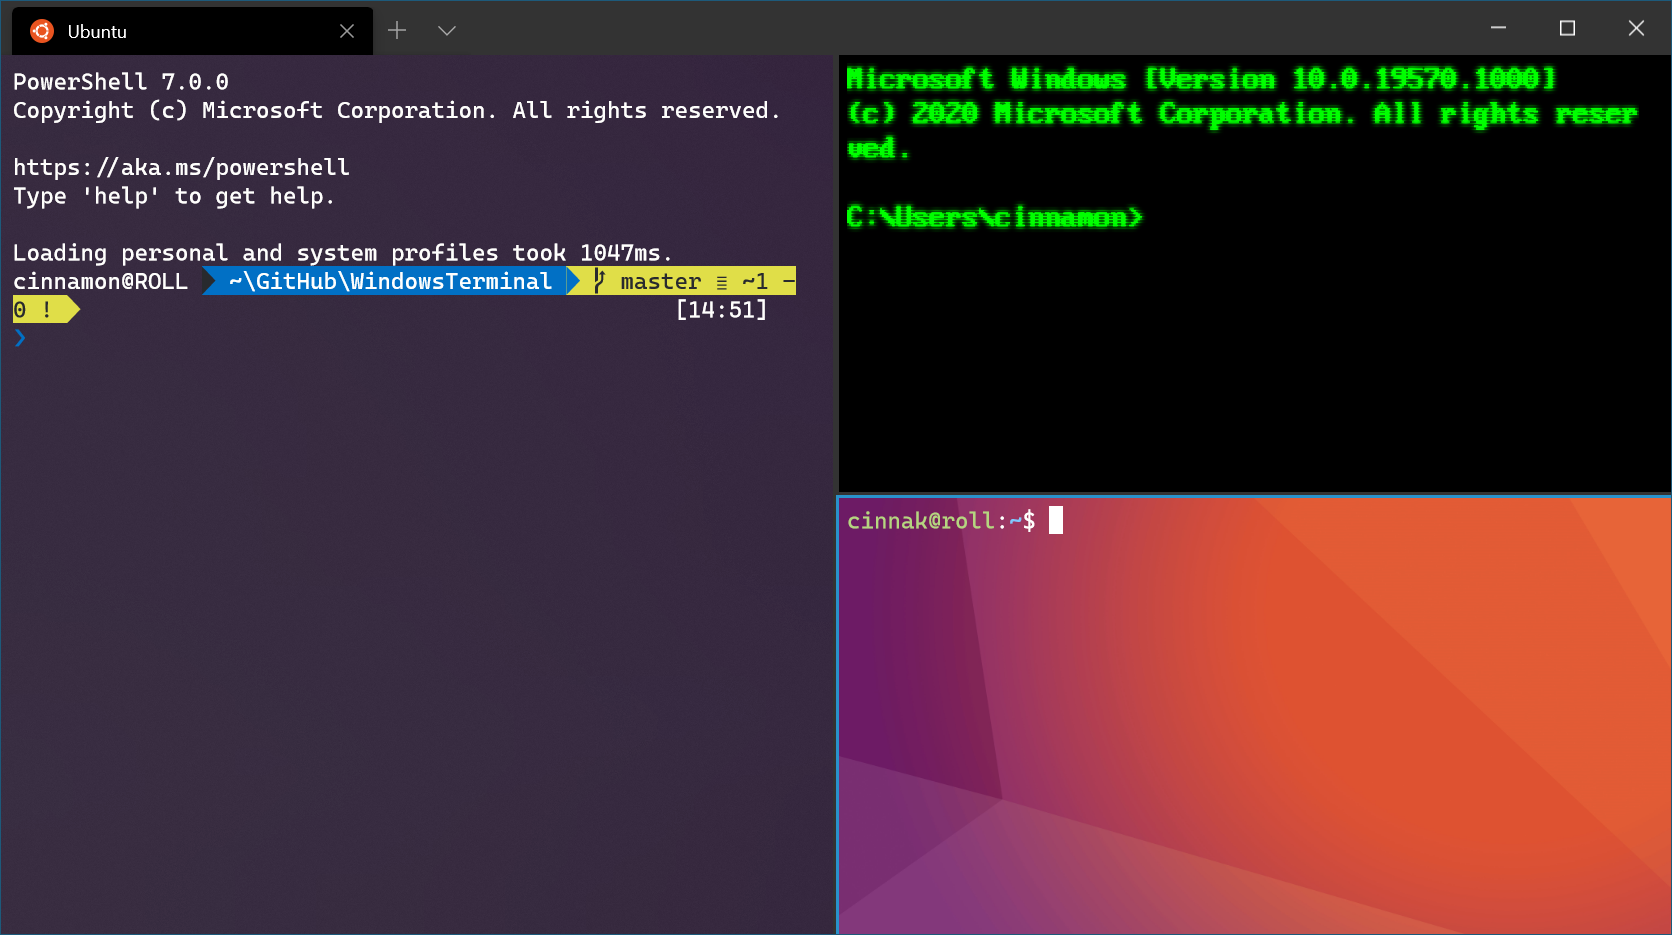
What is Windows Terminal?
Windows Terminal is a modern terminal application for users of command-line tools and shells like Command Prompt, PowerShell, and Windows Subsystem for Linux (WSL). Its main features include multiple tabs, panes, Unicode and UTF-8 character support, a GPU accelerated text rendering engine, and the ability to create your own themes and customize text, colors, backgrounds, and shortcuts.
Multiple profiles supporting a variety of command line applications
Any application that has a command line interface can be run inside Windows Terminal. This includes everything from PowerShell and Command Prompt to Azure Cloud Shell and any WSL distribution such as Ubuntu or Oh-My-Zsh.
Customized schemes and configurations
You can configure your Windows Terminal to have a variety of color schemes and settings. To learn how to make your own color scheme, visit the Color schemes page. You can also find custom Terminal configurations in the Custom terminal gallery.
Custom actions
There are a variety of custom commands you can use in Windows Terminal to have it feel more natural to you. If you don’t like a particular keyboard shortcut, you can change it to whatever you prefer.
For example, the default shortcut to copy text from the command line is ctrl+shift+c . You can change this to ctrl+1 or whatever you prefer. To open a new tab, the default shortcut is ctrl+shift+t , but maybe you want to change this to ctrl+2 . The default shortcut to flip between the tabs you have open is ctrl+tab , this could be changed to ctrl+- and used to create a new tab instead.
You can learn about customizing shortcuts on the Actions page.
Unicode and UTF-8 character support
Windows Terminal can display Unicode and UTF-8 characters such as emoji and characters from a variety of languages.
GPU accelerated text rendering
Windows Terminal uses the GPU to render its text, thus providing improved performance over the default Windows command line experience.
Background image support
You can have background images and gifs inside your Windows Terminal window. Information on how to add background images to your profile can be found on the Profile — Appearance page.
Command line arguments
You can set Windows Terminal to launch in a specific configuration using command line arguments. You can specify which profile to open in a new tab, which folder directory should be selected, open the terminal with split window panes, and choose which tab should be in focus.
For example, to open Windows Terminal from PowerShell with three panes, with the left pane running a Command Prompt profile and the right pane split between your PowerShell and your default profile running WSL, enter:
Learn how to set up command-line arguments on the Command line arguments page.
Terminal Server commands: MSG
This article introduces syntax and parameters of Terminal Server commands MSG.
Original product version: В Windows 10 — all editions
Original KB number: В 186480
Summary
MSG sends a message.
Syntax
Parameters
username : Identifies the user.
sessionname : Identifies the name of the session. The name was created by the system administrator when the session was configured.
sessionID : Specifies the ID of the session.
filename : Identifies a file containing a list of usernames , sessionnames , and sessionIDs to which to send the message.
message (message string): The text of the message you want to send. If no message is entered, standard input (STDIN) is read for the message.
/server:servername : Allows the Terminal Server to be specified. Otherwise, the current Terminal Server is used.
/time:seconds (time delay): Sets the amount of time you must wait before you receive confirmation from the target session that the message has been received.
/w (wait): Wait for a response from the target user(s).
/v (verbose): Displays information about the actions being performed.
/? (help): Displays the syntax for the command and information about the command’s options.
Security restrictions
The user must have Message access permission for the session.
Additional notes
If no user or session is specified, msg displays an error message. If the you specify the name of a session, it must identify an active session. Wildcards may be used for parameters. If a single wildcard is present (*), it specifies all users in the system.
Examples
To send the message titled Falafel? to all sessions for user MIKES, type:
To send a message to session MODEM02, type:
To send a message to session 12, type:
To send a message to all sessions contained in the file USERLIST, type:
To send the text in the file MSG.DAT as a message to all sessions for username TERRYJ, type:
To send a message to all logged-on users, type:
To send the message to all users, with an acknowledgment timeout of 10 seconds, type:
Messages do not queue on the Client screen. It may be useful to use the TIME: parameter so initial messages will expire and be replaced by new messages.
What is terminal session in windows? — (FAQ)
Category: what . Last Updated: 1 months ago . Views: 2
ANSWER
Here are some of the more commonly used Command Prompt commands that are utilized in a variety of circumstances: chkdsk, copy, ftp, del, format, ping, attrib, net, dir, help, and shutdown.
How to open terminal in windows?
Hello Everyone, Lets see how to open Terminal in Windows. Most computer applications operate from within an application window, but this was not always the case. Early computer programs were managed through the use of a command line interface, a m
How to Open a Terminal Session in Windows 7? See more: http://www.ehow.com/tech/
When you start a terminal session to a computer that is ? You start a terminal session to a computer that is running Windows Server 2008 and has the terminal server role installed. A specific program is configured to start on this terminal server when a terminal session is started. You end the terminal session while the terminal session is still being established.
How to open Terminal on Windows 10?
Its pretty easy. 1. Go to Start and Search ‘cmd’ or ‘Command Prompt’. 2. Click to open it and ‘Boom’. You’re done
How to Install Remote Desktop Services (Terminal Services ? In Windows Server 2016 & 2012 the Terminal Services role has been replaced by the Remote Desktop Session Host (RDSH) role service and is part of Remote Desktop Services (RDS). A Remote Desktop Session Host (RDSH) server, provides to remote users the ability to access the applications on the RDS host server and the company resources from
How to Use PuTTY on Windows? Terminal window and login credentials. After the security alert, you should get a terminal window. By default, this is a black, very bland window. It should first ask for your user name and then password. After these, you should get a command line on the server. You can then type into the terminal Window.
What is Windows Session 0 Isolation and Interactive ?
Session 0 is a specialised Windows Session where all aspects of a Windows and FireDaemon Pro services including interactive GUI components (e.g. windows, dialog boxes, popups etc.) and other aspects (e.g. mapped drives, environment variables etc.) are displayed / instantiated in complete isolation from your regularly logged in Windows desktop session.
How to Shadow (Remote Control) a User’s RDP session on RDS ? Using Remote Desktop Shadow from the Windows GUI. You can connect to a user session using mstsc.exe or directly from Server Manager graphical console. To do it, open the Server Manager console on the RDS server, go to the Remote Desktop Services section -> select your collection, for example QuickSessionCollection.. The list on the right will contain a list of users who have sessions …
How can you connect to CONSOLE on Windows 2012 remotely? Reconnecting to your existing physical console session is controlled by the «Restrict Terminal Services users to a single remote session» Group Policy setting, available in the Computer Configuration\Administrative Templates\Windows Components\Terminal Services\Terminal Server\Connections node of the Local Group Policy Editor.
How to use a new Windows Terminal app for SSH? Windows Terminal. Similar to the @Himura instructions, but instead of using «bash.exe» you will using «ssh.exe». For connection to the remote host, you can use the hostname from the.ssh/config file e.g ssh.exe test, if you don’t want to use a config file, you can use the [email protected] ssh.exe [email protected] and the password dialog will be promt
How to Use tmux on Linux (and Why It’s Better Than Screen)?
If you select a new session, your current one detaches, and the one you selected is attached. We detached the “geek-2” session before we did this. However, you can do this with sessions that are still attached to their original terminal windows. When you do, any screen changes will appear simultaneously in both tmux sessions.
Last modified: March 03 2021
Terminal Service Session
Related terms:
Download as PDF
About this page
Presentation virtualization (Terminal Services)
Thomas Olzak , . James Sabovik , in Microsoft Virtualization , 2010
TS Session Broker
The TS Session Broker serves two purposes in a TS environment with a farm of terminal servers. The first is TS Session Broker Load Balancing. When this feature is enabled, the TS Session Broker monitors the number of TS sessions open to each terminal server and directs new session requests to the server with the fewest open sessions. This allows for an even distribution of sessions across all servers in a farm.
The second function provided is the ability to ensure a TS user is automatically reconnected to their active session, if one exists. TS Session Broker tracks information on all open sessions within the farm, recording which user sessions reside on which terminal server. This allows a user to pick up where they left off if their session is unexpectedly disconnected. More detailed information on the installation and configuration of TS Session Broker can be found at http://go.microsoft.com/fwlink/?linkid=92670 .
The Optional Windows Components and Application WMI Providers
5.2.3.2.8 The Terminal Services connection session settings
The Win32_TSSessionSetting class exposes properties to configure the Terminal Services connection session settings shown in Figure 5.12 .

Figure 5.12 . The Terminal Services connection session settings.
The overall logic shown in Sample 5.14 is the same as before. The Terminal Services session policy must be defined first (lines 924 through 926) by updating the TimeLimitPolicy property exposed by the Win32_TSSessionSetting class. The value to use is shown in Table 5.14 . If the policy is enabled, the TimeLimit method exposed by the Win32_TSSessionSetting class will define the DisconnectedSessionLimit (line 930), ActiveSessionLimit (line 937), and IdleSessionLimit (line 944) properties. The values to use are listed in Table 5.14 .


Sample 5.14 . Configuring the Terminal Services connection session settings
Table 5.14 . The Terminal Services Connection Session Values
| TimeLimitPolicy | |
|---|---|
| Override user settings unchecked | 0 |
| Override user settings checked | 1 |
| DisconnectedSessionLimit | |
| End a disconnected session | |
| Never | 0 |
| n minutes | Delay in Min * 60 * 1000 |
| ActiveSessionLimit | |
| Active session limit | |
| Never | 0 |
| n minutes | Delay in Min * 60 * 1000 |
| IdleSessionLimit | |
| Idle session limit | |
| Never | 0 |
| n minutes | Delay in Min * 60 * 1000 |
| BrokenConnectionPolicy | |
| Override user settings unchecked | 1 |
| override user settings checked | 0 |
| BrokenConnectionAction | |
| Disc. From session | 0 |
| End session | 1 |
| ReconnectionPolicy | |
| Override user settings checked | 1 |
The same logic applies for the broken session policy. The BrokenConnectionPolicy property exposed by the Win32_TSSessionSetting class must be set first (lines 961 through 963). If the policy is enabled, the BrokenConnectionAction property must be set with the BrokenConnection method (line 967).
MCSA/MCSE 70-294 Working with User, Group, and Computer Accounts
Michael Cross , . Thomas W. Shinder Dr. , in MCSE (Exam 70-294) Study Guide , 2003
Terminal Services Tabs
Terminal Services allows users to access applications that are run on the server. Rather than running as independent computers, the clients that access Terminal Services act as dumb terminals. Throughout their session with the server, users run an environment that allows them to view and interact with programs that appear to run on the local computer but are actually running on the Terminal Services server located on the network.
The Properties dialog box of a user provides four tabs that specifically deal with Terminal Services: Environment, Sessions, Remote Control, and Terminal Services Profile. As seen in Figure 2.17 , the Environment tab is used to configure settings for Terminal Service’s startup environment. By default, users receive a Windows Server 2003 desktop when connecting using Terminal Services. The Starting program section contains fields for specifying a particular program to run when logging on to Terminal Services. If this option is enabled, users will receive the program instead of a desktop. When the Start the following program at logon check box is selected, you can enter the path and executable name for the program.

Figure 2.17 . Environment Tab of User’s Properties
The Client devices section also allows you to configure how devices on the computer you’re working on will be dealt with. The check boxes you can check to enable these settings are:
Connect client drives at logon This check box causes drive letters to be mapped to local client drives in the user’s Terminal Services session. This enables these local drives to be accessed from the session. Remember, when you are working in a session, you are actually working on the server, not your client. Therefore, the drives you seen in Explorer are the drives on the server, not the client. When this box is checked, you see both.
Connect client printers at logon This check box causes printers that are configured on the client computer to be connected and available while you are working in a Terminal Services session.
Default to main client printer This check box causes the default printer on your client computer to be the default printer in your Terminal Services session.
In addition to the settings on the Environment tab, the Sessions tab is also used for configuring Terminal Services. As seen in Figure 2.18 , this tab includes numerous settings for configuring timeout and reconnection settings for Terminal Services sessions:

Figure 2.18 . Sessions Tab of User’s Properties
End a disconnected session This drop-down box allows you to choose how long a disconnected session should remain on the server. If set to Never, which is the default setting, a disconnected session will remain on the server indefinitely. If set to a specific time limit, the session will be terminated on the server when this time limit is reached.
Active session limit This drop-down box is used to specify how long a user’s session should remain active. The default setting is Never, meaning that the user’s session can remain active indefinitely. If set to a limit by selecting a time from the drop-down list, the user’s session will remain active until that time is reached. At this time, the user is either disconnected from the session or the session is terminated, depending on what is set for the When a session limit is reached or connection is broken option.
Idle session limit This drop-down box controls how long a user can remain connected without any activity before the session ends or the user is disconnected from it, depending on what is set for the When a session limit is reached or connection is broken option.
When a session limit is reached or connection is broken This option button allows you to set what will happen when either of these situations occurs. You can choose either Disconnect from session or End session.
Allow reconnection This option button allows you to control how a user can reconnect to a disconnected session. You can choose to either reconnect From any client or From originating client only.
There are two ways to end a Terminal Services session. The first it is to log off. This completely destroys the session that you were using on the server and frees up the resources it was consuming. The second option is to disconnect. This simply breaks the communication from your client to the Terminal Services server. It does not terminate your session, which means that it continues to consume resources on the server. When you reconnect to a disconnected session, it appears exactly as it did when you disconnected from it.
The Remote Control tab allows you to configure remote control settings for the user, which enables others to take over a session. By taking over the computer, the other person can then perform actions on the remote computer, enabling that person to perform various actions and show the user how to do certain tasks. As shown in Figure 2.19 , the fields available to configure these settings are:

Figure 2.19 . Remote Control Tab of User’s Properties
Enable remote control This check box determines whether others can control or view a user’s session. This turns on or off remote control for a session belonging to a user.
Require user’s permission This check box determines whether the user needs to give permission to allow another user to control or view a session.
Level of control This option button determines how someone can use remote control with the user’s session. The options include View the user’s session, which only allows someone else to view what the user is doing, and Interact with the session, which allows another user to take control of the session and perform tasks as if he or she were sitting at the computer of the user that initiated the session.
The Terminal Services Profile tab is similar to the Profile tab discussed earlier, except that settings on this tab exclusively relate to a user’s Terminal Services session. As shown in Figure 2.20 , this tab provides the following fields:

Figure 2.20 . Terminal Services Profile
Profile Path This text box specifies the path to the user’s profile that should be used with Terminal Services. If no path is specified, the setting from the Profile tab is used.
Terminal Services Home Folder This text box allows you to specify where the user’s home directory that should be used during a Terminal Services session is located. As with the Profiles tab, this section provides two options. The Local path field is used to specify a local path to a location on the Terminal Services computer. The Connect drop-down box allows you to specify a drive letter for a mapped drive that will be available within the session, and a UNC path to the network location of the home directory. If no home folder is specified, the settings on the Profile tab are used.
Allow logon to terminal server This check box is used to enable users to establish a Terminal Services session. It is enabled by default.
Security Guidance for Citrix XenApp Server
Controlling through User Account Properties
You can configure shadowing settings at the user account level through the Active Directory Users and Computer snap-in as shown in Figure 5.11 .

Figure 5.11 . Configuring Shadowing through User Account Properties
On the Remote Control tab, you have the ability to enable or disable remote control, specify notification, and specify what level of control is allowed for the session. By default, in Active Directory, the user account is configured to enable remote control, require user’s permissions, and interact with the session. Settings configured here will apply to all terminal services sessions whether RDP or ICA.
Configuring Shadow Auditing and Logging
If your situation requires that you have to enable shadowing at any level it is recommended that you also enable shadow auditing and logging so that you can track who is performing shadowing and who is being shadowed. This information is recorded in the Windows event log as shown in Figure 5.12 .

Figure 5.12 . Event Log Shadow Entry
To enable Shadow Logging, you must select the option to Log Shadowing Sessions under the Shadow Logging section of the XenApp farm or server properties as shown in Figure 5.13 .

Figure 5.13 . Enabling Shadow Logging
If you have multiple XenApp shadow policies defined you should also consider configuring the option to merge multiple shadow policies, as shown in Figure 5.14 . This allows the farm to merge shadowers in XenApp shadowing policies. The resultant policy applies to merged policies without taking into consideration the prospective priorities of each policy.

Figure 5.14 . Merging Multiple Shadow Policies
MCSE 70-293: Planning Server Roles and Server Security
Martin Grasdal , . Dr. Thomas W. Shinder , in MCSE (Exam 70-293) Study Guide , 2003
Terminal Servers
Terminal servers allow remote access to applications using thin-client technology. This makes the user’s machine act as a terminal emulator (similar to the concept of a dumb terminal). The user connects to the terminal server using client software installed on their machine, logs on to the Terminal Services session, and is presented with a user interface (normally a Windows Server 2003 desktop). Keystrokes and mouse clicks generated by the user at the client are sent to the terminal server. Updated screen images are sent back from terminal server to the client system. When working in a session, the user is essentially working at the server. All processing is occurring at the server, which is being interacted with through the client software.
A benefit of Terminal Services is that users can run programs that they might otherwise be unable to use. For example, a user running an older version of Windows might need to use Office XP, but she doesn’t have the minimal requirements install it. Through Terminal Services, she can connect and be presented with a Windows Server 2003 desktop. If Office XP is installed on the terminal server, the user can open and use the application. Because all processing is actually occurring on the server, the user can run applications that are impossible to install on her local system.
There are a wide variety of clients that can use Terminal Services. Client software is available for Windows 3.11 and later, as well as Macintosh and UNIX. Internet Explorer can also be used to access a terminal server, using the Web client software.
Terminal Services and XenApp Server Deployment
Horizontal vs. Vertical Scaling
The argument as to whether it is better to scale up or scale out our Citrix XenApp server farms is nearly as old as the concept of server-based computing itself. Scaling up is the process of servicing more user sessions on the same hardware or increasing session density within the server through internal upgrades, such as four processors instead of two. Scaling out is the process of servicing more user sessions by adding more physically or logically separate servers to accommodate an increase in user session load. For a given number of user sessions, is it better to service them on more “smaller” servers or fewer “larger” servers? The argument arose shortly after Citrix introduced the Load-Balancing Option License for WinFrame nearly a decade ago. Today, load balancing is built into all versions of Citrix XenApp Server except Standard (or “S”). We should consider the “type” of session that our users will leverage. Accessing the farm from an internal ICA thin client will require less resources and planning typically than external access.
The ability to service user session load across more servers, or scaling out, has its advantages. Lower user session density on a given server translates to less impacted user sessions in the event of hardware failure. This also allows for greater flexibility during hardware or software maintenance windows, again with fewer users impacted. However, there are disadvantages to scaling out. More servers with lower user session densities mean more servers to license and maintain. More power requirements, more rack space, more components to replace when they fail, more Windows Server 2003 licenses to purchase—in general, just more to support and maintain. Increased cost in both hard and soft dollars, due to these factors, can make scaling out prohibitively expensive.
The flip side of higher user session densities on fewer, larger servers also has certain advantages. Less hardware to support and maintain, possibly less rack space, probably fewer Windows Server 2003 licenses to purchase, and overall, better utilization of software and hardware costs through the economies of scale.
The argument seems on the surface to be decidedly one-sided. Scaling up is the way to go, or so it seems. In the cruel, unforgiving reality of a production deployment, however, scaling out nearly always wins the day over scaling up. There are several reasons for this, but really none is “logically based.” One would think that a four or quad processor server would be cheaper than two dual processor servers, when in fact that is usually not the case. A typical 2 U rack-mount Dual Xeon server with 4 GB of memory costs about 1/3 to 1/4 as much as a typical 4 U rack-mount Quad Xeon server with 8 GB of memory. Therefore, from a hardware standpoint, you can buy two to four times the number of dual processor servers as you can quad processor servers. For those of you who are interested, eight-way processor servers are even more skewed. Vendors produce even fewer eight-way servers than quads, so the economies of scale are even at a greater loss. Hopefully, money will not be the determining factor in the long run. A single eight-way processor server simply doesn’t have the “oomph” that four dual-processor servers have.
The second issue with scaling up instead of out is due to design considerations within the operating system that is installed on the target hardware. Terminal Services’ purpose in life is to “virtualize” a desktop computer for the remote user session. A typical desktop workstation contains a single processor, and hopefully enough memory for the operating system and an adequate amount of memory remaining for the applications that a single user would use. If the workstation processor becomes overwhelmed due to the demand the user places on the system, overall performance only affects the single user of that workstation. If we take the user desktop environment and “virtualize” it via a Terminal Services session, we can see how this can compound the problem. We can look further into this scaling discussion by comparing the differences in roles that can be placed on a given server. A typical terminal server will have many more active processes running in the operating system than the same server hardware functioning as a mail or database server. To expound upon this point further, consider a typical Windows Server 2003 in the role of domain controller running on a dual processor server with 4 GB of memory. The domain controller has roughly 30 processes actively competing for the hardware resources at any given time. That same server functioning as a terminal server may have thousands of processes competing for the resources at any given point. Now, one could argue that the single process, WINWORD.EXE, for a user executing Microsoft Word on a terminal server has far less impact on a server than the single process NETLOGON.EXE running on the domain controller to facilitate the authentication of the domain it services. Therein lays the crux of the matter. Typically, it is not the single process that causes the load on the terminal server, it is the juggling act that the operating system must maintain to service the user sessions as evenly and quickly as possible. Occasionally, however, that single process may impact the overall performance of all user sessions on the server if the process demands a disproportionate amount of system resources either through user action or faulty application design. The result is that during planning, we as architects must plan for normal load that a server would incur during typical operations. We must also plan for the occasions when abnormal load is introduced to the server or server farm.
The ability to perform load balancing at the user session level is provided as a base function of the operating system in Windows Server 2003 called Windows Load Balancing Service (WLBS, previously known as Network Load Balancing). Citrix XenApp Server Advanced and Enterprise editions provide much greater control over load balancing through techniques Citrix developed years ago for larger WinFrame server farms. Today, larger Terminal Services implementations leverage the powerful load-balancing features of Citrix XenApp Server due primarily to the greater degree of control and lack of certain noted limitations of the WLBS.
To assist us in planning for and selecting the appropriate hardware for our Citrix XenApp Server farm, we must explore some of the possible bottlenecks that can occur in a typical XenApp Server deployment. The following list presents basic information for consideration and is not an exhaustive compilation of all potential scalability concerns for terminal servers. Primarily, the following list of bottlenecks is to aid in selecting a hardware platform through the basic components of that platform, namely central processing unit (CPU), memory, disks, network interface cards (NICs), and the limitations of the operating system. An exhaustive pilot should be conducted to determine the baseline for a given server platform prior to introducing that platform into production.
CPU performance obviously has the greatest impact on user perception of performance during periods of intense processor utilization on the server. When users start a session on a XenApp server, there is a great deal of processor time required to complete the authentication, apply the group policy objects, run the various login scripts, redirect the appropriate user devices (for example, drives and printers), and present the user session with the desktop or published application. Similarly, during logoff, the processor resources of the server are in greater demand than during a typical session. Periods of disproportionate logons or logoffs can cause a greater load on the servers than at other times. These periods of peak login/logoffs are typically associated with shift changes and start of the business day times. Additionally, lunch period and formalized break times can cause similar resource utilization issues, due to the frequency of logon and logoff operations. Multiple higher performance processors can assist with overcoming some of these issues. A solid recommendation would be to start with a server capable of dual processors and perform very detailed testing of your specific application needs to determine if scaling up to a quad processor server (or higher) will provide further benefit.
We must also consider the relationship between memory and disk subsystems on the server. A server can become memory bound through a variety of ways. If user session density is too high, available memory will be too low to adequately service the user sessions on the server. If flaws in applications, system drivers, or the operating system are present, these memory leaks can result in a similar memory-bound situation. Insufficient memory can masquerade as other system resource issues. If a server is low on available memory, the operating system will swap information from physical memory to virtual memory in the page file of the operating system. A memory-bound server in this case may actually report excessive disk times indirectly caused by the low system memory situation. Additionally, you will see this performance issue arise if the page file is not configured to be large enough, is placed on a volume with limited space, or on a volume that does not use the NT File System (NTFS). Memory minimums should be considered when detailing the specifications of the server platform for testing or building your production solutions. Consider the first 256 MB to 512 MB of the server’s memory as reserved for the operating system. An average user session today using Microsoft Office 2003-based products, Internet Explorer, and a few line-of-business applications can easily consume 64 MB to 128 MB of memory. With that being said, consider any “special” applications that you know are greater consumers of memory in your environment and plan accordingly.
Disk subsystems can be a challenge to diagnose and overcome. Typically, disk utilization should be low on Citrix XenApp server. The logic behind such an assertion is that Citrix XenApp servers typically access application data across the network and really shouldn’t “store” information locally. The use of the network file shares translates into lower disk times, typically, for the XenApp servers. We have several options when it comes to selecting the disk subsystem for our servers. We have Integrated Drive Electronics (IDE), Small Computer Systems Interface (SCSI), Boot from storage area network (SAN), and solid-state memory drives from which to choose. Which is the best option? Which solution will produce the best bang for the buck? Let’s consider IDE-based systems. IDE drives are very inexpensive compared to the other solutions. They typically don’t require expensive controllers to run them, and the new Serial Advanced Technology Attachment (ATA) devices are bursting at 150 MB throughput. IDE sounds good on the surface, but in reality, the Achilles heel of this platform is also what makes it so affordable. IDE (whether Parallel ATA or Serial ATA) on a Windows platform only supports multiple operations when they are spread across multiple channels. On a terminal server, there will undoubtedly be multiple simultaneous read and write operations, thus exposing this limitation, so… IDE is out as an option for most.
SCSI disks with a hardware Redundant Array of Inexpensive Disks (RAID) controller typically provide the best cost to benefit ratio. SCSI (especially RAID) controllers support the multiple input/output requests that characterize a terminal server. SCSI-based RAID drive sets provide a vast improvement over IDE and ATA drive sets. The RAID controller (not the CPU and IDE chipset) controls all the disk operations. The RAID card controls the drives via its own on-board CPU and memory. This allows the server CPU(s) to continue servicing requests without wasting time reading and writing to disk. Think of the RAID control as the “administrative assistant” to the CPU(s). In addition to the performance benefits gained through SCSI-based RAID controllers, there is the obvious fault tolerance benefits gained from creating RAID 1 Mirrored Sets or RAID 5 Fault Tolerance stripes.
Boot-from-SAN and solid-state memory drives can be excellent solutions to environment-specific needs. Boot-from-SAN allows you to leverage your considerable investment in your SAN and lower the cost per server (since there would be no local disks) for implementing your terminal servers. Boot-from-SAN may, however, prove slower than some of the newer faster SCSI RAID-based hard drives and can be prohibitively expensive if the SAN doesn’t already exist.
Solid-state memory drives have come a long way since their inception a couple of decades ago. A few companies today make random access memory (RAM) drives that fit into most standard hot-plug device slots. These devices, while a little pricier than conventional disks, provide amazing throughput and make for great solutions to disk-bound servers. If you have servers that are disk-bound, a RAM drive can go a long way to improving performance by reducing and in some cases eliminating this bottleneck.
Network bottlenecks can occur anytime an application that is executed by Citrix XenApp Server doesn’t actually exist on the server itself. For instance, Microsoft Word will typically install locally on the XenApp server, but the data normally exists somewhere else on the network. This is even truer for client server applications such as Peoplesoft or SAP. While the bandwidth used by the sessions the server is hosting is relatively low, the network requirements for those sessions will be substantially higher. There are several ways to address this issue: teamed cards to increase available bandwidth, co-location of the application and data on the Citrix XenApp server, and multihomed servers with network connects that separate session bandwidth from application bandwidth.
Teaming network cards for redundancy is almost always a good idea. This concept is covered in the next section, so we will wait until then to discuss that aspect in more detail. Teaming for increased bandwidth is really more what we are talking about in this section. By aggregating multiple network cards together, their “physical” bandwidth can be logically totaled to provide for more “pipe.” Most network cards today support teaming (in various forms), and in some cases the ability to team dissimilar network cards (such as a 10/100 Mbps card with a 1 Gbps card) if the need arises. We recommend that you always attempt to team identical cards to reduce the complexities and supportability issues that could arise otherwise.
Placing the application and data on the Citrix XenApp server will certainly decrease the amount of traffic required to service the user request, thus eliminating the network as the potential bottleneck. However, this action means we have indirectly created a single point of failure for access to this application. If the data is located on a single Presentation server, we will most likely not be able to “load balance” the application across the farm; therefore, this option isn’t really a viable solution except in certain circumstances.
The last option of multihoming our XenApp server presents many opportunities to increase performance and in a more limited way to increase fault tolerance. The concept of multihoming servers of all kinds has been around the networking world nearly as long as the network itself! Multihomed servers presented solutions to allow for fault tolerance, increase bandwidth, and in some cases, “private” networks for backup and authentication services. However, historically, Citrix XenApp’s ancestors had issues with multiple “paths” to a server. In the past, a Citrix server may inadvertently direct a user session to the “wrong” card in a multihomed server scenario, thus creating a denial of service. This problem has been long since fixed, so today we can discuss the benefit of multihoming our XenApp servers to improve quality of service (QoS). By multihoming our XenApp servers we can segment our session traffic from our data traffic (and possibly the authentication and backup traffic as well). Placing two “legs” or “routes” to the network also can provide some measure of fault tolerance for access to the specific XenApp server (although typically this is not as reliable or automatic as teaming). The situation arises due to the nature of application and network access. Let us consider the following scenario. Suppose we have a single XenApp server that has a single NIC for all user sessions and network data access. The server is servicing 50 user sessions. The applications are all well behaved with the exception of our in-house database system for order tracking. When the application running on the XenApp server (or client workstation) accesses the database for queries, large amounts of traffic are generated between the server and the database until the request is fulfilled. This translates into periods of slowness for the other user sessions on the server (even though the CPU, memory, and disk performance may be fine). Why? Because all the user sessions and the application data access are contending for the same network link. Consider separating the user sessions and database access onto two separate network cards.
Service Enablement of Client/Server Applications
Tom Laszewski , Prakash Nauduri , in Migrating to the Cloud , 2012
Sizing for Performance and Scalability
Fulfilling service-level agreement (SLA) requirements for an SOA solution requires careful consideration in the case of client/server integration. What matters most are the resources used by an instance of the Windows application and how many instances need to run concurrently to fulfill performance requirements.
Take the following scenario: A solution requires 50 unique users with an exclusive connection to a client/server application. To fulfill such a requirement, you will need 50 instances of an application running concurrently, possibly in a Windows Terminal Server environment. Let’s assume the application uses 100,000 KB of memory while in use, but not a significant amount of CPU time, and the Windows Terminal Services session uses about 15,000 KB. Therefore, to run 50 instances concurrently, a machine with available memory of at least 50 times 115,000 KB is required. The LegaSuite Windows Integration Engine consumes a relatively small amount of resources, between 20,000 KB and 100,000 KB to run 50 instances. These sample numbers come from analyzing an application during regular use, but some applications “take a resource hit” during startup, which also has to be accommodated while planning hardware for the runtime environment.
It’s not necessary to use Terminal Services to launch a number of application instances (e.g., you can launch n Windows Calculators on your desktop). However, from experience, it is a good practice to use Windows Terminal Services. Considering that you are usually dealing with older applications that have not been written with automation in mind, and some do not allow multiple instances, using Terminal Services to isolate each instance ensures the quality of the integration. In layman’s terms, this lets each instance believe it is the one and only instance running on a given machine.
Another aspect of sizing is how to determine the number of concurrent instances when using session pooling. When turning a client/server application into a service provider, you can increase the performance of the solution by reusing the same instance of the application by multiple requests. In the first example mentioned earlier, it was not possible to use session pooling because, due to auditing requirements, each user needs to be logged in to the application.
First you need to evaluate the average execution time of the Web services created. Execution time will depend on the complexity of the Web service flow. Because the client/server applications were written for human interaction rather than for a high transaction volume, some of the services may execute at a slower pace as compared to other legacy transaction servers. Let’s look at the following requirements: 4,000 Web service calls during a 10-hour window, each one taking about a minute to execute. This translates to approximately seven concurrent requests every minute. Therefore, seven concurrent instances of the application are needed to fulfill a requirement of this volume. Assuming that each request takes about a minute, those sessions will be busy for 10 hours. Consequently, the hardware requirements for the machine will have to satisfy, at a minimum, seven times the amount of resources consumed by the application.
All those estimates are based on careful observations of a unique application. As a result, it would be advisable to conduct performance testing before sizing a box for a production environment. This may cause quite a predicament, as hardware provisioning may take a while; this is why deploying SOA to the cloud makes perfect sense as provisioning in the cloud is much easier than hardware and software provisioning.
COMCOM 40 years
1 Introduction
In the last two decades, tremendous efforts as well as significant progress have been made on various aspects of mobility (location) management in a wide variety of wireless networks, such as cellular systems (2G/3G/4G/5G), mobile ad hoc networks (MANETs), wireless internet, wireless LAN, and opportunistic networks that involve device/terminal, session, service, and personal (human) mobility. Alongside, the advent of geographical positioning systems (GPS), Wi-Fi, Bluetooth technology, cognitive radios, and software defined networks (SDN) has further led to sophisticated mechanisms for location sensing and location based services. Diverse notions of location information in different wireless networks have spurred exciting paradigms in mobility management. The underlying research topics typically involve the design and analysis of efficient architectures, algorithms, protocols, and models for seamless mobility support (e.g., horizontal/vertical handoff, paging and update) in not only location-aware resource management and services, but also supporting emerging application scenarios in pervasive and context-aware computing [1] and cyber-physical systems [2] , such as context (e.g., location or activity) tracking in smart environments [3] , sensor and social networks.
This article aims to reflect on the author’s personal journey of mobility management research since 1995 with his attendance of the First ACM/IEEE Conference on Mobile Computing and Wireless Networking (MobiCom) held at the University of California, Berkeley. The goal here is to present a brief historical account of personal perspectives rather than state-of-the-art review of rich literature on mobility management, localization techniques, or covering all aspects of this important topic. (For recent surveys on localization techniques, please refer to [4–8] .)
The article is organized as follows. Section 2 briefly summarizes mobility management in wireless cellular systems, while Section 3 highlights mobility support in wireless internet. Section 4 presents a powerful abstract framework for mobility learning and prediction applicable to various contexts and network settings. Section 5 touches upon privacy-preserving mobility models while Section 6 sheds light on the emerging topic of human mobility, particularly opportunistic networking, in the era of Internet of People. Finally Section 7 offers conclusions with a thought-provoking socio-technical research challenge.


