- RaspberryPi4
- Current status (2021-06)
- Pulse Audio and Sound don’t work as of 04/07/2021
- Boot and Installing Debian on the Raspberry PI 4
- Tested and Daily Debian Images
- Using EFI Firmware and the regular Debian Installer
- Booting from USB
- Boot Methods
- Directly load kernel and initramfs from RPI firmware
- RPI firmware loads u-boot, which loads kernel/initramfs
- RPI firmware loads u-boot, which loads grub using EFI, which loads kernel/initramfs
- Tianocore EDK II on RPI4 is used to boot iPXE as a Network Boot/Installer for Debian
- Tianocore EDK II on RPI4 is used to boot Debian
- Network boot
- U-boot
- Hardware Information and Issues
- Raspberry PI 4 8G
- Upstream kernel
- Other distros
- Raspbian Raspberry Pi OS
- Ubuntu
- openSUSE
- RPi.GPIO basics 1 – how to check what RPi.GPIO version you have
- What is RPi.GPIO?
- How to check what RPi.GPIO version you have
- This works for all versions of RPi.GPIO
- How to check RPi.GPIO version in Python (works with 0.4.1a +)
- Running a live Python session
- If you want to make it into a little program…
- How to update your RPi.GPIO
- Coming soon…
- RasPiO ® GPIO Reference Aids
- 15 Responses to “RPi.GPIO basics 1 – how to check what RPi.GPIO version you have”
- Raspberry Pi
- Contents
- Hardware
- Models
- Installation
- Partitioning
- Boot partition
- Stage 3
- Stage 4
- Portage tree
- Cross compiling
- Crossdev
- Compiling using chroot
- Kernel and modules
- Manual compilation
- Genkernel
- Installing kernel image
- RPi3 specific
- Bluetooth
- Serial
- Bootable 64-bit Gentoo Image for RPi3 / RPi4
- VideoCore4
- RaspberryPi4
This page provides details about Raspberry Pi 4. You probably want to read the RaspberryPi page first (and maybe look at the images available at https://raspi.debian.net/), and then decide whether you want to read this page.
Current status (2021-06)
- Debian bullseye (and buster-backports) kernel (Linux 5.10) supports most of what is required (except hardware-accelerated 3D graphics).
Pulse Audio and Sound don’t work as of 04/07/2021
You won’t get sound using pulse audio using and the current debian installs using HDMI or A/V.
Boot and Installing Debian on the Raspberry PI 4
Tested and Daily Debian Images
We are automatically building daily images to run on all of the Raspberry Pi models, including the Raspberry Pi 4. There are also Tested Images that are verified to work and have their issues documented.
This is currently the recommended way of using Debian on the Raspberry Pi 4
Using EFI Firmware and the regular Debian Installer
The Pi Firmware Task Force works on an SBBR-compliant (UEFI+ACPI) AArch64 firmware for the Raspberry Pi 4 which allows the normal, vanilla Debian aarch64 installer to run and install a working Debian bullseye on the Raspberry PI.
Instructions to doing so are here and here.
The installed system does not use the Device Tree approach that is common on the ARM platforms to detect and enumerate hardware. Instead, vanilla ACPI is used like this is the case on the normal PC/Intel architecture. This might cause Raspberry Pi device drivers to support ACPI which some of today’s device drivers (2021-06) don’t do. If hardware that works on a device tree system doesn’t work on an EFI/ACPI system, it might be possible that the device driver doesn’t support ACPI yet. Unfortunately, the most prominent driver suffering from this lack of ACPI support is vc4, making this installation method unsuitable for systems that need a graphical console.
2021-06, the EFI firmware limits the usable memory amount to 3 GB to cater for a hardware issue that has been worked around in the recent kernels that Debian ships in bullseye and buster-backports. The option to enable the full memory is accessible in the EFI Setup at system startup: Device Manager → Raspberry Pi Configuration → Advanced Configuration and set Limit RAM to 3 GB to . This setting is safe for those kernels.
Booting from USB
Earlier versions of the Raspberry Pi 4 can only boot from the Micro SD card. Since April 2020, a boot loader EEPROM that can also boot from USB storage and UASP media is used. The EEPROM can be updated with media from here.
Boot Methods
There are several ways to boot.
Directly load kernel and initramfs from RPI firmware
That’s what the Debian images currently do.
RPI firmware loads u-boot, which loads kernel/initramfs
That’s what the Ubuntu images do, and is promising.
RPI firmware loads u-boot, which loads grub using EFI, which loads kernel/initramfs
Tianocore EDK II on RPI4 is used to boot iPXE as a Network Boot/Installer for Debian
This method provides a UEFI Network boot environment with a user GUI. SD Card or USB is not required. Requirements:
- Post Sept 2020 eeprom/firmware update.
- iPXE Compiled for arm64-efi.
Tiancore EDK II from ?GitHub compiled for RPI4.
Tianocore EDK II on RPI4 is used to boot Debian
This method provides a UEFI boot environment on the SD card with a user GUI.
- Post Sept 2020 eeprom/firmware update.
Tiancore EDK II from ?GitHub compiled for RPI4.
Network boot
U-boot
- U-boot patches for USB support now exists and appear to be in review process with upstream. (2020-06-16)
https://lists.denx.de/pipermail/u-boot/2020-June/414411.html
- USB firmware reloader — perhaps only needed for more recent rpi4’s ie 8GB version
https://patchwork.ozlabs.org/series/174860/mbox/
Hardware Information and Issues
Raspberry PI 4 8G
- USB doesn’t work up to kernel 5.7 for the hardware variant of PI4 with 8GB RAM
This was fixed in kernel 5.8: https://lkml.org/lkml/2020/5/5/998
Upstream kernel
Other distros
Raspbian Raspberry Pi OS
- ships only a armhf image
- 5.4 kernel with a lot of non-mainlined changes
Ubuntu
both armhf and arm64 images. See https://ubuntu.com/download/raspberry-pi/
- the linux-firmware-raspi2 source package. Maybe equivalent to Debian’s raspi-firmware source package?
- the u-boot-rpi package (different from Debian’s)
openSUSE
boots using u-boot -> grub -> Linux 5.4.14
Источник
RPi.GPIO basics 1 – how to check what RPi.GPIO version you have

It struck me the other day that I’ve published some fairly advanced RPi.GPIO tutorials, (e.g. interrupts and PWM) but not done anything more basic, apart from the Gertboard examples. So here’s an attempt to remedy that situation.
Over the next few days, we’re going to have a walk around Ben Croston’s RPi.GPIO, which is now at version 0.5.3a. Some of this stuff may be new to you even if you’ve been using RPi.GPIO’s more advanced features, so it’s worth having a look.
What is RPi.GPIO?
It’s an easy way of controlling the Pi’s General Purpose Input Output ports in Python. Control the world with your Raspberry Pi.
How to check what RPi.GPIO version you have
This works for all versions of RPi.GPIO
find /usr | grep -i gpio
And the output will look something like this (although there will be more of it)… 
You can see all those lines with 0.5.3a.egg-info telling me I have version 0.5.3a.
How to check RPi.GPIO version in Python (works with 0.4.1a +)
While the above works without even using Python, from RPi.GPIO 0.4.1 onwards (September 2012), you can check the version in your Python programs.
It’s quite useful to be able to find out what version of RPi.GPIO you have. Some features require a recent version, whereas others work with older versions. For example, interrupts were added at 0.5.1, PWM at 0.5.2 and with 0.5.3 some bugs have been squashed.
You don’t have to write or run any programs to find out which version you have. You can do it very quickly in a live Python session. If you don’t know how to do that, it’s a great way of testing things out in Python.
Running a live Python session
In the command line environment (either before typing startx or, if you’re in LXDE, start LXTerminal) type…
sudo python run python as super user (needed for RPi.GPIO to work)
Ignore the “help” “copyright” “credits” “license” notice. Just type the next line at the >>> prompt
import RPi.GPIO as GPIO loads the RPi.GPIO library so we can use it
GPIO.VERSION this returns the version number of RPi.GPIO
CTRL+D ends the python session cleanly (it won’t appear on the screen).

Watch out for RPi.GPIO. The i in RPi, is lowercase. All the rest is uppercase. Get it wrong and it won’t work.
So next time someone publishes a python script “that requires RPi.GPIO 0.5.3 or higher”, you’ll know how to check which version you have.
If you want to make it into a little program…
If you don’t like live python environments, you could make it into a little script using the code above.
cd
nano version.py
copy and paste or retype the above script
CTRL+O save
ENTER confirm
CTRL+X exit
Then, to run it, type sudo python version.py
…and this is what you should see… 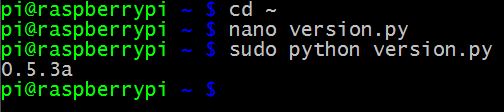
How to update your RPi.GPIO
If you find your RPi.GPIO version is horribly out of date, you can update it to the latest version with…
sudo apt-get update && sudo apt-get upgrade
But, if you haven’t updated for a while it could take quite a long time to update all your packages (>1hr).
If you don’t want to do it that way, you could use this, which updates your package list and installs the latest RPi.GPIO
sudo apt-get update && sudo apt-get install python-rpi.gpio python3-rpi.gpio
Coming soon…
In the next part, we’ll cover how to check what revision of Raspberry Pi you have. Currently there’s only Rev 1 and Rev 2, but there are some GPIO differences (e.g. i 2 c and port 21/27) between them, so it’s worthwhile being able to check, so you can make sure your programs will work on any Pi.
RasPiO ® GPIO Reference Aids
15 Responses to “RPi.GPIO basics 1 – how to check what RPi.GPIO version you have”
The other option is to type
dpkg -l python-rpi.gpio
but that will only work if you’ve installed it from the repository with apt-get (rather than installing it from source / by hand).
Another small tip: Your “find” command-line can be sped up by changing it to:
find /usr -iname «*gpio*»
(and this also has the advantage that it doesn’t print out the same directory-match multiple times)
It seems there are many ways to skin a cat. I use
find /usr – name GPIO
.even easier to type in 😉
Excellent – one more to the list 🙂
Oops running GPIO as superuser is mandatory? That’s such a bad practice, it’s giving me the creeps… well after being cultured by unix by 20 years LOL. Setting proper permissions is the right things to do.
You’re almost certainly right, but there’s nothing I can do about it. I am a mere Python dabbler not a low level C programmer.
There’s two ways of accessing the Pi’s GPIO pins – you can either use the high-level GPIO sysfs interface e.g. http://elinux.org/RPi_Low-level_peripherals#Bash_shell_script.2C_using_sysfs.2C_part_of_the_raspbian_operating_system and as this is file-based it’s fairly straightforward to set up appropriate user/group/etc. access permissions. The other way is by accessing /dev/mem and prodding registers in memory directly (which is obviously potentially dangerous, and so will always need superuser access).
I believe RPi.GPIO originally used sysfs access from Python, but was then re-written in C to use direct memory access, because the latter allows much faster GPIO functionality (since you’re banging the hardware directly rather than going through a translation layer, coupled with the Pi’s relatively slow CPU).
On another forum post on Alex’s blog somebody recently mentioned that the WiringPi library doesn’t need superuser access, but I’ve not yet looked at that myself.
Awesome blog, thank god i found it.. Thanks for all that awesome info.
I am however having an issue. Following all of the above to a t (running the update and upgrade now, so that might help). Anyways, my problem is i get an error when I include the GPIO.cleanup(). When i run find /usr | grep -i gpio
I basically get what you are getting 0.5.3a.egg-info. What is the deal, any clues?
I have no issues with other functions, they run fine. Help would be greatly appreciated since I would have to fry a pin. I am running Wheezy if that matters.
Andrew understands this better than me, but it sounds like you may have manually installed RPi.GPIO at some point in the past and this overrides the apt-get install.
I’m not sure how to remove it though (apart from reflash the SD card with the latest OS 😉 ) There is a way though.
As always, just saying “I get an error” is never very helpful 🙁
What would be much more helpful would be including exactly what the error message actually is…
I have just followed the upgrade process as described above. When I go int python I get the following:-
>>> import RPi.GPIO as GPIO
>>> GPIO.VERSION
Traceback (most recent call last):
File “”, line 1, in
AttributeError: ‘module’ object has no attribute ‘VERSION’
>>>
If I use the find linux command I get the following:-
pi@raspberrypi
Источник
Raspberry Pi
This document describes how to install Gentoo on the Raspberry Pi 1, 2, and 3 in 32-bit mode.
Contents
Hardware
Models
| The Raspberry Pi is series of single-board computers based on ARM devices. Raspberry Pi 1 is based on BCM2835 SoC and features a single core CPU (ARMv6), with 512 MB RAM. Earlier models had 256 MB RAM. | |
| Raspberry Pi 2 is based on BCM2836 SoC and features a quad-core CPU (ARMv7) and 1 GB RAM. The model 1 uses an SD card for storage but the model 2 uses a microSD. All versions have a VideoCore IV GPU. | |
| Raspberry Pi 3 B is based on BCM2837 SoC. According to #gentoo-arm ( webchat ), although the ARMv8 CPU in the Raspberry Pi 3 B is 64-bit, almost everything else is 32-bit, and therefore only 32-bit kernels are supplied from upstream for the machine. [1] Those who want to build a 32-bit kernel for the Pi 3 B, follow the Raspberry Pi 2 options listed below. 64 bit kernels are covered in the Raspberry Pi 3 64 bit Install guide. |
|
| Raspberry Pi Zero is small size single-board computer using same ARM BCM2835 SoC as Raspberry Pi. Versions 1.3 and above have camera connector compatible with other Raspberry Pi cameras modules and W version has integrated WiFi module. It has 512 MB RAM and out-of-box possibility to run at 1 GHz. |
Installation
Partitioning
The SD card must be properly prepared before installing Gentoo. Before partitioning, check to see if the SD card is listed as compatible in this list.
Create at least two partitions on the SD card. The /boot partition should be FAT32. The root ( / partition can be any preferred Linux filesystem, however since SD cards are flash-based media, there are many benefits to using F2FS.
For optimal compatibility, 255H/63S geometry is recommended.
Boot partition
The minimum setup for a correct /boot partition requires the following proprietary firmware files, provided by the Raspberry Pi foundation:
To boot the Raspberry Pi with gpu_mem=16 setting in config.txt , following files are required:
There are two video drivers for the Pi. The older one uses a fixed reserved GPU memory space. The Open Source VC4 driver uses the kernels contiguous memory allocator. Set gpu_mem=16 when you use the vc4 driver to avoid wasting RAM.
The proprietary firmware files are just an emerge away:
Note that sys-boot/raspberrypi-firmware no longer installs /boot/*.dtb and /boot/overlays/* files after version 1.20190709 [2] . You can get those, as well as a pre-compiled Raspberry Pi kernel and modules, by emerging the sys-kernel/raspberrypi-image package:
If you are planning to use a custom kernel, skip the sys-kernel/raspberrypi-image package and emerge the live ebuild =sys-boot/raspberrypi-firmware-9999. This will install latest firmware directly from the repository of the Raspberry Pi foundation and will not install a kernel or modules.
The firmware ebuild created a file called cmdline.txt which specifies any necessary kernel parameters. Make sure you adjust your root partition, if necessary. For example change the root parameter to:
When the file /boot/config.txt does not exist, bootcode.bin defaults to sensible settings for most things
Stage 3
Download appropriate Stage 3 tarball.
For Raspberry Pi A, A+, B, B+:
For the Raspberry Pi 2 or a Raspberry Pi 3 running in 32-bit mode:
Extract the root filesystem to SD card:
For the Raspberry Pi A, A+, B, B+:
For the Raspberry Pi 2 or Raspberry Pi 3 running in 32-bit mode:
Do not forget to adjust the fstab file. The SD card is recognized as /dev/mmcblk0 ).
Generate the root password hash:
Add the hash to the /etc/shadow file.
Stage 4
NOOBS image. The NOOBS image will be created on a daily basis. I’d be pleased to get feedback.
NOOBS images can be downloaded from here: https://github.com/raspberrypi/noobs, then untar the NOOBS image from above in the OS directory ( /os/Gentoo ).
Portage tree
Download the latest Portage tree:
Ensure there are enough inode blocks free on the root partition. Portage takes up approximately 181K inodes.
Extract Portage to the SD card:
Cross compiling
To aid the Raspberry Pi’s low power processor and hasten the Gentoo installation process, adding another machine to help the Rpi with compile jobs is preferred. Gentoo developers have created a cross compiling tool called crossdev in order to assist with toolchain generation. Once the toolchain is generated on a stronger machine, the stronger machine can help with compilation tasks, which saves much time.
Crossdev
Install the sys-devel/crossdev wrapper scripts:
Create the cross toolchain for ARM, specifying the correct CPU architecture for the device as follows.
For the Raspberry Pi A, A+, B, B+:
For the Raspberry Pi 2 or Raspberry Pi 3 B in 32-bit mode (recommended):
For the Raspberry Pi 3 B in 64-bit mode:
If there are any errors or Portage warnings here, please fix them. It will take a while for the cross toolchain to be successfully built. Go grab a coffee!
Compiling using chroot
It is possible to use generic x86_64 or i386 PC to chroot into existing SD card with Raspberry Pi system. This approach is significantly faster than compilation on Raspberry Pi (in case of using modern 4 core CPUs it gives about half of ‘native’ performance) and is slower (but easier) than using cross compiling approach.
To do so static installation of app-emulation/qemu is needed:
After emerging QEMU with `static-user` USE flag, the qemu-arm executable needs to be copied into chrooting system:
Once done it is necessary to register ARM executable interpreter in running kernel:
Before chrooting add necessary mounts to slave system:
It also wouldn’t be a bad idea to make sure /etc/resolv.conf is updated so network access works properly:
Finally chroot into Raspberry Pi system:
Kernel and modules
Download kernel sources for Raspberry Pi from GitHub:
Alternatively, to get the ‘bleeding edge’ Raspberry Pi kernel sources:
Manual compilation
Configure and install kernel manually:
For the Raspberry Pi A, A+, B, B+:
For the Raspberry Pi 2 or Raspberry Pi 3 B in 32-bit mode (recommended):
Alternatively, use the following command to configure the kernel manually:
Genkernel
genkernel can be used to cross-compile the kernel for Raspberry Pi. With genkernel all the preferences can be saved in genkernel.conf file for later use. The values of these variables need to be changed in /etc/genkernel-rpi.conf :
After saving the configuration file (for example to /etc/genkernel-rpi.conf ), mount the RaspberryPi SD card to the INSTALL_MOD_PATH configured above. Assuming the Raspberry Pi root partition device is /dev/sdd3 , run:
Now execute genkernel . For the Raspberry Pi A, A+, B, B+:
For the Raspberry Pi 2 or Raspberry Pi 3 B in 32-bit mode (recommended):
Save the above command to the custom script:
Now simply create kernel for the Raspberry Pi by executing:
Installing kernel image
For Raspberry Pi A, B, B+ (not 2 B!) create a kernel.img file by:
If your Raspberry Pi does not boot with this kernel, you may have an older firmware, which requires kernel to be uncompressed. If so, you will need to:
or using the Raspberry Pi mkimage tool from GitHub:
Alternatively, some devices need the zImage to be processed using the mkknlimg script. To do this:
For Raspberry Pi 2 B just copy arch/arm/boot/zImage to /boot/kernel7.img :
Copy the updated device tree binaries (.dtb) and device tree overlay (.dto) files into the boot partition:
RPi3 specific
RPi 3 and Zero W builtin Wi-Fi driver brcmfmac requires binary firmware blobs brcmfmac434*-sdio.bin and their corresponding configuration brcmfmac434*-sdio.txt to work properly. These are provided by the sys-kernel/linux-firmware ebuild.
Just install the package with
It is also possible to downstrip the provided firmware files with the savedconfig useflag.
Bluetooth
The Raspberry Pi 3B/Zero W needs the BCM43430A1.hcd firmware file, and the Raspberry Pi 3B+ needs the BCM4345C0.hcd firmware file. The firmware files can be found in the Raspbian bluez-firmware GitHub repository. The firmware files need to be placed in the /lib/firmware/brcm directory.
Create the firmware directory:
Fetch the Raspberry Pi 3B, Zero W Bluetooth firmware:
Fetch the Raspberry Pi 3B+ Bluetooth firmware:
Attach the serial device /dev/ttyAMA0 to the Bluetooth stack using btattach , which is provided by the net-wireless/bluez package:
Alternatively, hciattach can be used if net-wireless/bluez is built with the deprecated USE flag enabled:
Both commands will create a HCI device (e.g. hci0 ) in /sys/class/bluetooth and load the required firmware.
Serial
Serial port on RPi3 has some issues related to variable clock rate[2][3]. A few workarounds/solutions are available.
Bootable 64-bit Gentoo Image for RPi3 / RPi4
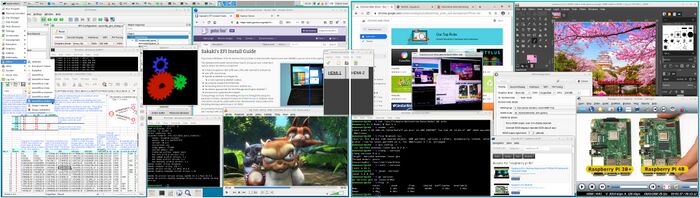
Those interested in trying 64-bit Gentoo on their RPi3 (model B or B+) or RPi4 (model B) may wish to check out the (unofficial) bootable image available here, from which the above screenshot has been taken (see also this forum thread).
Leveraging recently improved 64-bit support in the official Raspberry Pi kernel tree, the image supports:
- The Pi’s onboard Ethernet, Wi-Fi, and Bluetooth adapters;
- Access to the camera module (if fitted) and h/w video codecs, via V4L2-M2M / MMAL;
- ALSA sound playback, via headphone jack and HDMI;
- Accelerated VC4 graphics, via vc4-fkms-v3d / vc4 kernel module / Mesa.
The image contains a full Portage tree (and /etc/portage/ set) so that you can run emerge operations immediately.
The project’s GitHub page additionally contains instructions for setting up crossdev and distcc to build for the 64-bit RPi3 / RPi4.
VideoCore4
To enable VideoCore4 GPU acceleration on RPi device add following to /boot/config.txt :
Also you need live raspberrypi-firmware-9999 ebuild to be installed (as others seems to be outdated and not compatible with latest kernels).
Finaly, add VideoCore4 configuration to mesa and rebuild it.
For more info refer to Raspberry Pi VideoCore4 page.
Источник


