- Узнайте, какое устройство / dev / root представляет в Linux?
- How to find the root device?
- Author: Michael Opdenacker
- 20 thoughts on “How to find the root device?”
- Linux Root Folders Explained
- Linux Root folders
- / – The Root
- /bin – Binaries
- /boot – Boot Files
- /dev – Device Nodes
- /etc – Configuration Files
- /home – Users’ Folder
- /lib – Libraries
- /lost+found – Recovered Files
- /media – Automatic mount point
- /mnt – Manual mount point
- /opt – Optional Software
- /proc – Kernel Files
- /root – Root Home
- /run – Early temp
- /sbin – System Binaries
- /srv – Service Data
- /tmp – Temporary Files
- /usr – User Binaries
- /var – Variable Files
- Conclusion
Узнайте, какое устройство / dev / root представляет в Linux?
В linux есть /dev/root узел устройства. Это будет то же самое блочное устройство, что и другое устройство, например /dev/sdaX . Как /dev/root в этой ситуации я могу обратиться к «реальному» узлу устройства, чтобы я мог показать пользователю разумное имя устройства?
Например, я могу столкнуться с такой ситуацией при разборе /proc/mounts .
Я ищу решения, которые будут работать из сценария оболочки / Python, но не C.
Разобрать root= параметр из /proc/cmdline .
В системах, на которые я смотрел, /dev/root есть символическая ссылка на реальное устройство, поэтому readlink /dev/root (или, readlink -f /dev/root если вам нужен полный путь), это будет сделано.
Ну, /dev/root это просто символическая ссылка на реальное устройство, так что вы можете использовать, readlink(2) чтобы узнать, куда оно указывает из программы, или readlink(1) сделать то же самое из сценария оболочки.
Может быть, я что-то упустил, но как насчет:
Это, вероятно, следует обновить, потому что большая часть информации, представленной здесь, вводит в заблуждение, и, возможно, фактически никогда не была полностью правильной.
Для точки / mount вам просто говорят, что она соответствует / dev / root, который не является реальным устройством, которое вы ищете.
Конечно, вы можете взглянуть на командную строку ядра и увидеть, на какой начальной корневой файловой системе Linux было поручено загрузиться (параметр root):
$ cat / proc / cmdline mem = 512M console = ttyS2,115200n8 root = / dev / mmcblk0p2 rw rootwait
Однако это не означает, что вы видите текущее корневое устройство. Многие системы Linux загружаются на промежуточных корневых файловых системах (таких как initramdisks и initramfs), которые просто используются для доступа к финальной.
Одна вещь, на которую это указывает, заключалась в том, что вещь в / proc / cmdline не обязательно является действительным конечным корнем устройства, на котором фактически живут.
Это от занятых людей, которые, я полагаю, знают, о чем они говорят, когда дело доходит до загрузочных ситуаций.
Второй полезный ресурс, который я нашел, — это очень старая ветка Slackware по вопросу / dev / root. По возрасту этой ветки мы видим, что все варианты присутствовали всегда, но я считаю, что «большинство» дистрибутивов использовали символические метод link, но это был простой переключатель компиляции ядра, он мог сделать его или не сделать его, если бы я правильно понял плакаты, то есть переключить его одним способом, а readlink / dev / root сообщает реальное имя устройства, переключить его другой, и это не так.
Поскольку основной темой этого потока было то, как избавиться от / dev / root, они должны были понять, что это такое на самом деле, что делает его и т. Д., А значит, им нужно было понять это, чтобы избавиться от него.
скрежетно объяснил это хорошо
/ dev / root — это общее устройство, которое можно использовать в fstab. Можно также использовать «rootfs». Это дает некоторое преимущество, поскольку позволяет вам быть менее конкретным. Я имею в виду, что если корневой раздел находится на внешнем диске, он может не всегда отображаться как одно и то же устройство, и его успешное монтирование может потребоваться, если / потребуется изменить fstab для соответствия нужному устройству. Используя / dev / root, он всегда будет соответствовать любому устройству, указанному в параметрах загрузки ядра из lilo или grub.
/ dev / root всегда присутствовал как виртуальная точка монтирования, даже если вы ее никогда не видели. Также есть rootfs (сравните это со специальными виртуальными устройствами, такими как proc и tmpfs, у которых нет предшествующих / dev)
/ dev / root — это виртуальное устройство, такое как ‘proc’ или / dev / tcp ‘. Для этих вещей в / dev нет узла устройства — он уже находится в ядре как виртуальное устройство.
Это объясняет, почему символическая ссылка не обязательно существует. Я удивлен, что никогда раньше не сталкивался с этой проблемой, учитывая, что я поддерживаю некоторые программы, которые должны знать эту информацию, но лучше поздно, чем никогда.
Я полагаю, что некоторые из предлагаемых здесь решений будут «часто» работать, и, вероятно, я это сделаю, но они не являются истинным истинным решением проблемы, которое, как отметил автор busybox, значительно сложнее реализовать в очень надежная манера
[ОБНОВЛЕНИЕ:> После получения некоторых пользовательских тестовых данных, я собираюсь использовать метод монтирования, который, по крайней мере, подходит для некоторых случаев. / Proc / cmdline был бесполезен, потому что вариантов слишком много. В первом примере вы видите старый метод. Это все реже и реже, потому что настоятельно не рекомендуется использовать его (оригинальный синтаксис типа / dev / sdx 9), потому что эти пути могут изменяться динамически (порядок подстановки диска, вставка нового диска и т. Д., И внезапно / dev / sda1 становится / dev / sdb1).
VS очень чисто и легко разбирается
В случае с cmdline, вы увидите, что единственный вариант, который является правильным «теоретическим» ответом, — это первый устаревший вариант, поскольку вы не должны ссылаться на root для движущейся цели, такой как / dev / sdxy.
Следующие два требуют выполнения дальнейших действий для получения символической ссылки из этой строки в / dev / disk / by-uuid или / dev / disk / by-label
Последнее требует использования parted -l, чтобы найти то, на что указывает этот parted id.
Это только те варианты, которые я знаю и видел, вполне могут быть и другие, например, GPTID.
Итак, решение, которое я использую, заключается в следующем:
во-первых, посмотрите, является ли / dev / root символической ссылкой. Если это так, убедитесь, что это не / dev / disk / by-uuid или by-label, если это так, вам нужно сделать второй шаг обработки, чтобы получить последний реальный путь. Зависит от инструмента, который вы используете.
Если у тебя ничего нет, тогда иди на гору и посмотри как это. В качестве последнего резервного варианта я не использую, потому что аргументы, приведенные против него, не обязательно являются фактическим разделом или устройством, о котором идет речь, достаточно хороши, чтобы я отклонил это решение для моей программы. mount — не совсем надежное решение, и я уверен, что при наличии достаточного количества примеров было бы легко найти случаи, когда это совсем не так, но я считаю, что эти два случая охватывают «большинство» пользователей, и это все, что мне было нужно.
Самым хорошим, чистым и самым надежным решением для ядра было бы просто всегда создавать символическую ссылку, которая не повредила бы ничему или кому-либо, и называла бы это хорошим, но в реальном мире это не так. ,
Я не считаю ни одно из них «хорошими или надежными» решениями, но опция монтирования, по-видимому, удовлетворяет «достаточно хорошим», и, если требуется действительно надежное решение, используйте материал, рекомендованный busybox.
Источник
How to find the root device?
How to find which device corresponds to your root filesystem
I recently found something I was looking for for quite a long time. If you use the mount command in Linux, you can see that the root device is not listed like the other mounted filesystems:
For the / mount point, you are just told that it corresponds to /dev/root , which is not the real device you are looking for.
Of course, you can look at the kernel command line and see on which initial root filesystem Linux was instructed to boot ( root parameter):
However, this doesn’t mean that what you see is the current root device. Many Linux systems boot on intermediate root filesystems (like initramdisks and initramfs), which are just used to access the final one.
I explored the contents of /proc , but didn’t find any file revealing what the root device is.
Fortunately, I eventually found a command to find the root device:
But how does this work? How could we find such information by ourselves? Use the Source, Luke!
When you ask yourself questions like this one, the best is to look at the BusyBox sources which implement this command. These sources are usually simpler than the ones for the same GNU command.
Here is what BusyBox rdev does… It first runs the stat system call on the / directory. Let’s run the stat command that corresponds to it:
What’s interesting is the Device field. It means that the device corresponding to / has the major number b3 in hexadecimal ( 179 in decimal), and minor number 02 . Bingo, this corresponds to /dev/mmcblk0p2 :
Therefore, what BusyBox rdev does is walk through /dev and its subdirectories to find a device file matching the major and minor numbers.
This is not a completely generic solution though. On some very simple embedded systems, you don’t even need to create device files for all existing devices. In particular, the device file for the root filesystem doesn’t have to exist. In such a case, rdev wouldn’t be able to find the root device.
A more generic solution could be to walk through /sys/block which enumerates all the block devices present on a system (even if not all of them have an entry in /dev/ . This would allow to find the device with the matching major and minor numbers:
Through this example, you can see how useful it can be to study the sources of system commands to understand how the system works. BusyBox sources, implementing simplified versions of GNU utilities, make this even easier.
Author: Michael Opdenacker
Michael Opdenacker is the founder of Bootlin, and was its CEO until 2021. He is best known for all the free embedded Linux and kernel training materials that he created together with Thomas Petazzoni. He is always looking for ways to increase performance, reduce size and boot time, and to maximize Linux’ world domination. More details. View all posts by Michael Opdenacker
20 thoughts on “How to find the root device?”
Useful info there, thanks – though n.b. it doesn’t work with root mounted over NFS because there’s no entry in sys/block in this case (which is maybe why BusyBox walks /dev).
On some embedded systems the rdev command will fail simply because busybox has been compiled without it. As long as you have a writable device this is not a problem. Simply load a later busybox for your processor from the busybox.net website to that device with a different name and call the command with, for example, /dev/sda/busybox-mipsel rdev.
following your hints I came out with this, maybe simplistic, approach:
find_linux_root_device() <
RDEV=$(mountpoint -d /)
for file in $(find /dev);
do
if [ $(stat —printf=»%t:%T» «$file») = $RDEV ];
then
ROOTDEVICE=»$file»
break;
fi
done
What do you think about it?
In the code above I forgot to consider that ‘stat’ prints the major and minor number in hex, while ‘mountpoint’ outputs them in decimal.
Something like this should be used:
.
CURRENT_DEVICE=$(printf «%d:%d» $(stat —printf=»0x%t 0x%T» «$devnode»))
if [ $CURRENT_DEVICE = $RDEV ];
.
#/bin/bash
find_linux_root_device() <
RDEV=$(mountpoint -d /)
for file in /dev/* ; do
CURRENT_DEVICE=$(stat -c “%t:%T” $file)
if [ $CURRENT_DEVICE = $RDEV ]; then
ROOTDEVICE=”$file”
break;
fi
done
This seems to work for a lot of systems:
#/bin/bash
find_linux_root_device() <
local PDEVICE=`stat -c %04D /`
for file in $(find /dev -type b 2>/dev/null) ; do
local CURRENT_DEVICE=$(stat -c “%02t%02T” $file)
if [ $CURRENT_DEVICE = $PDEVICE ]; then
ROOTDEVICE=”$file”
break;
fi
done
cat /proc/cmdline
console=ttyS0,115200 root=/dev/nfs rw nfsroot=192.168.1.100:/home/nfs/IntelCE,nolock ip=dhcp mem=exactmap memmap=1M@0 memmap=639M@1M
How can i increase the size of my root partiotion , it is shown as /dev/root.
Thanks,
Rashmi
Assuming you have no duplicate partitions mounted nor any single partition mounted twice:
df -a | grep «`df -a | grep rootfs | cut -d -f2- | sed ‘s/^ *//g’`» | cut -d -f1 | tail -1
Basically, run df -a to get stats on what it lists as rootfs and then use that info to scan for what other listing has those stats.
on my system, /dev/root is a symlink to /dev/sda1, which is where the system was booted from.
Interesting. What kind of system is this? What distribution is it, or what was used to generate the root filesystem?
As least, this doesn’t seem to be a standard feature. Ubuntu 13.04 with Linux 3.8 doesn’t have such a link.
MAJOR_ROOTFS=$(mountpoint -d / | cut -f 1 -d “:”)
MINOR_ROOTFS=$(mountpoint -d / | cut -f 2 -d “:”)
However, this script doesn’t work when rootfs is an UBI file system. It fails because “mountpoint” returns wrong major/minor numbers. How can this be solved in a more generic way?
I was just investigating a solution to this and found this command that seems useful:
findmnt
# findmnt
TARGET SOURCE FSTYPE OPTIONS
/ /dev/mmcblk0p2 ext3 rw,relatime,errors=continue,user_x
|-/dev devtmpfs devtmpfs rw,relatime,size=383868k,nr_inodes
| `-/dev/pts devpts devpts rw,relatime,gid=5,mode=620
|-/proc proc proc rw,relatime
|-/sys sysfs sysfs rw,relatime
| `-/sys/kernel/debug debugfs debugfs rw,relatime
|-/run tmpfs tmpfs rw,nosuid,nodev,mode=755
|-/var/volatile tmpfs tmpfs rw,relatime
# findmnt -n -o SOURCE /
/dev/mmcblk0p2
Источник
Linux Root Folders Explained
In this post, you will finally get the Linux root folders explained. You will learn how these folders are used by your Linux system and how you can use them.
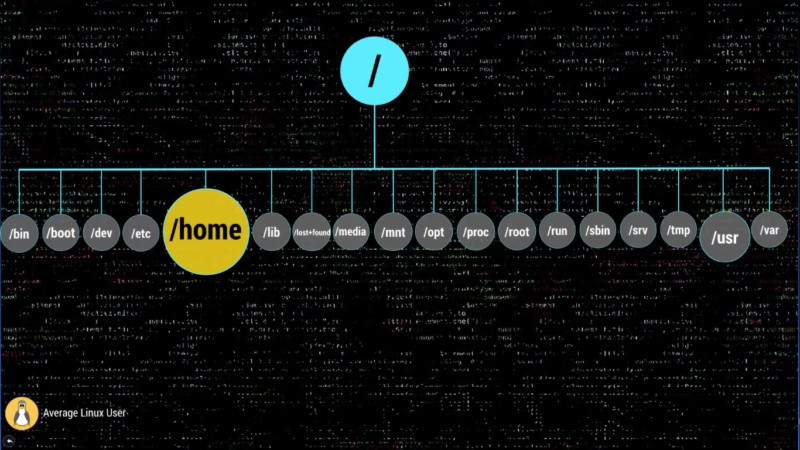
When you open your file manager, you are usually located in your home directory. But if you go two levels up, you will see this set of directories:
This post exactly about all these directories. You can watch the video where these Linux root folders explained or continue reading below.
Linux Root folders
I won’t use the terminal here and I will show you some visual presentation. But you are of course are encouraged to open the terminal and explore all these directories. Let’s get started.
/ – The Root
Everything begins in your system from this directory. All your folders, hard drives, USB drivers, everything is located in this root folder. You cannot go above this directory.
Also, the root directory is designated by the slash sign.
The concept of the root directory may be difficult to understand for Windows users who are used to see something like disk C, disk D and disk E. In Linux, every disk is a represented as a folder that is mounted under this root directory.
This Linux Directory Structure may look like a mess, but believe me when you learn it, you will realize how much sense it makes.
/bin – Binaries
The /bin folder contains programs that are essential for the system to boot and run. So, if you destroy this folder, your system won’t boot and run.
These programs are stored in the binary format. In other words, they are not in text format. You cannot open and read the content of these programs. The advantage of such format is that a computer can read and execute these programs very fast.
/boot – Boot Files
It is easy to guess from the name. This folder is needed to boot your system. It contains the Linux kernel, initial RAM disk image for drives need at boot time, and the bootloader.
I also would like to point out that within this boot folder, you can find the grub folder that contains grub configuration files.
If you read my Arch Linux post, you should remember than I used this command to generate the GRUB configuration file.
The boot folder also contains the Linux kernel.
/dev – Device Nodes
Here, I need to introduce another important concept of Linux – everything is a file. The /dev folder contains files for all devices your Linux is able to recognize.
If you have some Linux experience, you may recall that when you mount a hard drive, you use a name such as /dev/sda1 . The sda is the name of a first hard drive recognized by your Linux kernel and it is located in the dev folder. When the disk is mounted, you see it as a folder in that mounting point.
You can also find here USB devices, CPU etc.
/etc – Configuration Files
The /etc folder comprises all system-wide configuration files and some shell scripts that are executed during the system boot. All files here are text files, so they are human readable.
If you ever did any system-wide configuration, you probably edited some files here.
For example, there is /etc/fstab file that contains a table of storage devices and their mounting points.
/home – Users’ Folder
The home directory contains a home folder for each regular user on your Linux system. For example, I have tow folders in my /home folder. ALU is my home folder. The second folder belongs to another user, whom I named User2. So, the home folder of every user is named by its username.
You have as many folders as many users you have on your system.
These users’ folders are where users store their private data such as documents, videos, picture, music etc. When you open your file manager or your terminal by default you are located in you user’s home folder. It is also often marked as
/lib – Libraries
You already know the /bin directory that contains programs, this /lin folder contains libraries required by those programs from the /bin folder.
A library is a set of functions that are shared between programs. Thus, this /lib folder is also essential for your system to work correctly.
/lost+found – Recovered Files
You will have this directory if you use the ext4 file system. Most of the modern Linux distros use ext4, so most likely you have this folder. This is a file system specific folder that is used for data recovery in case of file corruption. Unless something bad has happened, this folder should be empty on your system.
This /lost+found folder is produced on every separate partition. So, if your /home folder is on a separate partition, you should have this /lost+found folder in your home directory too.
/media – Automatic mount point
This folder is used for automatic mounting of removable media such as USB drives, CD-ROM etc. For example, if your system is configured for automatic mounting, when you insert a USB drive it will be mounted to this folder.
/mnt – Manual mount point
The /mnt folder is similar to the /media folder, it is also used to mount devices, but usually, it is used for manual mounting. You, of course, can manually mount your devices to /media , but to keep some order in your system it is better to separate these two mounting points.
/opt – Optional Software
This folder is not essential for your system to work. Usually, it is used to install commercial programs on your system. For example, my Dropbox installation is located in this folder.
/proc – Kernel Files
This is a virtual file-system maintained by the Linux kernel. Usually, you do not touch anything in this folder. It is needed only for the kernel to run different processes.
/root – Root Home
This is the home directory of your root user. Don’t mix it with the / root directory. The / directory is the parental directory for the whole system, whereas this /root directory is the same as your user home directory but it is for the root account.
If you log in as a root, you will be located in this directory by default. This is a folder for private data and account specific setting of your root account.
/run – Early temp
The /run is a recently introduced folder that is actually a temporary file-system. It is used to store temporary files very early in system boot before the other temporary folders become available.
/sbin – System Binaries
Similar to /bin this folder contains binaries for essential system tasks but they are meant to be run by the super user, in other words, the administrator of the system.
/srv – Service Data
This directory contains service files installed on your system. For example, if you installed a web-served on your Linux system, it will be located in this folder.
/tmp – Temporary Files
This is just a place where programs store temporary files on your system. This directory is usually cleaned on reboot.
/usr – User Binaries
This is probably the largest folder after your home folder. It contains all programs used by a regular user.
I would like to stop little more on sub-directories of this /usr folder.
/usr/bin contains the programs installed by your Linux distribution. There are usually thousands of programs here.
The libraries for this /usr/bin executables are located in the /usr/lib folder.
The /usr/local doesn’t have any programs by default, but if you compile and install a program system-wide it will be placed here.
The most useful folder is /usr/share . It contains all the shared data used by the programs from /usr/bin .
All default configuration files, themes, icons, wallpapers, sound files are stored here, one more folder I would like to mention here is the /usr/share/doc folder, where you can find the documentation files for programs installed on your system.
/var – Variable Files
The /var contains files that are of variable content, so their content is not static and it constantly changes. For example, this is where the log files are stored. If you don’t know, a log file is a file that records all events happening in your system while it is running. These log files often help to find out if something is not working correctly in your system.
Conclusion
Now you have some clue about all those folders in your Linux system.
Please, feel free to add anything in the comments bellow in case I missed something.
Источник


