- Linux fsck command
- Description
- Technical description
- Syntax
- Options
- Filesystem-specific options
- Examples
- Dropping into single-user mode
- Checking filesystems
- Related commands
- ИТ База знаний
- Полезно
- Навигация
- Серверные решения
- Телефония
- Корпоративные сети
- Руководство по команде fsck для проверки и восстановления файловой системы
- Когда использовать fsck в Linux
- Базовый синтаксис fsck
- Как проверить и восстановить файловую систему
- Просмотр подключенных дисков и разделов
- Размонтировать диск
- Запустить fsck для проверки ошибок
- Смонтировать диск
- Сделать пробный запуск с fsck
- Автоматическое исправление обнаруженных ошибок с помощью fsck
- Пропускать восстановление, но выводить ошибки fsck на выходе
- Заставить fsck выполнить проверку файловой системы
- Запустить fsck сразу для всех файловых систем
- Пропустить проверку fsck в определенной файловой системе
- Пропустить Fsck в подключенных файловых системах
- Запустить fsck в корневом разделе Linux
- Что делать, если fsck прерывается?
- Обзор параметров команды Linux fsck
Linux fsck command

On Unix-like operating systems, the fsck command checks and repairs a Linux file system.
This page describes the GNU/Linux version of fsck.
Description
fsck stands for :file system consistency check:. On most systems, fsck is run at boot time if certain conditions are detected. Usually, these conditions are:
- A file system is marked as «dirty» — its written state is inconsistent with data that was scheduled to be written; or,
- A file system was mounted a set number of times without being checked.
The fsck command itself interacts with a matching filesystem-specific fsck command created by the filesystem’s authors. Regardless of filesystem type, fsck generally has three modes of operation:
- Check for errors, and prompt the user interactively to decide how to resolve individual problems;
- Check for errors, and attempt to fix any errors automatically; or,
- Check for errors, and make no attempt to repair them, but display the errors on standard output.
While normally run at boot time, fsck can run manually on unmounted filesystems by a superuser.
Technical description
fsck is used to check, and optionally repair, one or more filesystems.
filesys is a device name (e.g., /dev/hdc1, /dev/sdb2), a mount point (e.g., /, /usr, /home), or an ext2 label or UUID specifier (for example «UUID=8868abf6-88c5-4a83-98b8-bfc24057f7bd» or «LABEL=root«).
Normally, fsck tries to handle filesystems on different physical disk drives in parallel to reduce the total amount of time needed to check all of them.
If no filesystems are specified on the command line, and the -A option is not specified, fsck defaults to checking filesystems in /etc/fstab serially. This is equivalent to the combination of the -A and -s options.
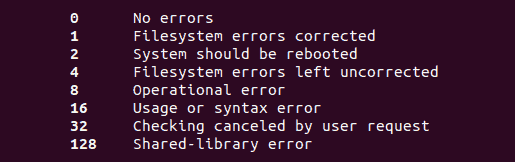
The exit code returned by fsck is a unique number representing the sum of the following condition values:
0 — No errors
1 — Filesystem errors corrected
2 — System should be rebooted
4 — Filesystem errors left uncorrected
8 — Operational error
16 — Usage or syntax error
32 — Fsck canceled by user request
128 — Shared-library error
The exit code returned when multiple filesystems are checked is the bitwise OR of the exit codes for each filesystem that is checked.
In actuality, fsck is a front-end for the various filesystem checkers (fsck.fstype) available under Linux. The filesystem-specific checker is searched for in /sbin first, then in /etc/fs and /etc, and finally in the directories listed in the PATH environment variable.
Read filesystem-specific checker manual pages for further details. For example, to learn more about ext3-specific fsck checking, run:
Syntax
Options
| -l | Lock the whole-disk device by an exclusive flock. This option can be used with one device only (this means that -A and -l are mutually exclusive). This option is recommended when more fsck instances are executed in the same time. The option is ignored when used for multiple devices or for non-rotating disks. fsck does not lock underlying devices when executed to check stacked devices (e.g., MD or DM); this feature is not implemented yet. |
| -s | Serialize fsck operations. This is a good idea if you are checking multiple filesystems and the checkers are in an interactive mode. Note: e2fsck runs in an interactive mode by default. To make e2fsck run in a non-interactive mode, you must specify the -p or -a option, if you want for errors to be corrected automatically, or the -n option if you do not. |
| -t fslist | Specifies the type(s) of filesystem to be checked. When the -A flag is specified, only filesystems that match fslist are checked. The fslist parameter is a comma-separated list of filesystems and options specifiers. All the filesystems in this comma-separated list may be prefixed by a negation operator ‘no‘ or ‘!‘, which requests that only those filesystems not listed in fslist are checked. If none of the filesystems in fslist are prefixed by a negation operator, then only those listed filesystems are checked. |
Options specifiers may be included in the comma-separated fslist. They must have the format opts=fs-option. If an options specifier is present, then only filesystems which contain fs-option in their mount options field of /etc/fstab are checked. If the options specifier is prefixed by a negation operator, then only those filesystems that do not have fs-option in their mount options field of /etc/fstab are checked.
For example, if opts=ro appears in fslist, then only filesystems listed in /etc/fstab with the ro option are checked.
For compatibility with Mandrake distributions with boot scripts dependant on an unauthorized UI change to the fsck program, if a filesystem type of loop is found in fslist, it is treated as if opts=loop were specified as an argument to the -t option.
Normally, the filesystem type is deduced by searching for filesys in the /etc/fstab file and using the corresponding entry. If the type cannot be deduced, and there is only a single filesystem given as an argument to the -t option, fsck uses the specified filesystem type. If this type is not available, then the default filesystem type (currently ext2) is used.
The root filesystem is checked first unless the -P option is specified (see below). After that, filesystems are checked in the order specified by the fs_passno (the sixth) field in the /etc/fstab file. Filesystems with a fs_passno value of 0 are skipped and are not checked at all. Filesystems with a fs_passno value of greater than zero are checked in order, with filesystems with the lowest fs_passno number being checked first. If there are multiple filesystems with the same pass number, fsck attempts to check them in parallel, although it avoids running multiple filesystem checks on the same physical disk.
fsck does not check stacked devices (RAIDs, dm-crypt, . ) in parallel with any other device. See below for FSCK_FORCE_ALL_PARALLEL setting. The /sys filesystem is used to determine dependencies between devices.
Hence, a very common configuration in /etc/fstab files is to set the root filesystem to have a fs_passno value of 1 and to set all other filesystems to have a fs_passno value of 2. This allows fsck to automatically run filesystem checkers in parallel if it’s advantageous to do so. System administrators might choose not to use this configuration if they need to avoid multiple filesystem checks running in parallel for some reason — for example, if the machine in question is short on memory so that excessive paging is a concern.
fsck normally does not check whether the device actually exists before calling a filesystem specific checker. Therefore, non-existing devices may cause the system to enter filesystem repair mode during boot if the filesystem specific checker returns a fatal error. The /etc/fstab mount option nofail may be used to have fsck skip non-existing devices. fsck also skips non-existing devices that have the special filesystem type auto.
Filesystem-specific options
Options that are not understood by fsck are passed to the filesystem-specific checker. These arguments must not take arguments, as there is no way for fsck to be able to properly guess which options take arguments and which don’t.
Options and arguments which follow the — are treated as filesystem-specific options to be passed to the filesystem-specific checker.
Please note that fsck is not designed to pass arbitrarily complicated options to filesystem-specific checkers. If you’re doing something complicated, execute the filesystem-specific checker directly. If you pass fsck some horribly complicated options and arguments, and it doesn’t do what you expect, you’re almost certainly doing something you shouldn’t be doing with fsck. Options to different filesystem-specific fsck‘s are not standardized. If in doubt, please consult the man pages of the filesystem-specific checker. Although not guaranteed, the following options are supported by most filesystem checkers:
| -a | Automatically repair the filesystem without any questions (use this option with caution). Note that e2fsck supports -a for backward compatibility only. This option is mapped to e2fsck‘s -p option that is safe to use, unlike the -a option that some filesystem checkers support. |
| -n | For some filesystem-specific checkers, the -n option causes the fs-specific fsck to avoid attempting to repair any problems, but report such problems to stdout. However, this is not true for all filesystem-specific checkers. In particular, fsck.reiserfs does not report any corruption if given this option. fsck.minix does not support the -n option at all. |
| -r | Interactively repair the filesystem (ask for confirmations). Note: It is generally a bad idea to use this option if multiple fsck‘s are being run in parallel. Also, note that this is e2fsck‘s default behavior; it supports this option for backward compatibility reasons only. |
| -y | For some filesystem-specific checkers, the -y option causes the fs-specific fsck to always attempt to fix any detected filesystem corruption automatically. Sometimes an expert can do better driving the fsck manually. Note that not all filesystem-specific checkers implement this option. In particular, fsck.minix and fsck.cramfs do not support the -y option. |
Examples
Do not run fsck on a mounted filesystem! If you run fsck on a filesystem that is currently mounted, (at best) you receive an error message, and (at worst) corrupt your filesystem data. If you’re going to check your filesystem with fsck, drop into single-user mode and make sure the filesystem is unmounted before you proceed.
Dropping into single-user mode
These instructions should help you bring your Linux system into single-user mode and unmount any filesystems you want to check with fsck.
First, initiate runlevel 1 (single-user mode) with the init command:
Now unmount the filesystem using umount. For instance, if /home is mounted on /dev/sda2, you could run:
Make sure to run umount for any filesystem you want to check with fsck.
Checking filesystems
This command attempts to check /dev/sda2, and report any errors it finds.
Check /dev/sda2, and attempt to automatically fix any errors found.
Check all configured filesystems. fsck processes the file /etc/fstab and check all file systems listed there. Systems are checked in order of their
value, as listed in the fstab file. Systems with a pass value of 0 are skipped; the system with a pass value of 1 is listed first, and remaining systems are checked in ascending order of their pass value.
View all configured filesystems. Output resembles the following:
View all filesystems that can be checked with fsck. Filesystems appear as extensions to the fsck.* files; for example:
Check /dev/sda2 for errors, but do not attempt to repair them; instead, print any errors to standard output.
Normally, fsck skips parts of the filesystem marked as «clean» — meaning all pending writes were successfully made. The -f («force») option specifies that fsck should check parts of the filesystem even if they are not «dirty». The result is a less efficient, but a more thorough check.
This command checks the ext2 filesystem on the floppy diskette device /dev/fd0.
Related commands
mkfs — Build a Linux file system, usually a hard disk partition.
Источник
ИТ База знаний
Курс по Asterisk
Полезно
— Узнать IP — адрес компьютера в интернете
— Онлайн генератор устойчивых паролей
— Онлайн калькулятор подсетей
— Калькулятор инсталляции IP — АТС Asterisk
— Руководство администратора FreePBX на русском языке
— Руководство администратора Cisco UCM/CME на русском языке
— Руководство администратора по Linux/Unix
Навигация
Серверные решения
Телефония
FreePBX и Asterisk
Настройка программных телефонов
Корпоративные сети
Протоколы и стандарты
Руководство по команде fsck для проверки и восстановления файловой системы
Утилита для файловой системы
Утилита Linux fsck (File System Consistency Check — проверка согласованности файловой системы) проверяет файловые системы на наличие ошибок или нерешенных проблем. Инструмент используется для исправления потенциальных ошибок и создания отчетов.
Онлайн курс по Linux
Мы собрали концентрат самых востребованных знаний, которые позволят тебе начать карьеру администратора Linux, расширить текущие знания и сделать уверенный шаг к DevOps

Эта утилита по умолчанию входит в состав дистрибутивов Linux. Для использования fsck не требуется никаких специальных шагов или процедуры установки. После загрузки терминала вы готовы использовать функции инструмента.
Следуйте этому руководству, чтобы узнать, как использовать fsck для проверки и восстановления файловой системы на Linux-машине. В руководстве будут перечислены примеры того, как использовать инструмент и для каких вариантов использования.

Когда использовать fsck в Linux
Инструмент fsck можно использовать в различных ситуациях:
- Используйте fsck для запуска проверки файловой системы в качестве профилактического обслуживания или при возникновении проблемы с вашей системой.
- Одна из распространенных проблем, которые может диагностировать fsck, — это когда система не загружается.
- Другой — когда вы получаете ошибку ввода/вывода, когда файлы в вашей системе становятся поврежденными.
- Вы также можете использовать утилиту fsck для проверки состояния внешних накопителей, таких как SD-карты или USB-накопители.
Базовый синтаксис fsck
Базовый синтаксис утилиты fsck следует этому шаблону:
В приведенном выше примере файловой системой может быть устройство, раздел, точка монтирования и так далее. Вы также можете использовать параметры, относящиеся к файловой системе, в конце команды.
Как проверить и восстановить файловую систему
Перед проверкой и восстановлением файловой системы необходимо выполнить несколько шагов. Вам нужно найти устройство и размонтировать его.
Просмотр подключенных дисков и разделов
Чтобы просмотреть все подключенные устройства в вашей системе и проверить расположение диска, используйте один из доступных инструментов в Linux.
Один из способов найти диск, который вы хотите просканировать, — это перечислить диски файловой системы с помощью команды df :

Инструмент показывает использование данных в вашей системе и файловых системах. Обратите внимание на диск, который вы хотите проверить, с помощью команды fsck .
Например, для просмотра разделов вашего первого диска используйте следующую команду:
sda — это то, как Linux относится к вашему первому SCSI-диску. Если у вас два, вторым будет sdb и так далее.
В нашем примере мы получили один результат, поскольку на этой виртуальной машине был только один раздел. Вы получите больше результатов, если у вас будет больше разделов.
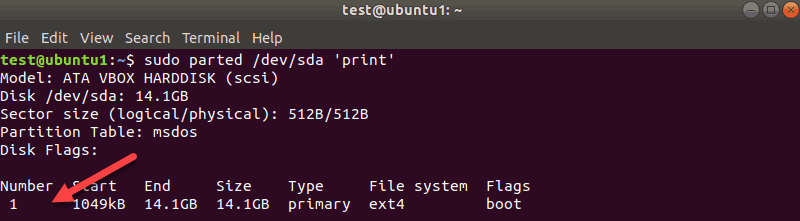
Имя диска здесь /dev/sda , а затем количество разделов отображается в столбце Number. В нашем случае это один: sda1.
Размонтировать диск
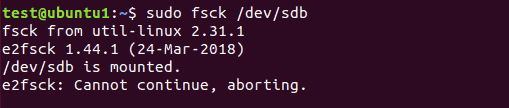
Прежде чем вы сможете запустить проверку диска с помощью fsck , вам необходимо отключить диск или раздел. Если вы попытаетесь запустить fsck на смонтированном диске или разделе, вы получите предупреждение:
Обязательно выполните команду размонтирования:
Замените /dev/sdb устройством, которое вы хотите размонтировать.
Обратите внимание, что вы не можете размонтировать корневые файловые системы. Следовательно, теперь fsck нельзя использовать на работающей машине. Подробнее об этом в конце руководства.
Запустить fsck для проверки ошибок
Теперь, когда вы отключили диск, вы можете запустить fsck . Чтобы проверить второй диск, введите:

В приведенном выше примере показан результат для чистого диска. Если на вашем диске имеется несколько проблем, для каждой из них появляется запрос, в котором вы должны подтвердить действие.
Код выхода, который возвращает утилита fsck , представляет собой сумму этих состояний:
Смонтировать диск
Когда вы закончите проверку и ремонт устройства, смонтируйте диск, чтобы вы могли использовать его снова.
В нашем случае мы перемонтируем SDB-диск:
Сделать пробный запуск с fsck
Перед выполнением проверки в реальном времени вы можете выполнить тестовый запуск с помощью fsck . Передайте параметр -N команде fsck , чтобы выполнить тест:
На выходе печатается, что могло бы произойти, но не выполняется никаких действий.
Автоматическое исправление обнаруженных ошибок с помощью fsck
Чтобы попытаться устранить потенциальные проблемы без каких-либо запросов, передайте параметр -y команде fsck .
Таким образом, вы говорите «да, попытайтесь исправить все обнаруженные ошибки» без необходимости каждый раз получать запрос.
Если ошибок не обнаружено, результат будет таким же, как и без опции -y.
Пропускать восстановление, но выводить ошибки fsck на выходе
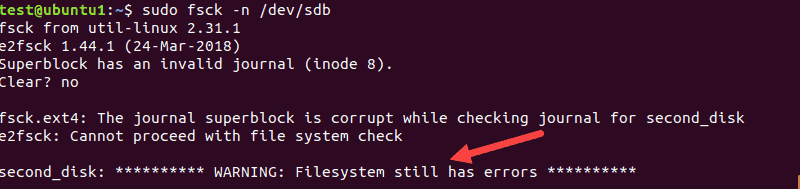
Используйте параметр -n , если вы хотите проверить потенциальные ошибки в файловой системе, не исправляя их.
У нас есть второй диск sdb с некоторыми ошибками журнала. Флаг -n печатает ошибку, не исправляя ее:
Заставить fsck выполнить проверку файловой системы
Когда вы выполняете fsck на чистом устройстве, инструмент пропускает проверку файловой системы. Если вы хотите принудительно проверить файловую систему, используйте параметр -f .Например:
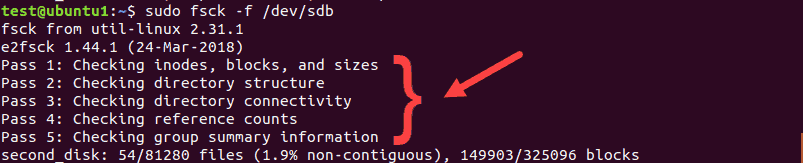
При сканировании будут выполнены все пять проверок для поиска повреждений, даже если будет обнаружено, что проблем нет.
Запустить fsck сразу для всех файловых систем
Если вы хотите выполнить проверку всех файловых систем с помощью fsck за один раз, передайте флаг -A . Эта опция будет проходить через файл etc/fstab за один проход.
Поскольку корневые файловые системы нельзя размонтировать на работающей машине, добавьте параметр -R , чтобы пропустить их:
Чтобы избежать запросов, добавьте параметр -y , о котором мы говорили.
Пропустить проверку fsck в определенной файловой системе
Если вы хотите, чтобы fsck пропустил проверку файловой системы, вам нужно добавить -t и no перед файловой системой.
Например, чтобы пропустить файловую систему ext3 , выполните эту команду:
Мы добавили -y , чтобы пропускать запросы.
Пропустить Fsck в подключенных файловых системах
Чтобы убедиться, что вы не пытаетесь запустить fsck на смонтированной файловой системе, добавьте параметр -M . Этот флаг указывает инструменту fsck пропускать любые смонтированные файловые системы.
Чтобы показать вам разницу, мы запустим fsck на sdb , пока он смонтирован, а затем, когда мы его размонтируем.
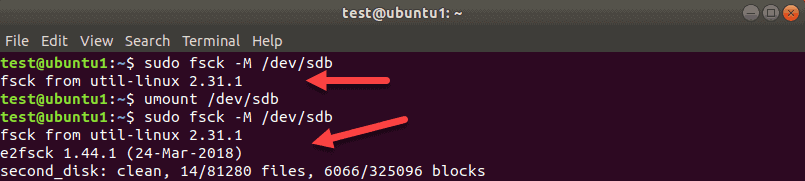
Пока sdb смонтирован, инструмент выходит без проверки. Затем мы размонтируем sdb и снова запускаем ту же команду. На этот раз fsck проверяет диск и сообщает, что он чистый или с ошибками.
Примечание. Чтобы удалить первую строку заголовка инструмента fsck «fsck from util-linux 2.31.1» , используйте параметр -T .
Запустить fsck в корневом разделе Linux
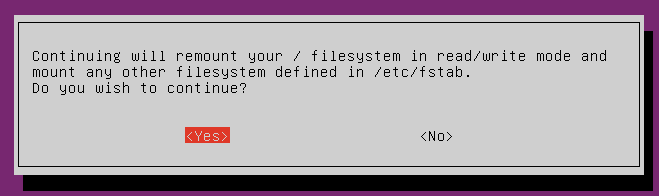
Как мы уже упоминали, fsck не может проверить корневые разделы на работающей машине, поскольку они смонтированы и используются. Однако даже корневые разделы Linux можно проверить, если вы загрузитесь в режиме восстановления и запустите проверку fsck :
1. Для этого включите или перезагрузите компьютер через графический интерфейс или с помощью терминала:
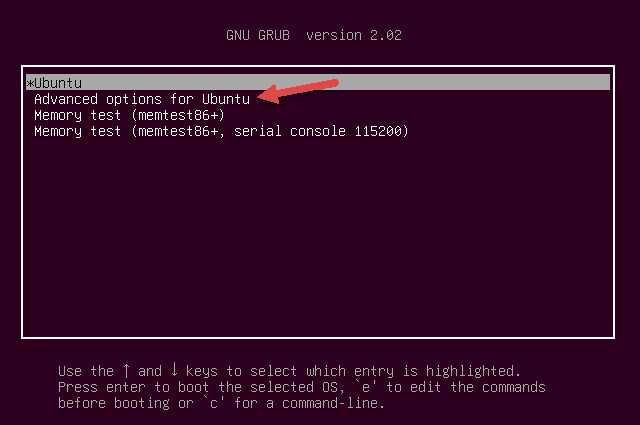
2. Нажмите и удерживайте клавишу Shift во время загрузки. Появится меню GNU GRUB.
3. Выберите Advanced options for Ubuntu (Дополнительные параметры для Ubuntu).
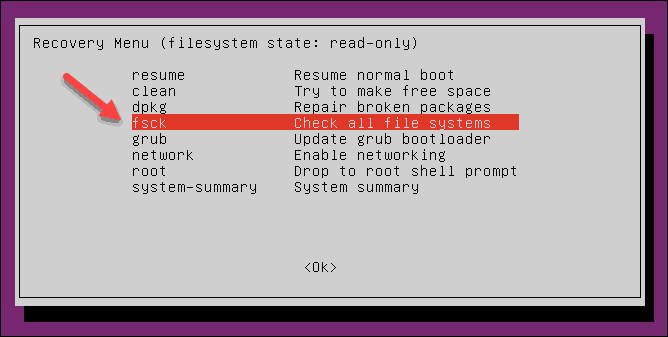
4. Затем выберите запись с (recovery mode — режим восстановления) в конце. Подождите, пока система загрузится в меню восстановления.
5. Выберите fsck в меню.
6. Подтвердите, выбрав Yes в ответ на запрос.
7. По завершении выберите resume в меню восстановления, чтобы загрузить машину.
Что делать, если fsck прерывается?
Вам не следует прерывать работу инструмента fsck , пока он работает. Однако, если процесс будет прерван, fsck завершит текущую проверку, а затем остановится.
Если утилита обнаружила ошибку во время проверки, она не будет пытаться что-либо исправить, если ее прервать. Вы можете повторно запустить проверку в следующий раз и дождаться ее завершения.
Обзор параметров команды Linux fsck
Подводя итоги, ниже приведен список параметров, которые вы можете использовать с утилитой fsck Linux.
- -а — Попробует автоматически исправить ошибки файловой системы. Подсказок не будет, поэтому используйте его с осторожностью.
- -А — Проверяет все файловые системы, перечисленные в /etc/fstab.
- -C — Показать прогресс для файловых систем ext2 и ext3.
- -f — Заставляет fsck проверить файловую систему. Инструмент проверяет, даже если файловая система кажется чистой.
- -l — Заблокирует устройство, чтобы другие программы не могли использовать раздел во время сканирования и восстановления.
- -M — Не проверяет смонтированные файловые системы. Инструмент возвращает код выхода 0, когда файловая система смонтирована.
- -N — Делает пробный запуск. В выводе печатается, что fsck будет делать без выполнения каких-либо действий. Также печатаются предупреждения или сообщения об ошибках.
- -П — Используется для параллельного сканирования нескольких файловых систем. Это может вызвать проблемы, в зависимости от ваших настроек. Используйте с осторожностью.
- -Р — Сообщает инструменту fsck, чтобы он не проверял корневые файловые системы при использовании параметра -A.
- -р — Распечатать статистику устройства.
- -t — Укажите типы файловых систем для проверки с помощью fsck. Обратитесь к странице руководства для получения подробной информации.
- -T — Скрыть заголовок при запуске инструмента.
- -у — Попытается автоматически исправить ошибки файловой системы во время проверки.
- -V — Подробный вывод.
Онлайн курс по Linux
Мы собрали концентрат самых востребованных знаний, которые позволят тебе начать карьеру администратора Linux, расширить текущие знания и сделать уверенный шаг к DevOps
Источник


