- Windows Setup Installation Process
- WindowsВ Setup Installation Types
- WindowsВ Setup Process
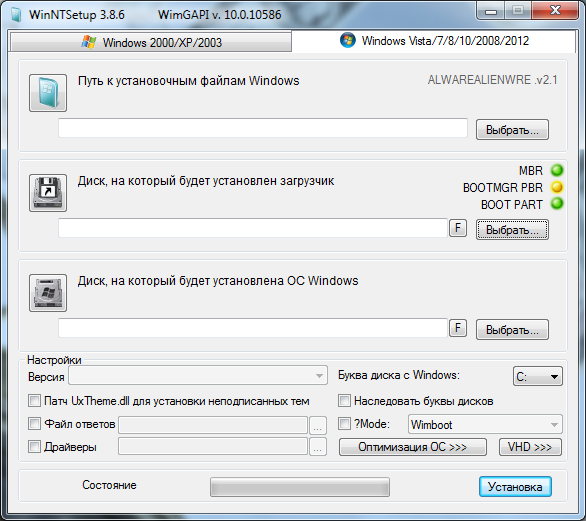
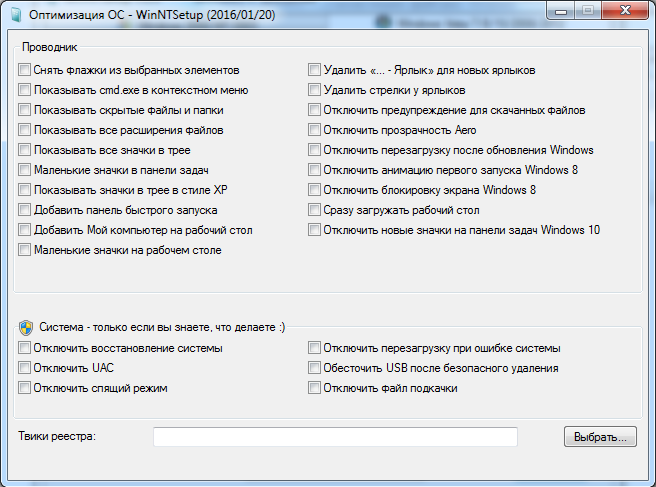
- WinNTSetup
- WinNTSetup как пользоваться
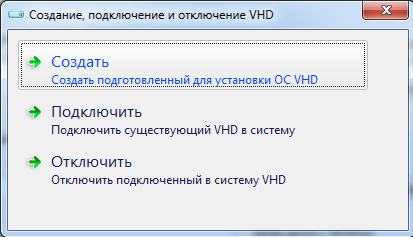
- Установка Windows на виртуальный жесткий диск (VHD)
- Скачать WinNTSetup
- Windows Setup Technical Reference
- Practical applications
- What’s New
- See also
- Microsoft-Windows-Setup
- In This Section
- Applies To
- Windows Setup Scenarios and Best Practices
- Common Usage Scenarios
- Custom Installations
- Upgrades
- Automated Installations
- WindowsВ Setup Best Practices
- WindowsВ Setup Limitations
Windows Setup Installation Process
Windows® Setup is the program that installs Windows or upgrades an existing Windows installation. It is also the basis for the following installation and upgrade methods:
Windows Deployment Services
WindowsВ Setup Installation Types
WindowsВ Setup can perform both clean and upgrade installations. However, it does not perform computer-to-computer migrations. Instead, you must use Windows Easy Transfer, the User State Migration Tool (USMT), or another migration tool to move data from a previous installation to the new operating system.
Custom installations. WindowsВ Setup can perform a custom installation, also known as a clean installation, which saves your previous Windows installation but does not migrate your settings. The previous Windows installation will not boot after a clean installation.
Upgrade installations. WindowsВ Setup can perform an installation that retains your settings and preferences while upgrading your operating system.
WindowsВ Setup Process
The WindowsВ Setup program starts and restarts the computer, gathers information, copies files, and creates or adjusts configuration settings. The following table shows the overall process for WindowsВ Setup:
| WindowsВ Setup phase | Setup actions | ||||||||||||||||||||||||||||||||||
|---|---|---|---|---|---|---|---|---|---|---|---|---|---|---|---|---|---|---|---|---|---|---|---|---|---|---|---|---|---|---|---|---|---|---|---|
| Setting | Description |
|---|---|
| ComplianceCheck | Checks that the requirements for installing Windows are fulfilled so that the operating system can be installed. |
| Diagnostics | Specifies whether to send installation information to Microsoft. |
| DiskConfiguration | Specifies the disk configurations to apply to a disk on the destination computer. |
| Display | Specifies display settings to apply to WindowsВ PE. |
| DynamicUpdate | Specifies whether to enable dynamic updates. |
| EnableFirewall | Specifies whether to enable Windows Firewall for WindowsВ PE. |
| EnableNetwork | Specifies whether a network connection is enabled. |
| ImageInstall | Specifies the Windows image to install. |
| LogPath | Specifies the path used for log files during WindowsВ PE. |
| PageFile | Specifies the size and the location of the page file used during WindowsВ PE. |
| Restart | Specifies whether to restart or shut down the computer after WindowsВ PE completes. |
| RunAsynchronous | Specifies commands to run asynchronously after WindowsВ PE starts. |
| RunSynchronous | Specifies commands to run synchronously after WindowsВ PE starts. |
| UpgradeData | Specifies whether the installation is an upgrade of an existing operating system. |
| UseConfigurationSet | Specifies that a configuration set is used. |
| UserData | Specifies user data, such as the user name and the product key to apply to the Windows installation. |
| WindowsDeploymentServices | Specifies settings for Windows Deployment Services, a management tool designed to facilitate deployment with a limited number of settings. |
Applies To
To determine whether a component applies to the image you’re building, load your image into Windows SIM and search for the component or setting name. For information on how to view components and settings, see Configure Components and Settings in an Answer File.
Windows Setup Scenarios and Best Practices
WindowsВ Setup installs the Windows operating system. WindowsВ Setup uses a technology called Image-based Setup (IBS) that provides a single, unified process with which all customers can install Windows. IBS performs clean installations and upgrades of Windows and is used in both client and server installations. WindowsВ Setup also enables you to customize Windows during installation by using Setup answer file settings.
Common Usage Scenarios
Common installation scenarios include performing clean installations, upgrades, and unattended installations.
Custom Installations
The most common scenario for WindowsВ Setup is performing a custom installation. In this scenario, you install Windows onto a computer that does not have an operating system, or has a previous version of Windows. This scenario consists of the following stages:
Run Setup.exe from your Windows product DVD or network share.
Select the Custom installation type.
If you are installing from a previous installation of Windows, WindowsВ Setup creates a local boot directory and copies all of the required WindowsВ Setup files to this directory.
WindowsВ Setup reboots, installs and configures Windows components, and, after installation is complete, launches WindowsВ Welcome.
Custom installations do not migrate any settings or preferences from previously installed versions of Windows. Files from previous Windows versions are copied to a \Windows.old directory. All data from the Windows installation including the Users, Program Files, and Windows directories are saved to this directory.
Upgrades
WindowsВ Setup can also perform upgrades from a supported operating system.
This scenario includes the following stages:
Run Setup.exe on the previous version of Windows.
Select the Upgrade installation type. WindowsВ Setup upgrades the system and protects your files, settings, and preferences during the installation process.
WindowsВ Setup reboots and restores your protected files, settings, and preferences. WindowsВ Setup then launches WindowsВ Welcome.
NotesВ В
- Upgrades are used to upgrade a single computer to WindowsВ 10.
- Upgrades support migrating user data to a new system.
- Upgrades support the following customizations of the Windows image. This is not a change in Windows Setup support policy but instead a clarification:
- Applying a cumulative (quality) update
- Applying updates to the servicing stack necessary to complete the feature update (see Servicing stack updates for more information)
- Applying updates to Setup.exe binaries or other files that Setup uses for feature updates
- Appling updates for the «safe operating system» (SafeOS) that is used for the Windows recovery environment
- Adding or removing languages
- Adding or removing Features on Demand
For clarity, Windows Setup does not support upgrades to a Windows image that has been customized by adding / removing / changing applications, settings nor drivers.
Automated Installations
Automated installations enable you to customize a Windows installation and remove the need for a user to interact with WindowsВ Setup. By using Windows System Image Manager (WindowsВ SIM) or the Component Platform Interface (CPI) APIs, you can create one or more customized Windows installations that can then be deployed across many different hardware configurations.
The automated installation, also called an unattended installation, scenario includes the following stages:
Use WindowsВ SIM or the CPI APIs to create an unattended installation answer file, typically called Unattend.xml. This answer file contains all of the settings that you configure in the Windows image. For more information, see Windows System Image Manager How-to Topics.
From WindowsВ PE, a previous version of Windows, or another preinstallation environment, run Setup.exe with the explicit path to the answer file. If you do not include the path to the answer file, Setup.exe searches for a valid answer file in several specific locations. For more information, see Windows Setup Command-Line Options.
WindowsВ Setup then installs the operating system and configures all settings listed in the answer file. Additional applications, device drivers, and updates can also be installed during WindowsВ Setup. After the operating system is installed, Setup launches WindowsВ Welcome.
WindowsВ Setup Best Practices
The following section describes some of the best practices to use with WindowsВ Setup.
Verify that there is sufficient space for WindowsВ Setup temporary files. If you run setup from a previous version of Windows, verify that there is sufficient space on the disk for temporary WindowsВ Setup files. The space that is required may vary, but it can be up to 500В megabytes (MB).
Previous Windows installations are moved to a Windows.old folder. As a best practice, you should back up your data before you upgrade. If you install Windows over a previous Windows installation, all previous Windows files and directories are moved to a Windows.old folder, including the contents of the Users, Program Files, and Windows directories. You can access your data in the Windows.old folder after WindowsВ Setup completes. If you have additional folders not in the Users, Program Files, or Windows directories, those folders are not moved. For example, if you have a folder that is named C:\Drivers, that folder will not be moved to the Windows.old folder.
Review the Windows Setup log files. If you experience problems during WindowsВ Setup, review the log files in %WINDIR%\panther. You will be able to identify and troubleshoot many issues by reviewing the installation log files. For more information, see Deployment Troubleshooting and Log Files and Windows Setup Log Files and Event Logs.
WindowsВ Setup Limitations
The following sections describe some of the limitations of WindowsВ Setup. Review this section before you run WindowsВ Setup.
Enable UEFI-compatibility mode to install to an UEFI-based computer. On some UEFI computers, you cannot install Windows in BIOS-compatibility mode. You may need to switch to UEFI-compatibility mode.
Applications might require a consistent drive letter. If you install custom applications to your Windows image, install Windows to the same drive letter on the destination computer, because some applications require a consistent drive letter. Uninstallation, servicing, and repair scenarios might not function appropriately if the drive letter of the system does not match the drive letter specified in the application. This limitation applies to both the Deployment Image Servicing and Management (DISM) tool and WindowsВ Setup.
Deploying multiple images to multiple partitions. If you capture and deploy multiple images on multiple partitions, the following requirements must be fulfilled:
The partition structure, bus location, and number of disks must be identical on the reference and destination computers.
The partition types (primary, extended, or logical) must match. The active partition on the reference computer must match that of the destination computer.
Installing Custom .wim files requires a description value in the .wim file. When you create a custom .wim file, WindowsВ Setup requires that you always include a description value. If a .wim file does not include a description value, the image may not install correctly. You can provide a description value when you use the dism command with the /capture-image option. If you install a .wim file that does not have a description value, recapture the image and provide a valid description value. For more information, see the DISM — Deployment Image Servicing and Management Technical Reference for Windows.
NoteВ В For Windows Preinstallation Environment (WindowsВ PE), the version of boot files must match the computer architecture. An x64 UEFI computer can only boot by using WindowsВ PE x64 boot files. An x86 computer can only boot by using WindowsВ PE x86 boot files. This is different from legacy BIOS. In legacy BIOS, an x64 computer can boot by using x86 boot files.


