- Настройка веб камеры Windows 10
- Установка устройства
- Тестирование
- Как пользоваться
- How To: Change Default Camera on Windows 10
- If the webcam is listed under Devices and Printers, please follow the steps below.
- April 2021 Update:
- Disabling another camera
- Select the default driver
- Webcam not working Windows 10
- Find the solution below that fits your situation and click, or go one by one until you find the one that works for you.
- Step 1: Check for a lid or slider covering the camera
- Step 2: Check your apps permissions
- Step 3: Roll back your webcam driver
- Step 4: Re-install the webcam driver
- Step 5: Download and install the official driver
- Step 6: Check your antivirus software
- Step 7: How to Update Windows 10
Настройка веб камеры Windows 10

В нашем обзоре рассмотрим подробную инструкцию по настройке, тестированию и использованию веб камеры компьютера на Windows 10. Видеоконференцсвязь становится очень популярной, особенно для компаний, в которых сотрудники работают из дома. Чтобы получить помощь по установке, уделите несколько минут этим советам.
Установка устройства
Сегодня большинство веб-камер универсальны, то есть работают практически на любых компьютерах. Выполните следующие действия, чтобы подключить и установить устройство:
- Включите ПК и убедитесь, что операционная система загружена.
- К большинству камер подключен USB-кабель. Соедините его со свободным USB-портом на вашем компьютере, который находится на задней панели или сбоку.

Операционные системы, такие как Windows 8 и Windows 10, должны сами распознавать новое оборудование, а драйверы обычно устанавливаются автоматически.
Если ваша операционная система не устанавливает драйверы автоматически, вы можете перейти на веб-сайт производителя и загрузить необходимое программное обеспечение. Если к вашей веб камере прилагался компакт-диск, вы можете установить это ПО, чтобы добавить дополнительные функции.

Веб-камеру необходимо разместить перед вами и примерно на том же уровне, что и ваше лицо, когда вы сидите. Лучшее место для установки — это верхняя часть монитора; большинство устройств располагаются именно там, имея регулируемый зажим, который упирается в заднюю часть дисплея для фиксации. Настройте фиксатор по желанию; по окончании веб-камера должна быть направлена вам в лицо.
Тестирование
Если на вашем компьютере установлена Windows 7, Windows 8 или Windows 10, вы можете использовать приложение «Камера» для тестирования. Чтобы открыть утилиту «Камера», выполните следующие действия:
- Нажмите клавишу Windows или щелкните Пуск. В поле поиска введите «Camera».
- В результатах поиска выберите приложение. На экране будет отображаться ваше видео в реальном времени.
- Вы можете настроить устройство так, чтобы ваше лицо находилось по центру экрана видео.
Как пользоваться
После того, как вы подключили и установили камеру на свой компьютер, вы можете использовать ее, чтобы показать свое видео. Можно применять популярные службы и программное обеспечение для видеоконференцсвязи, такие как: Microsoft Teams, Skype, Webex и Zoom. Когда вы подключаетесь к конференц-вызову с помощью ПО, вы можете активировать устройство для отображения видео в реальном времени.
У сервиса должна быть кнопка с изображением видеокамеры. Нажмите ее, чтобы включить устройство и активировать необходимые функции. В зависимости от службы видеоконференцсвязи обмен видео в реальном времени начинается немедленно или отображает предварительный просмотр.
Сегодня некоторые ноутбуки оснащены встроенной видеокамерой, что устраняет необходимость во внешнем оборудовании. Однако ее нелегко увидеть и легко не заметить. В большинстве случаев веб-камеры портативных компьютеров расположены посередине верхнего края экрана в пластиковом корпусе. Размер обычно составляет 1/2 дюйма или меньше. Это может быть маленький темный круг или небольшой квадрат с чуть менее темным кругом внутри него. Если у вас возникли трудности с ОС вы можете узнать цены на установку Windows в Киеве.
How To: Change Default Camera on Windows 10
A webcam can be a useful tool in a small business, especially if you connect to customers or employees via video conferencing software such as Skype or Google Hangouts. But if your laptop’s internal webcam no longer works or has been replaced by a better quality external webcam, you can tell your computer which one to use for a particular application.

Many modern laptops have an integrated webcam that you can use to record videos or participate in video chats. Most of the built-in webcams are of good quality, but if you want advanced features such as panning, automatic tracking and better video resolution, an external webcam is the best choice. Adding a second webcam to your laptop is quite simple, but operating the secondary camera with chat and video recording is a little more difficult. For the second webcam to work with many software applications, you must disable the laptop’s built-in webcam.
How can I change the default camera in Windows 10?

If the webcam is listed under Devices and Printers, please follow the steps below.
a. Press the Windows + X button.
b. Select Control Panel.
c. Click on Devices and Printers.
d. Check that the Logitech webcam is listed.
e. Right-click on the Logitech webcam.
f. Click on Set this device as default.
April 2021 Update:
We now recommend using this tool for your error. Additionally, this tool fixes common computer errors, protects you against file loss, malware, hardware failures and optimizes your PC for maximum performance. You can fix your PC problems quickly and prevent others from happening with this software:
- Step 1 : Download PC Repair & Optimizer Tool (Windows 10, 8, 7, XP, Vista – Microsoft Gold Certified).
- Step 2 : Click “Start Scan” to find Windows registry issues that could be causing PC problems.
- Step 3 : Click “Repair All” to fix all issues.

Disabling another camera
One of the most common bypass solutions when selecting a standard camera is to disable the other camera. This forces Windows to use the camera you want to use every time you are prompted to do so. To disable the other cameras:
- Simultaneously press the “Windows” + “X” keys and select “Device Manager” from the list.
- Double-click on the Imaging Devices drop-down list.
- Right-click on the name of the internal webcam and select Disable.
- Try using an application and see if the problem persists.
Select the default driver
Another common way to solve this problem is to select the default device. This allows you to configure Windows to open a third-party camera instead of the default internal camera. To do that:
- Press “Windows” + “S” to open the search option and type “Control Panel”.
- Select the first option and click on “View Devices and Printers” under the “Hardware and Sound” option.
- Make sure the webcam is on it.
- If so, right-click on the webcam and select Set this device as the default device.
- Check if the problem persists.
CONCLUSION
You now know how to change a lot of what Windows 10 does when you reinstall it. Take the time to run your computer the way you want, and you will be much more productive. Don’t forget to check these settings after major updates of Windows 10 as they may change from time to time.

CCNA, Web Developer, PC Troubleshooter
I am a computer enthusiast and a practicing IT Professional. I have years of experience behind me in computer programming, hardware troubleshooting and repair. I specialise in Web Development and Database Design. I also have a CCNA certification for Network Design and Troubleshooting.
Webcam not working Windows 10
Find the solution below that fits your situation and click, or go one by one until you find the one that works for you.
Webcams are becoming more and more essential for daily life, especially with the rise of online meetings, remote work, and classes. That is why it can be very critical (and annoying) if your webcam stops working.
There are two types of webcams: a built-in one which comes with almost every laptop nowadays and external USB webcams that you can buy separately and connect to your computer or laptop for more flexibility and higher resolution. The issues are almost the same for both types, but we added a few more tips for external ones at the end of the article, so make sure to check it out if that’s the type you have.
The webcam issues can differ from one situation to another. It may not be working only in some apps, and maybe it does not work at all. Either way, follow our article and we are sure you will be able to fix whatever the issue is so that you can get back to using your webcam.
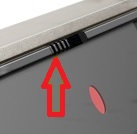
Step 1: Check for a lid or slider covering the camera
Some built-in webcams and external ones as well come with lids or sliders. Closing them sometimes does not only black the view out, it can completely disconnect the webcam from the computer. It is a great way to assure privacy and security against hacks, but many users totally forget about it when they have webcam issues.
Step 2: Check your apps permissions
A couple of years ago, Microsoft introduced an update where an option was added to allow your apps to access to your camera and microphone or deny them from doing so. After this update, the default state for this option was “Off”. So, let’s check it and enable the required permissions:
Go to Start > Settings > Privacy > Camera
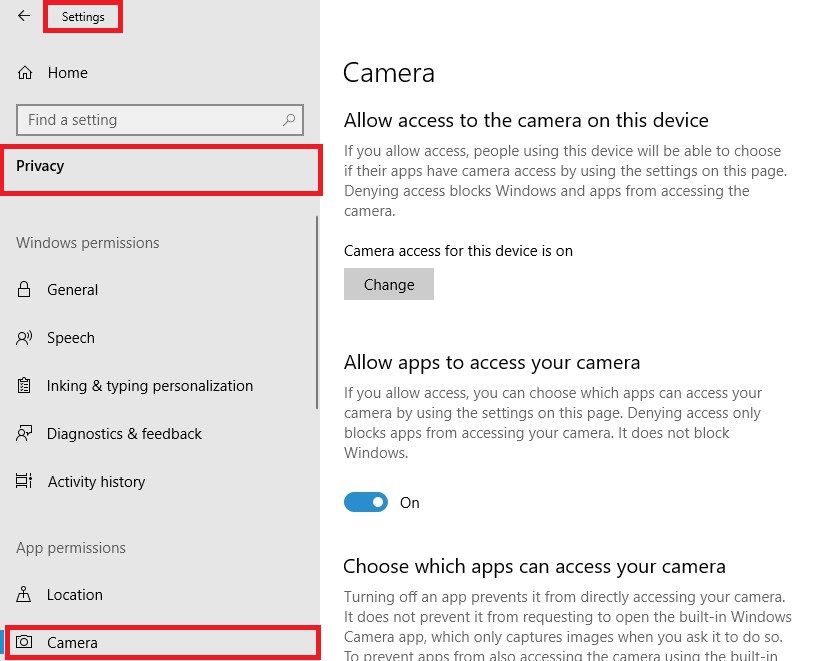
Click the “Change” button in the first section and make sure it’s set to “On”, this is a basic step to activate the camera.
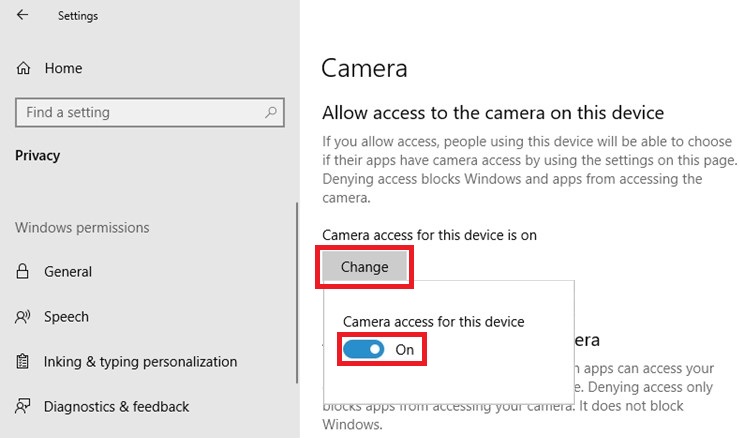
Now in the “Allow apps to access your camera” make sure the toggle button is set to “On” and then you can customize the access for each app in the list.

Step 3: Roll back your webcam driver
If the permissions were already set the right way, then it is probably a driver issue.
First, we will try to roll back the driver, which means going one step back before the last change or update that happened to the webcam, which may have caused the problem. Please note that this option may not be available for you, as you might not have a history of updates for your webcam. If so, do not worry about it and just skip to Step 4.
Here is how to perform a driver roll back:
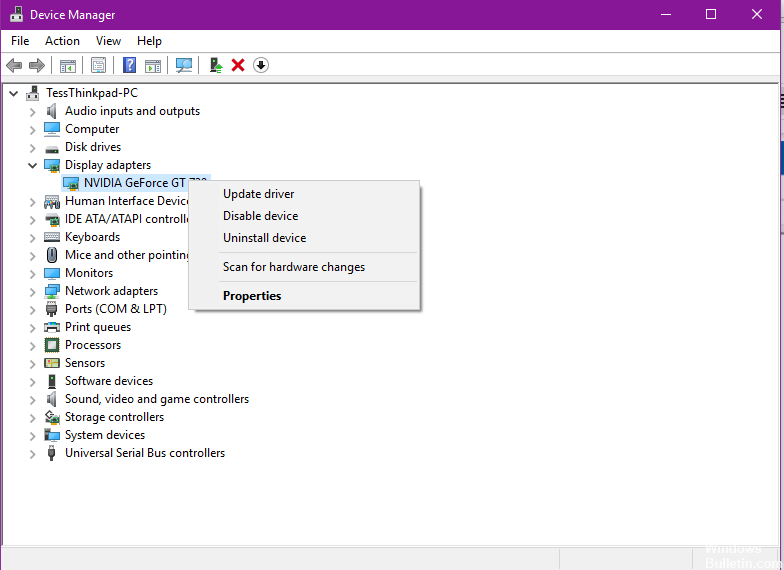
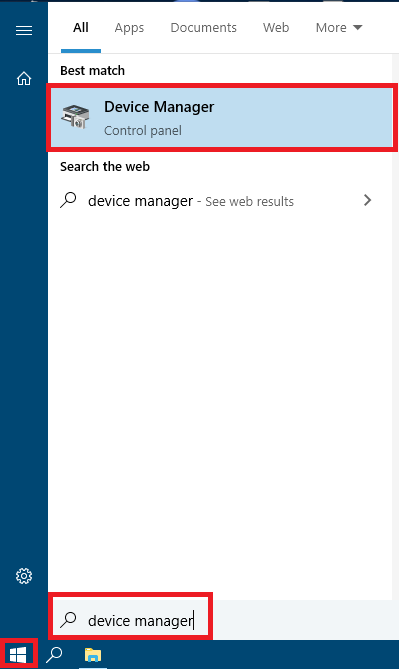
In the start menu, type «device manager» and select it from the search results.
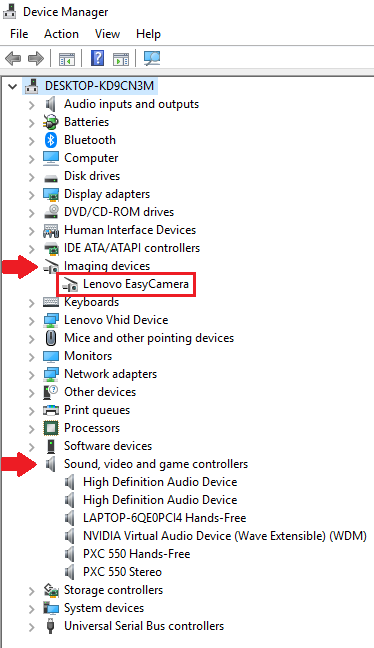
Expand «Imaging devices», «Sound, video and game controllers» or «cameras», and search for your webcam in these sections.
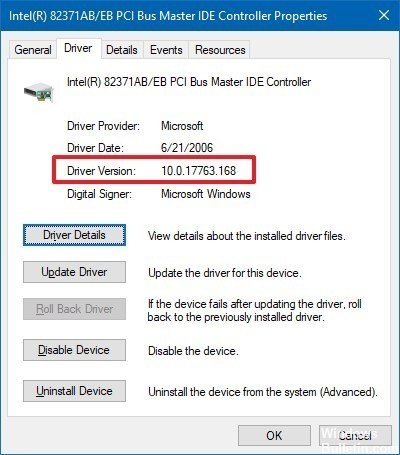
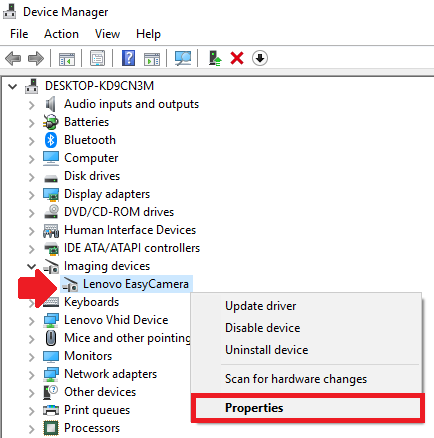
Once you find your webcam, right-click on it and then click «Properties»
In the «Driver» tab, click the «Roll Back Driver» button.
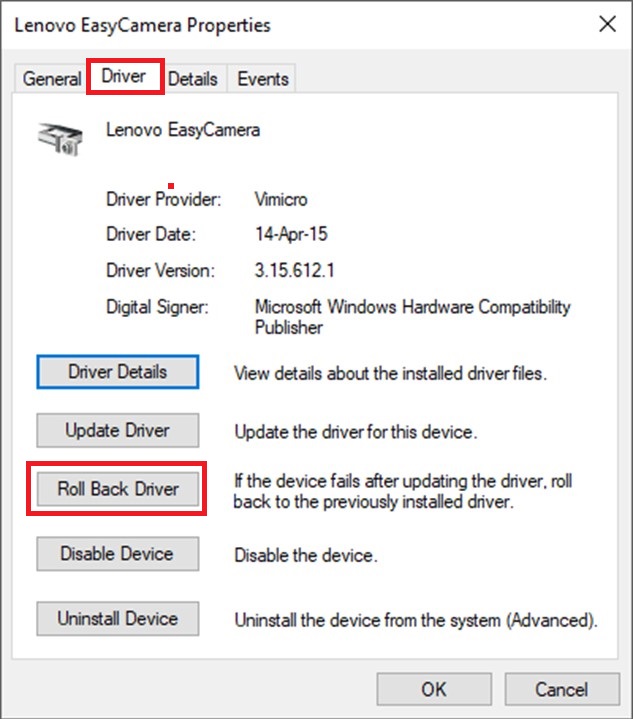
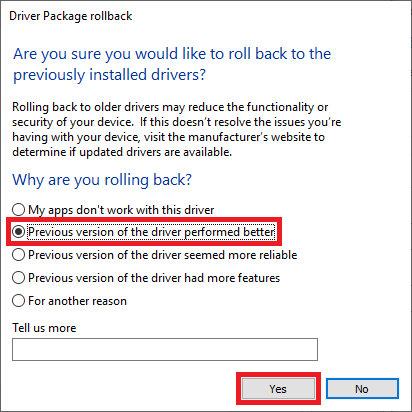
Choose the reason that fits for you, which will probably the second one: “Previous version of the driver performed better” Then click «Yes».
Once the roll back is done, reboot your computer and check if the previous version of the driver you went back to is working.
Step 4: Re-install the webcam driver
If the roll back option is not available or did not work, our next option is to completely uninstall the driver, remove the device, and then reboot the computer. The good thing is that Windows 10 scans for the hardware every time the computer reboots and re-installs the basic missing drivers automatically, which in our case, is the webcam’s.
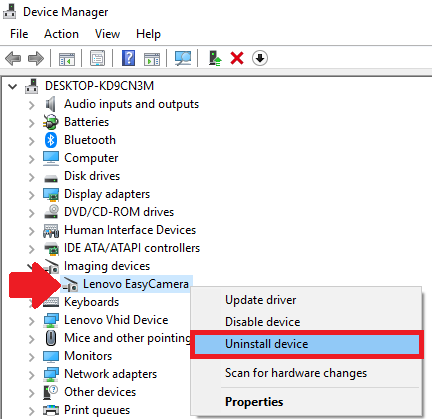
In the start menu, type «device manager» and select it from the search results.
Expand «Imaging devices», «Sound, video and game controllers» or «cameras», search for your webcam in these sections.
Once you find your webcam, right-click on it and then click “Uninstall device”
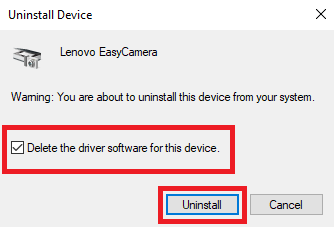
Check the “Delete the driver software for this device” checkbox and then click «Uninstall»
Once your driver is uninstalled, reboot your computer, and see if the webcams returns to life.
Feel free to perform Step 2 one more time after re-installing your webcam driver and remember that the default settings can prevent your computer from accessing the webcam.
Step 5: Download and install the official driver
In the earlier days, laptops, webcams, and other hardware used to come with CDs loaded with the drivers needed for them to function properly. Nowadays, it is totally different. Most devices are now “Plug and Play”, and you do not really need to install any drivers at first for them to work. Yet, some hardware like webcams need to be well-installed for better reliability and stability. Therefore, it is recommended to install their drivers manually.
If it is a built-in laptop webcam, you can always go to the laptop’s manufacturer’s official website and download the webcam driver and then install it manually. Same for the external USB webcam, you are most likely to find a driver for it on the webcam’s manufacturer’s website.
Step 6: Check your antivirus software
Many anti-viruses software are very strict with accessing the computer’s webcam and microphone, even if you enable the permissions from Windows settings, sometimes you can remain blocked. So it’s highly recommended that you check your antivirus settings, disable it temporarily, and see if it then works ok. In this case, you know where the issue is and deal with it depending on the software you’re using.
Step 7: How to Update Windows 10
Since Windows 10 is becoming Microsoft’s ‘Forever OS’, updating your Windows 10 version is getting more important. Some major updates will be as dramatic as upgrading from Windows 8.1 to Windows 10. These constant updates bring more security, new features and fix many software and hardware bugs that face the users, just like the webcam issue. Therefore, performing a Windows update is a really good way to minimize the issues you encounter, in our case, the webcam failure. Here is how to update Windows 10:
Open Windows’ Settings from the start menu.


