Установка VMware Tools на виртуальную машину Linux
В этой статье мы рассмотрим, как развернуть VMware Tools на виртуальных машинах Linux. Развертывание VMTools в гостевой операционной системе виртуальной машины повышает их производительность и управляемость. С VMTools некоторые из драйверов, включенных в ОС, заменяются на оптимизированный для виртуализации версии; одним из таких примеров является драйвер vmxnet3. Кроме того, VMTools обеспечивают фреймворки API, такие как VIX, позволяющие программное управление виртуальными машинами, а также раскрытие информации виртуальной машины, например, IP-адреса при использовании клиентов для vSphere.
VMware Tools поддерживается на 32-разрядных и 64-разрядных операционных системах, включая Microsoft,Apple, NetWare, Солярис, redhat и другие. Руководство по совместимости гостевой ОС предоставляет полный список поддерживаемых гостевых операционных систем вместе с поддерживаемыми функциями VMware Tools. Мы покажем, как развернуть VMware Tools на двух дистрибутивах Linux, а именно в CentOS и Debian.
Способы установки
В зависимости от дистрибутива Linux, существует несколько методов установки VMware Tools. Первый и наиболее часто используемый метод — установка с ISO. ISO-файл, содержащий двоичные файлы vmtools (установочные файлы, скрипты и т. д.) монтируется в виртуальный CD-ROM с гостевого меню виртуальной машины. После этого vmtools устанавливаются путем выполнения Perl-скрипта.
Другой популярный метод, который все больше набирает обороты, это Open-VM-Tools (OVT) от VMware. Это позволяет vmtools автоматически настраиваться во время установки ОС. В качестве альтернативы они могут быть установлены на более поздней с использованием ОС или из хранилища с помощью пакета инструментов управления, таких как YUM или APT.
На февраль 2016 дистрибутивы Linux, поддерживающие OVT, таковы;
- Fedora 19 и более поздние версии;
- Debian 7.x и более поздние версии;
- openSUSE 11.x и более поздние версии;
- Весрии Ubuntu (12.04 LTS, 13.10 и более поздние)
- Red Hat Enterprise Linux 7.0 и более поздние версии;
- CentOS 7.0 и более поздние версии;
- Oracle Linux 7.0 и более поздние версии;
- SUSE Linux Enterprise 12 и более поздние версии.
Метод ISO
Расскажем об обоих методах, начав с ISO. Чтобы проиллюстрировать процесс развертывания, сначала развернем vmtools на виртуальной машине Centos 6.x 32. Как видно на рисунке, изначально vmtools не развертывались на виртуальных машинах.
Рисунок 1 — CentOS ВМ без vmtools
Чтобы приступить к установке, щелкните правой кнопкой мыши на имени виртуальной машины, выберите «Guest» и нажмите «Install/Upgrade VMware Tools». Нажмите OK для подтверждения.
Рисунок 2 — Начало процесса установки vmtools
Что происходит: соответствующий образ ISO монтируется для дистрибутива Linux, на который вы хотите установить vmtools. Для этого убедитесь в том, что для виртуальной машины была выбрана правильная операционная система. Для этого проверьте тип операционной системы в свойствах ВМ (рис. 3). Вы должны выключить ВМ, если будете менять неправильный тип ОС.
Рисунок 3 — Проверка типа ОС
Как только это сделано, залогиньтесь как администратор и выполните последующие действия и запустите команды. В зависимости от дистрибутива, некоторые шаги могут несущественно отличаться.
Создайте папку и смонтируйте ISO-образ.

Рисунок 4 — Создание ISO-образа
Затем распакуйте архив vmtools и скопируйте папки в Temp.

Рисунок 5 — Извлечение папок vmtools
Как это иногда бывает, могут быть обнаружены отсутствующие зависимости, особенно на свежеустановленных виртуальных машинах. Например, нам сначала пришлось выполнить следующую команду, чтобы извлечь YUM и установить пакеты (рис. 6), необходимые для обеспечения успешной установки vmtools.

Рисунок 6 — Установка отсутствующих зависимостей
Теперь перейдите в папку /tmp и запустите скрипт установки Perl. Следует включить параметры по умолчанию, если вы не собираетесь настроить процесс установки вручную.

Рисунок 7 — Установка vmtools с использованием скрипта Perl
Рисунок 8 — Завершение процесса выполнения скрипта Perl
Проверить, завершился ли процесс установки, можно просмотрев статус VMware Tools в клиенте vSphere (Рисунок 9).
Рисунок 9 — vmtools установлены правильно
Иногда, в зависимости от выбранного дистрибутива Linux и его конфигурации, вы можете встретить ошибку компилятора во время выполнения скрипта установки Perl.
Следующий шаг является необязательным, но если у вас есть непреодолимая потребность держать все в строжайшем порядке, вы можете выполнить следующие команды, чтобы очистить лишние файлы установки:


» Видео показывает весь описанный здесь процесс: смотреть
Установка open-vm-tools из репозитория
В этом примере мы устанавливаем open-vm-tools на дистрибутив Debian 8 64-бит. Отличный пример есть на сайте VMware, поэтому мы не будем изобретать велосипед и покажем процесс установки в видео.
При установке OVT можно заметить, что статус vmtools показывается как «Running (Guest Managed)», как показано на рисунке 10. Для сторонних vmtools статус будет «Running (3rd-party/Independent)». Это нормально и ожидаемо от OSP (Operating System Specific Packages), использующих базовое ПО и механизмы установки на гостевых ОС для обновления vmtools.
Источник
Vmware tools linux download iso
johnwvmw released this Sep 24, 2021
open-vm-tools 11.3.5 release based on build 18557794
The granular changes that have gone into the 11.3.5 release are in the ChangeLog at https://github.com/vmware/open-vm-tools/blob/stable-11.3.5/open-vm-tools/ChangeLog
The hgfsmounter (mount.vmhgfs) command has been removed from open-vm-tools.
- Changes may be needed to remove /sbin/mount.vmhgfs from packaging scripts.
A configurable logging capability has been added to the network script.
For issues resolved in this release, see the Resolved Issues section of the Release Notes.
johnwvmw released this Jun 19, 2021
open-vm-tools 11.3.0 release based on build 18090558
The granular changes that have gone into the 11.3.0 release are in the ChangeLog at https://github.com/vmware/open-vm-tools/blob/stable-11.3.0/open-vm-tools/ChangeLog
The following github issues and pull requests have been resolved:
Pull requests: #474 and #505
A number of issues detected by Coverity, internally or by third parties, have been addressed.
A command line tool, vmwgfxctrl, has been added to open-vm-tools for Linux that can be used to control various aspects of the vmwgfx Linux kernel module.
[Republishing the open-vm-tools 11.3.0 release to correct an invalid tag link]
Источник
Manually Download VMware tools ISO image from VMware
Here we will see how to download the VMware tools manually from VMware website. In most of the organization ,there will be a dedicated VMware support team and where the guest operating will be managed by windows or Linux/Solaris team according the operating system model.In these kind of support model, you need VMware team help to attach the VMware tools ISO on the guest operating system to install the VMware tools. VMware tools is very important element to work guest operating systems properly without any performance issue.
VMware Offers to download the Guest operating system’s VMware tools on portal http://packages.vmware.com/tools/esx/
Here i would like to share some of the screen to select the correct VMware guest tools for specific ESXi version.
1.Open the http://packages.vmware.com/tools/esx/ browser and select the appropriate ESXi version. Just scroll down and select if you are using ESXi 5.5 update 1.
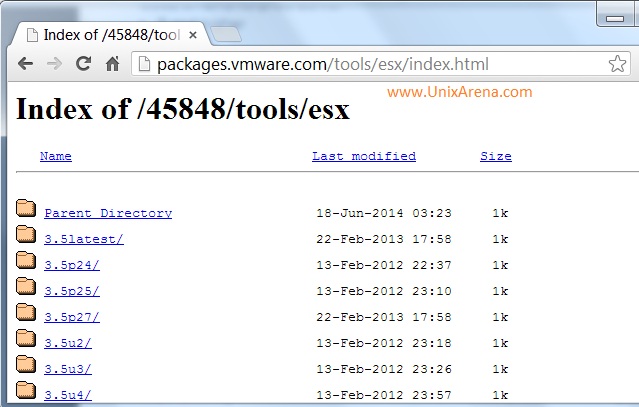 Select the ESXi version here
2.Here you have all the ESXi 5.5 update 1 supported guest operating systems directory.Here i have just highlighted redhat Linux supported version on VMware ESXi 5.5 u1.Select the Guest opeating system type and version here.
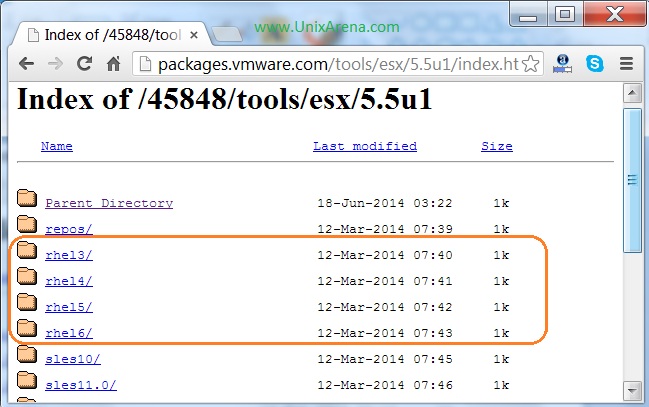 Supported Guest operating systems
3.Navigate to the Guest operating system architecture. If it is 64 bit operating system, then select X86_64 and 32-bit operating system choose i386 or x86.
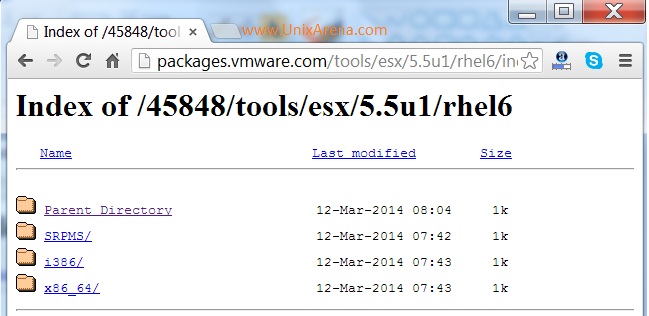 Select the OS architecture
4.You can get the repodata file for redhat Linux since its support YUM.For windows ,you will get single EXE file.
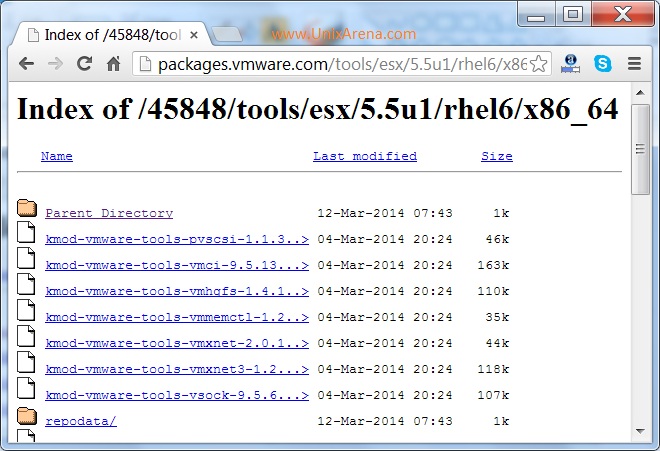 Download and install it
You can download the files and install the VMtools in few minutes. VMware recommended to keep the VMware tools update to date to avoid VM crash.
Источник
VMware Workstation 5.5
The following sections describe how to install VMware Tools:
Don’t Forget VMware Tools
It is very important that you install VMware Tools in the guest operating system.
With the VMware Tools SVGA driver installed, Workstation supports significantly faster graphics performance.
The VMware Tools package provides support required for shared folders and for drag and drop operations.
Other tools in the package support synchronization of time in the guest operating system with time on the host, automatic grabbing and releasing of the mouse cursor, copying and pasting between guest and host, and improved mouse performance in some guest operating systems.
The installers for VMware Tools for Windows, Linux, FreeBSD, and NetWare guest operating systems are built into VMware Workstation as ISO image files. (An ISO image file looks like a CD-ROM to your guest operating system and even appears as a CD-ROM in Windows Explorer. You do not use an actual CD-ROM to install VMware Tools, nor do you need to download the CD-ROM image or burn a physical CD-ROM of this image file.)
When you choose VM > Install VMware Tools from the VMware Workstation menu, VMware Workstation temporarily connects the virtual machine’s first virtual CD-ROM drive to the ISO image file that contains the VMware Tools installer for your guest operating system and you are ready to begin the installation process.
Источник
VMware Workstation 4
Installing VMware Tools
Installing VMware Tools
The following sections describe how to install VMware Tools:
Don’t Forget VMware Tools
It is very important that you install VMware Tools in the guest operating system.
With the VMware Tools SVGA driver installed, Workstation supports significantly faster graphics performance.
The VMware Tools package provides support required for shared folders and for drag and drop operations.
Other tools in the package support synchronization of time in the guest operating system with time on the host, automatic grabbing and releasing of the mouse cursor, copying and pasting between guest and host, and improved mouse performance in some guest operating systems.
The installers for VMware Tools for Windows, Linux, FreeBSD and NetWare guest operating systems are built into VMware Workstation as ISO image files. (An ISO image file looks like a CD-ROM to your guest operating system and even appears as a CD-ROM in Windows Explorer. You do not use an actual CD-ROM to install VMware Tools, nor do you need to download the CD-ROM image or burn a physical CD-ROM of this image file.)
VMware Tools for Windows supports Windows 95, Windows 98, Windows Me, Windows NT 4.0, Windows 2000, Windows XP and Windows Server 2003 guest operating systems.
When you choose File > Install VMware Tools from the VMware Workstation menu, VMware Workstation temporarily connects the virtual machine’s first virtual CD-ROM drive to the ISO image file that contains the VMware Tools installer for your guest operating system and begins the installation process.
VMware Tools for Windows Guests
VMware Tools for Windows Guests
The detailed steps for installing VMware Tools depend on the version of Windows you are running. The steps that follow show how to install VMware Tools in a Windows XP guest. Some steps that are automated in newer versions of Windows must be performed manually in Windows 9x and Windows NT.
Note: If you are running VMware Workstation on a Windows host, and your virtual machine has only one CD-ROM drive, the CD-ROM drive must be configured as an IDE or SCSI CD-ROM drive. It cannot be configured as a generic SCSI device.
Installing VMware Tools in a Windows Guest Operating System
Installing VMware Tools in a Windows Guest Operating System
- Power on the virtual machine.
- When the guest operating system starts, prepare your virtual machine to install VMware Tools.
Choose File > Install VMware Tools.
The remaining steps take place inside the virtual machine.
- If you have autorun enabled in your guest operating system (the default setting for Windows operating systems), a dialog box appears after a few seconds. It asks if you want to install VMware Tools. Click Yes to launch the InstallShield wizard.
If autorun is not enabled, the dialog box does not appear automatically. If it doesn’t appear, run the VMware Tools installer. Click Start > Run and enter D:\setup\setup.exe where D: is your first virtual CD-ROM drive.
Note: You do not use an actual CD-ROM to install VMware Tools, nor do you need to download the CD-ROM image or burn a physical CD-ROM of this image file. The VMware Workstation software contains an ISO image that looks like a CD-ROM to your guest operating system and even appears as a CD-ROM in Windows Explorer. This image contains all the files needed to install VMware Tools in your guest operating system. When you finish installing VMware Tools, this image file no longer appears in your CD-ROM drive.

Additional Steps for Some Versions of Windows When Migrating from Old Disk Versions
Additional Steps for Some Versions of Windows When Migrating from Old Disk Versions
If you are migrating a VMware Workstation 2 disk to VMware Workstation 4 and your guest operating system is Windows NT, Windows Me, Windows 98 or Windows 95, you need to configure the video driver by hand. Instructions open automatically in Notepad at the end of the installation process. If the Notepad window is hidden, bring it to the front by clicking the Notepad button on the Windows taskbar.
For details, see the steps below that correspond to your guest operating system.
- After installing VMware Tools, click Finish. The Display Properties dialog box appears.
- Click the Display Type button. The Display Type dialog box appears.
- Click the Change button. The Change Display dialog box appears.
- Select VMware, Inc. from the Manufacturer list.
- Select VMware SVGA as the display adapter and click OK.
- Click Yes in response to the on-screen question about third-party drivers to install the driver, then click OK to confirm the drivers were installed.
- Click Close from the Display Type dialog box, then click Close from the Display Properties dialog box.
- Click Yes to restart Windows NT and start using the new video driver.
- The VMware Tools background application is launched automatically when you reboot your virtual machine.
Windows Me
- After installing VMware Tools, click Finish. The Display Settings dialog box appears.
- Click the Advanced button.
- Click the Adapter tab.
- Click the Change button. This starts the Update Device Driver Wizard.
- The wizard now presents two options. Choose the second option to Specify the location of the driver.
Check the Specify a location checkbox. Enter the following path:
D: is the drive letter for the first virtual CD-ROM drive in your virtual machine.
If you are upgrading a virtual machine created under VMware Workstation 2, you may see a dialog box that warns, «The driver you are installing is not specifically designed for the hardware you have. Do you wish to continue?» Click Yes.
After the driver is installed, click Finish.
Windows 98
- After installing VMware Tools, click Finish. The Display Settings dialog box appears.
- Click the Advanced button. The Standard Display Adapter (VGA) Properties dialog box appears. If you are upgrading from a previous version of the VMware drivers, this dialog box is titled VMware SVGA Properties.
- Click the Adapter tab.
- Click the Change button. This starts the Update Device Driver Wizard. Click Next.
- The wizard presents two options. Choose the option to Display a list of all drivers in a specific location. Click Next.
- Select Have Disk. The Install From Disk dialog box appears.
- Enter the following path:
D: is the drive letter for the first virtual CD-ROM drive in your virtual machine.
Windows 95
- After installing VMware Tools, click Finish. The Display Settings dialog box appears.
- Click the Advanced Properties button. The Advanced Display Properties dialog box appears.
- Click the Change button. The Select Device dialog box appears.
- Select Have Disk.
- Enter the following path:
D: is the drive letter for the first virtual CD-ROM drive in your virtual machine.
VMware Tools for Linux Guests
VMware Tools for Linux Guests
- Power on the virtual machine.
- After the guest operating system has started, prepare your virtual machine to install VMware Tools.
Choose File > Install VMware Tools.
The remaining steps take place inside the virtual machine.
- Be sure the guest operating system is running in text mode. You cannot install VMware Tools while X is running.
- As root (su -), mount the VMware Tools virtual CD-ROM image, change to a working directory (for example, /tmp), uncompress the installer, then unmount the CD-ROM image.
Note: You do not use an actual CD-ROM to install VMware Tools, nor do you need to download the CD-ROM image or burn a physical CD-ROM of this image file. The VMware Workstation software contains an ISO image that looks like a CD-ROM to your guest operating system. This image contains all the files needed to install VMware Tools in your guest operating system.
Note: Some Linux distributions use different device names or organize the /dev directory differently. If your CD-ROM drive is not /dev/cdrom, modify the following commands to reflect the conventions used by your distribution.
mount /dev/cdrom /mnt
cd /tmp
tar zxf /mnt/vmware-linux-tools.tar.gz
umount /mnt
Run the VMware Tools installer.
Log out of the root account.
Note: You may run VMware Tools as root or as a normal user. To shrink virtual disks, you must run VMware Tools as root (su -).
Starting VMware Tools Automatically
Starting VMware Tools Automatically
You may find it helpful to configure your guest operating system so VMware Tools starts when you start your X server. The steps for doing so vary depending on your Linux distribution and your desktop environment. Check your operating system documentation for the appropriate steps to take.
For example, in a Red Hat Linux 7.1 guest using GNOME, follow these steps.
- Open the Startup Programs panel in the GNOME Control Center.
Main Menu (click the foot icon in the lower left corner of the screen) > Programs > Settings > Session > Startup Programs
The next time you start X, VMware Tools starts automatically.
Uninstalling VMware Tools
Uninstalling VMware Tools
If you need to remove VMware Tools from your Linux guest operating system, log on as root (su -) and run the following command:
VMware Tools for FreeBSD Guests
VMware Tools for FreeBSD Guests
- Power on the virtual machine.
- Prepare your virtual machine to install VMware Tools.
Choose File > Install VMware Tools.
The remaining steps take place inside the virtual machine, not on the host computer.
- Be sure the guest operating system is running in text mode. You cannot install VMware Tools while X is running.
- As root (su -), mount the VMware Tools virtual CD-ROM image, change to a working directory (for example, /tmp), uncompress the installer, then unmount the CD-ROM image.
Note: You do not use an actual CD-ROM to install VMware Tools, nor do you need to download the CD-ROM image or burn a physical CD-ROM of this image file. The VMware Workstation software contains an ISO image that looks like a CD-ROM to your guest operating system. This image contains all the files needed to install VMware Tools in your guest operating system.
mount /cdrom
cd /tmp
tar zxf /cdrom/vmware-freebsd-tools.tar.gz
umount /cdrom
Run the VMware Tools installer.
Log out of the root account.
Note: You may run VMware Tools as root or as a normal user. To shrink virtual disks, you must run VMware Tools as root (su -).
Note: In a FreeBSD 4.5 guest operating system, sometimes VMware Tools does not start after you install VMware Tools, reboot the guest operating system or start VMware Tools on the command line in the guest. An error message appears:
Shared object 'libc.so.3' not found.
The required library was not installed. This does not happen with full installations of FreeBSD 4.5, but does occur for minimal installations. To fix the problem of the missing library, take the following steps:
- Insert and mount the FreeBSD 4.5 installation CD or access the ISO image file.
- Change directories and run the installation script.
Installing VMware Tools in a NetWare Virtual Machine
Installing VMware Tools in a NetWare Virtual Machine
- Power on the virtual machine.
- Prepare your virtual machine to install VMware Tools.
Choose File > Install VMware Tools.
The remaining steps take place inside the virtual machine.
Load the CD9660.NSS driver so the CD-ROM device mounts the ISO image as a volume. In the system console, type
When the driver finishes loading, you can begin installing VMware Tools. In the system console, type
Restart the guest operating system. In the system console, type
Источник


