- File sharing over a network in Windows 10
- VMware Workstation 5.0
- Viewing a Shared Folder
- Viewing Shared Folders in a Windows Guest
- Viewing Shared Folders in a Linux Guest
- How to see all shared folders on Windows-10 Home and Pro?
- Show all the shared folders on Windows-10, this example is also for Windows 8.1 and Windows 7!
- 1.) . Show all shared folders on Windows 10! 2.) . Prevent automatically adding shared folders to the Windows 10 Search index!
- 1.) Show all shared folders on Windows 10!
- 2.) Prevent automatically adding shared folders to the Windows 10 Search index!
- Как перенести общие папки(shared folders) Windows.
- Как перенести общие папки(shared folders) Windows.
- How to view all network shared folders on Windows 10
- How to view shared folders using File Explorer
- How to view shared folders using Computer Management
File sharing over a network in Windows 10
In Windows 10, some features of file and folder sharing over a network have changed, including the removal of HomeGroup. Read on for answers to common questions about other changes to file and folder sharing in Windows 10.
To share a file or folder in File Explorer, do one of the following:
Right-click or press a file, select Give access to > Specific people.

Select a file, select the Share tab at the top of File Explorer, and then in the Share with section select Specific people.

If you select multiple files at once, you can share them all in the same way. It works for folders, too—share a folder, and all files in it will be shared.
To stop sharing in File Explorer, do one of the following:
Right-click or press a file or folder, then select Give access to > Remove access.

Select a file or folder, select the Share tab at the top of File Explorer, and then in the Share with section select Remove access.

File Explorer shows the «Remove access» option («Stop sharing» in older versions of Windows 10) for all files, even those that aren’t being shared over a network.
Open File Explorer, then type \\localhost into the address bar.
Note: When you’ve shared a file from a folder in your user profile and you go to \\localhost, you’ll see your user profile and all its files there. This doesn’t mean that all of your files are shared—just that you have access to all your own files.
If you open File Explorer, go to Network, and see an error message («Network discovery is turned off….»), you’ll need to turn on Network discovery to see devices on the network that are sharing files. To turn it on, select the Network discovery is turned off banner, then select Turn on network discovery and file sharing.

To troubleshoot problems with sharing files or folders, follow the steps below on all computers from which you’re trying to share.
Make sure the computers are on the same network. For example, if your computers connect to the internet through a wireless router, make sure they all connect through the same wireless router.
If you’re on a Wi-Fi network, set it to Private. To find out how, read Make a Wi-Fi network public or private in Windows 10.
Turn on network discovery and file and printer sharing, and turn off password protected sharing.
Select the Start button, then select Settings > Network & Internet , and on the right side, select Sharing options.
Under Private, select Turn on Network discovery and Turn on file and printer sharing.
Under All Networks, select Turn off password protected sharing.
Make sharing services start automatically.
Press the Windows logo key + R.
In the Run dialog box, type services.msc, and then select OK.
Right-click each of the following services, select Properties, if they’re not running, select Start, and next to Startup type, select Automatic:
VMware Workstation 5.0
Viewing a Shared Folder
Shared folders appear differently, depending on the guest operating system. The following sections describe viewing shared folders in Windows and Linux guests.
Note: You can use shared folders to share any type of file. However, Windows shortcuts and Linux symbolic links do not work correctly if you try to use them via shared folders.
Caution: Do not open a file in a shared folder from more than one application at a time. For example, you should not open the same file using an application on the host operating system and another application in the guest operating system. In some circumstances, doing so could cause data corruption in the file.
Viewing Shared Folders in a Windows Guest
In a Windows guest operating system, you can view shared folders using Windows Explorer. Look in My Network Places (Network Neighborhood for a Windows NT guest) under VMware Shared Folders.
Note: If you have trouble finding a shared folder when using the desktop icon for My Network Places (or Network Neighborhood in Windows NT), instead open Windows Explorer and look in My Network Places (Network Neighborhood). The Windows desktop icon does not display an option for Entire Network.
For example, if you specify the name Test files for one of your shared folders, you can navigate to it by opening My Network Places > VMware Shared Folders > .host > Shared Folders > Test files.
You can also go directly to the folder using the UNC path
\\.host\Shared Folders\Test files.
You can map a shared folder to a drive letter just as you would with a network share.
Note: If your guest operating system has VMware Tools from Workstation 4.0, shared folders appear as folders on a designated drive letter.
Viewing Shared Folders in a Linux Guest
In a Linux virtual machine, shared folders appear under /mnt/hgfs.
To change the settings for a shared folder on the list, click the folder’s name to highlight it, then click Properties. The Properties dialog box appears.
Change any settings you wish, then click OK.
How to see all shared folders on Windows-10 Home and Pro?
Show all the shared folders on Windows-10, this example is also for Windows 8.1 and Windows 7!
Content / Solution / Tip:
1.) . Show all shared folders on Windows 10!
2.) . Prevent automatically adding shared folders to the Windows 10 Search index!
In this Windows 10 FAQ «Show All Shares» is a solution / simple explain how you can view all the shared directories (folders) that exist on your computer at once! However, anyone who is new to Microsoft’s Windows OS or just starting to build a home network may not know what releases are and what shares can be used for.
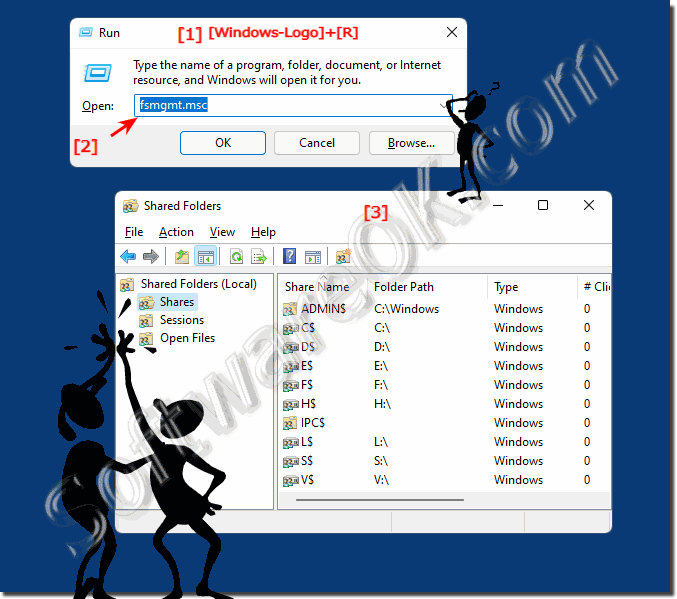
1.) Show all shared folders on Windows 10!
If you want to see all shared folder on Windows 10, please use the command : fsmgmt.msc via WINDOWS+R Run-Dialog
| (Image-1) All shared folders on Windows! |
 |
If you have set up your own home network, you have many functions at your disposal and you can share the files saved on your PC with your home network group for other devices. To learn how to share files, folders, and drives on the home network, read this part: ► Command to open Advanced sharing settings in Windows 10?

Useful info (c) Microsoft:
You can use in Windows 10 the Shared Folders Microsoft Management Console (MMC) snap-in to centrally manage file shares on a computer. Shared Folders enables you to create file shares and set permissions, as well as view and manage open files and users connected to file shares on the Windows 10 computer.
The maximum number of users allowed to connect to a shared folder is limited by software licensing terms.
You can disconnect users from a shared folder by using the Shared Folders MMC snap-in or by using the command prompt. You cannot disconnect users through Windows 10 Explorer.
Share permissions apply to users who connect to a shared folder over the network. Share permissions do not affect users who log on locally, or log on using Remote Desktop.
View all shared folders on example is usable on: Windows 10 Pro, Enterprise, Home, Windows 8.1, Windows 8, Windows-Server 2019, 2016, 2012, Windows 7 Basic, Professional, Starter, Ultimate
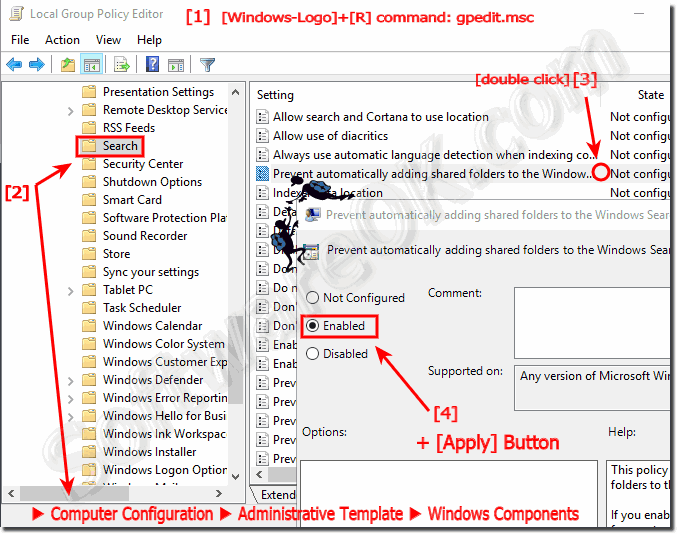
2.) Prevent automatically adding shared folders to the Windows 10 Search index!
For this action you need Admin Privileges on Windows 10
Please Run the command gpedit.msc and open the Sub Folder:
Computer Configuration ► Administrative Template ► Windows Components ►Search
Select in List View Prevent automatically adding shared folders to the Windows Search index do Right Click
| (Image-2) Shared folders Windows-10 Search Index! |
 |
Over time, you lose track: which of your own folders are actually given free? Windows has just the right tool for this purpose, which clearly shows you all important information about releases.
Info about this policy:
If you disable or do not configure this policy setting, Windows 10 Search monitors which folders are shared or not shared on this computer, and automatically adds them to or removes them from the index.
Как перенести общие папки(shared folders) Windows.
Общие папки в Windows — это, говоря по простому, папки, которые доступны по сети. Эти папки имеют свои разрешения(чтение, изменение и т.д. для разных пользователей(групп).
Часто администраторам приходится сталкиваться с вопросом о переносе этих папок(например, при переезде на другой сервер, переустановке операционной системы и т.д). Конечно, можно просто скопировать папки на новый сервер и заново назначить разрешения на папки, но это не «камильфо», когда у вас много расшаренных папок и на них выставлены разрешения для кучи пользователей.
Если перед вами встал вопрос Как перенести общие папки, то вот вариант:
Как перенести общие папки(shared folders) Windows.
Перенести shared folders можно с помощью экспорта и последующего импорта куста реестра(папки, естественно, нужно перенести на другой «целевой» сервер).
- Откройте редактор реестра, набрав в строке поиска в Windows или Пуск -> Выполнить следующее: regedit.exe и нажмите Enter.
- В открывшемся окне редактора реестра перейдите к HKEY_LOCAL_MACHINE\SYSTEM\CurrentControlSet\Services\LanmanServer\Shares

3.Нажмите правой кнопкой Shares и в контекстном меню выберите «Экспортировать«.

4. Укажите место для сохранения файла и его имя(например shares)

После этого, в указанном месторасположении у вас появится файл shares.reg, который(как и папки с общим доступом), нужно скопировать на новый сервер и там импортировать(двойным кликом).
Теперь нужно выполнить две команды: net stop server, а потом net start server. Список существующих шар можно посмотреть командой net share.
После этого на новом сервере ваши общие папки будут иметь те же разрешения, что и были.
How to view all network shared folders on Windows 10
Wondering how many folders are you sharing and where they’re located? In this guide, you’ll learn the steps to view all the shared folders on Windows 10.

On Windows 10, you can easily share folders with other users in the network to share files and offer network storage. However, if you’re sharing multiple folders from different locations, it can become difficult to keep track of all the shares.
Luckily, Windows 10 includes multiple ways to view a list of all the folders share on your device, including using File Explorer and Computer Management.
In this guide, you’ll learn two ways to view all the folders that your computer is currently sharing in the network.
How to view shared folders using File Explorer
Use these steps to view all the network shared folders from your device using File Explorer:
Open File Explorer.
Click on Network.
Under the “Computer” section, double-click your device name.
See all the folders currently shared on the network.
 See all shared folders using File Explorer
Once you complete the steps, you’ll have a clear understanding on the folders currently accessible from the network.
How to view shared folders using Computer Management
Use these steps to view all the network shared folders from your computer with Computer Management:
Open Start.
Search for Computer Management and click the top result to open the experience.
Expand the Shared Folders branch from the left pane.
Click the Shares item.
See all the folders currently shared on the network.
 All shared folders using Computer Management
When using Computer Management to see a list of the shared folders, you’ll also notice additional shared items, such as C$, IPC$, and ADMIN$, which are administrative (hidden) shares that Windows 10 enables by default, and they’re not visible unless someone uses the specific path and proper credentials.
Although these methods can help to see all the folders currently shared on the network, note that if you’re sharing a folder inside your profile folder, it’ll appear as the Users folder being shared. Usually, you don’t want to share folders from within your profile folders (Desktop, Downloads, Pictures, etc.). Instead, you should create a share from another drive or in the root of the C:\ drive.
We may earn commission for purchases using our links to help keep offering the free content. Privacy policy info.
All content on this site is provided with no warranties, express or implied. Use any information at your own risk. Always backup of your device and files before making any changes. Privacy policy info.


