- Valheim — Dedicated Linux Server
- Guide to Dedicated Linux Server
- Assumptions
- Main Install of the Server
- Modify the Server Start Script
- Create and Register the Service
- Wrap Up
- Установка сервера Valheim на Linux
- Содержание
- Первичная настройка Linux
- Установка сервера Valheim
- Настройка сервера Valheim
- Автоматический перезапуск игрового сервера после падения или перезапуска VDS
- Valheim dedicated server linux
Valheim — Dedicated Linux Server

This is a guide to setting up a linux based Valheim dedicated server with a systemd service that can update/start the server and report on it’s status within the operating system.
You can also click the link below to order your own game server!
Guide to Dedicated Linux Server
Assumptions
It is assumed you have at least a working knowledge of Linux and can navigate around the operating system somewhat proficiently to complete this. Also I prefer to use the nano text editor on my system however if you use something else that is fine. Finally you will need to have steamcmd installed on your system in order for many of the things in this guide to work so ensure you have completed the steps outlined on the valve developer site to get it setup.
Main Install of the Server
Warning: Make sure you replace all instances of «username» with your own in the code blocks!
After you have steamcmd setup on your machine ensure you are back in the main directory of your account, this can be accomplished by typing:
Now create a folder at this location, I called mine Valheim (original right!)
We are now ready to install the server files, using steamcmd by calling the whole thing from the command line with the following:
/home/username/.steam/steamcmd/steamcmd.sh +login anonymous +force_install_dir
/home/username/Valheim +app_update 896660 validate +exit
This will install the server files into the Valheim directory we created earlier.
Modify the Server Start Script
Make sure you are in the Valheim directory and can see the files by executing the following:
Something like this file list will appear.

Now we get into the fun stuff, you need to make a copy of the server_start.sh file in the Valheim directory so that when steamcmd updates the server at some point your own changes are not overwritten and your service will still work. To do this execute the following on the command line:
cp start_server.sh start_valheim.sh
This will make a copy of the file and rename it start_valheim.sh, once that is done then we need to open the file and make a few edits to it.
Once it is open copy the following block of code and paste it into the nano window using whatever method is convenient for you, or type it all in if you prefer. Note, this text should replace what is in the file. Or you could go line by line and just update your file with the stuff from below that is missing from yours.
export templdpath=$LD_LIBRARY_PATH
export LD_LIBRARY_PATH=./linux64:$LD_LIBRARY_PATH
export SteamAppId=892970
# Tip: Make a local copy of this script to avoid it being overwritten by steam.
# NOTE: Minimum password length is 5 characters & Password cant be in the server name.
# NOTE: You need to make sure the ports 2456-2458 is being forwarded to your server through your local router & firewall.
/home/username/.steam/steamcmd/steamcmd.sh +login anonymous +force_install_dir /home/username/Valheim +app_update 896660 +quit
./valheim_server.x86_64 -name «Your Server Name» -port 2456 -world «Dedicated» -password «Your Password» -public 1 > /dev/null &
echo «Server started»
echo «»
#read -p «Press RETURN to stop server»
#echo 1 > server_exit.drp
#echo «Server exit signal set»
#echo «You can now close this terminal»
while :
do
TIMESTAMP=$(date ‘+%Y-%m-%d %H:%M:%S’)
echo «valheim.service: timestamp $
sleep 60
done
Again be sure to change any instance of «username» you find in the directory calls with your own username and change the server name and password to your own. When you are done with the file from nano you type in ctl+x and save it.
A few things to note about the changes in this file are the while statement at the bottom. This is for the systemd journalctl service so that a running timestamp of how long the server is up can be written to the log. Also at the start of the script after the environment variables are set for the server to run correctly I am calling the steamcmd script to ensure that the server is the current version by running an update action. This makes it easy for you to create a cron to restart your server daily and when the service is started it will automatically check if there is an update for the server available from steam. Finally we comment out a few things at the bottom (echo statements) because they will not be needed to stop the server.
Now we will need to create and register the service that will get this file running.
Create and Register the Service
Now we need to make a service file and do some editing to it in order to start this server in a nice way with the operating system.
That will create a file called «valheim.service» and open it automatically in the nano editor. Now paste the following contents into it.
[Unit]
Description=Valheim service
Wants=network.target
After=syslog.target network-online.target
What this is doing is creating the variables needed by the systemd daemon in order to start the server and manage it for you. In this we are telling the server not to attempt to start the service until after the network is online and logging has been started. In the [Service] section we are telling the system what type of service it is and what to do if it fails or crashes. Then we are telling it where the run script can be found/executed and what directory to work out of. Finally, since you never want to run a server (typically) as a root user we are defining the username to run the service as which should be your limited account. Again make sure you replace any instance of «username» you find with your own or this will not work as expected. Finally we need to copy this script into the proper directory and register it with the systemd daemon in order for it to be able to run.
sudo cp valheim.service /etc/systemd/system
Sudo is needed because you are copying this file to a protected system folder. Now register it with the systemd daemon
sudo systemctl daemon-reload
And finally we can start the service and see if everything is functional
sudo systemctl start valheim
Wait 10-15 seconds then
sudo systemctl status valheim
Once you execute all that you should see something similar to the following screenshot.
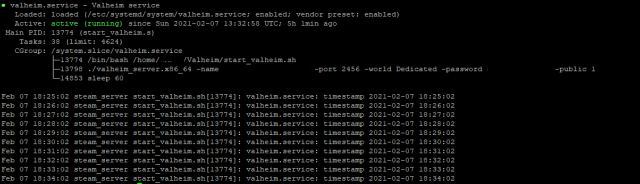
Of course you will see a few things after the name and password parts of the text, I blacked those out to protect my server :).
Finally if you want to stop the server for any reason you can do the following
sudo systemctl stop valheim
Lastly if you want this to start auto-magically with the operating system just run the following
sudo systemctl enable valheim.service
Wrap Up
After you see that pretty green text that says active (running) that is it, your Valheim dedicated server is online. Finally you will need to forward the appropriate ports to your server which is outside the scope of this guide and when you log into the game you should be able to find your server in the server browser list and connect to it. Happy playing with your friends in a persistent dedicated world!
Bonus: On my server I have set it up to check for OS updates and install them nightly then reboot the server, I have accomplished this with cron jobs and the following code will outline how to do that if you want a hands off type of install.
This will open the system cron, then at the bottom of the file insert the following information.
0 2 * * * apt update && apt upgrade -y
30 2 * * * reboot
30 3 * * * apt autoremove && apt clean
This will do the following on your server daily.
- Line 1 — Updates the repos on the system and then upgrades available packages at 2am
- Line 2 — Reboots the machine at 2:30am after the update
- Line 3 — Cleans up the apt system and removes deprecated packages at 3:30am
This should keep your system updated and clean as well as restart the Valheim server on a nightly basis and check for updates for it.
Источник
Установка сервера Valheim на Linux

В данной инструкции мы расскажем как установить сервер игры Valheim на ОС Linux Debian 10
Минимальная характеристика виртуального сервера для игры Valheim.
- Тариф: Medium
- Количество потоков: 2
- Оперативной памяти: 4 Gb
- Места на диске: 10 Gb
Содержание
Первичная настройка Linux
Вы заказали на сайте MyArena виртуальный сервер, выбрали и установили операционную систему, что же делать дальше? Прежде чем перейти к установке сервера игры, нам потребуется провести предварительную настройку Linux.
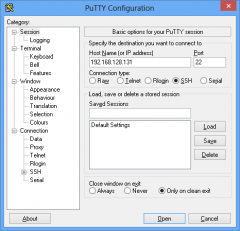
1. Скачиваем и устанавливаем программу PuTTY себе на компьютер, что бы подключиться к серверу.
- Запускаем программу, открываем вкладку Window, переходим в Translation и в меню Remote character set выбираем UTF-8.
- Возвращаемся во вкладку Session.
- В Host Name указываем IP адрес вашего сервера, порт 22, ниже в Saved Sessions придумайте имя для подключения и нажмите на кнопку Save.
- Выделяем название сервер и нажимаем на кнопку Open.
- У вас откроется черное окно терминала в котором вам потребуется указать логин и пароль от вашего сервера.
2. Установка дополнительных библиотек, при использование 64 битной операционной системы
3. Установка дополнительных программ.
4. Устанавливаем редактор Nano для пользователя root по умолчанию.
Установка сервера Valheim
1. Создаем нового пользователя с паролем, например gameserver.
Все последующие шаги выполняются под созданным пользователем. Выйти из него можно командой ‘exit’.
2. Переключаемся на пользователя gameserver.
3. Устанавливаем редактор Nano для пользователя gameserver по умолчанию.
4. Создаем и переходим в папку, куда будем загружать steamcmd.
5. Скачиваем архив steamcmd и разархивируем его.
6. Запускаем steamcmd.sh. Важно: нужно находиться в папке steamcmd.
7. Загрузка и установка сервера
8. Запуск сервера. После загрузки сервера выходим из steamcmd введя команду ‘quit’
Теперь запускаем сервер, для этого пропишите в консоли команду
После этих действий сервер начнет запускаться, вы сможете зайти на него указав ip адрес и порт, например 37.230.228.208:2456
Завершить процесс и выключить игровой сервер нажатием клавиш ctrl+c
На этом установка сервера закончена.
Настройка сервера Valheim
1. Чтобы в будущем избежать правок конфигурационного файла start_server.sh при обновлении сервера, следует создать его копию.
Находясь в директории /valheim, прописываем данную команду. С этим файлом мы будем работать дальше.
Данная команда скопирует файл start_server.sh и создаст его копию с названием start_valheim.sh.
2. Открываем файл start_valheim.sh командой.
Открыв данный файл пропишите в него эти данные.
Разберем используемые параметры.
- Проверка обновлений сервера при запуске. Вы должны указать путь до файла steamcmd.sh и путь до папки с вашим игровым сервером.
Строка запуска сервера.
- -name «[RU] MyArena» — Название вашего сервера.
- -port 2456 — Порт сервера.
- -world «Underworld» — Название карты.
- -password «qwerty» — Пароль для входа на сервер, на данный момент это обязательный параметр, минимум 5 символов.
- -public «1» — Сервер будет виден в поиске серверов.
- -savedir «/home/gameserver/valheim/» — Путь до папки с сервером, куда будет сохраняться игровой мир, админы и баны.
3. Сохраняем результат нажатием одновременно ctrl+x, у вас попросят подтвердить действия, нажимаем на Y и enter.
4. Проверим сервер, запустим наш файл start_valheim.sh командой
После этих действий сервер начнет запускаться. Завершить процесс и выключить игровой сервер нажатием клавиш ctrl+c.
Автоматический перезапуск игрового сервера после падения или перезапуска VDS
1. Находясь в директории /valheim, создадим дополнительный файл start_vh_server.sh для запуска сервера.
2. В данный файл прописываем параметры и сохраняем результат нажатием одновременно ctrl+x, у вас попросят подтвердить действия, нажимаем на Y и enter.
3. Добавляем права на файл start_vh_server.sh, командой.
4. Под пользователем gameserver прописываем команду crontab -e и указываем эти данные.
- После этого нажимаем на сочетание клавиш ctrl+x и сохраняем результат
- Чтобы посмотреть, что запущено в скрине наберите screen -ls
- Чтобы посмотреть отдельный скрин screen -x название скрина или его номер.
- Чтобы выйти из выбранного скрина нажмите ctrl+a затем d.
5. Перезапуск сервера в час ночи.
Выходим из под пользователя gameserver командой exit обратно под root, прописываем вновь crontab -e и указываем эти данные.
Теперь каждый день, в час ночи игровой сервер будет перезапущен.
На этом установка и настройка сервера закончена.
Источник
Valheim dedicated server linux


| 1,227 | уникальных посетителей |
| 36 | добавили в избранное |

It is assumed you have at least a working knowledge of Linux and can navigate around the operating system somewhat proficiently to complete this. Also I prefer to use the nano text editor on my system however if you use something else that is fine. Finally you will need to have steamcmd installed on your system in order for many of the things in this guide to work so ensure you have completed the steps outlined on the valve developer site to get it setup.
Warning:
Make sure you replace all instances of «username» with your own in the code blocks!
After you have steamcmd setup on your machine ensure you are back in the main directory of your account, this can be accomplished by typing:
Now create a folder at this location, I called mine Valheim (original right!)
We are now ready to install the server files, using steamcmd by calling the whole thing from the command line with the following:
-Provided by Kirbo, the $
This will install the server files into the Valheim directory we created earlier.
Note:
If you get the «No subscription» error when attempting to pull the files, then try to login using your normal steam credentials first. This will cache your account and then all calls using anonymous should work after that. — Thank you Tander for this tip!
Make sure you are in the Valheim directory and can see the files by executing the following:
Something like this file list will appear.
Now we get into the fun stuff, you need to make a copy of the server_start.sh file in the Valheim directory so that when steamcmd updates the server at some point your own changes are not overwritten and your service will still work. To do this execute the following on the command line:
This will make a copy of the file and rename it start_valheim.sh, once that is done then we need to open the file and make a few edits to it.
Once it is open copy the following block of code and paste it into the nano window using whatever method is convenient for you, or type it all in if you prefer. Note, this text should replace what is in the file. Or you could go line by line and just update your file with the stuff from below that is missing from yours.
Again be sure to change any instance of «username» you find in the directory calls with your own username and change the server name and password to your own. When you are done with the file from nano you type in ctl+x and save it.
A few things to note about the changes in this file are the while statement at the bottom. This is for the systemd journalctl service so that a running timestamp of how long the server is up can be written to the log. Also at the start of the script after the environment variables are set for the server to run correctly I am calling the steamcmd script to ensure that the server is the current version by running an update action. This makes it easy for you to create a cron to restart your server daily and when the service is started it will automatically check if there is an update for the server available from steam. Finally we comment out a few things at the bottom (echo statements) because they will not be needed to stop the server.
Now we will need to create and register the service that will get this file running.
Now we need to make a service file and do some editing to it in order to start this server in a nice way with the operating system.
That will create a file called «valheim.service» and open it automatically in the nano editor. Now paste the following contents into it.
What this is doing is creating the variables needed by the systemd daemon in order to start the server and manage it for you. In this we are telling the server not to attempt to start the service until after the network is online and logging has been started. In the [Service] section we are telling the system what type of service it is and what to do if it fails or crashes. Then we are telling it where the run script can be found/executed and what directory to work out of. Finally, since you never want to run a server (typically) as a root user we are defining the username to run the service as which should be your limited account. Again make sure you replace any instance of «username» you find with your own or this will not work as expected.
*NOTE*
In some cases, like your default interpreter is set to something other than bash/sh, you may need to specify the bash environment to start the script properly. You would need to change the line:
This will let the system know that bash should be the interpreter for the script it is about to execute.
Finally we need to copy this script into the proper directory and register it with the systemd daemon in order for it to be able to run.
Sudo is needed because you are copying this file to a protected system folder. Now register it with the systemd daemon
And finally we can start the service and see if everything is functional
Wait 10-15 seconds then
Once you execute all that you should see something similar to the following screenshot
Of course you will see a few things after the name and password parts of the text, I blacked those out to protect my server :).
Finally if you want to stop the server for any reason you can do the following
Lastly if you want this to start auto-magically with the operating system just run the following
After you see that pretty green text that says active (running) that is it, your Valheim dedicated server is online. Finally you will need to forward the appropriate ports to your server which is outside the scope of this guide and when you log into the game you should be able to find your server in the server browser list and connect to it. Happy playing with your friends in a persistent dedicated world!
On my server I have set it up to check for OS updates and install them nightly then reboot the server, I have accomplished this with cron jobs and the following code will outline how to do that if you want a hands off type of install.
This will open the system cron, then at the bottom of the file insert the following information.
This will do the following on your server daily.
- Line 1 — Updates the repos on the system and then upgrades available packages at 2am
- Line 2 — Reboots the machine at 2:30am after the update
- Line 3 — Cleans up the apt system and removes deprecated packages at 3:30am
This should keep your system updated and clean as well as restart the Valheim server on a nightly basis and check for updates for it.
Источник


