- Installing XGBoost on windows 10 (64 bit) with Anaconda Python Package
- 1. Install MingW64
- MinGW-w64 — for 32 and 64 bit Windows
- Download MinGW-w64 — for 32 and 64 bit Windows for free. A complete runtime environment for gcc. The mingw-w64 project…
- 2. Download and install git for windows
- Git for Windows
- We bring the awesome Git VCS to Windows
- 3. Install xgboost
- 4. Install python bindings
- 5. Demo Example
- Algomaster
- Как установить библиотеку Xgboost на Windows?
- 1 ответ 1
- Сборка XGBoost для Python под Windows
- Install XGBoost on Windows 10 For Python Programming in Easy Steps
- How to install xgboost package in python (windows platform)?
- 18 Answers 18
Installing XGBoost on windows 10 (64 bit) with Anaconda Python Package

Jun 2, 2018 · 4 min read
XGBoost is an advanced implementation of gradient boosting that is being used to win many machine learning competitions.
It is compelling, but it can be hard to get started. Installing xgboost in windows can be very tedious task. In windows the xgboost package needs compiling. Here I put up a set of steps that will help in installing the library successfully.
My system’s specification: Windows 10, 64 bit ;Anaconda 5.2 ;Python 3.6
1. Install MingW64
MinGW-w64 — for 32 and 64 bit Windows
Download MinGW-w64 — for 32 and 64 bit Windows for free. A complete runtime environment for gcc. The mingw-w64 project…
After downloading ‘mingw-w64-install.exe’ start the installation by double clicking the file.

When running ming w -64-install.exe , you have to choose the x86_64 architecture on the settings screen. With this architecture, 64-bit is also the default target.Do not modify the other settings.


Then Click on Next and Make sure you install it in program files and not program Files (x86).

Add a windows path to the folder where you installed mingw-w64 as shown below:
i. Open Advanced System Settings then click on Environment Variables.

ii. Select Path and Click on Edit

iii. Add path into environment variable as shown below and then click on OK.

2. Download and install git for windows
Download git for windows .Follow instructions in link.
Git for Windows
We bring the awesome Git VCS to Windows
If Git Bash terminal is open then close the Git Bash terminal, and launch it again. This will take into account the new Path variable. To check you are fine, type the following
It should return something like:

3. Install xgboost
- Briefly, from git command line go to the directory where you want the xgboost folder to be copied to and type:
- cd into the xgboost folder and type the following in the git console:
It will take a long while to compile. After it finishes compiling open the anaconda prompt (command line).
4. Install python bindings
Hopefully you installed the anaconda version of python.You can download anaconda from https://www.anaconda.com/download/.
Open Anaconda prompt(command line) and cd into the xgboost folder:
Note: Here ‘C:\xgboost’ is Xgboost install directory in my PC.
Then install python bindings as follows:
5. Demo Example
This demo example taken from http://xgboost.readthedocs.io/en/latest/get_started/index.html. We can quickly try out xgboost on the demo dataset on a binary classification task. You can copy demo folder from xgboost install directory to xgboost folder in Anaconda3/LIb/site-packages/xgboost-0.6-py3.6.egg/xgboost to have demo files available in site-packages.
Algomaster
I am a Data Scientist, a professional Embedded Systems Design Engineer and a Biomedical Engineering Post Graduate with great interest in Healthcare Innovations.
Как установить библиотеку Xgboost на Windows?
Пробовал по инструкции на хабре, но не нашел в репозитории папку xgboost/windows, нет её. Пробовал как здесь через MinGW-w64, дальше make не получается. Помогите, пожалуйста, кто сталкивался.
1 ответ 1
- Статья на Хабре прошлогодняя, поэтому внезапно устарела,
- А уже в этом году признано, что проект для Windows неактуален (см. https://github.com/dmlc/xgboost/issues/736), поэтому планируется полный переход на CMake (ещё про это здесь: https://github.com/dmlc/xgboost/issues/792).
- Ещё в середине января всё для Windows убрано из репозитория.
Пока всё не утряслось, можно взять старую версию репозитория, в которой .sln для Windows ещё есть. По ссылкам выше видно, на какие ревизии ориентироваться.
Но самое надёжное — воспользоваться инструкцией https://xgboost.readthedocs.org/en/latest/build.html#building-on-windows (по ссылке https://github.com/dmlc/xgboost/issues/831 виден один нюанс с командой mkdir , а в остальном должно всё работать).
Дополнение:
Привожу сокращённый перевод руководства с официального сайта:
Сперва надо клонировать репозиторий xgboost. Откройте git-shell и выполните следующие команды:
После установке Git для Windows, запустите Git Bash . Все следующие шаги выполняются в нём:
В MinGW для выполнения make надо позвать mingw32-make , поэтому стоит добавить следующую строчку в файл .bashrc :
Чтобы собрать xgboost в MinGW выполните следующую команду:
Дополнение 2:
Ответ на вопрос о том, как открыть git-shell:
Если установлен GitHub для Windows, то должен был быть создан такой ярлык. Если его нет (удалили почему-то), то можно запустить git-shell одной из этих команд (зависит от версии, не забудьте вставить правильный Username ):
Открыв git-shell одной из этих команд, восстановите нужные ярлыки, выполнив команду
Сборка XGBoost для Python под Windows
Windows is so evil that consumes extra energy to make the things running.

Библиотека XGBoost гремит на всех соревнованиях по машинному обучению и помогает завоёвывать призовые места. Однако, стать обладателем этого пакета для Python под Windows не так просто.
Процесс установки скудно описан на GitHub и немногим шире на форуме Kaggle. Поэтому попробую описать пошагово и более подробно. Надеюсь это поможет сохранить много времени неопытным пользователям.
Допустим у вас уже установлен Python. В моём случае это сборка Anaconda с Python 3.4.
1. Устанавливаем JDK от Oracle. Потому что для компиляции нам потребуется библиотека JNI.
2. Устанавливаем Visual Studio 2013 по ссылке выделенной на скриншоте. Более поздние версии просят править код решения, поэтому для простых людей не подходят. Само решение xgboost, опубликованное на GitHub, собрано в Visual Studio 2010.

3. Скачиваем всю библиотеку XGBoost c GitHub:

4. Распаковываем архив, получаем папку C:\xgboost-master.
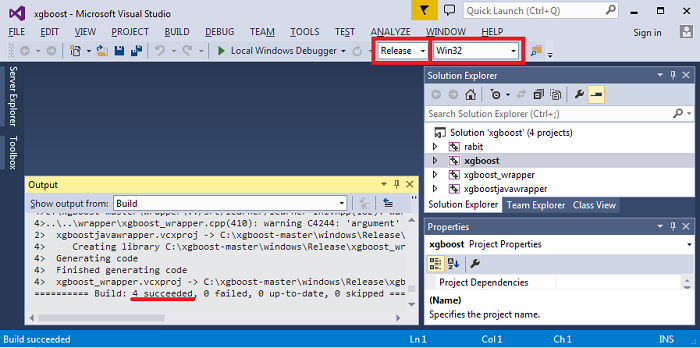
5. Открываем с помощью Visual Studio файл решения C:\xgboost-master\windows\xgboost.sln. Выбираем Release и вариант платформы, под которую будем собирать. Далее Build -> Build Solution. В результате должны получить «4 succeeded»:
Уже на этом этапе можно собрать проблемы.
«Не удалось обнаружить CL.exe» — при установке не был выбран C#/Visual C++. Доустанавливаем компоненты.
«Cannot open include file: ‘corecrt.h’» — ищете файл поиском, скорее всего он тут: ProgramFiles(x86)\Windows Kits\10\Include\10.0.10150.0\ucrt и добавляете директорию в $IncludePath, либо поступаете грубо и копируете все *.h файлы куда-нибудь на видное место, например в Program Files\Microsoft Visual Studio 12.0\VC\include.
«Cannot open include file: ‘jni.h’» — после установки JDK ошибки не должно быть.
Однако всё может пройти гладко и никаких проблем не будет. У меня получалось и так, и так, на разных ЭВМ.
6. Из папки C:\xgboost-master\windows\Release нам нужны файлы xgboost.exe и xgboost_wrapper.dll.
Копируем их в папку с пакетом для Python: C:\xgboost-master\python-package.
7. Открываем консоль (cmd), меняем директорию:
cd «C:\xgboost-master\python-package»
8. Там же запускаем установщик:
python setup.py install
Вот и всё. Запускаете удобную вам среду Python и пишете традиционное:
Install XGBoost on Windows 10 For Python Programming in Easy Steps


X GBoost is a popular machine learning library, which is mostly used to win the kaggle competition. Most of the machine learning developer will try to use this library to get a more accurate model. In this tutorial, you will learn, how to install the XGBoost package on Windows 10 for Python programming.
If you look at the documentation of XGBoost, it will show too many steps to install XGBoost. The goal of this tutorial is to ease the installation of the XGBoost library on Windows 10 in few easy steps.
First, you need the Python 64-bit version. It is highly recommended to use the 64-bit Python version.
Get the latest Python version
Get the Python 3.7 version(Latest version while writing this post)
Install the downloaded python by clicking next and next.
If you have python already installed, you can check the bit of the python by typing python in cmd.

In the above picture, if it shows 32 bit on your machine, then you must uninstall 32-bit python and install python 64-bit version.
Install the pip, if you don’t have it on your machine.
Get pip file using
Save the above file and execute the file using
Now you have installed the pip.
Get Python XGBoost whl file using below link
I have installed Python 3.7 64-bit version choose xgboost-0.81-cp37-cp37m-win_amd64.whl file.
Make sure to match your python version and system architecture, e.g. “ xgboost-0.81-cp37-cp37m-win_amd64.whl” for python 3.7 on 64-bitmachine
Install the downloaded XGBoost Python whl file using below command.
That’s all. You have successfully installed XGBoost on your Windows 10.
You can import the XGBoost package to test. Open any python editor and type below code
How to install xgboost package in python (windows platform)?
On the homepage of xgboost(above link), it says: To install XGBoost, do the following steps:
You need to run make in the root directory of the project
In the python-package directory run
python setup.py install
However, when I did it, for step 1 the following error appear: make : The term ‘make’ is not recognized as the name of a cmdlet, function, script file, or operable program. Check the spelling of the name, or if a path was included, verify that the path is correct and try again.
then I skip step1 and did step 2 directly, another error appear:
Does anyone know how to install xgboost for python on Windows10 platform? Thanks for your help!
18 Answers 18
I installed XGBoost successfully in Windows 8 64bit, Python 2.7 with Visual Studio 2013 (don’t need mingw64)
Updated 15/02/2017
With newer version of XGBoost, here are my steps
Step 1. Install cmake https://cmake.org/download/
Verify cmake have been installed successfully
Step 2. Clone xgboost source
Step 3. Create Visual Studio Project
Step 4. Build Visual Studio 2013 project
- Open file xgboost_dir/build/ALL_BUILD.vcxproj with Visual Studio 2013
- In Visual Studio 2013, open BUILD > Configuration Manager.
- choose Release in Active solution configuration
- choose x64 in Active solution platform
- Click BUILD > Build Solution (Ctrl + Shift +B)
After build solution, two new files libxgboost.dll and xgboost.exe are created in folder xgboost_dir/lib
Step 5. Build python package
- Copy file libxgboost.dll to xgboost_dir/python-package
- Change directory to xgboost_dir/python-package folder
- Run command python setup.py install
Verify xgboost have been installed successfully
Old Answer
Here are my steps:
- git clone https://github.com/dmlc/xgboost
- git checkout 9bc3d16
- Open project in xgboost/windows with Visual Studio 2013
- In Visual Studio 2013, open BUILD > Configuration Manager. ,
- choose Release in Active solution configuration
- choose x64 in Active solution platform
- Rebuild xgboost , xgboost_wrapper
- Copy all file in xgboost/windows/x64/Release folder to xgboost/wrapper
- Go to xgboost/python-package , run command python setup.py install
- Check xgboost by running command python -c «import xgboost»
In case anyone’s looking for a simpler solution that doesn’t require compiling it yourself:
- download xgboost whl file from here (make sure to match your python version and system architecture, e.g. «xgboost-0.6-cp35-cp35m-win_amd64.whl» for python 3.5 on 64-bit machine)
- open command prompt
- cd to your Downloads folder (or wherever you saved the whl file)
- pip install xgboost-0.6-cp35-cp35m-win_amd64.whl (or whatever your whl file is named)
If you find it won’t install because of a missing dependency, download and install the dependency first and retry.
If it complains about access permissions, try opening your command prompt as Administrator and retry.
This gives you xgboost and the scikit-learn wrapper, and saves you from having to go through the pain of compiling it yourself. 🙂


Note that as of the most recent release the Microsoft Visual Studio instructions no longer seem to apply as this link returns a 404 error:
You can read more about the removal of the MSVC build from Tianqi Chen’s comment here.
So here’s what I did to finish a 64-bit build on Windows:
- Download and install MinGW-64: http://sourceforge.net/projects/mingw-w64/
- On the first screen of the install prompt make sure you set the Architecture to x86_64 and the Threads to win32
- I installed to C:\mingw64 (to avoid spaces in the file path) so I added this to my PATH environment variable: C:\mingw64\mingw64\bin
- I also noticed that the make utility that is included in bin\mingw64 is called mingw32-make so to simplify things I just renamed this to make
- Open a Windows command prompt and type gcc. You should see something like «fatal error: no input file»
- Next type make. You should see something like «No targets specified and no makefile found»
- Type git. If you don’t have git, install it and add it to your PATH.
These should be all the tools you need to build the xgboost project. To get the source code run these lines:
- cd c:\
- git clone —recursive https://github.com/dmlc/xgboost
- cd xgboost
- git submodule init
- git submodule update
- cp make/mingw64.mk config.mk
- make -j4
Note that I ran this part from a Cygwin shell. If you are using the Windows command prompt you should be able to change cp to copy and arrive at the same result. However, if the build fails on you for any reason I would recommend trying again using cygwin.
If the build finishes successfully, you should have a file called xgboost.exe located in the project root. To install the Python package, do the following:
- cd python-package
- python setup.py install
Now you should be good to go. Open up Python, and you can import the package with:


