- Download Eclipse Technology that is right for you
- Tool Platforms
- Get Eclipse IDE 2021‑03
- Eclipse Che
- Orion
- Runtime Platforms
- GlassFish
- Jetty
- Equinox
- Concierge
- Technology Communities
- Systems Engineering
- LocationTech
- Установка java (jdk и среды разработки eclipse)
- Eclipse Installer 2021-03 R
- Try the Eclipse Installer 2021‑03 R
- 5 Steps to Install Eclipse
- 1. Download the Eclipse Installer
- 2. Start the Eclipse Installer executable
- 3. Select the package to install
- 4. Select your installation folder
- 5. Launch Eclipse
- Eclipse/Installation
- Contents
- Install a JVM
- Eclipse 4.19 (2021-03)
- Eclipse 4.18 (2020-12)
- Eclipse 4.17 (2020-09)
- Eclipse 4.16 (2020-06)
- Eclipse 4.15 (2020-03)
- Eclipse 4.14 (2019-12)
- Eclipse 4.13 (2019-09)
- Eclipse 4.12 (2019-06)
- Eclipse 4.11 (2019-03)
- Eclipse 4.10 (2018-12)
- Eclipse 4.9 (2018-09)
- Eclipse 4.8 (Photon)
- Eclipse 4.7 (Oxygen)
- Eclipse 4.6 (Neon)
- Eclipse 4.5 (Mars)
- Eclipse 4.4 (Luna)
- Eclipse 4.3 (Kepler)
- JRE/JDK Sources
- Download Eclipse
- Configure Eclipse to use the JVM
- Extending Eclipse
- Troubleshooting
Download Eclipse Technology
that is right for you
Tool Platforms
The Eclipse Installer 2021‑03 R now includes a JRE for macOS, Windows and Linux.
Get Eclipse IDE 2021‑03
Install your favorite desktop IDE packages.
Eclipse Che is a developer workspace server and cloud IDE.
Eclipse Che
Eclipse Che is a developer workspace server and cloud IDE.
A modern, open source software development environment that runs in the cloud.
Orion
A modern, open source software development environment that runs in the cloud.
Runtime Platforms
Eclipse GlassFish provides a complete application server which serves as a compatible implementation for the Jakarta EE specification.
GlassFish
Eclipse GlassFish provides a complete application server which serves as a compatible implementation for the Jakarta EE specification.
Eclipse Jetty provides a web server and javax.servlet container.
Jetty
Eclipse Jetty provides a web server and javax.servlet container.
Eclipse Equinox is an implementation of the OSGi core framework specification.
Equinox
Eclipse Equinox is an implementation of the OSGi core framework specification.
Eclipse Concierge is a small footprint implementation of the OSGi specification.
Concierge
Eclipse Concierge is a small footprint implementation of the OSGi specification.
Enabling modular business apps for desktop, browser and mobile.
Enabling modular business apps for desktop, browser and mobile.
Technology Communities
Open source technology for IoT solution developers.
Open source technology for IoT solution developers.
Open source solutions for systems engineering and embedded systems.
Systems Engineering
Open source solutions for systems engineering and embedded systems.
Open source solutions for geospatial applications.
LocationTech
Open source solutions for geospatial applications.
Установка java (jdk и среды разработки eclipse)
Что нужно, чтобы начать программировать на java?
Необходимо установить на компьютер две вещи это
1. JDK ( Java Development Kit ) – инструментарий разработчика java.
2. Среда разработки — это та программа, в котором мы работаем для создания своих программ.
Я отдаю приоритет Eclipse. В моей проф. практике она использовалась большинством фирм и программистов. Так же довольно неплохи IntelliJ IDEA и NetBeans, используются довольно часто, но мне они нравятся меньше.
Итак, более подробно по указанным выше шагам:
Первым делом качаем jdk с сайта oracle. Интерфейс сайта порой обновляется и выходят новые версии. Уверен на 99 процентов, что ссылка будет сразу на первой странице ресурса. Особенно, если вы обратитесь к гуглу с запросом: “oracle java download”.
В данный момент последняя версия это Java Platform (JDK) 7u40 и картинка с надписью Download сразу передо мной, собственно на нее и нажимаем. Если такого нет, ищем в навигации Download jdk или download java for developers.

установка java – скачиваем JDK
На следующей странице нажимаем Accept License Agreement и выбираем из первой таблицы — списка Вашу Операционную систему (ОС). У меня в данный момент стоит 64 битная windows. Если у Вас windows но Вы не знаете конкретно какая именно, нажмите правой кнопкой мыши на ярлыке мой компьютер и выбирайте «Свойства». Там будет отображена соответствующая информация.

установка java – скачаем jdk
Дальше скачаем eclipse. Для этого заходим на сайт и в разделе downloads выбираем Eclipse IDE for Java Developers или Eclipse IDE for Java EE Developers (рекомендую!), если в ближайшем будущем хотите писать веб приложения на java.

Далее выбираем ближайший к Вам сервер, с которого собственно и будем качать eclipse.

установка java – качаем eclipse
Рекомендую на компьютере создать папку java, где будет лежать все необходимое для java. Туда установить JDK, который, уже наверняка скачался и туда же распаковать архив с еклипсой (eclipse не нуждается в установке, ее нужно просто распаковать).
После того, как Вы установили jdk, скачали и распаковали Eclipse, заходим внутрь папки, где лежит среда разработки и запускаем файл Eclipse.ехе.
Eclipse должна стартануть, и надеюсь, у Вас все получилось. Поздравляю, теперь мы можем разрабатывать программы на java! 
Eclipse Installer 2021-03 R
The Eclipse Installer 2021‑03 R now includes a JRE for macOS, Windows and Linux.
Try the Eclipse Installer 2021‑03 R
The easiest way to install and update your Eclipse Development Environment.
Download
5 Steps to Install Eclipse
We’ve recently introduced the Eclipse Installer, a new and more efficient way to install Eclipse. It is a proper installer (no zip files), with a self-extracting download that leads you through the installation process. For those who prefer not to use the Installer, the packages and zip files are still available on our package download page.
1. Download the Eclipse Installer
Eclipse is hosted on many mirrors around the world. Please select the one closest to you and start to download the Installer
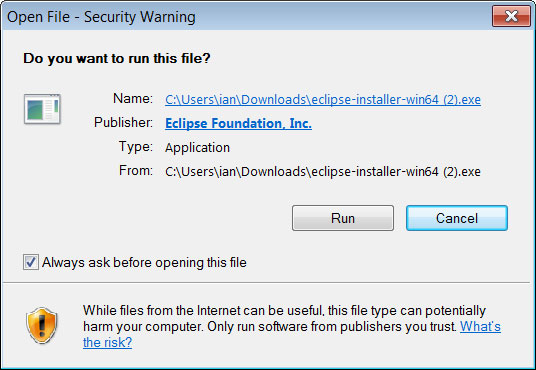
2. Start the Eclipse Installer executable
For Windows users, after the Eclipse Installer executable has finished downloading it should be available in your download directory. Start the Eclipse Installer executable. You may get a security warning to run this file. If the Eclipse Foundation is the Publisher, you are good to select Run.
For Mac and Linux users, you will still need to unzip the download to create the Installer. Start the Installer once it is available.
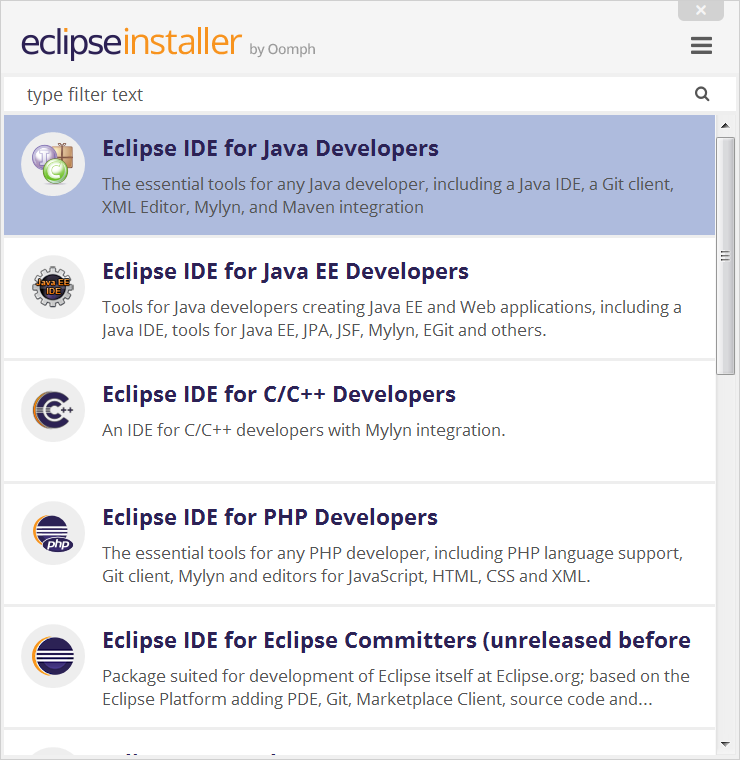
3. Select the package to install
The new Eclipse Installer shows the packages available to Eclipse users. You can search for the package you want to install or scroll through the list.
Select and click on the package you want to install.
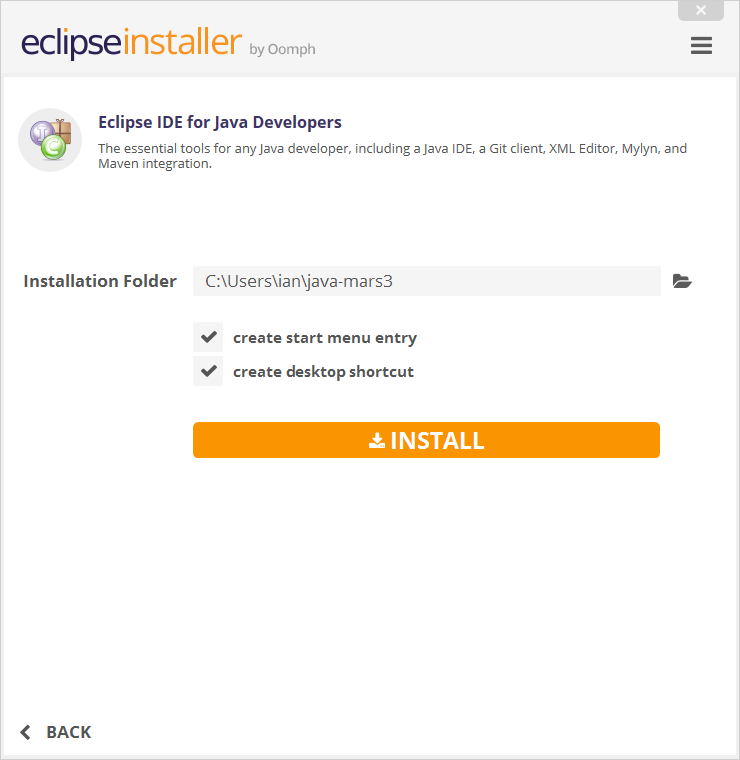
4. Select your installation folder
Specify the folder where you want Eclipse to be installed. The default folder will be in your User directory.
Select the ‘Install’ button to begin the installation.
5. Launch Eclipse
Once the installation is complete you can now launch Eclipse. The Eclipse Installer has done it’s work. Happy coding.
Eclipse/Installation
Installing Eclipse is relatively easy, but does involve a few steps and software from at least two different sources. Eclipse is a Java-based application and, as such, requires a Java Runtime Environment or Java Development Kit (JRE or JDK) in order to run.
Note that on recent versions of Mac, a full JDK needs to be installed, not just a JRE; see instructions below.
Contents
Install a JVM

If you are using Eclipse to do Java development, or are on macOS, install a JDK. In all cases, Eclipse requires a 64-bit JVM
A Java Development Kit (JDK) includes many useful extras for Java developers including the source code for the standard Java libraries.
Regardless of your operating system, you will need to install some Java virtual machine (JVM). You may either install a Java Runtime Environment (JRE), or a Java Development Kit (JDK), depending on what you want to do with Eclipse. If you intend to use Eclipse for Java development, then you should install a JDK. If you aren’t planning to use Eclipse for Java development and want to save some disk space, install a JRE.
- If you’re using Windows, you may already have a JRE installed, but upgrading usually won’t hurt.
- If you’re using Mac, and you don’t have a JDK installed, you may get a bogus message from the OS stating that you should «install the legacy Java SE 6 runtime». Installing that will not solve the problem, because recent versions of Eclipse require a higher version. If you install just a JRE, and not a full JDK, that error message will persist. You must install a full JDK.
- If using Linux, read this
- GCJ will NOT work.
Eclipse 4.19 (2021-03)
Eclipse 4.19 (2021-03) was released on March 17, 2021. It is the supported release.
A Java 11 or newer JRE/JDK is required, LTS release are preferred to run all Eclipse 2021-03 packages based on Eclipse 4.19, with certain packages choosing to provide one by default. The Installer now includes a JRE. Consider using the Installer. Please see 5 Steps to Install Eclipse.
Eclipse 4.18 (2020-12)
Eclipse 4.18 (2020-12) was released on December 16, 2020.
A Java 11 or newer JRE/JDK is required, LTS release are preferred to run all Eclipse 2020-12 packages based on Eclipse 4.18, with certain packages choosing to provide one by default. The Installer now includes a JRE. Consider using the Installer. Please see 5 Steps to Install Eclipse.
Eclipse 4.17 (2020-09)
Eclipse 4.17 (2020-09) was released on September 16, 2020.
Consider using the Installer. Please see 5 Steps to Install Eclipse.
A Java 11 or newer JRE/JDK is required, LTS release are preferred to run all Eclipse 2020-09 packages based on Eclipse 4.17, as well as the Installer.
Eclipse 4.16 (2020-06)
Eclipse 4.16 (2020-06) was released on June 17, 2020.
Consider using the Installer. Please see 5 Steps to Install Eclipse.
A Java 8 or newer JRE/JDK is required, LTS release are preferred to run all Eclipse 2020-06 packages based on Eclipse 4.16, as well as the Installer.
Eclipse 4.15 (2020-03)
Eclipse 4.15 (2020-03) was released on March 18, 2020.
A Java 8 or newer JRE/JDK is required, LTS release are preferred to run all Eclipse 2020-03 packages based on Eclipse 4.15, as well as the Installer.
Eclipse 4.14 (2019-12)
Eclipse 4.14 (2019-12) was released on December 18, 2019. See Eclipse 2019-12 schedule.
Consider using the Installer. Please see 5 Steps to Install Eclipse.
A Java 8 or newer JRE/JDK is required to run all Eclipse 2019-09 packages based on Eclipse 4.14, as well as the Installer.
Eclipse 4.13 (2019-09)
Eclipse 4.13 (2019-09) was released on September 18, 2019. See Eclipse 2019-09 schedule.
Consider using the Installer. Please see 5 Steps to Install Eclipse.
A Java 8 or newer JRE/JDK is required to run all Eclipse 2019-09 packages based on Eclipse 4.13, as well as the Installer.
Eclipse 4.12 (2019-06)
Eclipse 4.12 (2019-06) was released on June 19, 2019. See Eclipse 2019-06 schedule.
Consider using the Installer. Please see 5 Steps to Install Eclipse.
A Java 8 or newer JRE/JDK is required to run all Eclipse 2019-03 packages based on Eclipse 4.12, as well as the Installer.
Eclipse 4.11 (2019-03)
Eclipse 4.11 (2019-03) was released on March 20, 2019. See Eclipse 2019-03 schedule.
Consider using the Installer. Please see 5 Steps to Install Eclipse.
A Java 8 or newer JRE/JDK is required to run all Eclipse 2019-03 packages based on Eclipse 4.11, as well as the Installer.
Eclipse 4.10 (2018-12)
Eclipse 4.10 (2018-12) was released on December 20, 2018. It is the supported release. See Eclipse 2018-12 schedule.
Consider using the Installer. Please see 5 Steps to Install Eclipse.
A Java 8 or newer JRE/JDK is required to run all Eclipse 2018-12 packages based on Eclipse 4.10, including running the Installer. The reasoning behind requiring Java 8 are discussed here.
Eclipse 4.9 (2018-09)
Eclipse 4.9 (2018-09) was released on September 19, 2018. See Eclipse 2018-09 schedule.
A Java 8 or newer JRE/JDK is required to run all Eclipse 2018-09 packages based on Eclipse 4.9, including running the Installer. The reasoning behind requiring Java 8 are discussed here.
Eclipse 4.8 (Photon)
Eclipse 4.8 (Photon) was released on June 27, 2018. See Photon schedule.
A Java 8 or newer JRE/JDK is required to run all Oxygen packages based on Eclipse 4.7, including running the Installer. The reasoning behind requiring Java 8 are discussed here.
Eclipse 4.7 (Oxygen)
Eclipse 4.7 (Oxygen) was released on June 28, 2017. See Oxygen schedule.
A Java 8 or newer JRE/JDK is required to run all Oxygen packages based on Eclipse 4.7, including running the Installer. The reasoning behind requiring Java 8 are discussed here.
Eclipse 4.6 (Neon)
Eclipse 4.6 (Neon) was released on June 22, 2016. See Neon schedule.
A Java 8 JRE/JDK is required to run all Neon packages based on Eclipse 4.6, including the Installer. The reasoning behind requiring Java 8 are discussed here.
Eclipse 4.5 (Mars)
Eclipse 4.5 (Mars) was released on June 24, 2015.
A Java 7 JRE/JDK is required for all Mars package downloads based on Eclipse 4.5, including the Installer. Information concerning tested configurations for Eclipse 4.5 is provided here.
Eclipse 4.4 (Luna)
Eclipse 4.4 (Luna) was released on June 25, 2014.
A Java 7 JRE/JDK is required for most of the Luna package downloads based on Eclipse 4.4. Information concerning tested configurations for Eclipse 4.4 is provided here.
Eclipse 4.3 (Kepler)
Eclipse 4.3 (Kepler) was released in June 2013.
A Java 6 JRE/JDK is recommended for Eclipse 4.3. More information concerning tested configurations for Eclipse 4.3 is provided here.
JRE/JDK Sources
There are several sources for a JRE/JDK. Here are some of the more common/popular ones (listed alphabetically):
Download Eclipse
Download Eclipse from the Eclipse Downloads Page.
There are several package choices. Note that you can install the features from any package into any other package. If you are, for example, planning to do mostly Java development and some C/C++ development, you should download the Eclipse IDE for Java Developers and then add the C/C++ development tools via the «Help > Install New Software. » menu option.
The download will be delivered as a compressed (i.e. a «.zip», or «.tar.gz») file. Decompress this file into the directory of your choice (e.g. «c:\eclipse» on Windows) and ensure you have full Read and Execute permissions. You can optionally create a shortcut of the executable file («eclipse.exe» on Windows, or «eclipse» on Linux).
Note that there is a known problem with the built-in decompression utility on all current versions of Windows. We recommend that you use a more robust decompression utility such as the open source 7zip when decompressing an Eclipse download. Some people report success when initially decompressing Eclipse into a root directory (e.g. c:\) and then moving it to a more appropriate home (e.g. c:\Program Files\Eclipse)
Configure Eclipse to use the JVM
It is strongly recommended to configure Eclipse with the specific JVM that you want. See the instructions at Eclipse.ini This is a very important step to be sure that Eclipse is using the JVM you intend and can’t be influenced by any other software that might alter your system. The JVM used to launch Eclipse has no affect on whether it can compile Java sources for other Java language versions.
Extending Eclipse
Use the Help > Install new software. menu option to add Kepler features to your Eclipse installation (you can, for example, use this option to add C/C++ development support). Additionally, you can tap into a vast collection of extensions provided by the Eclipse community and ecosystem via the Eclipse Marketplace Client (Help > Eclipse Marketplace). Note that not all Eclipse packages contain the Eclipse Marketplace Client.
Troubleshooting
Java was started but returned exit code = 13
If you’ve «installed» Eclipse but are having trouble getting it to run, the most likely cause is that you have not correctly specified the JVM for it to run under. You may need to edit the eclipse.ini file.
Another common mistake on Microsoft Windows is a mismatch between the «bittedness» of Eclipse and the JVM/JDK. This is the most frequent cause of an Error 13. 64-bit Eclipse requires a 64-bit JVM, and 32-bit Eclipse requires 32-bit JVM—you can not mix-and-match between 32-bit and 64-bit, so make sure the version of Eclipse you installed matches the JVM/JDK that you’re using to run it (and make sure you’re using eclipse.ini to specify the exact JVM used to run Eclipse, described above).
As a simple test, open a Command Prompt window, move to the directory that is pointed to by the -vm argument in your eclipse.ini, and run the intended java.exe with the -d32 switch to test if it supports 32-bit, or -d64 to test for 64-bit support. It’s often simplest to download a version of Eclipse that will work with whatever Java you already have installed.
To open «Eclipse» you need to install the legacy Java SE 6 runtime
On more recent versions of the Mac, if you don’t have a full JDK of an appropriately high version installed, the OS produces this bogus message. Installing any JRE will not eliminate this problem. A full JDK needs to be installed on the Mac.
Extraction requires a password or otherwise fails on Windows.


