- ftp ftp
- Синтаксис Syntax
- Параметры Parameters
- Комментарии Remarks
- Installing a secure FTP server on Windows using IIS
- Installing FTP Server
- On Windows Server 2016 and Windows Server 2012
- On Windows Server 2008 R2
- On Windows Desktop (Windows 10, Windows 8, Windows 7 and Windows Vista)
- Opening IIS Manager
- Creating Certificate for the FTPS Server
- Servers behind external Firewall/NAT
- Windows Firewall Rules
- Restarting FTP Service
- Adding FTP Site
- To a Web Site
- Standalone FTP Site
- Connecting to Your FTPS Server
ftp ftp
Область применения: Windows Server (половина ежегодного канала), Windows Server 2019, Windows Server 2016, Windows Server 2012 R2, Windows Server 2012 Applies to: Windows Server (Semi-Annual Channel), Windows Server 2019, Windows Server 2016, Windows Server 2012 R2, Windows Server 2012
Передает файлы на компьютер, на котором запущена служба протокол FTP (FTP), и с него. Transfers files to and from a computer running a File Transfer Protocol (ftp) server service. Эту команду можно использовать интерактивно или в пакетном режиме, обрабатывая текстовые файлы ASCII. This command can be used interactively or in batch mode by processing ASCII text files.
Синтаксис Syntax
Параметры Parameters
| Параметр Parameter | Описание Description |
|---|---|
| -v -v | Отключает отображение ответов на удаленные серверы. Suppresses display of remote server responses. |
| -d -d | Включает отладку, отображая все команды, передаваемые между FTP-клиентом и FTP-сервером. Enables debugging, displaying all commands passed between the FTP client and FTP server. |
| -i -i | Отключает Интерактивные запросы во время передачи нескольких файлов. Disables interactive prompting during multiple file transfers. |
| -n -n | Подавляет автоматическое имя входа при начальном подключении. Suppresses auto-login upon initial connection. |
| -g -g | Отключает имя файла глобализации. Disables file name globbing. Стандартная маска позволяет использовать звездочку (*) и вопросительный знак (?) в качестве подстановочных знаков в именах локальных файлов и путей. Glob permits the use of the asterisk (*) and question mark (?) as wildcard characters in local file and path names. |
| #d0 -s: | Указывает текстовый файл, содержащий команды FTP . Specifies a text file that contains ftp commands. Эти команды выполняются автоматически после запуска FTP . These commands run automatically after ftp starts. Этот параметр не допускает пробелов. This parameter allows no spaces. Используйте этот параметр вместо перенаправления ( ). Use this parameter instead of redirection ( ). Примечание. В операционных системах Windows 8 и Windows Server 2012 или более поздней версии текстовый файл должен быть написан в кодировке UTF-8. Note: In Windows 8 and Windows Server 2012 or later operating systems, the text file must be written in UTF-8. |
| -a -a | Указывает, что при привязке подключения к данным FTP можно использовать любой локальный интерфейс. Specifies that any local interface can be used when binding the ftp data connection. |
| -A -A | Выполняет вход на FTP-сервер как анонимный. Logs onto the ftp server as anonymous. |
| x -x: | Переопределяет размер SO_SNDBUF по умолчанию 8192. Overrides the default SO_SNDBUF size of 8192. |
| Cерверный -r: | Переопределяет размер SO_RCVBUF по умолчанию 8192. Overrides the default SO_RCVBUF size of 8192. |
| & -b: | Переопределяет число асинхронных буферов по умолчанию, равное 3. Overrides the default async buffer count of 3. |
| Белая -w: | Задает размер буфера перемещения. Specifies the size of the transfer buffer. Размер окна по умолчанию составляет 4096 байт. The default window size is 4096 bytes. |
| Указывает имя компьютера, IP-адрес или IPv6-адрес сервера FTP, к которому осуществляется подключение. Specifies the computer name, IP address, or IPv6 address of the ftp server to which to connect. Имя узла или адрес, если он указан, должен быть последним параметром в строке. The host name or address, if specified, must be the last parameter on the line. | |
| -? -? | Отображение справки в командной строке. Displays help at the command prompt. |
Комментарии Remarks
Параметры командной строки FTP чувствительны к регистру. The ftp command-line parameters are case-sensitive.
Эта команда доступна, только если протокол Internet Protocol (TCP/IP) установлен в качестве компонента в свойствах сетевого адаптера в окне Сетевые подключения. This command is available only if the Internet Protocol (TCP/IP) protocol is installed as a component in the properties of a network adapter in Network Connections.
Команду FTP можно использовать в интерактивном режиме. The ftp command can be used interactively. После запуска FTP создает подсреду, в которой можно использовать команды FTP . After it is started, ftp creates a sub-environment in which you can use ftp commands. Вы можете вернуться в командную строку, введя команду Quit . You can return to the command prompt by typing the quit command. При запуске вспомогательной среды FTP она указывается в ftp > командной строке. When the ftp sub-environment is running, it is indicated by the ftp > command prompt. Дополнительные сведения см. в разделе команды FTP . For more information, see the ftp commands.
При установке протокола IPv6 команда FTP поддерживает использование IPv6. The ftp command supports the use of IPv6 when the IPv6 protocol is installed.
Installing a secure FTP server on Windows using IIS
Installing FTP Server
On Windows Server 2016 and Windows Server 2012
- In Windows Server Manager go to Dashboard and run Manage > Add Roles and Features.
- In Add Roles and Features wizard:
- Proceed to Installation Type step and confirm Role-based or feature-based installation.
- Proceed to Server Roles step and check Web Server (IIS) role. Note that it is checked already, if you had IIS installed as a Web Server previously. Confirm installing IIS Management Console tool.
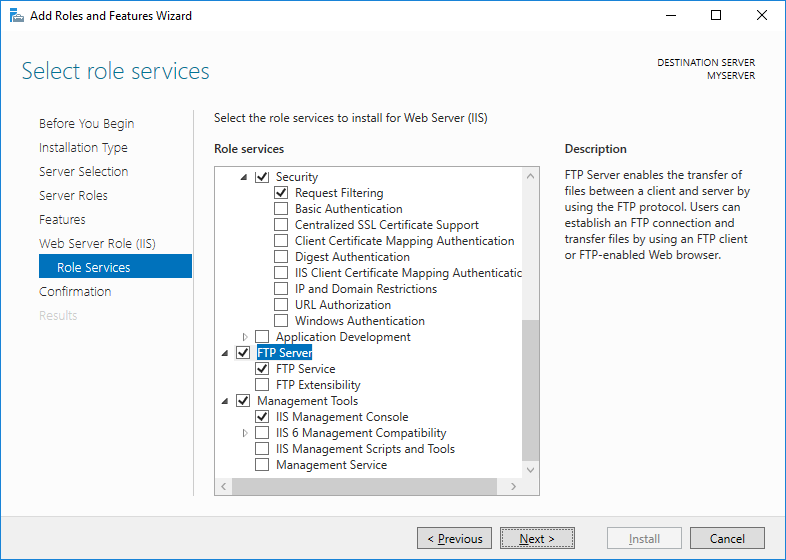
- Proceed to Web Server Role (IIS) > Role Services step and check FTP Server role service. Uncheck Web Server role service, if you do not need it.
- Proceed to the end of the wizard and click Install.
- Wait for the installation to complete.
On Windows Server 2008 R2
If you do not have IIS installed yet:
- In Windows Server Manager go to Roles node and in Roles Summary panel click Add Roles.
- In Add Roles wizard:
- Proceed to Server Roles step and check Web Server (IIS) role.
- Proceed to Role Services step and check FTP Server > FTP Service role service. Uncheck Web Server role service, if you do not need it. Make sure Management Service > IIS Management Console role service is checked.
- Proceed to the end of the wizard and click Install.
- Wait for the installation to complete.
If you have IIS installed already (i.e. as a Web Server):
- In Windows Server Manager go to Roles node and in Web Server (IIS) > Role Services panel click Add Role Services.
- In Add Role Services wizard:
- Check FTP Server > FTP Service role service.
- Make sure that Management Service > IIS Management Console is checked.
- Confirm with Next button.
- Proceed to the end of the wizard and click Install.
- Wait for the installation to complete.

On Windows Desktop (Windows 10, Windows 8, Windows 7 and Windows Vista)
- Go to Control Panel > Programs > Program and Features > Turn Windows features on or off.
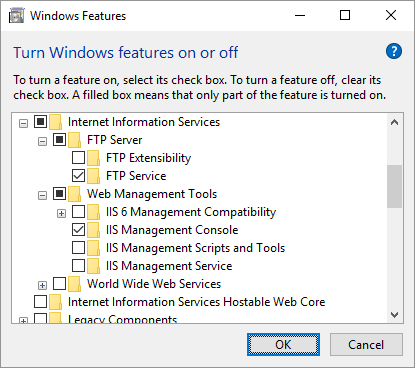
- On a Windows Features window:
- Expand Internet Information Services > FTP Server and check FTP Service.
- Expand Internet Information Services > Web Management Tools and check IIS Management Console, if it is not checked yet.
- Confirm with OK button.
- Wait for the installation to complete.
Opening IIS Manager
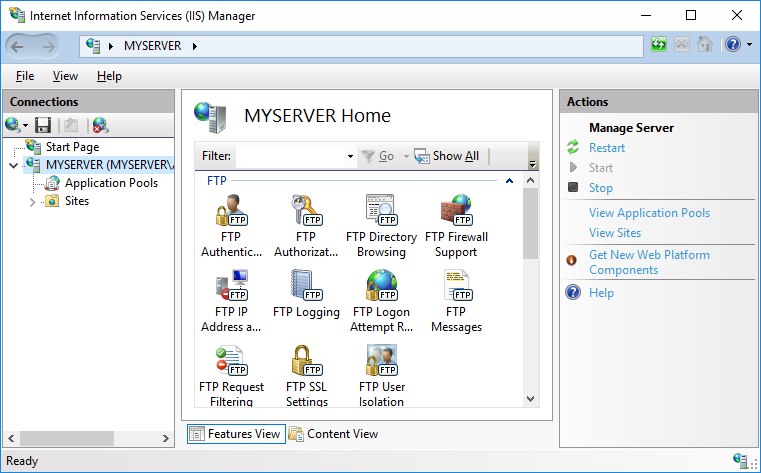
- Go to Control Panel > System and Security > Administrative Tools and open Internet Information Services (IIS) Manager.
- Navigate to your Windows server node.
Creating Certificate for the FTPS Server
You may also create a self-signed certificate locally, but in such case users of your FTPS server will be warned, when connecting to the server.
To create the self-signed certificate:
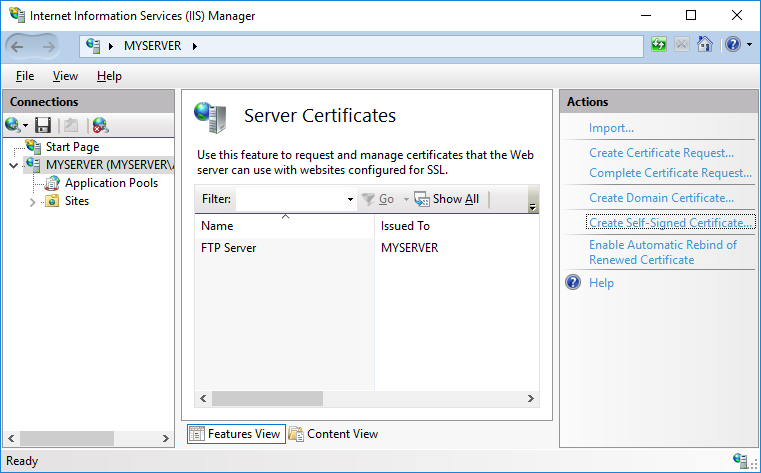
- In IIS Manager, open IIS > Server Certificates.
- Click on Create Self-Signed Certificate action.
- Specify a certificate name (e.g. “FTP Server”) and submit with OK.
Self-signed certificates created by IIS Manager do not work with FTPS clients that check for key usage violations.2 To create a certificate with a correct key usage, use New-SelfSignedCertificate PowerShell as an Administrator:
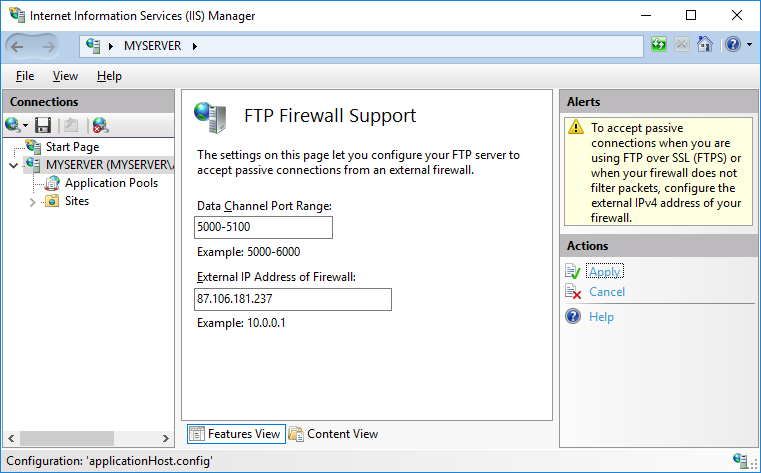
Servers behind external Firewall/NAT
- In IIS Manager, open FTP > FTP Firewall Support.
- Specify your server’s external IP address.
For Microsoft Azure Windows servers you will find the external IP address in Public IP address section of the virtual machine page.
When behind an external firewall, you need to open ports for data connections (obviously in addition to opening an FTP port 21 and possibly an implicit TLS/SSL FTP port 990). You won’t probably want to open whole default port range 1024-65535. In such case, you need to tell the FTP server to use only the range that is opened on the firewall. Use a Data Channel Port Range box for that. Any time you change this range, you will need to restart FTP service. Learn how to open ports on Microsoft Azure.
Click Apply action to submit your settings.
Some external firewalls are able to monitor FTP control connection and automatically open and close the data connection ports as needed. So you do not need to have whole port range opened all the time, even when not in use. This won’t work with the secure FTPS as the control connection is encrypted and the firewall cannot monitor it.
Windows Firewall Rules
An internal Windows firewall is automatically configured with rules for the ports 21, 990 and 1024-65535 when IIS FTP server is installed.
The rules are not enabled initially though some versions of Windows.3 To enable or change the rules, go to Control Panel > System and Security > Windows Defender Firewall4 > Advanced Settings > Inbound Rules and locate three “FTP server” rules. If the rules are not enabled, click on Actions > Enable Rule.
Restarting FTP Service
While the internal Windows firewall is automatically configured to open FTP ports when FTP server is installed, this change does not seem to apply, until FTP service is restarted. The same is true for changing data channel port range.
To restart FTP service go to Control Panel > System and Security > Administrative Tools and open Services. Locate Microsoft FTP Service and click Restart service.5
Adding FTP Site
To a Web Site
If you want to add FTP server to manage your web site remotely, locate your web site node in IIS Manager and:
- Click Add FTP Publishing action.
- In Add FTP Site Publishing wizard:
- On an initial Binding and SSL Settings step, select Require SSL to disallow non-encrypted connections and select your certificate.
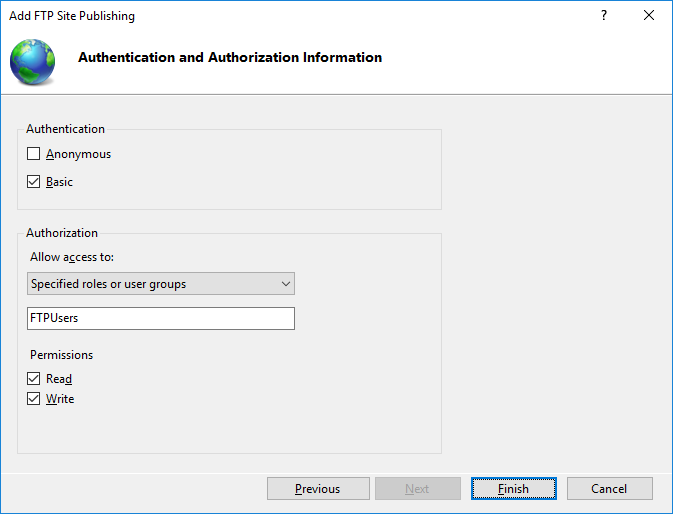
- On Authentication and Authorization Information step, select Basic authentication and make sure Anonymous authentication is not selected. Select which users (Windows accounts) you allow to connect to the server with what permissions. You can choose All users or select only some. Do not select Anonymous users.
- Submit with Finish button.
Your secure FTPS server is now running and can be connected to.
Standalone FTP Site
If you want to add a standalone FTP server to store/exchange files, locate Sites node (folder) of your Windows server in IIS Manager and:
- Click Add FTP Site action.
- In Add FTP Site wizard:
- On an initial Site Information step, give a name to your FTP site (if it’s the only site you are going to have, simple “FTP site” suffice) and specify a path to a folder on your server’s disk that is going to be accessible using FTP.
- On a Binding and SSL Settings step, select Require SSL to disallow non-encrypted connections and select your certificate.
- On Authentication and Authorization Information step, select Basic authentication and make sure Anonymous authentication is not selected. Select which users (Windows accounts) you allow to connect to the server with what permissions. You can choose All users or select only some. Do not select Anonymous users.
- Submit with Finish button.
Your secure FTPS server is now running and can be connected to.
Connecting to Your FTPS Server
For connecting to a Microsoft Azure Windows instance, see a specific guide.
Start WinSCP. Login Dialog will appear. On the dialog:
- Select FTP protocol and TLS/SSL Explicit encryption.
- Enter your Windows server hostname to Host name field. Avoid using an IP address to allow WinSCP to verify that the hostname matches with host the server’s certificate was issued to (not applicable to self-signed certificates).
- Specify username and password for Windows account you want to connect with (when using domain accounts, you need to specify a full username with format domain\username ).
- You may want to save your session details to a site so you do not need to type them in every time you want to connect. Press Save button and type site name.
- Press Login to connect.
- If you are using self-signed certificate, you will be prompted to accept it.


