- List of user groups command line
- Run command for user accounts and groups
- Windows 10 – Create Local User Account, User Group, View & Change Properties
- How to Create Local User Account in Windows 10
- How to View & Change the Properties of a User Account in Windows 10
- How to Create a User Group in Windows 10
List of user groups command line
On Windows OS we can find the list of local user groups created on a system from Contorl Panel -> User Accounts. This information can be obtained from command line also using net command. Syntax is shown below.
Example: Running this command shows the following local groups on my system.
How to list the users in a local group?
Use the below command to know the list of members of a group from command line.
For example to get the list of all remote desktop users on a system we can run the below command.
How to find the list of all groups a user is member of?
You can run the below command to list the groups a user is member of. This command prints the details of the given user account. You can find the group membership information in the last two line of this command output.
Useful references, however “net use username” should be changed to “net user username”
Thank you Kennedy. Corrected the command.
Please get me a command which will display all local users as: LOGIN, FULL NAME, DESCRIPTION, GROUP etc..
I’d just like to express my frustration with this API. As you can see in these examples, thet net API localgroups functionality will happily list all members of a group. However the net user code completely ignores system accounts, as does most of the rest of what Windows makes available. Internally they are organized as a subclass of Win32_Account but not Win32_UserAccount. So it’s possible to retrieve a bunch of useless information from the Windows API. This happens with LookupAccountSid as well. If you give it an SID like S-1-5-20, it will give you an answer. But the answer it gives you can’t be used as input for anything else, which is obnoxious.
You can query if users exist by doing
SET /P query_user=What user do i look for?
::Take out /domain if you want to look on the local computer
Net User %query_user% /domain
if NOT %errorlevel% == 0 goto s_error_1
if %errorlevel% == 0 goto s_success_1
“net user /domain username” lists only the groups to which the username is a direct member. It can’t show nested groups. I was doing a quick check to see if a username was a member of a group:
net user /domain username | find “Group Name”
That fails since the user is not directly a member of “Group Name”. In reality, they are a member, as they’re a member of a nested group.
Any idea of a command line that will expand groups to look for a particular member? I’ve used the “dsquery” and “dsget” commands, but they are only present if the AD tools are installed.
Very useful thanks, didn’t worked for me the first time.
The command is not case sensitive.
For example “NET USER /DOMAIN MYDOMAIN/MyUser” Didn’t worked.
But “NET USER /DOMAIN MyUser” works fine!
So not necessary to put explicitly the domain.
By the way it means also you can’t query another domain than the main one you are logged on to ?
Is there any option where we can get the multiple user’s output in excel for local computer and remote computer
net user userName
Run command for user accounts and groups
Learn how to open Local users and Groups console from Run window. In this console, administrators can perform operations like creation/deletion of user accounts, resetting user password etc.
Execute the command lusrmgr.msc to open user accounts window from Run.
However, on Windows XP we need to run a different command.
On XP: nusrmgr.cpl

Also, we can use Netplwiz from Run window to launch user accounts window which shows only the local user accounts on the system.
If you are looking for a way to manage user accounts from command line then see the below posts.
It worked for me. In my machine i was unable to find «User Account» Shortcut. SO was searching it to open it from Run Window. Thanks for the Stuff.
How do you do it with windows 7. I tried the ‘nusrmgr.cpl’ to no avail.
This is changed in Windows 7. You can run compmgmt.msc and manage user accounts from there.
Run “control nusrmgr.cpl”
command to open user accounts is “LUSRMGR.MSC”
nusrmgr.cpl works for XP where as lusrmgr.msc works for Windows 7. Updated the post for Windows 7.
I have unintentionally closed (forced) exlorer.exe on a remote server & now I am unable to run explorer.exe back. It gives me blank screen everytime I try to login. It is a remote server (Windows 7). I need to access it urgently as I was treoubleshooting something.
Thanks in advance.
If explorer is killed, it can be restarted by running ‘explorer’ from command prompt. But I’m not sure if you have access to command window.
Press alt+ctrl+delete to open task manager and click on new task and type explorer.exe
hi everyone,
i have create the user accounts through lusrmgr in windows server 2012R2 but there is no user account at logon screen. thanks
regards,
Mohsin khan
Hello Mohsin, when a new user local or domain is created the first time you login, the user needs to invoked by clicking on the left lower corner and choose other user. for a domain user the user name will work, for a local user type .\user-name (.\ translates to local machine)
Hi , in an enterprise environment , how can I find out to how many computers one user is logged in ? Sometimes users have frequent account lock out for logging to more than one computer , is there a site that I can find out logs for the computers that the effected user logged in to ? thanks so much
Windows 10 – Create Local User Account, User Group, View & Change Properties
The Computer Management tool of Windows 10 has Local Users and Groups listed under its System Tools. In our recent talk about Computer Management, we have briefly described Local Users and Groups. So, today we bring you an entire topic on Local Users and Groups. Here, in this article, we will share with you the steps to create local user account in Windows 10 through Computer Management. And also we will discuss how to see and modify the properties of a user account. Along with this, you will also learn the procedure for creating a User Group.
How to Create Local User Account in Windows 10
Before we start with the procedure, few simple things are needed to be noted down to create local user account:
- To finish the below procedure, the minimum group membership required is of Administrators.
- On the local computer, you must be a member of the Administrators group.
- Or to carry out the entire process, if prompted, you must give your details for the Administrator account on the local computer.
- The username that you will provide, should not be similar to other existing username or user group of the computer.
- The username that you will provide can hold up to twenty characters having uppercase or lowercase.
- Only these characters are not allowed: ” / \ [ ] : ; | = , + * ? @
- You can use up to 127 characters for the password.
To carry out the procedure, you need to get into the Computer Management. And the easiest way is to obtain it from the Power Menu. When you make right click on the Start Menu, the Power Menu comes up. So, click Computer Management.

Now, on the left column of the Computer Management window, navigate the following path: Local Users and Groups -> Users folder.
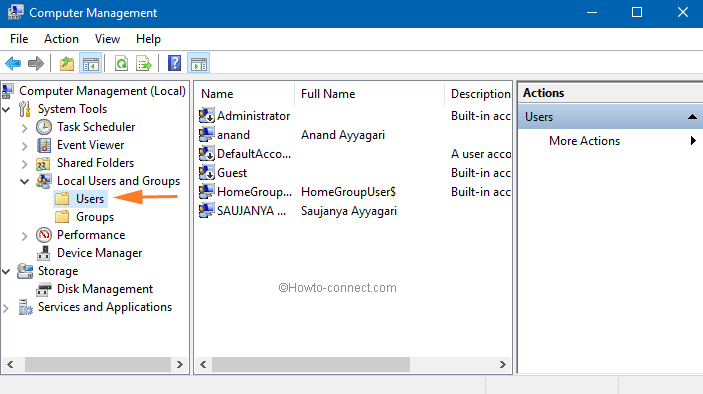
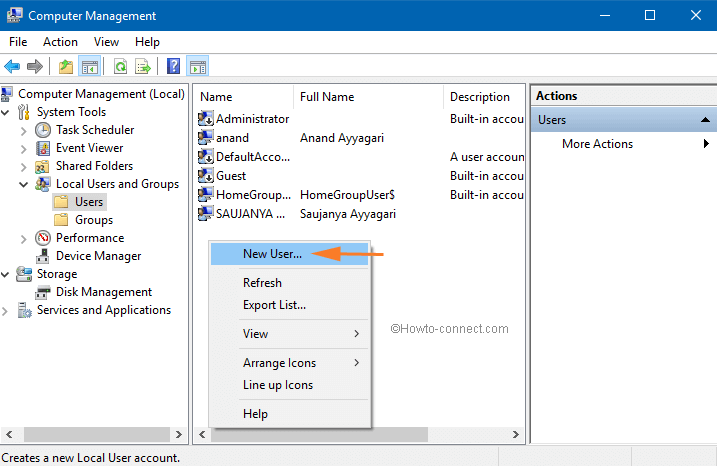
Get into the center area of the Computer Management window and perform right click on the vacant space and choose New User to create local user account.
Your above action will lead to the emergence of New User window. Here, you have to enter the details of the new users. Provide the name of the user in the User Name field followed by a description in the Description box (optional).
Then, enter a password in its respective box and to confirm it re-enter it in the Confirm password field. You will see a few options with a checkbox to each in the lower half of the New User window. Let’s see what they mean:
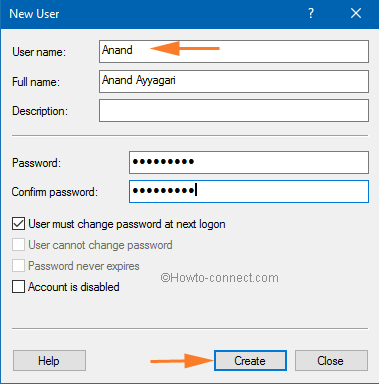
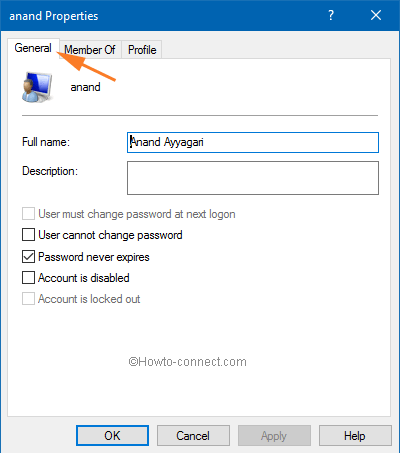
User must change password at next logon: If you wish not to use a password now, you can mark the checkbox which says Use must change password at next logon. In this way, when the user first uses this user account, he must set his own password.
User cannot change password: Here, only the administrator will be able to do any changes on the password for that particular user account.
Password never expires: Usually, this option is chosen by the corporate environments. They use certain for the user account password which gets expire after a certain amount of time.
Account is disabled: The user account will be disabled and cannot be put into use if this option is selected.
After carrying out the settings as per your requirement, click the Create button to create the user account. Now, the newly created user account is all ready to be used. After you are over with the procedure, click the Close button of the New User window.
The user accounts that have been created by this procedure will not hold any administrative authorities and thus will be registered as the members of the Users group. And it will have the authority only to utilize the present resources and applications.
How to View & Change the Properties of a User Account in Windows 10
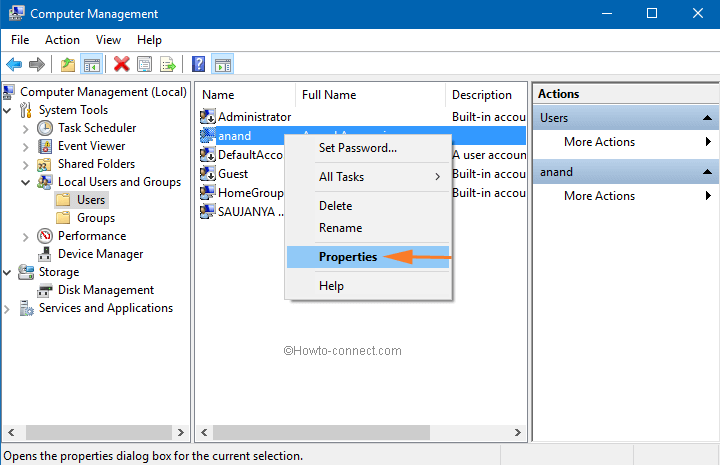
After you create local user account there is also a provision to modify or edit the properties of the prevailing users. As mentioned above, get to the Users folder and then go to the center area of the window where you will see the list of prevailing users. Now, look for the user account whose Properties you wish to change and make a right-click on it to choose its Properties option.
The Properties window of the selected account opens up on the screen. The options that were mentioned in the previous section of this article will be seen in the General tab. You can modify the changes if needed.
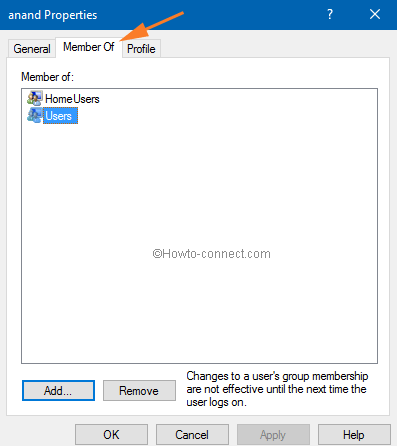
The next tab is Member of. This tab displays the list of those groups in which the user is a member. To be a member of another group, click on the Add button and choose the required user group. If you wish to remove its membership from any of the prevailing groups, choose that user group and click on the Remove button.
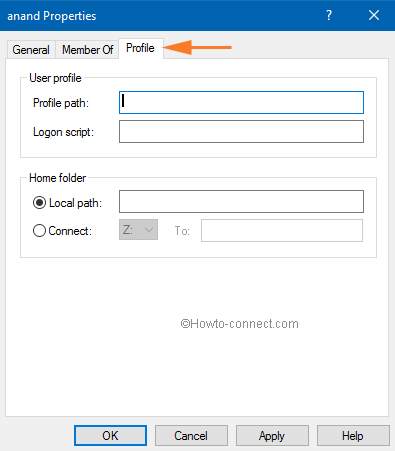
The following tab is the Profile tab. This tab is mainly used by corporate network scenarios. It provides you to set the Profile path which is the place where the user profile data is saved. The Logon script should be executed on the login of the Windows 10. It has another section of Home folder.
After doing the changes as per your choice, click the Ok button and implement the changes.
How to Create a User Group in Windows 10
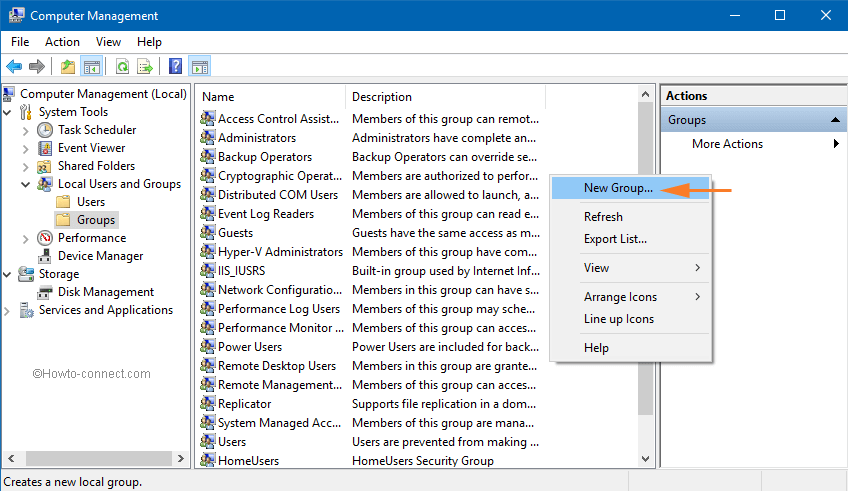
Now, we will see how to create a user group. And to make it happen open Computer Management followed by a click on Local Users and Groups and again on Groups folder.

The center area will have a list of groups represented with their names along with their description. Make right-click on a vacant space of the central area and choose New Group.
This opens up a New Group window. Provide a name for the group in the Group Name field and its explanation in the Description box (the description box is optional).
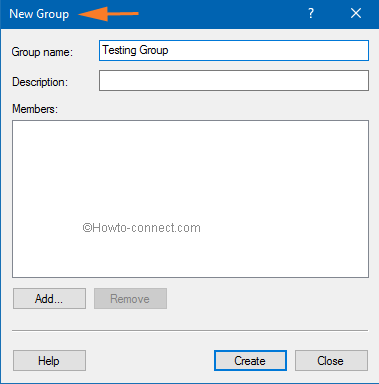
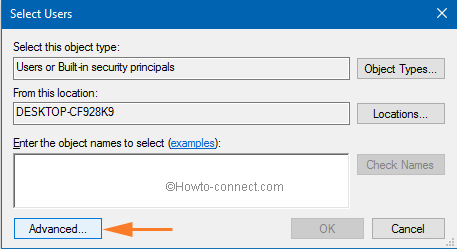
Now, you have to add the members. Click on the Add button.

You will see the Select Users window on your screen. Here, click on the Advanced button.
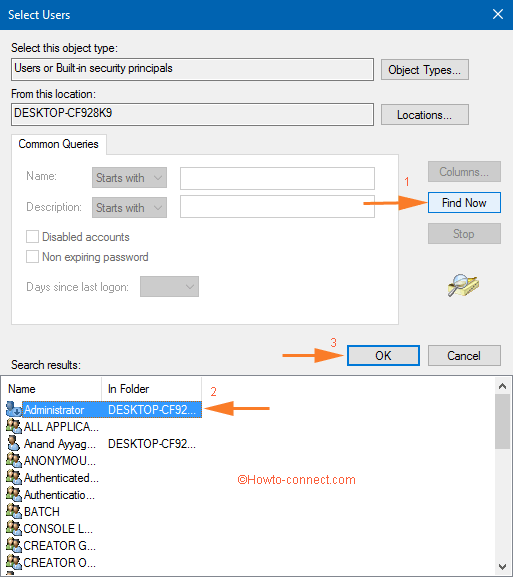
Another window of Select Users appears on the screen with a variety of options to choose the user accounts. Click the Find Now button and scan the arrival results to find the user account (s) that you wish the user group to be a part of it. Finally, click the Ok button.
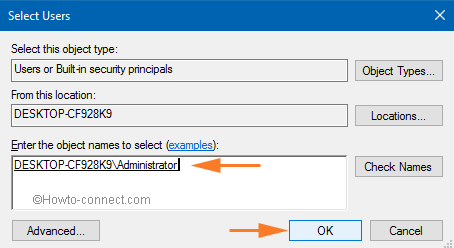
On the Select Users window, you will notice the selected user account(s). Click Ok to affirm the step.
Again you are back to the New Group window. You will see the added member(s) here. Once you complete the procedure, click Create button followed by the Close one.
You can even provide particular permissions to the created user group and its added members will follow them. We will soon bring you an article describing the procedure of how you will change permissions.
Previously we’ve written s guide and steps to switch to Local account you can read.
Closure
Expecting that this article will be of great use to you, we have penned down the basics of the Local Users and Groups. Following the steps mentioned above, you can easily create a local user account and also set up a user group. You can even do the modifications of the user account and set things as per your preference. This is the most useful segment of the Computer Management tool. To learn more about Computer Management, you can see our related posts. If you face any trouble while setting up the user account or user group, feel free to ask us. Also, if you hold any user accounts whose properties you wish to edit then give it a try.


