- XCode on Windows: How to Develop for Mac or iOS on a PC
- Installing a virtual PC application with Mac OS X
- Installing Mac OS X and booting your virtual machine
- Installing XCode on your Mac OS X virtual machine
- Developing iOS Apps and more using XCode
- Xcode for Windows (12 Ways to Build iOS Apps on PC)
- Rent a Mac
- Virtualize MacOS
- Build a “Hackintosh”
- Third Party Solutions
- Xcode for Windows : How to install XCode IDE for iOS SDK on Windows 10 using virtual machine
- What is XCode IDE?
- What is the main usage of Xcode
- Features of Xcode IDE
- Physical overview of Xcode IDE
- Assistant Editor
- Jump Bar
- Interface Builder
- Version editor and Source Control
- Testing
- Requirements for installing Xcode IDE on Windows
- Steps to install macOS Sierra on Virtual Machine on Windows
- How to
- Install Xcode IDE on macOS Sierra running on Windows Virtual Machine
- Video Tutorial to install Xcode on Windows
XCode on Windows: How to Develop for Mac or iOS on a PC
 Would you like to develop software for Mac OS X or iOS? While it’s easy to develop apps for Linux and Windows on any platform, developing software for Mac requires a toolset called XCode, designed and built by Apple specifically for Mac OS X.
XCode is an incredibly powerful piece of software. Not only is it a complete toolset for developing Mac apps; it’s also an interface builder, testing application, and asset management toolkit.
In this simple guide, you’ll learn how to use XCode on Windows – something that’s normally impossible. All you’ll need is a Windows PC, a copy of Mac OS X, an Apple account, and an Internet connection.
Is this your first time using XCode? Learn how to program software for Mac and iOS with our 1 Hour XCode Introduction.
Installing a virtual PC application with Mac OS X
Since XCode only runs on Mac OS X, you’ll need to be able to simulate an installation of Mac OS X on Windows. This is surprisingly easy to do with virtualization software like VMWare or open source alternative VirtualBox.
For the purpose of this guide, we’ll be using VirtualBox. If you use a different virtual computer application, the process is much the same. Since VirtualBox is open source and free to use, it’s worth downloading it if you don’t already have a copy installed.
Have you never used VirtualBox before? Learn how to use this powerful virtual PC application by enrolling in our course, QuickStart! – Virtual Box. In addition to Mac OS X, VirtualBox can also be used to run Linux and other operating systems.
Running a virtual computer is quite a demanding process, and you’ll need to have a fairly powerful PC for it to operate successfully. You’ll also need a PC with hardware similar to that of a standard, Apple-constructed iMac, MacBook, or Mac Pro.
To successfully emulate a Mac using a Windows PC, you’ll need the following:
- A Dual Core Intel processor
- At least 2GB of RAM (4GB+ recommended)
- Hardware Virtualization
Is your PC too weak to emulate a Mac properly? Learn how to build a powerful PC for gaming, app development, and more with our Learn How to Build a Computer course.
You’ll also need an installation disc for Mac OS X. You can purchase this online from the Apple Store or, if you already own a MacBook, iMac, or Mac Pro, you can use the install disc you received with your computer.
Once you’ve installed VirtualBox, open the application and choose to install Mac OS X Server 64 Bit. Provide the virtual computer with at least 2GB of RAM (if you have more than 8GB of RAM, choose 4GB+) and more than 30GB of hard disk space.
VirtualBox will automatically configure the operating system, but you’ll still need to make a few changes manually. Open the Settings menu and carry out the following changes:
- On the System tab, uncheck Enable EFI
- On the Processor tab, select at least two CPUs
- On the Display tab, increase the video memory to at least 128MB
Installing Mac OS X and booting your virtual machine
Finally, you’ll need to download a Hackboot boot loader to install OS X. You can find a Hackboot install file by searching Google – in this case, you’ll need Hackboot 1 and Hackboot 2, as well as your OS X disc, to complete the installation.
Select your Hackboot 1 disc image, and then start the virtual machine. Your virtual machine will boot, and you’ll see an OS X screen. Using the menu at the bottom of the screen, launch the disc drive that contains your OS X installation disc.
From here, you’ll need to follow the installation instructions for Mac OS X. It takes several minutes to install the operating system. Once the process is finished, you’ll need to switch off your virtual machine and change your boot disc.
Reopen VirtualBox and, leaving all of your other settings the same, switch your boot disc from Hackboot 1 to Hackboot 2. You’ll boot into a screen with two icons. Select Mac OS X and press Enter to initiate the Mac OS X boot sequence.
During the Mac OS X configuration sequence, you’ll need to enter your Apple ID. This is necessary for downloading the XCode toolset later, so make sure you enter a valid Apple account when you configure your operating system.
Installing XCode on your Mac OS X virtual machine
Once you’ve configured your Mac OS X virtual machine, installing XCode is relatively easy. Before you install XCode, you’ll want to configure your virtual machine to your preferred resolution and settings using the System Preferences menu.
Is this your first time using Mac OS X? If you’re a PC user, finding your way around in the new interface can be a challenge. Enroll in Using Mac OS X for Windows Users to learn the basics of the OS X interface, from the Dock to features like Spotlight.
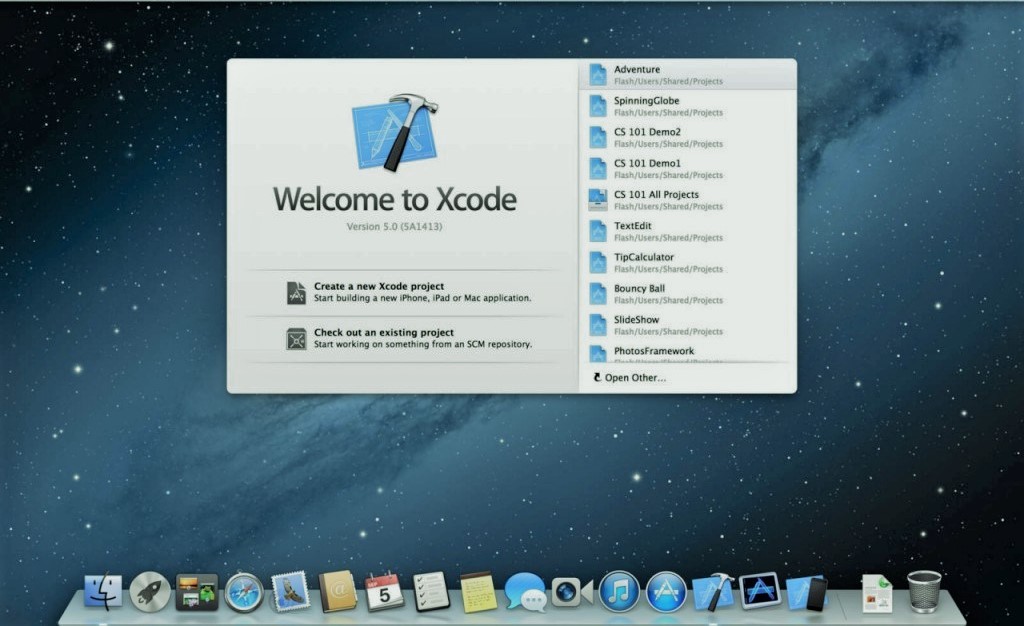
From here, installing XCode is simple. Open the App Store application from the dock and type XCode into the search bar. You might need to reenter your account details, or enter them for the first time if you didn’t do so during Mac OS X configuration.
Navigate to the XCode app and click Install Now to download it. If you don’t have an Apple account, you’ll need to create one in order to download the XCode toolset for your virtual machine.
XCode is quite a large application, and downloading it could take anywhere from a minute to several hours, depending on your Internet connection speed. Once your download is finished, open Applications and click XCode to launch the installer.
Once the installation process is complete, you’ll be able to use XCode within your virtual machine to program apps for Mac OS or iOS. You can also download other Mac apps to use on your virtual machine, although they may not run smoothly.
Developing iOS Apps and more using XCode
XCode is an incredibly powerful toolkit for app development. It’s also refreshingly easy to use, especially for developers accustomed to cumbersome and complicated programming software for PC.
Learn more about how to use XCode by reading our iOS programming tutorial. It’s a great overview of the XCode interface, the programming characteristics of iOS, and much more.
Xcode for Windows (12 Ways to Build iOS Apps on PC)
I wish I had known this when I first started because I delayed myself for 3 years before biting the bullet and buying a Mac.
Had I known about running Xcode on Windows or about the solutions below, I might’ve started building iPhone apps much earlier!
Rent a Mac
Before committing to buying a new Mac, you can actually “rent” one for development. You’ll remotely access the Mac and Xcode through your PC.
It’ll be like having the Mac desktop in a window on your Windows Desktop.
The really nice thing about this option is that the cost is really low and it’s the fastest option to get up and running.
If you decide that app development isn’t for you, you just cancel your plan.
1. MacStadium
These guys were featured in the recent Apple keynote when they introduced the updated Mac Mini! They have the newest Macs available.
(Use coupon code “CODEWITHCHRIS” for 50% off your first month. If you do, please let me know in the comments below. I’ll get a small kick back at no extra expense to you so thank you for supporting my site!)
If you go down this route for iOS app development, make sure you get my Xcode cheatsheet with references and keyboard shortcuts for Windows users.
There are a couple other companies that provide this service:
2. MacInCloud
This is the most well known service out of the three. You won’t have to install Xcode because it comes preinstalled. You can also do pay-as-you-go so it’s a pretty low commitment. Some people complain that it’s slow but you can try it out for yourself since it’s only about a buck an hour!
3. XcodeClub
XcodeClub is run by Daniel who is a passionate developer himself. From the reviews I see, the service is fast and friendly. The pricing is less flexible than MacInCloud and you’ll have to commit to at least a month.
Virtualize MacOS
If you’re a little more technically savvy, you can use virtualization software and run a “virtual Mac” on your PC.
The services above are essentially doing the same thing on their servers and then they charge you a fee to access the virtual machine.
By setting it up yourself on your own PC, you essentially cut the middle man out of the equation.
Unfortunately it does take a little bit of technical know-how to get this up and running.
The two most popular pieces of software to do virtualization are VirtualBox and VMWare Workstation.
You can download them below and then use Google to find a guide on how to install the latest MacOS (Mojave) with either VirtualBox or VMWare Workstation.
After that, spin up your new virtual Mac and download Xcode. This is as close as you’ll get to running actual Xcode on Windows!
4. VirtualBox
VirtualBox is open source software which means that it’s free. That probably explains why it’s a lot more popular than VMWare Workstation when it comes to running MacOS on your Windows machine!
5. VMWare Workstation
Unfortunately you’ll have to pay for this piece of software and at the time of this writing, a license costs about half the price of a brand new Mac Mini which is perfectly suitable for iOS app development. I would recommend you try VirtualBox first or try to buy a used Mac Mini.
Build a “Hackintosh”
You can also build a “Hackintosh” which is a PC that has been customized to run MacOS.
This requires the most effort out of all the options presented so far but it can work for someone who wants a separate physical computer running MacOS.
6. Hackintosh.com
A great resource for all things Hackintosh. The first How-To section contains links to a number of great tutorials for building your own Hackintosh and installing High Sierra.
7. Hackintosh Subreddit
I love looking for Reddit communities on anything that I’m interested in because there are always interesting conversations happening. Reddit provides a way to have a dialogue with like minded individuals, to get help and to help others!
8. Hackintosh Articles on 9to5mac.com
I included this link because it contains up to date news and articles for Hackintosh builds.
Third Party Solutions
Lastly, there are many third party solutions that you can use to do iOS development on Windows.
You won’t be using Xcode in these solutions but you’ll be able to generate an app that can run on iOS devices.
Check out these great Xcode alternatives:
9. React Native
Use JavaScript to build native mobile apps.
10. Xamarin
Use C# to build a mobile app that you can deploy natively to Android, iOS and Windows.
11. Appcelerator
Build native mobile apps using JavaScript.
12. PhoneGap
Build hybrid cross-platform mobile apps using HTML, CSS and JavaScript.
Xcode for Windows : How to install XCode IDE for iOS SDK on Windows 10 using virtual machine
This tutorial is an exclusive and detailed guide, which will help you to install XCode IDE framework on Windows computer. This guide is compatible with all the latest version of Windows, including Windows 7, Windows 8, Windows 8.1 and Windows 10. Do check out the detailed guide and let us know if you have any queries.
What is XCode IDE?
One of the major features for Xcode is that it will allow you to build binary file. Using which you can easily make a single software module work on Power PC and Intel-based x86 platforms. This is done through universal binary files. In windows, it can run both, 32 bit and 64 bit architecture.
The Xcode IDE is the center of the Apple development experience. The top best IDE is tightly integrated with the Cocoa and Cocoa Touch frameworks. Xcode is an incredibly productive environment for macOS containing a suite of software development tools. These tools are developed by Apple for developing software for macOS, iOS, watchOS, and tvOS. The first version of the IDE known as Xcode 1.0 was released in 2003.
Currently the latest stable release for the IDE is version 9.4. The current stable version is available for users via the Mac App Store free of charge for macOS High Sierra users. The developers registered with the company can also download preview releases and prior versions of the suite through the Apple Developer website.
What is the main usage of Xcode
Xcode is an Integrated Development Environment, so it means that it has all the tools required to produce an application. It is, in particular, a text editor, a compiler and a build system into a single software package. These tools work together to help users to write software, compile it and load it onto a device. Users can also use these tools to debug their program and ultimately submit it to the app store. Xcode is Apple’s official IDE for Mac and iOS developers, so if a user is Mac or iOS developer then it is must to use software for them.
However, the software also has a couple of uses for those users who don’t write their own codes. First one is to side-load programs into iOS 9 and later using Xcode IDE 7 or later. The user will need the source code and a cryptographic signature to do so, such that user can’t just upload any arbitrary iOS program. This is a new feature meant to encourage new programmers to design their own programs. The new programmers even do not require to pay for the Apple Developer program. Another reason for users to use Xcode IDE is because of OS X. The OS X is Unix based operating system which means a lot of codes from other Unix-like systems (such as Linux), can be compiled and run with some little modifications.
Features of Xcode IDE
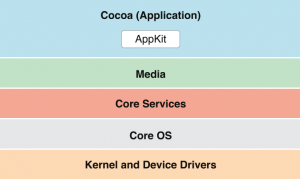
As already described the IDE is t ightly integrated with the Cocoa and Cocoa Touch frameworks. So let us know about Cocoa and Cocoa Touch and their features.
Cocoa is Apple’s native object-oriented application programming interface (API) for their operating system macOS. It consists of Cocoa.h header file that includes some kits. The main kits used in Cocoa are the Foundation Kit, Application Kit, and Core Data frameworks. It also consists of some libraries and frameworks that are included in these kits. These libraries mainly include the C standard library and the Objective C runtime. Cocoa Touch is a similar API for iOS, tvOS, and watchOS. It includes gesture recognition, animation and a different set of graphical control elements. Cocoa Touch API is mainly used to design applications for Apple devices such as iPhone, iPad, Apple TV and Apple Watch.
Xcode IDE is one of the best IDE for C++, C, objective C, and Objective C++ programming language as well.. Apart from all these C languages it also supports Java, AppleScript, Python, Ruby, ResEdit, and Swift. Xcode supports these all languages with a variety of programming models also including Cocoa. Some third parties have also added support for GNU Pascal, Free Pascal, Ada, C#, Perl, and D.
Xcode can also build fat binary files that contain code for multiple architectures. This fat binary files are in the Match-O executable format and are known as universal binary files. These binary files allow software to run on both PowerPC and Intel-base (x86) platforms including both 32-bit and 64-bit code. Xcode IDE also includes the GUI tool instruments. These instruments run with a dynamic tracing framework known as DTrace. DTrace is created by Sun Microsystems and it was released as a part of OpenSolaris.
Physical overview of Xcode IDE
Xcode IDE like any other IDE available also has various windows and parts to help users complete their tasks easily. So now let’s know about a physical overview about the IDE.
Assistant Editor
The Assistant button in the IDE will split the Xcode editor into two parts. The first part will contain user’s primary work document on the left side. While on the right side user will get an intelligent Assistant editor pane. The Assistant editor will automatically display files that Xcode determines are most helpful to the user based on the work user is performing in the primary editor.
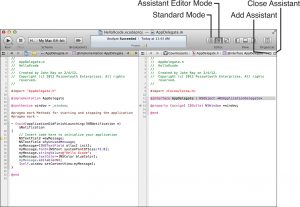
Jump Bar
Jump Bar is available at the top of every editor pane. On clicking on it the user can quickly select what information to view in the Assistant editor.

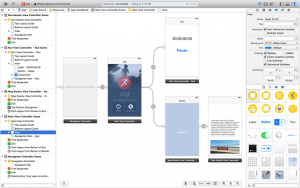
Interface Builder
The Interface Builder design makes it simple for user to prototype a full user interface without writing any code. User can design a prototype in minutes and then graphically connect their interface to the source within the Xcode editor, laying out windows, buttons, and sliders to create a functioning Mac, iPhone, or iPad user interface. With the Assistant editor, user can work on the graphical design side-by-side with the implementation source code.
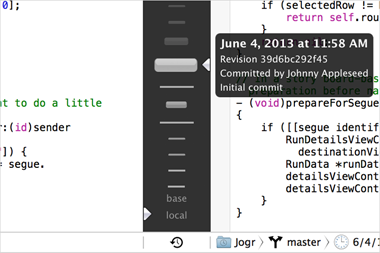
Version editor and Source Control
The Version editor will make it easy for the user to compare two versions of a file. Users can also see commit logs, check who made a code change, and even zoom back through the commit timeline.
Testing
The Test Navigator will make it easier for users to jump to any test in their project. It also allows users to either execute an individual test, or execute a group of tests.
Requirements for installing Xcode IDE on Windows
Now lets know about using Xcode IDE on Windows to develop applications for iOS or macOS. So, here is a list of system requirements that a user will need to run Xcode on Windows.
- A Virtual Machine such as VMware or VirtualBox. (Both VMware and VirtualBox are open source and free to download. So users can easily download it.)
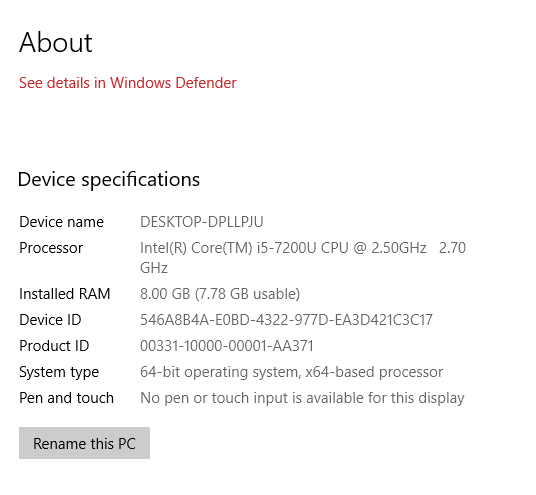
- Download a copy of Mac OS Sierra. Download as per the processor of the system either Intel version or AMD version. (To know about processor Press Windows Key + X and then select System, then check the processor name there.)
- Download Xcode package from Apple site. User will need to have Apple ID to download it from the Apple Store.
- Dual Core Intel or AMD processor.
- Minimum 2GB of RAM (Recommended: 4 GB+)
- Hardware Virtualization
A professional app developer will have to purchase Apple hardware with OS X and app developer ID. The professional app developers may need to use Xcode on their Apple hardware to test their software before publishing it on the App Store.
Steps to install macOS Sierra on Virtual Machine on Windows
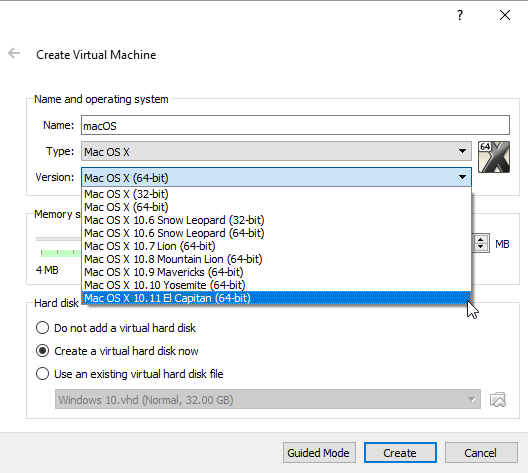
Step I : Open Virtual Machine (VMware or VirtualBox). Then select Create a New Virtual Machine. After that a new window will open. Then type macOS in the Name section. The Virtual Machine will automatically detect the OS as the user will type. Now, the Type row will set default to Mac OS X. However, user will need to change this. Under Version, select Mac OS X 10.11 El Capitan.
Step II : Next, user have to set the amount of RAM the virtual OS can use. User should set a minimum of 4 GB for efficient working of the OS. After that user will be asked to assign a hard disk.
Step III : Then select the type of Hardware file as VDI (VirtualBox Disk Image).
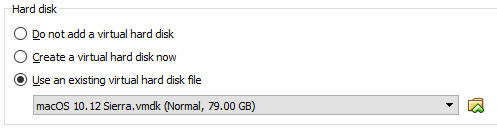
Step IV : Then user have to choose the OS file to install it. Select the folder icon and browse to the location of the Virtual Machine Disk Format file. Then open the file. User should make sure that they have selected the correct virtual disk then click on Create.
How to
Install Xcode IDE on macOS Sierra running on Windows Virtual Machine
Step I : After successfully installing the macOS on the Virtual Machine, user have to click on the Virtual Machine to start it.
Step II : After the OS X will boot, users will get some on-screen wizards. Follow the on-screen wizards to complete the installation process.
Step III : Now, after the completion of booting up of the OS user will see the Desktop in the macOS Sierra on their Virtual Machine.
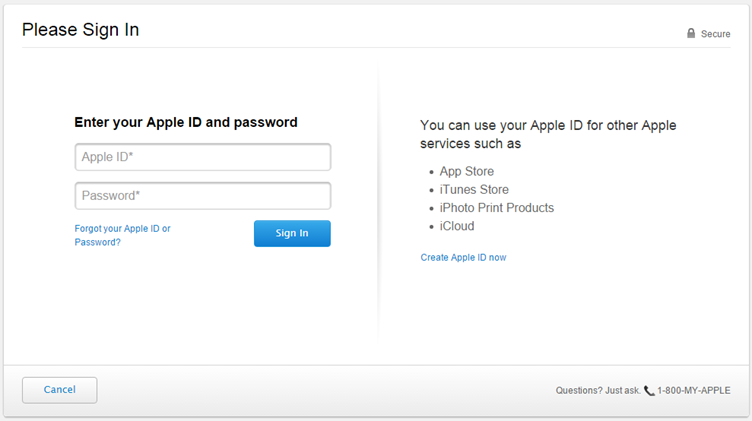
Step IV : Then user should go to the Safari Browser from the applications and go to the official Apple app store. After that user have to sign in the app store using their Apple ID and Password.
Step V : After signing in, user will search for Xcode IDE in the search box in order to download the complete package. From various apps that will appear select Xcode and click on Free and Download. Then complete the download process by clicking on OK. This will install the Xcode on the Virtual Machine.

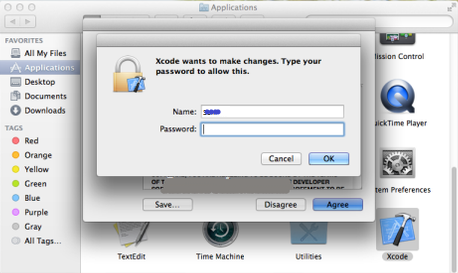
Step VI : After completion of the installation process, open the Xcode from the list of applications. Now, the system will ask for the root credentials from the user to get access to install components for Xcode. This will also modify the system settings. User have to enter the name and password to provide root access to Xcode and then click on OK.
Step VII : This will complete the procedure of installation. Now user have successfully installed latest version of Xcode IDE on the Virtual Machine for their Windows.

This steps will complete the installation of Xcode IDE on the Virtual Machine on user’s Windows PC or Laptop. Now, user can easily use the IDE to create new applications using the interface. Users may face some issues regarding speed and performance of Xcode as it will be running on a Virtual Machine. However, it will be good for educational purpose but for a professional user, using Xcode in Macbook will be good.


