- Use windows key in games
- How to disable the Windows key
- WINDOWS KEY NOT WORKING — Already tried all thing on this forum
- Replies (56)
- How to disable the Windows Key in Windows 10 [FULL GUIDE]
- How can I disable the Windows Key while gaming?
- 1. Modify your registry
- 2. Use Disable Windows key reg
- 3. Use AutoHotkey
- 4. Use SharpKeys
- 5. Use Gaming mode on your keyboard
- 6. Use your keyboard software
Use windows key in games
To disable the Windows key, follow these steps:
Click Start, click Run, type regedt32, and then click OK.
On the Windows menu, click HKEY_LOCAL_ MACHINE on Local Machine.
Double-click the System\CurrentControlSet\Control folder, and then click the Keyboard Layout folder.
On the Edit menu, click Add Value, type in Scancode Map, click REG_BINARY as the Data Type, and then click OK.
Type 00000000000000000300000000005BE000005CE000000000 in the Data field, and then click OK.
Close Registry Editor and restart the computer.
To enable the Windows key, follow these steps:
Click Start, click Run, type regedt32, and then click OK.
On the Windows menu, click HKEY_LOCAL_ MACHINE on Local Machine.
Double-click the System\CurrentControlSet\Control folder, and then click the Keyboard Layout folder.
Right-click the Scancode Map registry entry, and then click Delete. Click Yes.
Close Registry Editor and restart the computer.

— Click Start, click Run, type regedt32, and then click OK.
— On the Windows menu, click HKEY_LOCAL_ MACHINE on Local Machine.
— Double-click the System\CurrentControlSet\Control folder, and then click the Keyboard Layout folder.
— On the Edit menu, click Add Value, type in Scancode Map, click REG_BINARY as the Data Type, and then click OK.
— Type 00000000000000000300000000005BE000005CE000000000 in the Data field, and then click OK.
— Close Registry Editor and restart the computer.
How to disable the Windows key
By Tyler Wilde 18 January 2015

Ask PC Gamer is our weekly question and advice column. Have a burning question about the smoke coming out of your PC? Send your problems to letters@pcgamer.com.
Look, See? I am a PC Gamer. I am impressed—really!—by the knowledge the Windows key does all that. However, due to my empirical knowledge of how aggravating the Windows key is to my PC Gaming I will continue to remove the Windows key from my keyboards. —Klimek Shannon
OK, so that wasn’t a question, but it brings one up. That was a response to my post from last week, in which I offered a few of my favorite Windows shortcuts and tricks. While the Windows key can be useful for the highly efficient PC gamer, Klimek points out that it can also be the cruelest key of them all. Accidentally dumping yourself to the desktop in the middle of a competitive game is worse than accidentally hitting Insert and typing over a sentence. Thankfully, there are ways to disable it.
As commenters pointed out, some keyboards (like the one pictured) include a button to disable the key. On my Thermaltake keyboard, the left Windows key is replaced with an Fn key, so I don’t worry about it. If you’re out of luck with your keyboard, though, you can still disable the key in Windows 7 with a bit of registry editing. Here, directly from Microsoft support, is how to do it:
- Click Start, click Run, type regedt32, and then click OK.
- On the Windows menu, click HKEY_LOCAL_ MACHINE on Local Machine.
- Double-click the System\CurrentControlSet\Control folder, and then click the Keyboard Layout folder.
- On the Edit menu, click Add Value, type in Scancode Map, click REG_BINARY as the Data Type, and then click OK.
- Type 00000000000000000300000000005BE000005CE000000000 in the Data field, and then click OK.
- Close Registry Editor and restart the computer.
If you don’t want to mess with your registry yourself, which can be dangerous, Microsoft will do it for you with a little download on the support page. Or you can try a different method, with a program that’s handy to have anyway, and keep the shortcuts. [The following has been revised thanks to solliddd’s great comment.]
AutoHotkey is what you want. Download the program (it’s free and open source) and run it, then right click on its icon in the taskbar. Select ‘Edit This Script’ and it’ll open the default script in Notepad. Somewhere between the comments (which are marked with semi-colons) add the following:
Now just save the file, right click on AutoHotkey again, and select ‘Reload This Script.’ Both Windows keys should now do nothing when pressed on their own, but shortcuts will still work. Now you’ll never end up looking at the desktop when you meant to crouch. Whew.
Note: Some online games may detect AutoHotkey as a potential cheating application, though I always have it running and have never had a problem. Obviously, if you’re creating scripts to automate in-game actions, the game’s moderators may not approve. Use it at your own risk!
WINDOWS KEY NOT WORKING — Already tried all thing on this forum
My windows key simply stoped working
Now when I try to use WIN+ «something» it selects the icon with the letter I press. Like I press WIN+D(to desktop) it selects the icon with a letter D
Already tried everything I seen in this forum about it nothing seem to work
Replies (56)
* Please try a lower page number.
* Please enter only numbers.
* Please try a lower page number.
* Please enter only numbers.
Method 1: Disable gaming mode on your keyboard
Some keyboards, usually marketed as “gaming”, have ability to turn off Windows keys via some hardware switch or Fn key combination in order to prevent pressing this key which usually exits your game. The gaming mode key is usually marked with a joystick drawing. Here is how to disable gaming mode on some of the popular gaming keyboards.
On Logitech keyboards, there is a switch above the F1, F2 & F3 function keys that you can flip to the right for gaming mode and to the left for regular use. Flip it to the left. Other versions have a gaming mode button above F4, press the button to toggle in between gaming and standard modes.
In some keyboards, beside the right Ctrl button, instead of a second Windows button, there is a “Win Lock” button (not the menu button). Press it to enable the Windows key.
Corsair keyboards have their own software to adjust lighting, functionality, etc. Run the Corsair software (which has an option to enable/disable the windows key) and enable your Windows key.
The Azio keyboard also has such a switch in the MGK1 series. MGK1 & MGK1-K: Press FN and F9 at the same time. For MGK1-RGB: Press FN and Windows Start Key at the same time.
For the MSI computer/laptop keyboards, you can switch turn on the Windows key from the Dragon Gaming Center > System Tuner.
For the ibuypower keyboard, press fn + ibuypower (aka windows key) to toggle Windows key on and off
For Alienware gaming keyboard, press Fn + F6 to toggle gaming mode on and off
For MS Sidewinder keyboard, go into MS Keyboard & Mouse Center and you can click the Windows key in the dashboard and set it to enabled/disabled
Method 2: Enable Windows Key using registry edit
The registry can allow or restrict a lot including keyboard keys and menu items. To enable your Windows key:
Click Start, type ‘Run’ and click Run, or in Windows 8/10 right click on the start button and click run
Type ‘regedt32’, and then click OK. Click Yes if you get any EULA message asking for confirmation.
On the Windows menu, click HKEY_LOCAL_ MACHINE on Local Machine.
Double-click the System\CurrentControlSet\Control folder, and then click the Keyboard Layout folder.
Right-click the Scancode Map registry entry, and then click Delete.
Click Yes on the confirmation/warning message.
Close Registry Editor and restart the computer.
If you need to disable Windows key again, go to the Microsoft page here and follow the instructions for disabling windows key. You can also use the easy fix tool from here to enable and disable the Windows Key.
Method 3: Re-Register all apps
This will clear any software conflict with your keyboard
Click on the Windows button.
Type ‘PowerShell’ and then right click on ‘Windows PowerShell’ and run as an administrator.
If your start button doesn’t work when you click on it, go to this location: C:\Users\YourUserName\AppData\Roaming\Microsoft\Windows\Start Menu\Programs\Windows PowerShell\ and right click on “Windows PowerShell” and run as administrator
Type or copy and paste the script below into the PowerShell window and press enter
Get-AppXPackage -AllUsers | Foreach
Restart your PC
Method 4: Enable the start menu
In cases where your start key does not bring up the start menu, there is a possibility the start menu was disabled. To enable it, follow the steps below.
Right click on the Start Button and select “Run” or press Ctrl + Shift + Esc and go to File > click run a new task from task manager.
Type “regedit” (without the quotes)
Navigate to this key
HKEY_CURRENT_USER > Software > Microsoft > Windows > CurrentVersion > Explorer > Advance
Right click on the right hand side panel and create a new DWORD (32-bit) value
Call the new key “EnableXamlStartMenu”
Restart your PC or restart Explorer using task manager as explained in method 5 below.
Method 5: Restart Windows/File Explorer
Explorer controls your Windows user interface. This method will restart Windows/File Explorer and clear any errors that prevented it from starting correctly.
Press Ctrl + Alt + Del on the keyboard and click on task manager.
Click on the Process tab and locate Explorer in the windows and right click on it and select end task.
Click on File and then click on Run New Task.
Type ‘explorer.exe’ and press enter.
Method 6: Turn off filter keys
This has been seen as one of the culprits in Windows 8 and Windows 10 issues. Turning on filterkeys ignores or slows down repeated key strokes and adjusts repeat rates. Somehow, the windows key is also affected on some keyboards. To turn off filter keys:
Drag your mouse to the right edge of your Windows 8 PC and click settings. In windows 10, right click on your start menu and select settings.
From the Windows settings page, scroll down and click on Ease of Access
Click on the keyboard tab on the left hand pane
Scroll down to ‘filter keys’ and turn it off
Method 7: Uninstall and reinstall your keyboard drivers
Uninstalling the bad keyboard drivers will reinstall the correct drivers for your keyboard.
Right click on the Start Button and select “Run” or press Ctrl + Shift + Esc to open task manager and go to File > run a new task.
Type devmgmt.msc and hit enter to open device manager
Expand the ‘Keyboards’ section
Right click on your keyboard drivers and select ‘Uninstall device’
On the warning message that appears, click on ‘Yes’ or ‘Uninstall’ to remove these drivers
If you have a USB keyboard, unplug it then plug it back in. Or restart your computer. Windows will reinstall the drivers automatically. Check if Windows key now functions.
Method 8: Unplug your game controller
Your Windows key might not function some times when your game pad is plugged in and a button is pressed down on the gaming pad. This could be caused by conflicting drivers. It is rear however, but all you need to do is unplug your gamepad or make sure no button is pressed down on your gaming pad or keyboard. Updating your gamepad or keyboard drivers might permanently solve this problem.
Please let me know if one of these will help you solve your concern.
How to disable the Windows Key in Windows 10 [FULL GUIDE]

- Have you wondered how to disable the Windows key? Modifying the registry is one solution.
- Instead of modifying the registry, you can download a .reg file and use it to disable the Windows key.
- Usually, gaming keyboards have dedicated software so you can check the key settings there.
- Using a dedicated third-party tool is another solution of how to disable the Windows key button.

- Download Restoro PC Repair Tool that comes with Patented Technologies (patent available here).
- Click Start Scan to find Windows issues that could be causing PC problems.
- Click Repair All to fix issues affecting your computer’s security and performance
- Restoro has been downloaded by 0 readers this month.
The Windows Key is rather useful and it’s a part of many shortcuts on Windows 10. Even though many users use it frequently, some users want to disable it.
Every advanced Windows user knows how useful Windows Key button is. Despite its usefulness, the key can sometimes be a problem, especially during intense gaming sessions.
By default, pressing the Windows Key will open the Start Menu and that can be a problem during gaming. By accidentally pressing the Windows button you’ll lose focus on your game and that can be a big problem.
In order to avoid these kinds of problems, many gamers disable their Windows Key during the gaming sessions.
In this guide, we’re going to show how to disable the Windows button. There are a couple of methods you can use from where you can choose the best for you.
How can I disable the Windows Key while gaming?
1. Modify your registry
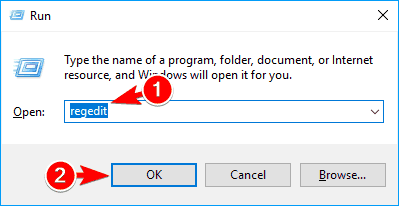
- Press Windows Key + R and enter regedit.
- Click on OK or press Enter.

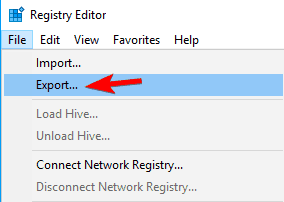
- Optional: Before you make any changes to your registry it’s always a good idea to create a backup. To do that, just click on File > Export.
- Select All as Export range, choose a safe location, enter the desired file name and click on Save.
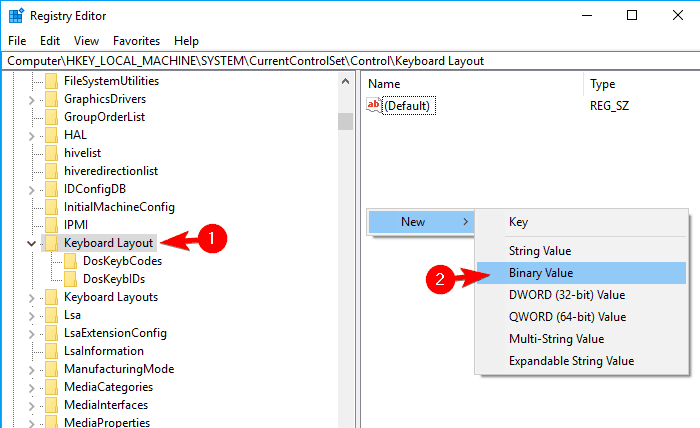
- In the left panel, navigate to: Computer\HKEY_LOCAL_MACHINE\SYSTEM\CurrentControlSet\Control\Keyboard Layout
- In the right pane, right-click the empty space and choose New >Binary Value from the menu.
- Enter Scancode Map as the name of the new value.
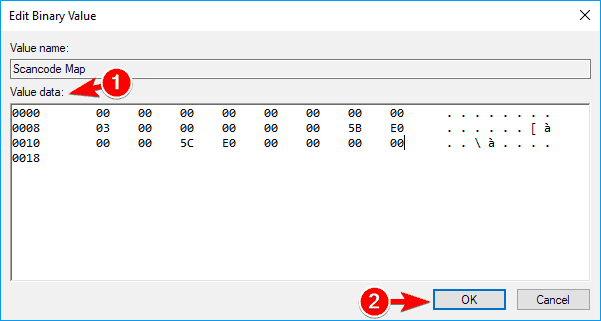
- Double click Scancode Map value and enter 00000000000000000300000000005BE000005CE000000000 in the Data field.
- Be extra cautious and double-check if the entered value is correct. Now click OK.
- After doing that, close Registry Editor and restart your PC.

Note: Keep in mind that your registry has sensitive information in it, so if you want to edit it, use extra caution. If you encounter any problems with your PC after modifying the registry, restore the backup created at steps 3-4.
After your PC restarts, the Windows Key should be completely disabled. To enable the Windows Key, you need to go back to Registry Editor and delete the Scancode Map that you created.
2. Use Disable Windows key reg

If you don’t want to modify your registry manually, there’s a .reg file available that you can use to modify it. Simply download Disable Windows key.reg and run it.
When the warning message appears, click on Yes. If you want to enable Windows Key again, download and run Enable Caps Lock and Windows keys.reg.
This method is a lot faster and simpler, so if you’re not comfortable with modifying the registry manually, be sure to try using the .reg file.
This method is great if you want to disable Windows Key and prevent other users from enabling it. Modifying the registry manually might not be the simplest method, but you can always use the .reg file to modify it automatically.
3. Use AutoHotkey

If you want to disable your Windows Key, you might want to try using AutoHotkey. This is an open-source and powerful automation scripting language.
The application allows you to assign certain commands to your keys, but it also allows you to disable keys. AutoHotkey isn’t the simplest application , so you might want to learn how it works before you can use it correctly.
Basically, you need to create a script that will block Windows Keys and add that script to AutoHotkey. Simply click AutoHotkey icon in your Taskbar and choose Edit this Script. Now you need to paste the following script at the bottom:
Save your script, right-click AutoHotkey and choose to Reload This Script from the menu. After doing that, both Windows Keys will be disabled.
Keep in mind that this solution won’t disable shortcuts that involve Windows Key, instead, it will just disable the keys themselves.
It’s worth mentioning that some online games might recognize AutoHotkey as a cheating application, so keep that in mind.
Before you use this solution it’s always a good idea to do some research and check if the game developers allow you to use AutoHotkey with their game.
⇒ Download Autohotkey
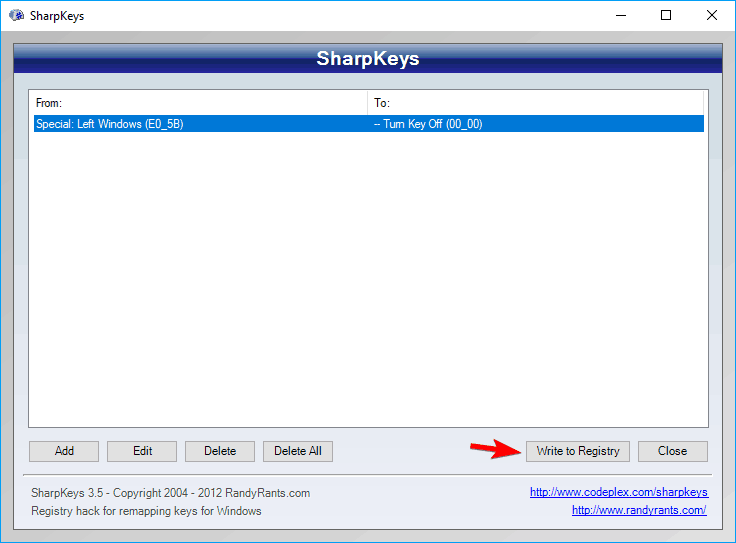
4. Use SharpKeys
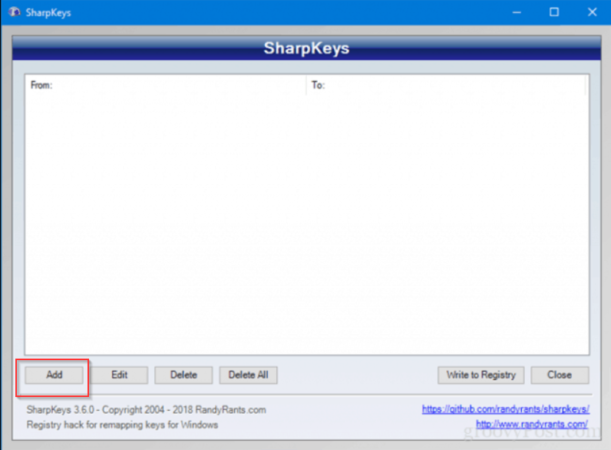
- Download and start SharpKeys.
- Once the application starts, click on Add.
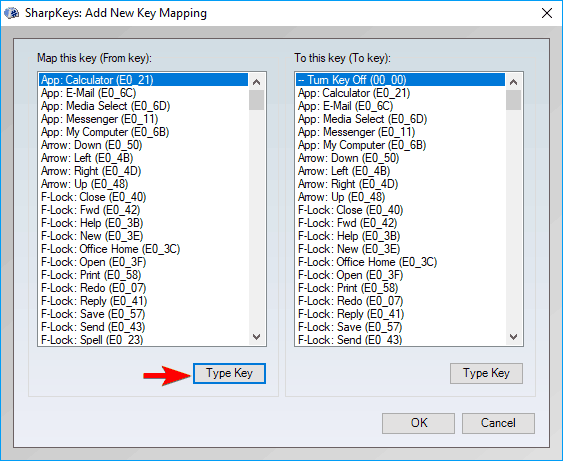
- Now you’ll see two columns. Click on Type Key in the left pane and press the Windows Key.
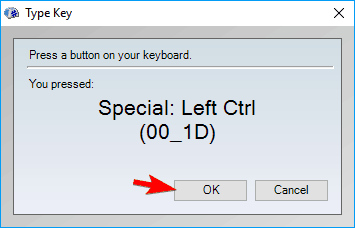
- Now click on OK to select the pressed key.
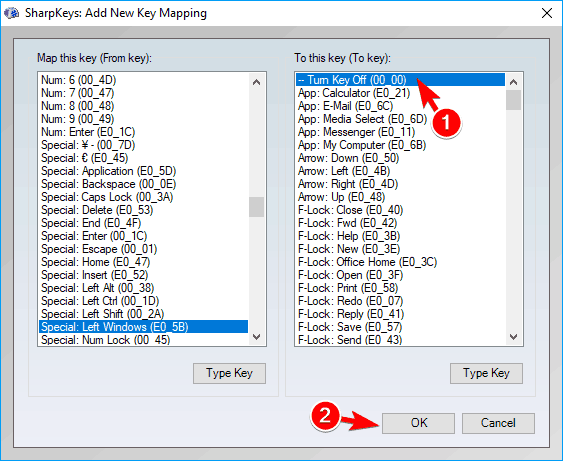
- Select Turn Key Off in the right pane and click on OK to save changes.
- Now click on Write to Registry button.
- Now you just have to restart your PC or log out and log back in to apply the changes.
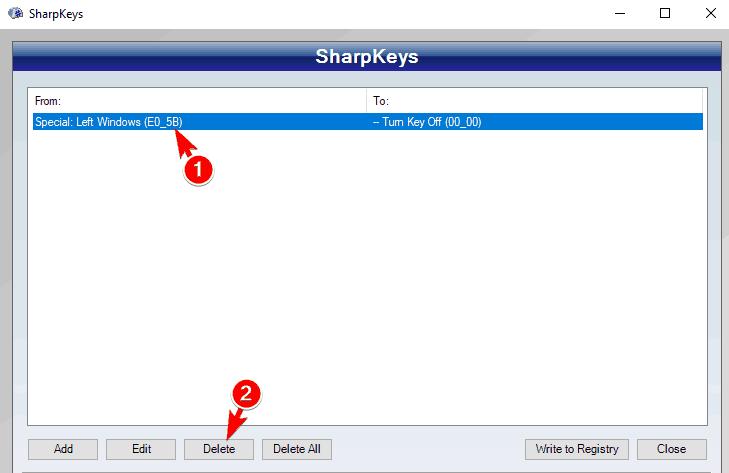
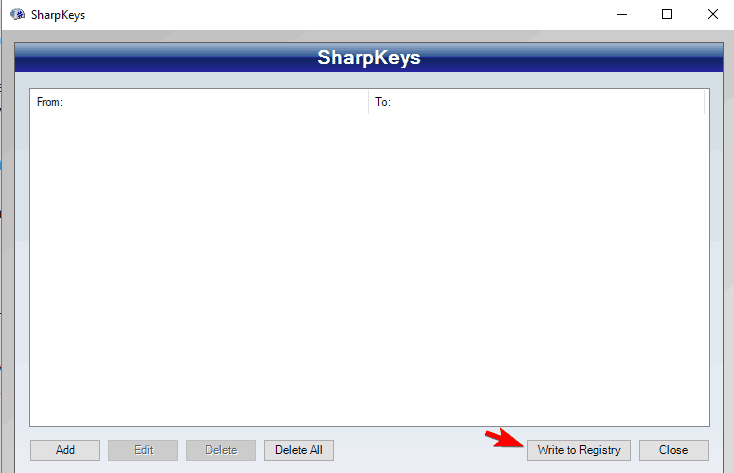
- To enable Windows Key again, start Sharpkeys, s elect the desired key from the menu, and click on Delete.
- After deleting the key, click on Write to Registry button.
- Now restart your PC or log off and back on to apply the changes.
Note: This is a free and portable tool that allows you to remap your keys, but it also has the ability to disable keys or to assign them to certain functions. Keep in mind that this is a powerful application, so you’re using it at your own risk.
5. Use Gaming mode on your keyboard

Many gaming keyboards have a Gaming mode feature that allows you to block Windows Key with ease. To activate Gaming mode you usually have to press a certain keyboard shortcut.
Some keyboards even have a controller icon on one of its keys so you can easily find the shortcut key for Gaming mode. If you can’t find the shortcut on your own, we advise you to check your keyboard manual for detailed instructions on how to activate Gaming mode.
Keep in mind that not all keyboards support this feature, so before you can use it you need to check if your keyboard supports it. Activating the Gaming mode is the simplest and fastest way to disable Windows Key, but unfortunately, not all keyboards support this feature.
6. Use your keyboard software
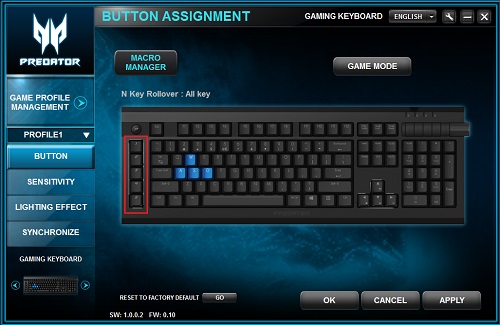
As we previously mentioned, many gaming keyboards support Gaming mode. These keyboards usually have dedicated software that you can use to configure various settings such as macros and lighting.


