- Install Windows from a USB Flash Drive
- What you need
- Step 1 — Format the drive and set the primary partition as active
- Step 2 — Copy Windows Setup to the USB flash drive
- Step 3 — Install Windows to the new PC
- If your Windows image is larger than 4GB
- Windows Asks to Format Your USB Drive or SD Card When Connected?
- Method 1 – System File Checker
- Method 2 – Reinstall USB Controller
- Method 3 – Run chkdsk
- Method 4 – Plug into Different USB Port
- Method 5 – Try Partition Recovery Tool
- Method 6 – Format the Device
- What to Do When Your USB Drive Is Not Showing Up
- How To Fix a Plugged-In USB Drive Not Showing Up
- Preliminary Checks
- Check For Device Compatibility
- Update Your Operating System
- Use Disk Management Tool
- Try Plugging Into a Different Computer Or USB Port
- Troubleshoot Drivers
- Use Device Manager To scan For Hardware Changes
- Reinstall USB Controllers
- Create a New Drive Volume & Assign a Drive Letter
- Disable USB Selective Suspend Feature
Install Windows from a USB Flash Drive
Here’s how to create a bootable Windows installation USB drive starting with a Windows .iso file or a Windows Setup DVD.
If you’re looking for an easy way to create a bootable USB Windows installation drive, use the media creation tool.
What you need
- Windows 10 install .iso or DVD
- USB flash drive with at least 5GB free space. This drive will be formatted, so make sure it doesn’t have any important files on it.
- Technician PC — Windows PC that you’ll use to format the USB flash drive
- Destination PC — A PC that you’ll install Windows on
Step 1 — Format the drive and set the primary partition as active
Connect the USB flash drive to your technician PC.
Open Disk Management: Right-click on Start and choose Disk Management.
Format the partition: Right-click the USB drive partition and choose Format. Select the FAT32 file system to be able to boot either BIOS-based or UEFI-based PCs.
Set the partition as active: Right-click the USB drive partition and click Mark Partition as Active.
If Mark Partition as Active isn’t available, you can instead use diskpart to select the partition and mark it active.
Step 2 — Copy Windows Setup to the USB flash drive
Use File Explorer to copy and paste the entire contents of the Windows product DVD or ISO to the USB flash drive.
Optional: add an unattend file to automate the installation process. For more information, see Automate Windows Setup.
Step 3 — Install Windows to the new PC
Connect the USB flash drive to a new PC.
Turn on the PC and press the key that opens the boot-device selection menu for the computer, such as the Esc/F10/F12 keys. Select the option that boots the PC from the USB flash drive.
Windows Setup starts. Follow the instructions to install Windows.
Remove the USB flash drive.
If your Windows image is larger than 4GB
Windows USB install drives are formatted as FAT32, which has a 4GB filesize limit. If your image is larger than the filesize limit:
Copy everything except the Windows image file (sources\install.wim) to the USB drive (either drag and drop, or use this command, where D: is the mounted ISO and E: is the USB flash drive.)
Split the Windows image file into smaller files, and put the smaller files onto the USB drive:
Windows Asks to Format Your USB Drive or SD Card When Connected?
Windows has its set of quirks and this is one of them
So here’s a really annoying problem: you connect a USB drive or USB SD card reader to your PC and Windows tells you it needs to format the drive in order to use it properly! The only issue is that you didn’t have this problem two days ago and everything connected just fine! So what’s the solution?
Well, Windows is quirky and if some of the system files get corrupted, you can end up with this really annoying problem of having to reformat all your USB drives and SD cards!
Most of the time that’s not even an option and if you can plug the device into another system where it loads properly, then why format.
Luckily, there are a couple of things you can do to get rid of the problem. In this article, I’ll try and walk you through the different actions you can take to correct this issue.
Method 1 – System File Checker
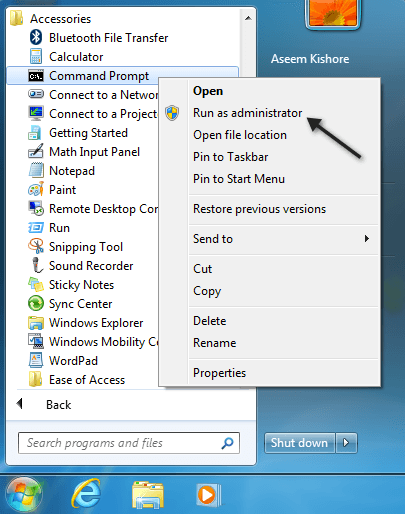
The first thing to try is to run the System File Checker, a built in tool that scans all the Windows system files and replaces any corrupted ones with fresh copies. You need to run this using an elevated command prompt.
You can get to an elevated command prompt by going to Start, then Accessories and right-clicking on Command Prompt and choosing Run as Administrator. In new versions of Windows, just search command prompt from the Start Menu and then right-click on the first result.
Now type sfc/scannow and press Enter. Get ready to sit back and wait a while because this process usually takes a long time.

If, for whatever reason, system file checker cannot replace all corrupt files (which it will tell you), then you will have to manually do it. You can follow the instructions here:
Hopefully, you won’t have to do that though. Now go ahead and restart your computer and then try to plug in your USB device and see what happens. If you are still being asked to format it, keep reading.
Method 2 – Reinstall USB Controller
Another thing you can try is to reinstall the USB controllers on your Windows machine. You can do this by clicking on the Start button and then typing in devmgmt.msc in the search box and pressing Enter.
If you are not using Windows 7, you can go to Device Manager by going to the Control Panel, then System and clicking on Hardware.
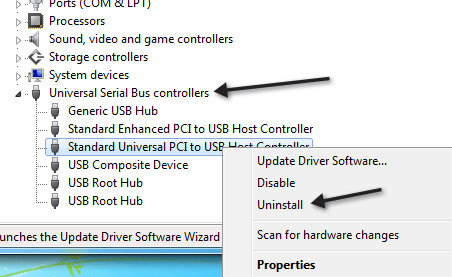
Go ahead and right-click on each item under Universal Serial Bus controllers and choose Uninstall. After you have uninstalled all items, go ahead and restart your computer and it will automatically reinstall each USB port.
Method 3 – Run chkdsk
So it may not seem worth doing, but running a chkdsk on your USB drive might also fix the problem. chkdsk will check for bad sectors and fix them if they exist. Now you might be saying that the USB drive works perfectly fine on a different computer, so it can’t have any possible problem, right? Well, maybe not.
Either way, it’s a solution that some people have said has fixed the problem. Again, you need to run it using an elevated command prompt, which I mentioned how to do above. Then type in the following command without the brackets:
The [drive] is the drive you want to scan. /p will check the hard drive even if it has been marked as dirty. /r will find the bad sectors and recover any data from there. Once it has finished, go ahead and disconnect the drive and then restart your computer. See what happens when you connect it again.
Method 4 – Plug into Different USB Port
At this point, you are running out of options. One solution a few people mentioned was trying to plug the device into a different USB port. Apparently this is more of a problem with Windows XP.
Somehow when a device gets connected to a particular port, Windows remembers something about that device and connecting it to a different port can confuse Windows.
I’ve never really had this problem before, but it seems to cause issues with some folks. It’s worth a shot and could be a simple fix.
Method 5 – Try Partition Recovery Tool
If the USB drive is giving you the same message on any computer you connect it to, then it’s probably an issue with the file system structure on the USB drive.
You can try to repair the USB drive by running chkdsk, which I mentioned in Method 4. If that doesn’t work, you can try out a third-party tool called TestDisk, which is open source and free.

It’s a command line tool and therefore a little more technical, but it does work very well. They also have good documentation. In our case, you should follow the step-by-step instructions for recovering and repairing partitions.
Method 6 – Format the Device
If you still get this message, then there really is not much else you can do other than format it. However, you should connect the device to another computer, copy off all the data and then perform a format.
Also, when you format the device, you should go to Disk Management and then right-click on the device there and choose Format.
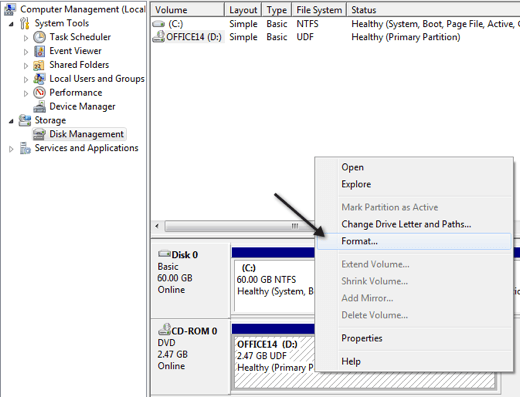
You can get to Disk Management by right-clicking on My Computer or the Computer icon in Windows 7 and clicking on Manage. Also, check out my previous post on the best file format to use when formatting USB drives.
Lastly, I wrote a post if your computer doesn’t recognize your USB drive at all and how to fix that issue. If you had this problem and fixed it some other way, post a comment here and let us know how! Enjoy!
Founder of Online Tech Tips and managing editor. He began blogging in 2007 and quit his job in 2010 to blog full-time. He has over 15 years of industry experience in IT and holds several technical certifications. Read Aseem’s Full Bio
What to Do When Your USB Drive Is Not Showing Up
Follow these steps to pinpoint the problem
USB is an extensively adopted technology that allows us to plug lots of devices into our computers every day. Although it’s quite easy to set up, sometimes it’s not all plug and play. What do you do when your USB drive is not showing up?
This can be caused by several different things such as a damaged or dead USB flash drive, outdated software and drivers, partition issues, wrong file system, and device conflicts. Other causes like faulty hardware, dead system controller or USB ports require professional assistance from your device manufacturer or a certified computer technician.

While it’s not easy to pinpoint the exact reason why your computer won’t recognize the USB stick, you can work through various possible solutions until it works again.
We’ve rounded up some effective solutions that can work when you’re experiencing USB connection issues. Most of these also apply to different devices such as disk drives, mice, video game controllers and more, which requires a connection via USB.
Also, check out our short YouTube video where we go through some of the solutions down below. If you’re getting a USB Device not Recognized error, we have a solution for that too, so check out the link.
How To Fix a Plugged-In USB Drive Not Showing Up
- Preliminary checks
- Check for device compatibility
- Update your operating system
- Windows Troubleshooter tool
- Use Disk Management tool
- Try plugging into a different computer or USB port
- Troubleshoot drivers
- Use Device Manager to scan for hardware changes
- Create new drive volume and assign a drive letter
- Disable USB Selective Suspend feature
Preliminary Checks
- Check That Your USB Device Is On. When you connect your USB stick to your computer, it should ideally turn on automatically with flashing lights on the unit indicating activity. Some units have a dedicated power cable, or physical power button that you have to turn on manually, for your computer to detect it.
- Examine The USB Stick For Cracks. It’s possible that the flash drive could have been damaged without your knowledge, so check it physically to rule out any issues before trying again.
- Restart Your Computer. This may be an old tech support standby, but it fixes a lot of issues, especially those caused by software glitches. Unplug the USB stick, shut down your computer and unplug it from the power source. Wait up to one minute before restarting your computer and trying the flash drive again.
- Allow Your Computer To LoadFully before trying the USB stick again. Some computers can be slow and get overwhelmed by the multiple operations they have to run during startup, so it’s possible that your USB stick might be getting overlooked.
Check For Device Compatibility
If your USB stick isn’t meant to work with your computer, then it won’t show up when you plug it in. In Windows PCs, most USB 3 devices can connect to USB 2 ports, which shouldn’t be much trouble.
However, with advances in technology, a USB 3 device may require a more powerful and compatible port to work. Check your device’s instruction manual or packaging for compatibility information before trying again.
Update Your Operating System
If you’re using Windows, updating the operating system comes with important files that support different hardware and devices, plus fixes to any errors you may encounter.
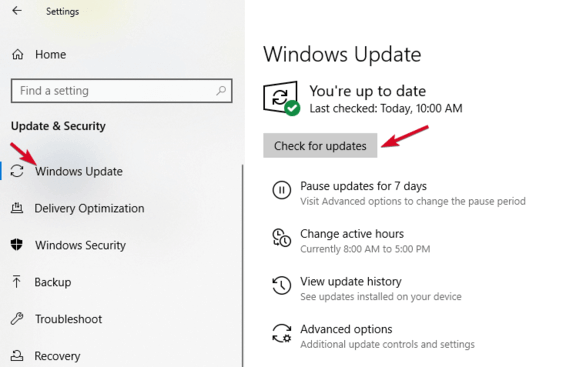
- Open Settings > Update & Security.
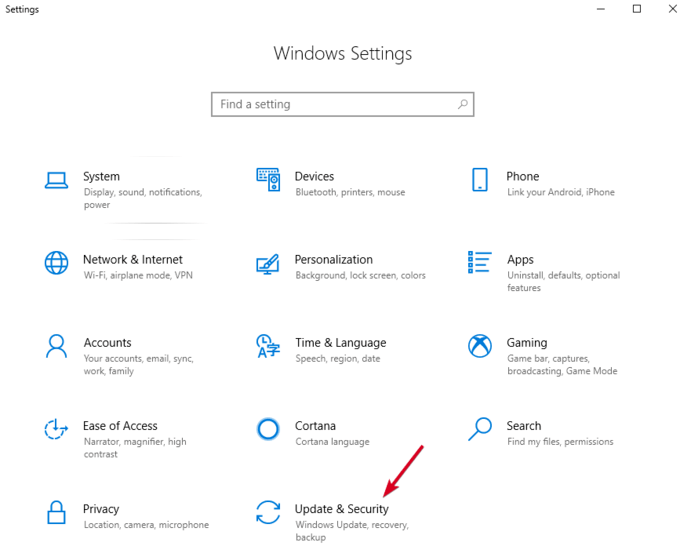
- Click Check for Updates. If there are any pending updates, download and restart your computer before trying your USB stick again.
Use Disk Management Tool
This tool checks whether Windows will detect your USB stick. It also shows you all the hard disks connected to your PC, and you can review information like partitions, sizes, and more.
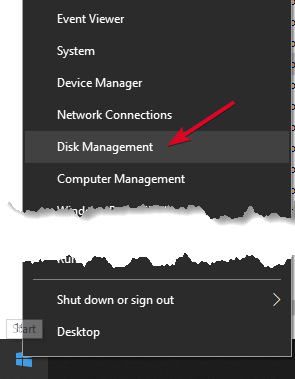
- Plug in your USB stick and right-click Start > Disk Management.
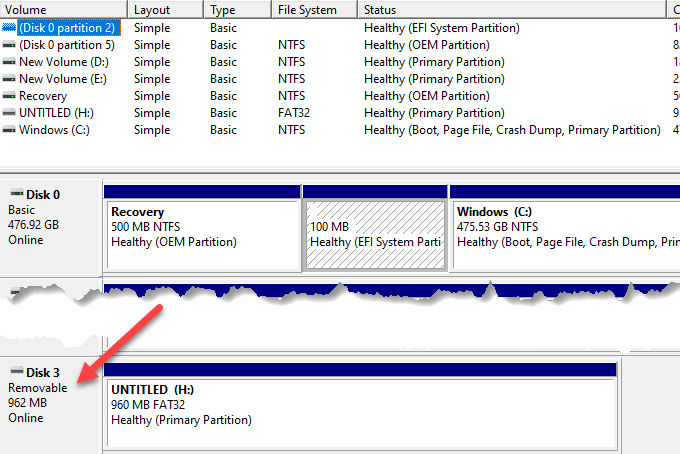
- Check for your USB stick under primary or secondary disks. If it doesn’t contain partitions, it’ll appear as Removable.
- If you see it in the Disk Management utility, you can create a new volume and assign a drive letter. This way, you can partition or format the flash drive to make it easily detectable by other devices, including your PC.
- If your USB drive is not showing up, it could be a driver or hardware issue, or the drive is dead.
Try Plugging Into a Different Computer Or USB Port
Unplug the USB stick from the current port and computer, and try plugging into a different computer and/or USB port. If it works on the new USB port or computer, the USB port may be damaged or dead, or the computer itself may have a problem.
A faulty, damaged or dead USB port presents problems such as failure to detect USB drives or displays error messages. Check if the port is clean, dust-free, and firm. If it’s moving up and down or feels loose, then it’s faulty/damaged.
If you’re using a USB hub, unplug the stick from the hub and plug it directly into your computer. Some hubs have insufficient power for external drives to function, which may be the case with yours.
If the USB drive isn’t showing up even after trying a different port, computer, or checking in Disk Management, the drive is probably dead and needs to be replaced.
Troubleshoot Drivers
You can troubleshoot driver issues using Device Manager, especially if your USB stick is detected by a different computer other than the one you’re using, signaling a driver problem.
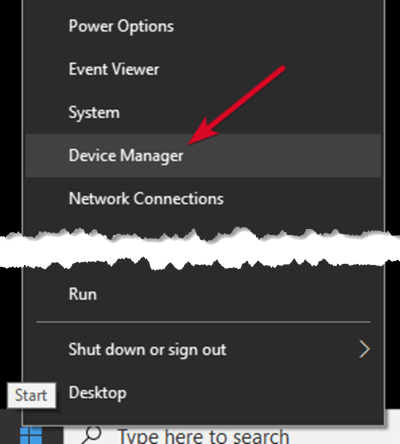
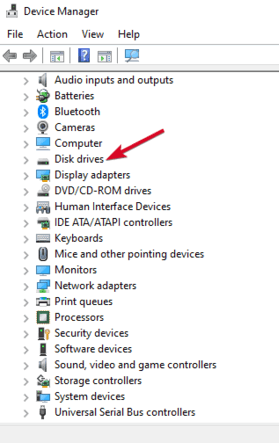
- Right-click Start>Device Manager.
- Expand Disk drives and check for a yellow exclamation point next to any of the listed devices. If there’s one or more with this mark, then the device(s) has a driver issue.
- Right-click on the problematic device and select Properties to see the related error message. You can search for the error online to find a solution to the problem
You can also try the following solutions to resolve driver issues:
- Roll back the driver to revert to recent driver updates and restore the device back to a time when it was functioning properly.
- Download drivers from the device manufacturer’s site from the downloads page, support page, or by searching on the site for the right driver.
- Update the driver by right-clicking on the driver in Device Manager, select Update driver and follow the prompts.
- Uninstall the device from your computer, restart it and wait for it to reinstall the right driver and configurations.
Use Device Manager To scan For Hardware Changes
- Right-click Start and select Device Manager.
- Click Action > Scan for hardware changes.
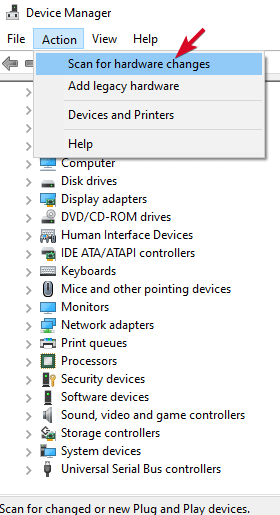
Windows will try to find your USB stick so you can access it again.
Reinstall USB Controllers
This method helps where the USB driver is unstable or corrupted.
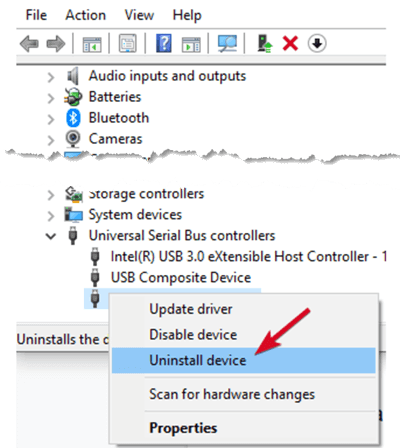
- Right-click Start>Device Manager and click on the Universal Serial Bus controllers to expand the list.

- Right-click your device and click Uninstall, and then restart your computer to reinstall the controllers automatically.
Create a New Drive Volume & Assign a Drive Letter
If your device appeared in the Disk Management step, you can create a new drive volume and assign a drive letter. The Disk Management tool fixes partitioning and file system problems with different drives.
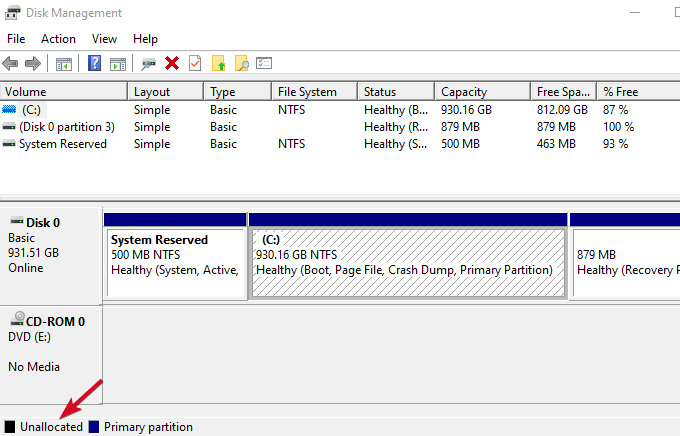
However, your USB stick may show only Unallocated space, in which case you’ll have to create a new partition so that Windows and other operating systems can use it.
- Right-click Start>Disk Management, right-click on the Unallocated space>New Simple Volume and follow the prompts to create a partition.
If you still can’t see your flash drive, yet it’s partitioned, make sure it has a drive letter. Ideally, this should be automatic, but if you removed it manually, the drive won’t be detected or accessed in Windows.
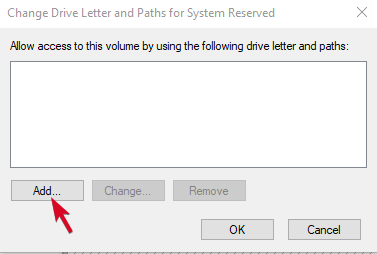
- Right-click the drive’s partition and click Change Drive Letter and Paths.
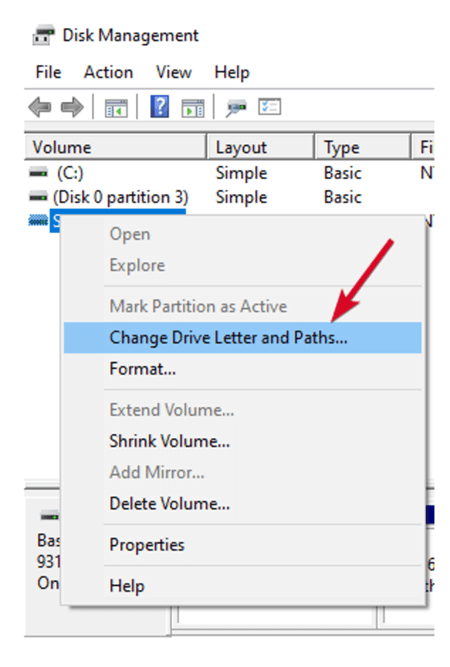
- If it doesn’t have an assigned drive letter, click Add and pick a letter. If it has a letter, click Change and choose a different one.
Disable USB Selective Suspend Feature
This is a power-saving setting that helps reduce battery use by cutting power to your USB stick when it’s plugged in. To ensure your drive isn’t powering down for any reason, disable this feature so that power management settings don’t override the USB controller, which makes Windows not detect it.
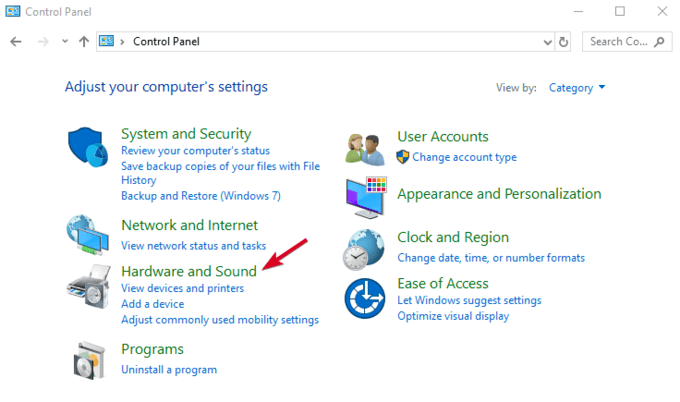
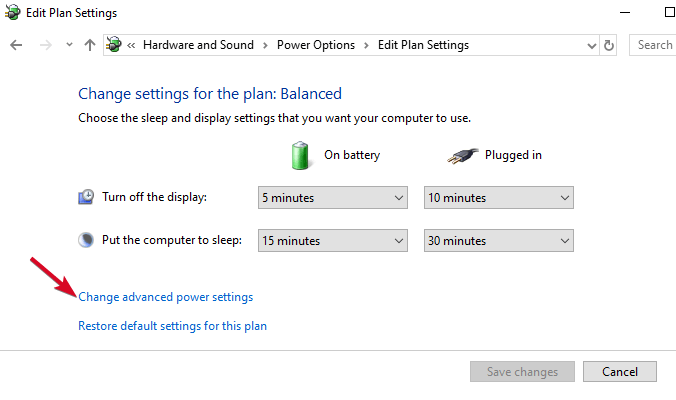
- Click Start>Control Panel and select Hardware and Sound.
- Click Power Options>Change plan settings.
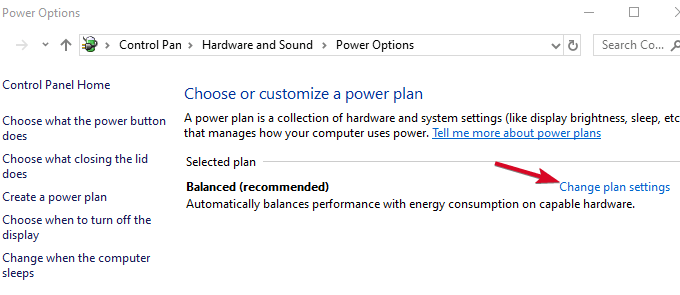
- Click Change advanced power settings.
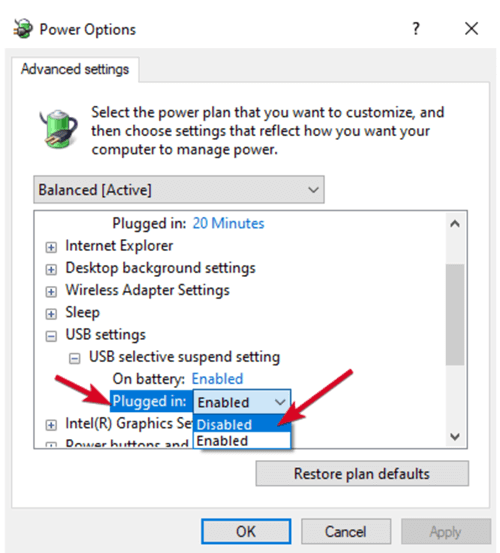
- Go to USB settings and expand it.
- Click USB selecting suspend settings and change the Plugged in drop-down menu to Disabled (Note: If you’re using a laptop, click On battery and change to Disabled in the drop-down menu).
- Click Apply>OK and restart your computer to effect the changes.
If all else fails, you can replace your USB stick as a last resort method, though you can do this if the drive is already broken. Otherwise, we hope this guide has helped ease the process, and you now know what to do when your USB drive isn’t showing up when you plug it in.
Elsie is a technology writer and editor with a special focus on Windows, Android and iOS. She writes about software, electronics and other tech subjects, her ultimate goal being to help people out with useful solutions to their daily tech issues in a simple, straightforward and unbiased style. She has a BCom degree in Marketing and currently pursuing her Masters in Communications and New Media. Read Elsie’s Full Bio


