- Crucible Support
- Knowledge base
- Products
- Jira Software
- Jira Service Management
- Jira Core
- Confluence
- Bitbucket
- Resources
- Documentation
- Community
- Suggestions and bugs
- Marketplace
- Billing and licensing
- Viewport
- Confluence
- Installing and upgrading Git
- Getting Started
- On this page
- Related content
- Still need help?
- Check your version of Git
- Install or upgrade Git on Linux
- Install or upgrade Git on Mac OS X
- Install or upgrade Git on Windows
- Restart Crucible
- On Windows:
- Как обновить Git до последней версии для Windows? Все еще показывает старую версию
- Git Bash
- Установщик Git для Windows
- git update-git-for-windows
- How to update git version from GitHub Desktop on Windows
- 4 Answers 4
- How to install and use Git on Windows
- Installing Git on Windows
- Configuring and connecting to a remote repository
- Working in your local repository and pushing files
- Creating a new file and pushing to remote repository
- Modifying a file and pushing to remote repository
- Pulling or fetching updates from the remote repository
- How to deal with a Git merge conflict
- Creating a Git branch
- How to merge a branch back into the master
- How to delete a local and remote branch
Crucible Support
Knowledge base
Products
Jira Software
Project and issue tracking
Jira Service Management
Service management and customer support
Jira Core
Manage any business project
Confluence
Bitbucket
Git code management
Resources
Documentation
Usage and admin help
Community
Answers, support, and inspiration
Suggestions and bugs
Feature suggestions and bug reports
Marketplace
Billing and licensing
Frequently asked questions
Viewport
Confluence
Versions
Installing and upgrading Git
Getting Started
On this page
Related content
Still need help?
The Atlassian Community is here for you.
This page describes how to install or upgrade Git on the Crucible server:
Check your version of Git
The versions of Git supported by Crucible are listed on Supported platforms.
You can check your current version of Git by running the git —version command in a terminal (Linux, Mac OS X) or command prompt (Windows).
If you don’t see a supported version of Git, you’ll need to either upgrade Git or perform a fresh install, as described below.
Install or upgrade Git on Linux
Use your package manager to install Git. For example, on Ubuntu 13.10, use:
If you are using a different Linux distribution, you may need to use a different package repository to get the latest stable version of Git.
Now check the Git version – you should see the new version of Git.
If you still can’t see the Git version, you may need to add the Git install location to your path. Open your
/.profile file in a text editor and add this line, where
is the install location for Git:
You can use the which git command to find the install location for Git.
Install or upgrade Git on Mac OS X
This section describes how to install the latest stable Git release on your Mac. It does not describe how to update the version of Git that is bundled with Apple’s Xcode.
Download the latest stable Git release from the Git website. Click on the downloaded .dmg file, then double-click the .pkg icon to run the installer. This will install the new version of Git over the existing version:
Now check the Git version – you should see the new version of Git.
If you still can’t see the Git version, you may need to add the Git install location to your path. Open your
/.profile file in a text editor and add this line, where
is the install location for Git:
You can use the which git command to find the install location for Git.
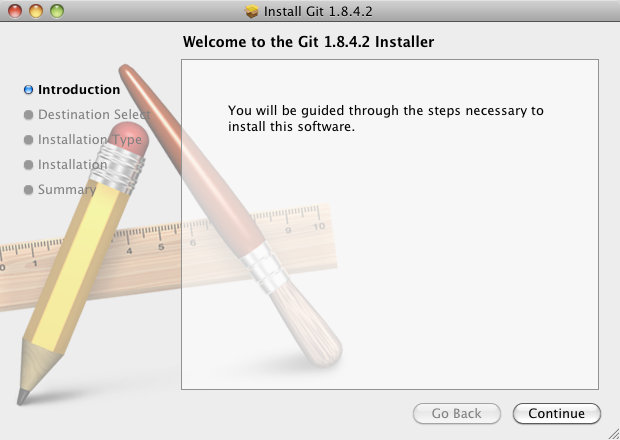
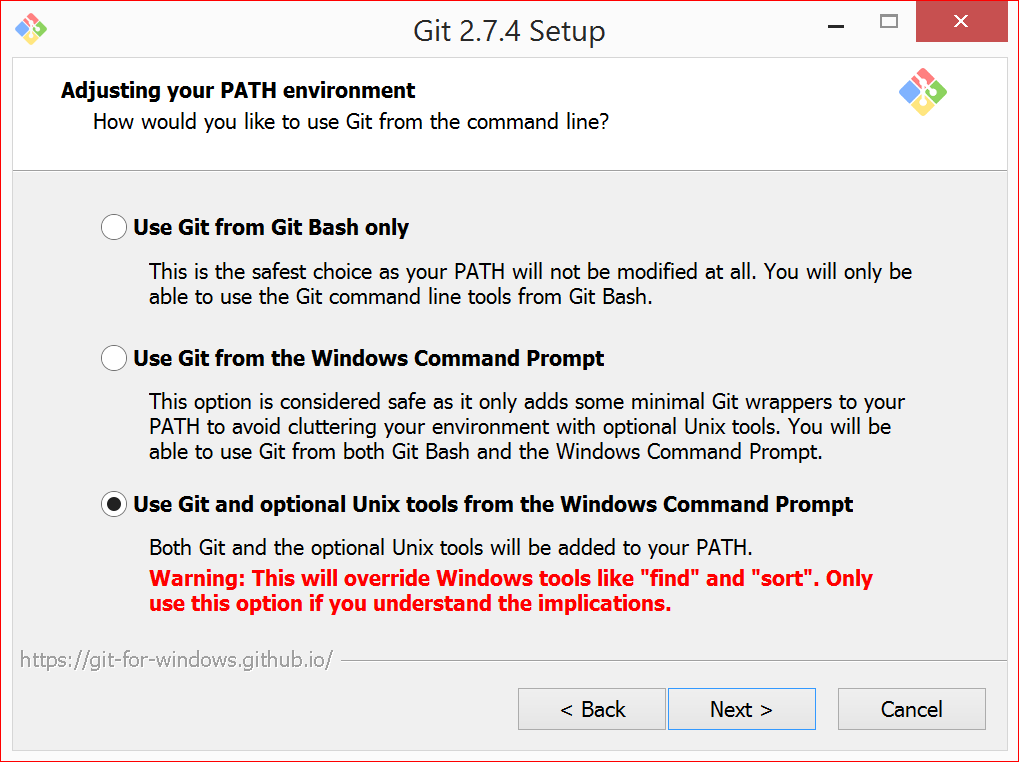
Install or upgrade Git on Windows
Download the Full installer for official Git for Windows. Installing Git for Windows (previously known as msysGit) also installs a supported version of Perl.
Git for Windows is the only supported distribution when running Crucible on Windows. Cygwin Git is not supported and has known issues.
Run the Git installer, ensuring that you install into the same location as any existing Git installation. You can use where git to locate existing installations.
Ensure that git.exe is available in the path:
- Choose either Option 2, Run Git from the Windows Command Prompt, or Option 3, Run Git and included Unix tools from the Windows Command Prompt. Both these options will work with Crucible.
- Do not select Option 1, Use Git Bash only, when installing or upgrading Git for the Crucible server – this will not work with Crucible.
Now, check the Git version – you should see the new version of Git.
Restart Crucible
You’ll need to stop and restart Crucible so that it will pick up the upgraded version of Git.
On Windows:
Control the Crucible service from the Windows administration console. Alternatively, in a command prompt, change directory to and run:
Как обновить Git до последней версии для Windows? Все еще показывает старую версию
Я только что обновился до Git 1.8.0.1 для Windows, с моей предыдущей версии 1.7.9.mysysgit.0. Я скачал новую версию с сайта Git и установил ее через обычный установщик Git EXE.
Тем не менее, когда я запускаю окно терминала, оно все еще показывает, что я использую git версии 1.7.9.mysysgit.0. Когда я набираю «git —version» из моей подсказки, то же самое.
Я нашел эту статью по аналогичной проблеме с Git на Mac OSX , что наводит меня на мысль, что это как-то связано с ошибочным PATH, но я все еще довольно новичок во всем этом (5 месяцев самоучка), поэтому я Я в недоумении, как перевести это на Windows.
Эта проблема возникла, когда я начал новый проект Rails и попытался отправить его в Git. Я добавил пульт:
Я получил следующее сообщение об ошибке:
Неустранимый: https://github.com ссылки не найдены: вы запустили git update-server-info на сервере?
Попытка погуглить эту ошибку привела меня к этой статье , которая подтолкнула меня к обновлению, и вот я здесь.
Начиная с Git 2.16.1 (2) вы можете использовать
В версиях между 2.14.2 и 2.16.1 команда была
(Позже он был переименован, чтобы избежать путаницы с обновлением локального хранилища, например, как svn update это делается.)
Эта команда не существует в Git 2.13 и ранее.
Если это ошибка с «is git command», то либо у вас фактически нет Git для Windows, либо ваша версия очень старая.
В этом случае просто скачайте последнюю версию установщика с https://git-scm.com/download (проверьте, хотите ли вы 32- или 64-разрядную версию) и запустите ее для обновления.
Если у вас уже установлена последняя версия, она ничего не делает, и в этом случае вы можете вручную запустить установщик для переустановки.
Во-первых, проверьте вашу версию git с помощью этой команды
Тогда следуйте за случаем согласно вашей версии git
Если ваша версия git 2.14.1 или более ранняя:
Удалите git, загрузите последний git и установите его снова.
И версии между 2.14.2 и 2.16.1:
Используйте команду git update
Если версия равна или больше, чем Git 2.16.1 (2):
Используйте команду git update-git-for-windows
Обновление (26SEP2016): больше не нужно удалять предыдущую версию git, чтобы обновить ее до последней; пакет установки, найденный на сайте загрузки git win, позаботится обо всем. Просто следуйте инструкциям. Для получения дополнительной информации следуйте инструкциям при установке и обновлении git .
Используя команду «где git», узнайте, как в командной строке выбирается версия. Как только у вас есть путь, вы можете пойти дальше и полностью удалить / удалить предыдущую версию. Затем, если вы установите и убедитесь, что новое установленное местоположение находится в пути, оно должно работать нормально.
Использование таких инструментов, как cmder , сделает вашу жизнь намного проще. Вам больше не нужно использовать двойную загрузку или Cygwin, так как поддержка git в windows уже на высшем уровне. (Git для Windows устанавливает msysgit, который включает в себя все необходимые инструменты Unix от MinGW. MinGW был там некоторое время и довольно стабилен. Если вы хотите, вы можете установить полную версию msysgit, а не Git для Windows . Msysgit доступен на Git для Страница окон внизу.)
Git Bash
Обратите внимание: если вы вместо этого хотите узнать, какая у Git Bash вас версия работает, или хотите узнать, нужно ли вам обновляться Git Bash , она является частью Git for Windows .
Итак, ваша версия Git Bash:
Обратите внимание, что это технически отличается от Bash . На моей же машине, когда я бегу:
Установщик Git для Windows
Чтобы обновить последнюю версию Git и Git Bash, вы можете загрузить и установить последнюю версию git для Windows . Согласно FAQ , настройки / настройки должны быть сохранены, если они были установлены в соответствующих папках конфигурации.
Примечание. Их установщик действительно продуман для правильных действий (за исключением того, что он говорит, что делает все правильно). Если вы делаете обновление, то каждый экран установщика предварительно помечается настройками из вашей текущей (скоро будет предыдущей) установки.
Он не показывает общие настройки по умолчанию. Вам не нужно искать какие-либо из них или бояться нарушить тщательно отточенные настройки. Просто оставьте все как есть, чтобы сохранить прежний выбор.
На самом деле, они сделали это еще проще (если бы было ясно, что они так и сделали).
Внизу есть флажок [] Show only new settings (точную формулировку я не помню). Поскольку на первом экране ничего не меняется, когда вы отмечаете поле, не совсем очевидно, для чего оно. Если вы отметите флажок, все ваши текущие настройки будут сохранены, и будут пропущены показы этих последующих экранов настроек. Будут показаны только экраны с недавно введенными настройками.
git update-git-for-windows
В качестве альтернативы, как уже отмечали другие, вы также можете обновить Git Bash и Git (по определению, оба всегда обновляются одновременно) из командной строки Git Bash:
Если вы git update печатаете, git любезно напоминает вам, что команда была обновлена до git update-git-for-windows :
Предупреждение! git update устарела;
Пожалуйста, используйте git update-git-for-windows вместо этого.
Git для Windows , 2.26.0.windows.1 (64bit)
до настоящего времени
How to update git version from GitHub Desktop on Windows
I want to use the new worktree functionality introduced in git 2.5 . However, I don’t know how to update to the most recent version of GitHub Desktop (not git itself).
I install GitHub for desktop and hoped it ships with the most recent version, however git —version returns git version 1.9.5.github.0 . But if I understand correctly, we’re already at version 2.6.x! So how can I update to this version on my Windows machine, where the only version of git I installed was with the GH Desktop?
4 Answers 4
Update Nov. 25th, 2015.
For what it is worth, GitHub Desktop (finally) uses a more recent git version: 2.5. See Brendan Foster tweet.
Original answer (early Nov 2015)
First, the latest git for windows release is available here on GitHub.
I always use the archive portable form (unzipped anywhere I want, and added to the PATH ).
But if you have chosen the exe setup, that means it has been installed in C:\Program Files\Git .
However, as I mentioned here, git is also included in GitHub Desktop own installation path ( %USERPROFILE%\AppData\Local\GitHub\PORTAB
You could, in theory, replace the exact value of the folder PORTAB
1 by a directory JUNCTION:
In my latest GitHub Desktop 3.0.7.1 3397ae4, I see:
However, that would not work: when starting GitHub Desktop again, it would detect the change and restore its own embedded Git version (1.9.5)
So you can’t force easily GitHub Desktop to use another git version.
Even if you were able somehow to force GitHub for Desktop to use another version of Git, you would have to carefully report its own internal git system configuration:
This file points to GitHub Desktop specific settings:
THose settings are not present in a non-GitHub embedded version of Git, and would need to be restored.
How to install and use Git on Windows

By default, Git is installed on Linux and macOS computers as a command line option. However, Microsoft Windows does not include a Git command. Below are the steps on how to install and use Git and GitHub on Microsoft Windows.
Installing Git on Windows
- Open the Git website.
- Click the Download link to download Git. The download should automatically start.
- Once downloaded, start the installation from the browser or the download folder.
- In the Select Components window, leave all default options checked and check any other additional components you want installed.
- Next, in the Choosing the default editor, used by Git unless you’re familiar with Vim we highly recommend using a text editor you’re comfortable using. If Notepad++ is installed, we suggest using it as your editor. If Notepad++ is not installed, you can cancel the install and install Notepad++ and then restart the GitHub install.
- Next, in the Adjusting your PATH environment, we recommend keeping the default Use Git from the command line and also from 3rd-party software as shown below. This option allows you to use Git from either Git Bash or the Windows Command Prompt.

- Next, we recommend leaving the default selected as Use OpenSSH.
- Next, in Choosing HTTPS transport backend, leave the default Use the OpenSSL library selected.
- In the Configuring the line ending conversions, select Checkout Windows-style, commit Unix-style line endings unless you need other line endings for your work.
- In the Configuring the terminal emulator to use with Git Bash window, select Use MinTTY (the default terminal of MSYS2).
- On the Configuring extra options window, leave the default options checked unless you need symbolic links.
- Click the Install button
- Once completed, you can check the option to Launch Git Bash if you want to open a Bash command line or, if you selected the Windows command line, run Git from the Windows command line.
We highly recommend you use Git from the command line and not use a GUI interface. You’ll only be using the command line to interface with Git to manage the files. Editing can still be done through a text editor or IDE of your choice. If you’re new to the command line, you can find help with navigating the Windows command line and Linux (Bash) through the links below.
Configuring and connecting to a remote repository
In our example, we’re using GitHub as a storage for our remote repository. Below are the steps on how you can connect to a GitHub repository. If you are new to GitHub, see: How to create a GitHub repository.
- From the command line, move to the directory you want to contain your Git repository.
- How to change a directory or open a folder.
- Type the following command to configure your Git username, where will be your GitHub username.
- After entering the above command, you’ll be returned to the command prompt. Next, enter your e-mail address by typing the following command, where is your e-mail address.
- Once the above steps are completed, you’ll be ready to connect to a remote repository. To find the repository address, go to a repository on GitHub and click the Clone or download repository link to get the address. For example, we’ve created a repository called «example» at https://github.com/Computerhope/example.git address. Copy the address to your clipboard.
- Once copied go back to the command line and type the following command, where is the address you copied. To paste that address into the command line right-click in the command line window and click paste.
- Once the Git repository is created, you’ll have a new directory in your current directory with the name of the Git repository.
- Once the Git remote repository is cloned to your local repository, a new folder in the current directory should appear with the name of the Git repository. For example, in our «example» Git we would have a new directory called «example». Use the cd command to change into the new directory.
- Once in the new directory, type the following command to list the remote repositories.
- If successful, the output is «origin,» which is a special name that refers to the remote repository.
- To see the aliases (URL or path), type the following command.
Running each of the above commands give you an output similar to what is shown in our example below.

Now that you’ve connected to a remote repository on GitHub you’re ready to start working on the files and pushing and pulling files as you update the files.
Working in your local repository and pushing files
After following the above steps and cloning a remote repository, you can work on the files as you normally would. You can create new files or edit existing files from the command line or your favorite text editor. Below, are the steps of creating a new file, pushing that file, editing an existing file, and pushing the update.
Creating a new file and pushing to remote repository
- Create a new file in the Git directory by typing the following command from either the Bash or Windows command line. The following command opens and creates a file called example.txt in Notepad. In Git Bash, you could also use the touch command to create a blank new file and then type «start » to open the file in your favorite text editor.
- In the text editor, enter some text into the file and save and exit the file.
- Back at the command line type the following command to get the current status of your branch and untracked files.
- Git displays a window similar to the example shown below, showing that the file we created is new and untracked by Git.

- We’ll now want to add this file to Git to be tracked by typing the following command. If your file is not named «example.txt,» you’d want to change the text to the name of your file.
- After entering the above command, the file is added as a new file also known as staging. Typing git status again shows you in green that the file is a new file that is ready to be committed.
- Next, type the following command to commit the changes made in the local workspace to the local repository. In the example below, our notes «First example» should be notes that would make sense everyone working on your project.
You can also type git commit with no additional tags or options. However, when doing this it opens a vim like editor that can be difficult for those not familiar with the vim to use. If you type this command press «i» to enter insert mode and type the notes for the commit on the first line, press Esc, and then type «:wq» to save, exit, and commit. We suggest using the above command because it’s easier for more people to use.
- Finally, now that changes are moved from your workspace into your local repository it’s ready to be pushed to the remote repository. Type the following command to push all changes to the remote repository.
If you want to follow the progress, you can type git status again to see the current status. You can also type git log to see a log of changes.
You’ll be asked for your GitHub username and password if your computer has not logged in to Git from the command line.
Once the file is pushed, it appears in your GitHub remote repository and is available to everyone else who’re working with the same repository.
Modifying a file and pushing to remote repository
- Edit and modify one or more files in your Git.
- Type git status to see the status of all the files not yet committed from the workspace to the local repository.
- Type the following command to add all files. The single period indicates that you want all files to be added to the local repository. Some people may also use git add -A to add all.
You can also use wildcards instead of a period. For example, if you wanted to add all text files you could type *.txt instead of a single period to only add text files.
- Once the files are added, type the following command to commit. Change the notes to apply to your commit.
- Finally, type git push to push the commit to the remote repository.
If you’re working with a lot of other people, we’d recommend you pull (explained below) before committing. If your local repository is not the same as the remote repository (excluding your new changes), the commit fails. For example, if someone has added new files to the remote repository while you’ve been working and you try commit, it fails until you pull.
Pulling or fetching updates from the remote repository
If it’s been awhile since you’ve committed any work, perform the git pull command to get the latest updates from the remote repository and merge them into your local repository. By pulling updates from a repository before committing, it verifies your local repository and the remote repository are the same and prevents merge conflicts.
To get all changes without merging, run the git fetch command to grab all of the latest updates from the remote repository without merging changes.
How to deal with a Git merge conflict
When multiple people are working with the same files, you’re going to encounter merge conflicts. When a conflict occurs, Git modifies your local files and it is up to you to manually fix the files with the conflicts.
Use the git status command to see the status and merge conflict information.
Open the file with the conflict to start correcting the errors. In the example file below, we had a text file with one line of text and in the local repository we added the text «update1» to the file. However, during the same time, the remote repository file was modified and added «update2″ to the file on the same line. Git marks conflicts with » >>>>>> » to mark the end.
To resolve this merge conflict, we would need to decide what text we wanted to keep, update, or remove. In this example, we want to keep «update1» and «update2» in the order they’re listed so we would only need to remove the Git markings to make the file resemble the following example.
If you’re working with a big file, it’s a good idea to search the file for «HEAD» because there may be more than one conflict.
Once the changes are made in the file, we could save the file and then perform the following git commands to update the fixes.
The example given in this merge conflict is a very basic example. When dealing with a file with more than a few lines of text or big sections of code, merge conflict can get a lot more confusing. To make it easier to deal with merge conflicts, you can use the command git mergetool to use a merge tool, such as WinMerge or another popular merge tool.
Creating a Git branch
Creating a branch allows you to create a duplicate of the master (trunk) and make several updates without affecting the master. For example, when developing a program if a big fix was need that could take weeks or months, a branch could be created for that fix. Once you’ve fixed the bug, you could merge your branch back into the master.
To create a branch in your local repository, follow the steps below.
- In the Git master directory, type the following command, where » » is the name of the new branch name. For example, we could call the branch «examplebranch».
- Next, type the following command to switch to the branch.
- After entering the above command, the prompt (in Git Bash) changes from «master» to the branch name to indicate you’re working in a branch.
- From this point, you can continue to use Git and modify the files how you have in the past.
- To see all available branches, you can use the git branch command. For example, typing git branch displays your local repository branches. Typing git branch -a displays all local and remote repositories.
- If you need to push the branch to the remote repository, you can run the following command.
- Finally, if you need to switch back to the master branch, you can type the following command.
How to merge a branch back into the master
After completing your work, you’ll want to merge it back into the master or another branch by following the steps below.
- Move into the branch you want to merge into. For example, if you wanted to merge back into the master, type the following command.
- Once in the master, type the following command to merge the branch.
- Once the merge is performed, add the files.
- Next, commit the changes.
- Once merged and committed, push the merge by typing the following command. If you get conflicts during the merge, see our how to deal with merge conflicts section.
How to delete a local and remote branch
If, after merging a branch you no longer want to keep the local or remote branch, you can perform the following commands.
To delete the local branch, type the following command.
To delete the remote branch, type the following command.


