- Удаление Sql Server
- How to Uninstall SQL Server 2017 running on Ubuntu
- Uninstall SQL Server 2017 Running on Ubuntu
- Step 1 — Preliminary SQL Server Database Backups
- Step 2 — Connect to the SQL Server with PuTTY to Begin the Uninstall
- Step 3 — Determine if the SQL Server Services are Running
- Step 4 — Validate the SQL Server Directories
- Step 5 — Begin the SQL Server Uninstall
- Step 6 — Validate the SQL Server Database Directory
- Step 7 — Remove the MSSQL Folder and Files
- Step 8 — Very the SQL Server Services Do Not Exist
- Как удалить полностью SQL Server
- Installation guidance for SQL Server on Linux
- Supported platforms
- Supported platforms
- System requirements
- Configure source repositories
- Install SQL Server
- Update or Upgrade SQL Server
- Rollback SQL Server
- Check installed SQL Server version
- Uninstall SQL Server
- Unattended install
- Offline install
- Licensing and pricing
- Optional SQL Server features
- Get help
Удаление Sql Server
Данное руководство содержит последовательность действий для полного удаления SQL Server (опробовано на 2008-ом). Использовать в случае, если при попытках удалить существующий или установить новый экземпляр возникают ошибки, и стандартные процедуры по удалению заканчиваются неудачей. Когда я столкнулся с этой проблемой, такая инструкция мне бы здорово пригодилась.
1) Пробуем удалить SQL Server с помощью Microsoft Fix it. Как и ожидалось у меня этот способ не сработал. Идем дальше.
2) На всякий случай делаем бэкап реестра и удаляем следуюее:
- HKEY_LOCAL_MACHINE\SOFTWARE\Microsoft\Microsoft SQL Server;
- HKEY_LOCAL_MACHINE\SOFTWARE\Microsoft\MSSQLServer.
Далее, в следующих ветках удаляем все ключи, связанные с SQL Server:
- HKEY_LOCAL_MACHINE\SOFTWARE\Microsoft\Windows\CurrentVersion\Uninstall;
- HKEY_LOCAL_MACHINE\SYSTEM\CurrentControlSet\Services.
После переименовываем или удаляем все папки связанные с SQL Server, перезагружаемся и пробуем установить SQL Server. Если все так же безуспешно, переходим к шагу 3.
3) Если при установке получаем следующую ошибку: Компоненту MsiGetProductInfo не удалось получить значение ProductVersion для пакета со значением Product Code = «
- из лога установки SQL Server нас интересует следующая строка: например, «Exit message: Компоненту MsiGetProductInfo не удалось получить значение ProductVersion для пакета со значением Product Code = „
“ . Нам нужен Product Code. Копируем его первую часть CC8BA866, ищем в реестре и удаляем все найденные ключи. После этого, записываем его наоборот 668AB8CC, опять ищем в реестре, удаляем все найденные значения; - запускаем установку;
- при установке могут возникать похожие ошибки, но с другим Product Code. Повторяем установку и удаление ключей из реестра до тех пор, пока не пропадет ошибка.
Если опять потерпели неудачу, переходим к шагу 4.
4) Если при установке получаем следующую ошибку: Error result: -2068643839; Result facility code: 1203; Result error code: 1 делаем следующее:
- создаем папку на диске С, копируем в нее установочные файлы, пробуем установить;
- если не сработало, возможно к некоторым папкам невозможно получить доступ;
- может случиться так, что установщик Windows поврежден, тогда нужна диагностика кэша установщика;
- проверить или переустановить фрэймворки.
5) Готово!
Надеюсь это будет полезным и кому-нибудь пригодится.
Источник
How to Uninstall SQL Server 2017 running on Ubuntu
Problem
SQL Server installation or removal is an important DBA task. I have written many articles on how to install SQL Server 2017 on different Linux flavors and you can take a look at “Next Steps” section to access those articles. In this tip, I am going to demonstrate how to uninstall SQL Server 2017 from an Ubuntu Linux server.
Solution
As you probably know, Microsoft started SQL Server support on Linux operating systems starting with SQL Server 2017. This has generally been referred to as SQL Server vNext. Now you can design, build and deploy your application anywhere whether its Windows or Linux. This version has brought SQL Server to a larger audience.
Sometimes, we need to remove SQL Server from an existing operating system as per business needs and we will cover how to do this for SQL Server running on Ubuntu.
Uninstall SQL Server 2017 Running on Ubuntu
I installed SQL Server 2017 on this machine and now I want uninstall it cleanly from the Ubuntu machine. Follow the steps in this tip to proceed with the SQL Server 2017 uninstall.
NOTE: I recommend testing this first on a lower life cycle system before performing this action in production.
Step 1 — Preliminary SQL Server Database Backups
Make sure you have proper approvals in place to uninstall the SQL Server installation. The next step to proceed with the uninstall of SQL Server is to secure your data for future reference. Make sure to run full database backups of all databases and save to a secure location so that you can access the if needed in the future. You can use the BACKUP DATABASE command or your backup jobs to execute the backups.
Step 2 — Connect to the SQL Server with PuTTY to Begin the Uninstall
Once you have executed the backup and saved the backup files, we will proceed with the uninstallation steps. Launch PuTTY terminal and connect to your Ubuntu server on which SQL Server is running that needs to be uninstalled. You can also directly be logged in to the Ubuntu server locally and connect to with a local terminal window.
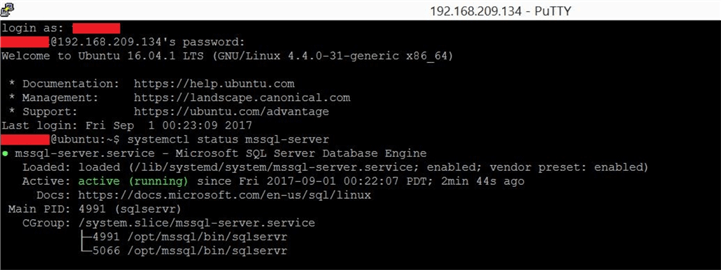
I have performed this process using PuTTY terminal. If you are going to use PuTTY then launch a terminal screen and enter your Ubuntu server details to establish the connection. Once you will get the login screen, type your login and password and press enter to connect.
Step 3 — Determine if the SQL Server Services are Running
Once you connect to the Ubuntu server, we need to uninstall SQL Server 2017. The next step is to check and verify whether SQL Server is installed and running on this server or not. We will check the SQL Server services that are running by executing the below commands.
You can see the in the below screenshot where we have executed the command and we can see SQL Server is active and running on this machine.
Step 4 — Validate the SQL Server Directories
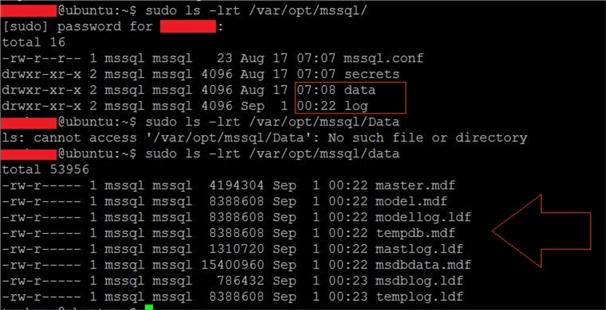
Now we will check and verify the database files under their respective directory. SQL Server installs databases under /var/opt/mssql directory. I ran the ls-lrt command to check the files and folders present under this directory. We can see the data folder is showing under /var/opt/mssql directory and when we look inside the data directory, we can see the mdf and ldf database files.
To access the content of the above directory we need to run the commands using sudo access. I have executed this to see the below files in the below screenshot.
Step 5 — Begin the SQL Server Uninstall
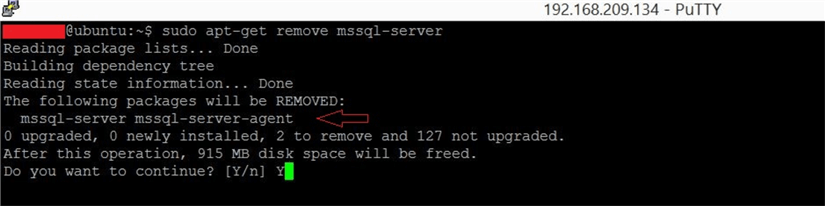
Now we will start the SQL Server uninstall from this Ubuntu server by executing the below command.
You can see I have executed the above command in the below screenshot. Once we execute the command, it will read the package list and build a dependency tree as shown in the below image. This command will remove two SQL Server packages mssql-server and mssql-server-agent. We can see this in the output of the command. Execution will ask you again to enter Y to proceed with the removal. You can also see how much disk space will be freed post uninstalling SQL Server from this machine in the below screenshot.
Once you will type Y and press enter to proceed with the uninstall, execution will start to remove SQL Server from this Ubuntu server. You can have a look at the below screenshot where SQL Server has been removed from the Ubuntu server.

Step 6 — Validate the SQL Server Database Directory
We can see in above the screenshot that SQL Server and SQL Server Agent have been uninstalled from the Ubuntu server. The package name for SQL Server and SQL Server Agent is mssql-server and mssql-server-agent respectively that have been removed from this Ubuntu server.
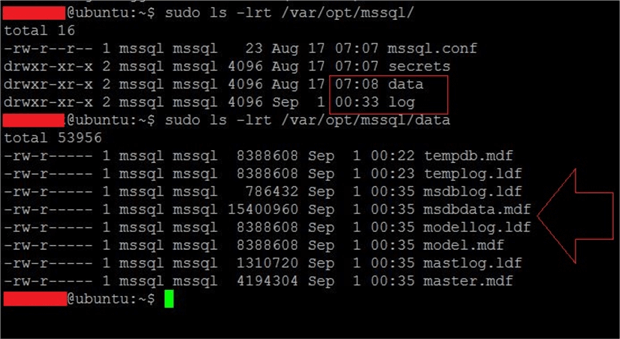
But uninstalling SQL Server or the SQL Server package does not delete the created database files from the server. We need to delete them manually in order to clean the system from SQL Server.
First, let’s verify whether the database files or mssql folder under directory /var/opt/ is removed or still present.
Run the same commands we ran in Step 4 to check the database files. We can see all of the files and folders are still there. Now we need to remove them manually.
Step 7 — Remove the MSSQL Folder and Files
We will remove the mssql folder, so that all files and folders inside this directory are removed from this Ubuntu server. Be aware that running the below command will remove whatever directory you pass.
Run the below command to remove all mssql related files.
When you access the above folder to see the details, you will end with the below error because all files and folders have been removed.

Step 8 — Very the SQL Server Services Do Not Exist
Now you have completely removed SQL Server from the Ubuntu machine. Next, we will verify this uninstall by checking the SQL Server service. Run the below command to check the SQL Server service.
The SQL Server service was not found on the Ubuntu server as shown in the below screenshot.
Источник
Как удалить полностью SQL Server
В сегодняшней заметке я в первую очередь для себя разберу как деинсталлировать сервис организации Базы Данных установленный ранее по заметке, сейчас задача в следующем — проработать шаги посредством которых можно деинсталлировать все компоненты установки. Данные компоненты перечислены в оснастке «Установка и Удаление программ» на операционной системе Windows Server 2008 R2 Enterprise.
Ниже шаги по удалению:
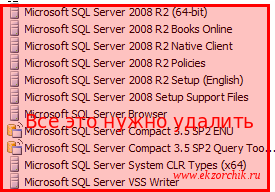
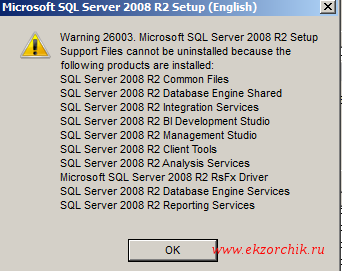
Start — Control Panel — Programs and Feature — находим и выделяем «Microsoft SQL Server 2008 R2 Setup (English)» и нажимаем Uninstall, но оказываем нельзя вот так просто удалить данное программное обеспечение, потому как сперва нужно деинсталлировать компоненты
Ну что ж, тогда на очереди:
Microsoft SQL Server 2008 R2 (64-bit) — Uninstall — Remove, далее в окне мастера:
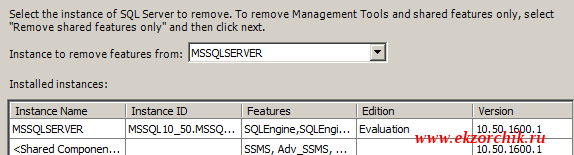
Setup Support Rules — нажимаю Ok, после в окне выбора установленного экземпляра: Select Instance выбираю MSSQLSERVER и нажимаю Next
Следом отмечаю все компоненты (Select Features) которые в моем случае были установлены нажатием кнопки Select All → Next
В окне: Removal Rules → нажимаю Next
на последний запрос, а действительно ли нужно удалить все от SQL Server 2008 R2 в мастере (Ready to Remove) нажимаю Remove и ожидаю…
В окне: Complete (Your SQL Server 2008 R2 removal completed successfully) нажимаем Close
Теперь Удаляем все там же находясь в «Program and Features» оставшиеся компоненты:
- Microsoft Report Viewer Redistributable 2008 SP1 — Uninstall
- Microsoft SQL Server 2008 R2 Native Client
- Microsoft SQL Server Compact 3.5 SP2 ENU
- Microsoft Visual Studio 2008 Shell (Integrated mode) — ENU
- Microsoft Visual Studio Tools for Applicaions 2.0 — ENU
После запускаю командную строку с правами Администратора и:
C:\Windows\system32>rmdir /S /Q «c:\Program Files\Microsoft SQL Server»
C:\Windows\system32>rmdir /S /Q «c:\Program Files (x86)\Microsoft SQL Server»
C:\Windows\system32>rmdir /S /Q «c:\ProgramData\Microsoft\Microsoft SQL Server»
C:\Windows\system32>rmdir /S /Q «%userprofile%\AppData\Roaming\Microsoft\Microsoft SQL Server»
C:\Windows\system32>rmdir /S /Q «%userprofile%\AppData\Local\Microsoft\Microsoft SQL Server»
После перезагружаю систему.
А теперь пробую установить на эту же систему роль сервера базы данных SQL Server 2008 r2 с целью проверки, а возможно ли это будет и правильна ли была сделана деинсталляция?: — ответ да!, установка, создание базы данных, восстановление из бекапа происходит без каких либо ошибок. Все работает. Как видно процесс удаление не такой уж и сложный . На этом я прощаюсь, с уважением автор блога — ekzorchik.
Источник
Installation guidance for SQL Server on Linux
Applies to: SQL Server (all supported versions) — Linux
This article provides guidance for installing, updating, and uninstalling SQL Server 2017 and SQL Server 2019 on Linux.
For other deployment scenarios, see:
This guide covers several deployment scenarios. If you are only looking for step-by-step installation instructions, jump to one of the quickstarts:
For answers to frequently asked questions, see the SQL Server on Linux FAQ.
Supported platforms
SQL Server is supported on Red Hat Enterprise Linux (RHEL), SUSE Linux Enterprise Server (SLES), and Ubuntu. It is also supported as a Docker image, which can run on Docker Engine on Linux or Docker for Windows/Mac.
| Platform | Supported version(s) | Get |
|---|---|---|
| Red Hat Enterprise Linux | 7.7 — 7.9, 8.0 — 8.3 | Get RHEL |
| SUSE Linux Enterprise Server | v12 SP3 — SP5 | Get SLES v12 |
| Ubuntu | 16.04, 18.04 | Get Ubuntu 18.04 |
| Docker Engine | 1.8+ | Get Docker |
Supported platforms
| Platform | File System | Installation Guide | Get |
|---|---|---|---|
| Red Hat Enterprise Linux 7.7 — 7.9, or 8.0 — 8.3 Server | XFS or EXT4 | Installation guide | Get RHEL 8.0 |
| SUSE Enterprise Linux Server v12 SP3 — SP5 | XFS or EXT4 | Installation guide | Get SLES v12 |
| Ubuntu 16.04 LTS, 18.04 LTS, 20.04 LTS | XFS or EXT4 | Installation guide | Get Ubuntu 20.04 |
| Docker Engine 1.8+ on Windows, Mac, or Linux | N/A | Installation guide | Get Docker |
For more information, review the system requirements for SQL Server on Linux. For the latest support policy for SQL Server 2017, see the Technical support policy for Microsoft SQL Server.
Microsoft also supports deploying and managing SQL Server containers by using OpenShift and Kubernetes.
SQL Server is tested and supported on Linux for the previously listed distributions. If you choose to install SQL Server on an unsupported operating system, please review the Support policy section of the Technical support policy for Microsoft SQL Server to understand the support implications.
System requirements
SQL Server has the following system requirements for Linux:
| Requirement | |
|---|---|
| Memory | 2 GB |
| File System | XFS or EXT4 (other file systems, such as BTRFS, are unsupported) |
| Disk space | 6 GB |
| Processor speed | 2 GHz |
| Processor cores | 2 cores |
| Processor type | x64-compatible only |
If you use Network File System (NFS) remote shares in production, note the following support requirements:
- Use NFS version 4.2 or higher. Older versions of NFS do not support required features, such as fallocate and sparse file creation, common to modern file systems.
- Locate only the /var/opt/mssql directories on the NFS mount. Other files, such as the SQL Server system binaries, are not supported.
- Ensure that NFS clients use the ‘nolock’ option when mounting the remote share.
Configure source repositories
When you install or upgrade SQL Server, you get the latest version of SQL Server from your configured Microsoft repository. The quickstarts use the Cumulative Update CU repository for SQL Server. But you can instead configure a GDR repository. For more information on repositories and how to configure them, see Configure repositories for SQL Server on Linux.
Install SQL Server
You can install SQL Server 2017 or SQL Server 2019 on Linux from the command line. For step-by-step instructions, see one of the following quickstarts:
| Platform | Installation quickstarts |
|---|---|
| Red Hat Enterprise Linux (RHEL) | 2017 | 2019 |
| SUSE Linux Enterprise Server (SLES) | 2017 | 2019 |
| Ubuntu | 2017 | 2019 |
| Docker | 2017 | 2019 |
You can also run SQL Server on Linux in an Azure virtual machine. For more information, see Provision a SQL VM in Azure.
After installing, consider making additional configuration changes for optimal performance. For more information, see Performance best practices and configuration guidelines for SQL Server on Linux.
Update or Upgrade SQL Server
To update the mssql-server package to the latest release, use one of the following commands based on your platform:
| Platform | Package update command(s) |
|---|---|
| RHEL | sudo yum update mssql-server |
| SLES | sudo zypper update mssql-server |
| Ubuntu | sudo apt-get update sudo apt-get install mssql-server |
These commands download the newest package and replace the binaries located under /opt/mssql/ . The user generated databases and system databases are not affected by this operation.
To upgrade SQL Server, first change your configured repository to the desired version of SQL Server. Then use the same update command to upgrade your version of SQL Server. This is only possible if the upgrade path is supported between the two repositories.
Rollback SQL Server
To rollback or downgrade SQL Server to a previous release, use the following steps:
Identify the version number for the SQL Server package you want to downgrade to. For a list of package numbers, see the Release notes.
Downgrade to a previous version of SQL Server. In the following commands, replace with the SQL Server version number you identified in step one.
| Platform | Package update command(s) |
|---|---|
| RHEL | sudo yum downgrade mssql-server- .x86_64 |
| SLES | sudo zypper install —oldpackage mssql-server= |
| Ubuntu | sudo apt-get install mssql-server= sudo systemctl start mssql-server |
It is only supported to downgrade to a release within the same major version, such as SQL Server 2019.
Check installed SQL Server version
To verify your current version and edition of SQL Server on Linux, use the following procedure:
If not already installed, install the SQL Server command-line tools.
Use sqlcmd to run a Transact-SQL command that displays your SQL Server version and edition.
Uninstall SQL Server
To remove the mssql-server package on Linux, use one of the following commands based on your platform:
| Platform | Package removal command(s) |
|---|---|
| RHEL | sudo yum remove mssql-server |
| SLES | sudo zypper remove mssql-server |
| Ubuntu | sudo apt-get remove mssql-server |
Removing the package does not delete the generated database files. If you want to delete the database files, use the following command:
Unattended install
You can perform an unattended installation in the following way:
- Follow the initial steps in the quickstarts to register the repositories and install SQL Server.
- When you run mssql-conf setup , set environment variables and use the -n (no prompt) option.
The following example configures the Developer edition of SQL Server with the MSSQL_PID environment variable. It also accepts the EULA (ACCEPT_EULA) and sets the SA user password (MSSQL_SA_PASSWORD). The -n parameter performs an unprompted installation where the configuration values are pulled from the environment variables.
You can also create a script that performs other actions. For example, you could install other SQL Server packages.
For a more detailed sample script, see the following examples:
Offline install
If your Linux machine does not have access to the online repositories used in the quick starts, you can download the package files directly. These packages are located in the Microsoft repository, https://packages.microsoft.com.
If you successfully installed with the steps in the quick starts, you do not need to download or manually install the SQL Server package(s). This section is only for the offline scenario.
Download the database engine package for your platform. Find package download links in the package details section of the Release Notes.
Move the downloaded package to your Linux machine. If you used a different machine to download the packages, one way to move the packages to your Linux machine is with the scp command.
Install the database engine package. Use one of the following commands based on your platform. Replace the package file name in this example with the exact name you downloaded.
| Platform | Package install command |
|---|---|
| RHEL | sudo yum localinstall mssql-server_versionnumber.x86_64.rpm |
| SLES | sudo zypper install mssql-server_versionnumber.x86_64.rpm |
| Ubuntu | sudo dpkg -i mssql-server_versionnumber_amd64.deb |
You can also install the RPM packages (RHEL and SLES) with the rpm -ivh command, but the commands in the previous table automatically install dependencies if available from approved repositories.
Resolve missing dependencies: You might have missing dependencies at this point. If not, you can skip this step. On Ubuntu, if you have access to approved repositories containing those dependencies, the easiest solution is to use the apt-get -f install command. This command also completes the installation of SQL Server. To manually inspect dependencies, use the following commands:
| Platform | List dependencies command |
|---|---|
| RHEL | rpm -qpR mssql-server_versionnumber.x86_64.rpm |
| SLES | rpm -qpR mssql-server_versionnumber.x86_64.rpm |
| Ubuntu | dpkg -I mssql-server_versionnumber_amd64.deb |
After resolving the missing dependencies, attempt to install the mssql-server package again.
Complete the SQL Server setup. Use mssql-conf to complete the SQL Server setup:
Licensing and pricing
SQL Server is licensed the same for Linux and Windows. For more information about SQL Server licensing and pricing, see How to license SQL Server.
Optional SQL Server features
After installation, you can also install or enable optional SQL Server features.
 Get help
 Get help
For answers to frequently asked questions, see the SQL Server on Linux FAQ.
Источник


