- How to Make MS Paint Turn White Background Transparent
- How to make a background transparent in Paint on Windows 10
- How can I remove background color in Paint?
- 1. How to add transparent backgrounds to images with Paint
- 2. Alternative methods to add transparent backgrounds to images on Windows 10
- Adobe Photoshop
- 3. Add transparent backgrounds to images in Paint 3D
- How to use Windows 10 Paint 3D to remove white backgrounds and make transparent images
- Remove white backgrounds from images in Paint 3D
- Turn your cut out image into a sticker
- More Windows 10 resources
- The Dell XPS 15 is our choice for best 15-inch laptop
- Halo: MCC’s live service elements make it better, not worse
- Microsoft’s Surface Duo is not ‘failing up’
- These external monitors go perfectly with the Lenovo ThinkPad X1 Carbon
How to Make MS Paint Turn White Background Transparent
There are many situations where you may want to use images with a transparent background. Images with transparent background stack on each other very well and your particular task may require images with transparent background. However, there is no option to save images with transparent background MS Paint, Windows’ built-in image application.
Many Paint users are confused with an option in Select tool under Image group on Paint’s Home tab. This is the Transparent Selection option that you can toggle on and off. Paint users select this option and hope that their saved image will have a transparent background. Unfortunately, this is not true. Transparent Selection option only works within the Paint application and it only works with the white background. To try this option, follow these steps.
Click the small arrow on Select tool under Image group and check Transparent Selection
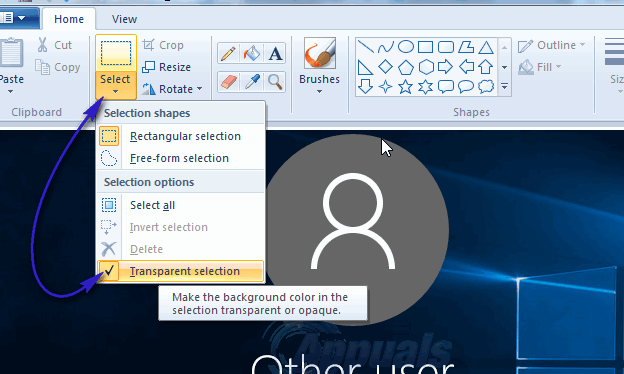
Now select an area of the image that contains a part of the image and a part of the white background.
Copy and paste this selection to another area of the image.
You will see that the white part of the selection is transparent. However, when you save the image, the white area of the image will not be transparent.
Fortunately, there is a hack that you can use to have images with transparent backgrounds. However, you need Microsoft PowerPoint for this hack to work. If you have Microsoft PowerPoint installed, you are ready to go. Follow these steps to remove background color of your image.
Insert your image into Microsoft PowerPoint.
Select the image.
In Picture Tools, go to Adjust group and click the Color
Select Set Transparent Color. A color selection tool will be attached to your mouse cursor. Precisely click in your picture on the color you want to remove.
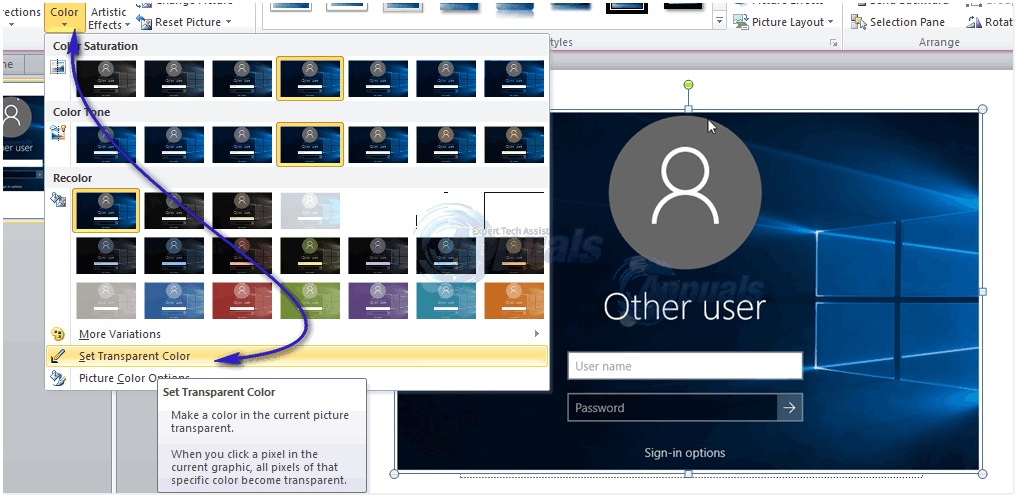
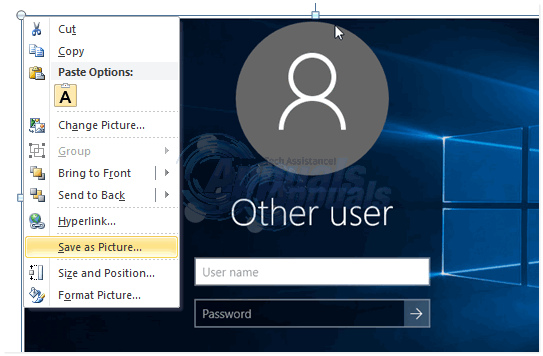
You will see the color being removed instantaneously. Right click the picture and click Save as picture.
Choose PNG from Save as type dropdown menu in the Save As Picture dialogue box.
Note: If the background color is present in other areas of the picture, it will be removed as well.
Your saved picture will have a transparent background.
How to make a background transparent in Paint on Windows 10

- Microsoft Paint is capable of various tricks, and in this guide, we’ll show you how to make background transparent in Paint.
- To create a transparent background, you just need to select the object and cut it from an image.
- Paint 3D also supports transparent background, and it’s usually a better option for image editing.
- If you want to create professional images, you can always use specialized tools such as Adobe Photoshop.
![]()
- Photos
- Videos
- Songs
- 3D models & infographics
- Many other artworks
Paint is the image editor included with Windows. Most photographers probably overlook MS Paint or new Paint 3D for editing photos as they have relatively limited tools compared with the likes of Photoshop.
However, one thing you can do is make a transparent background in Paint and Paint 3D for Windows 10. Here’s how.
How can I remove background color in Paint?
So, how do I make a transparent background in Paint?
There are two ways that you can make a picture‘s background transparent in Paint for Windows 10.
The first method involves cutting out a foreground area in an image so that the rest of its surrounding background becomes transparent. Then you can paste the foreground over another image.
The second method involves deleting an area from a picture so it’s left with a transparent area that you can fill by adding a second background image layer.
You can add transparent backgrounds to selected foregrounds with the original Paint. However, that Windows accessory doesn’t save transparent backgrounds so that you can combine images with layers.
Although, you can set up image layers with transparent backgrounds in Paint 3D. Below you can see how you can make background 100% transparent in both Paint and Paint 3D.
1. How to add transparent backgrounds to images with Paint
- Open Paint by clicking the Cortana button. Enter the keyword Paint in Cortana’s search box, and select to open Paint.
- Next, click File >Open; and select an image to open.
- Press the Select button, and then click the Transparent selection option.

- Select the Free-form selection option on the Select button’s menu.
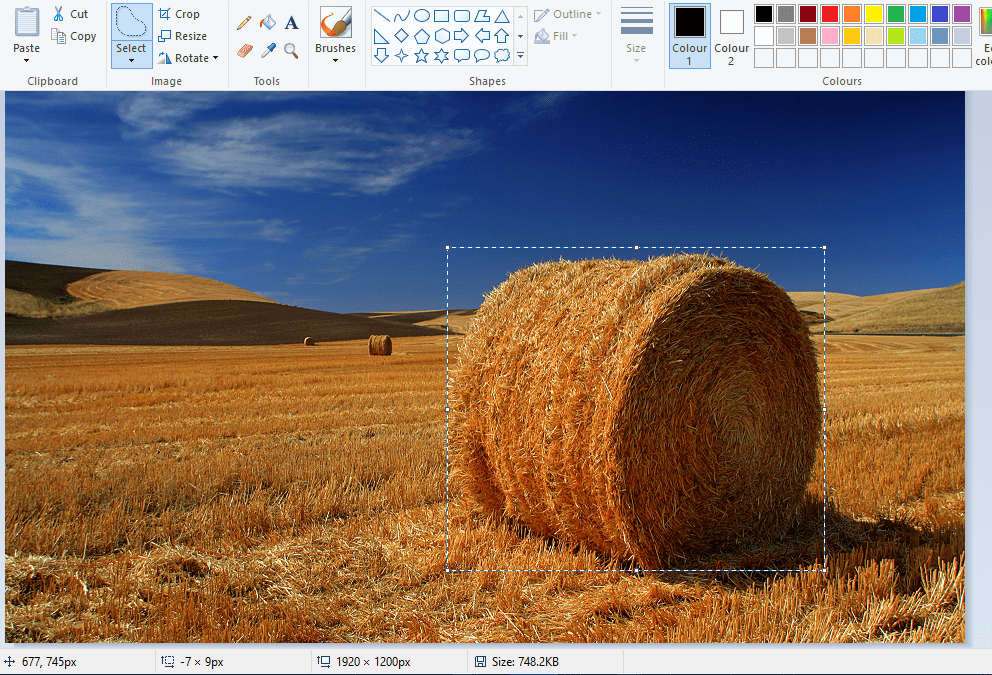
- Trace around a foreground area to preserve from the original picture with the cursor by holding the left mouse button.
- The rest of the picture left outside the traced area will be a transparent background.
- Right-click within the rectangle that appears around the selected area.
- Select Cut on the context menu to remove the selected foreground from the picture as in the snapshot below.
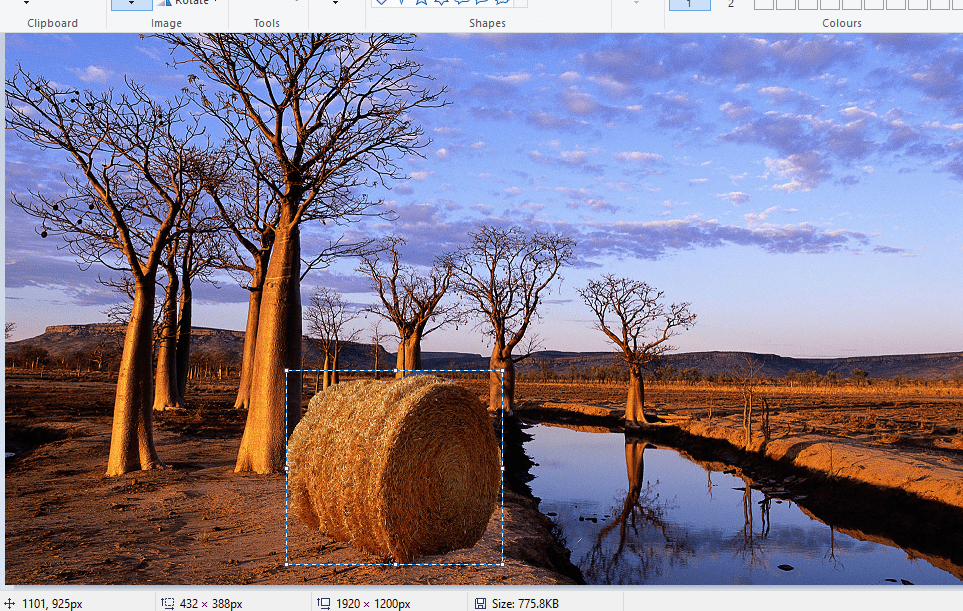
- Now open an entirely new image in Paint.
- Press the Ctrl + V hotkey to paste the foreground area you traced from the first image.
- As that picture now has a transparent background, you can see the rest of the second image behind it as shown below.
- Now left-click the pasted foreground image, and drag it to a suitable position on the background picture.

If you ever wondered how to remove background in Paint, this is one of the ways to do it.
2. Alternative methods to add transparent backgrounds to images on Windows 10
When it comes to digital graphics design, few programs have a more resounding name than Adobe Photoshop.
Among the many features that this program boasts, it can also help you in your effort to create transparent backgrounds.
This is thanks to the fact that Adobe Photoshop supports the use of image layers, allowing you to overlap images for great effect.
If you want to know to create transparent background in Adobe Photoshop, follow the steps below:
- Go to the Layers tab on the right-pane, right-click your image and select Duplicate Layer
- Make sure to hide the newly-created bottom image layer
- Select the original picture in the Layers tab, and then select the Magic Wand tool from the toolbar on the left pane
- Select and mark the background in your image that you need to turn transparent
- Click the Delete key on your keyboard
- Press File, and hit Save as…
- Give your newly-created image a name, and save it in the PNG format
Of course, this is just one of many tools and useful tricks that you can perform in Adobe Photoshop.
As such, if you are an avid graphics designer and feel like adding a bit of extra life into your photography, then a tool like Adobe Photoshop is the right thing for you.
Adobe Photoshop
3. Add transparent backgrounds to images in Paint 3D
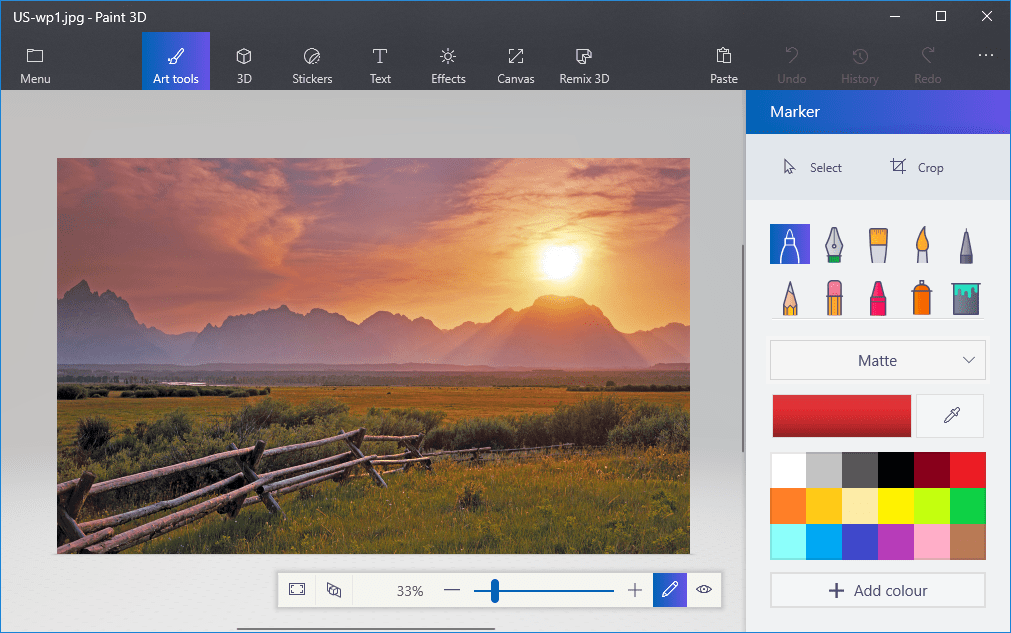
- Enter Paint 3D in Windows 10’s search box. If you haven’t had the Creators update, add the app to Windows 10 from this website page.
- Select to open the Paint 3D app below.
- Click Menu >Open >Browse files, and select an image to open in Paint 3D.
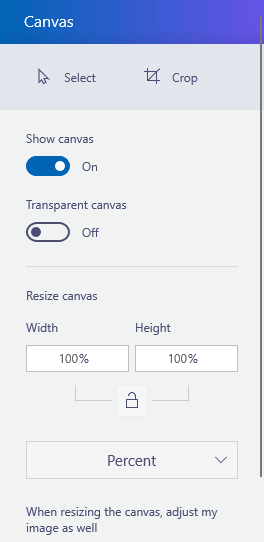
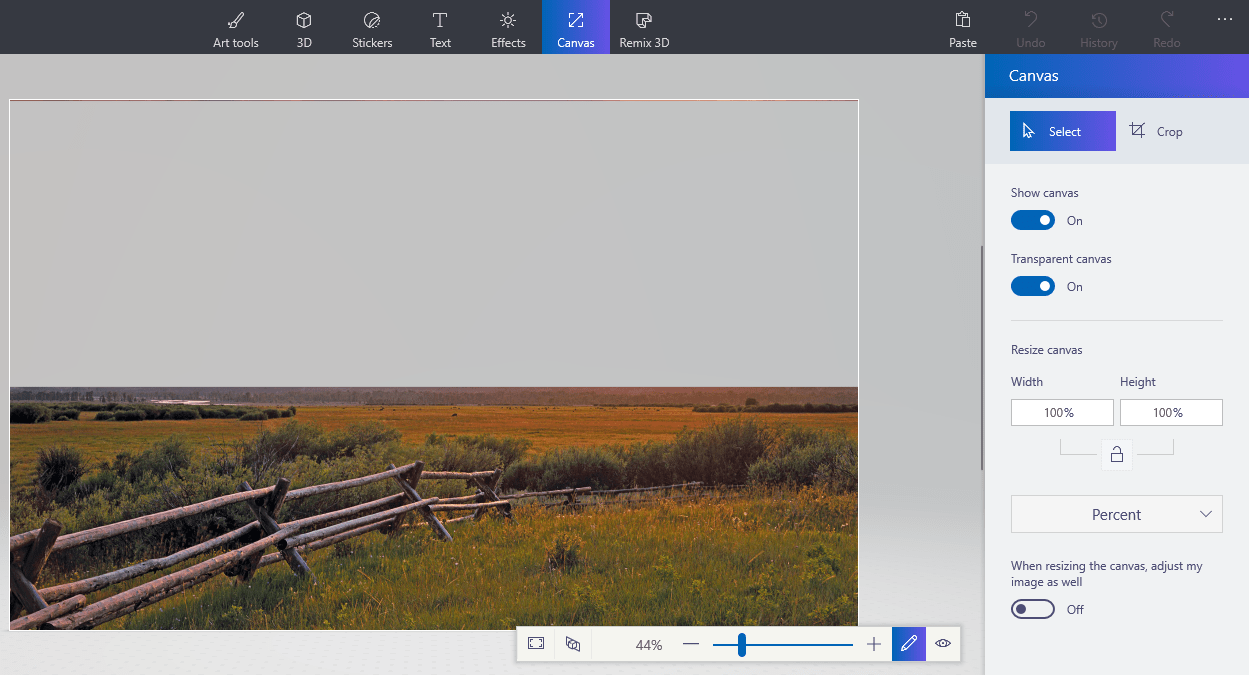
- Press the Canvas button to open the sidebar shown directly below.
- Click the Transparent canvas setting on the sidebar.
- Press the Select button, and then drag the selection rectangle over an area of the image to delete.
- Press the Ctrl + X hotkey to cut out the area from the picture as in the snapshot below.
- That leaves the picture with a blank transparent area that any background layer can fill.
- That leaves the picture with a blank transparent area that any background layer can fill.
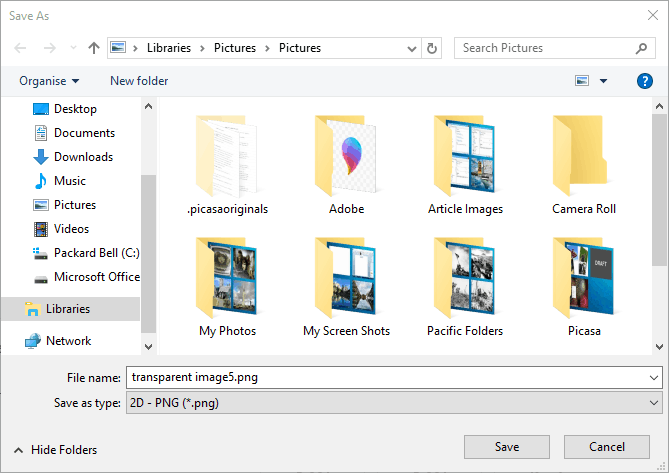
- Click Menu >Save as, and select the 2D PNG option.
- Enter a file title in the text box, and press the Save button.
- Click Menu >New to open a blank canvas.
- Select Menu >Open >Browse files, and select to open a background layer image for the transparent picture you just saved.
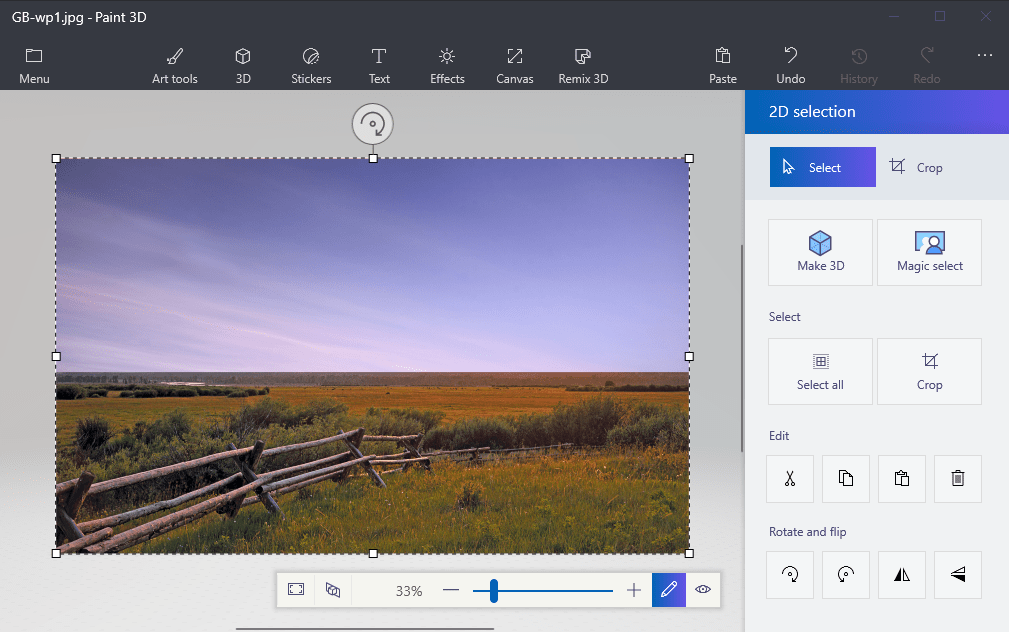
- Click Menu >Insert, and select to open the transparent image that you saved.
- The transparent image will open on top of the background layer as shown in the snapshot directly below.
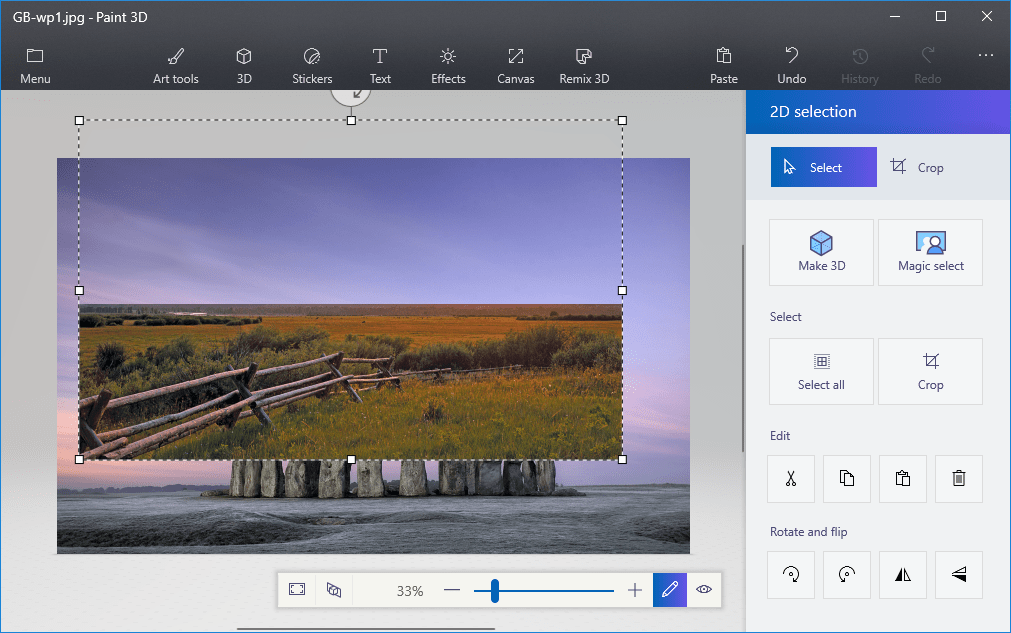
- As you can see, the background image layer now fills the transparent area in the overlapping picture.
- You can resize the overlapping picture by moving the cursor to one of the selection border’s corners, holding the left mouse button and then dragging the cursor.
- To rotate the foreground picture layer, hover the cursor over the rotation circle at the top of the selection border and hold the left mouse button. Drag the cursor left or right to rotate the selected layer clockwise or anti-clockwise.


Cutting the foreground out in Paint leaves a blank area in the original picture. However, that does not become a transparent region in the original picture when you save the image.
Consequently, the area cut out remains blank when you open the image and utilize layers in other image-editing software.
However, Paint 3D in Windows 10 does save transparent areas in images, and you should be able to make transparent background in Paint 3D using this method.
So, that’s how Windows 10 users can add transparent backgrounds to images with Paint. Then you can combine the transparent images with other pictures by pasting the selected foreground or overlapping them with layers.
By following the steps written above, you should be able to turn any backgrounds transparent in Microsoft Paint.
If you need more ideas on how to make transparent selections in Paint, we’ve written a similar guide on the subject. Check it out here.
Alternatively, in case you may want to remove photo background images without using any photo background remover software, check out this guide for more information.
How to use Windows 10 Paint 3D to remove white backgrounds and make transparent images
 Source: Windows Central
Paint 3D is an underrated Windows 10 app, which comes pre-installed on Windows 10 PCs. The app is a «modernized» version of Microsoft Paint, bringing tons of useful features. It’s probably not powerful enough for professional image manipulation. Still, if you want to just quickly remove the white background from an image and make something transparent for use in a blog or making a meme, it’s quite easy to do. Here’s how.
Remove white backgrounds from images in Paint 3D
- Open Paint 3D by typing «Paint 3D» into the Start Menu.
Open the image you want to use, by selecting Open, then Browse Files from the Welcome Screen. Use the File Browser to find the correct file you want to edit. Alternatively, you can right-click on the file, and select edit with Paint 3D if you already know where the file is.
 Source: Windows Central
Select the Magic Select tool, pictured here.
Source: Windows Central
Paint 3D will start guiding you through the process. Crop the image as shown here to remove unnecessary areas.
Source: Windows Central
You can zoom in with the mouse scroll wheel. You can Remove or Add additional parts of the picture using the tools on the right side bar.
Source: Windows Central
When you hit Done, your image cut-out will appear as a separate object you can move around.
Source: Windows Central
Next, you’ll want to remove the canvas background. Go to Canvas and select the Show Canvas toggle to hide it. The background will turn grey.
Source: Windows Central
You’ll want to select PNG as your image type, since this is an image format that can detect transparency. Also select Transparency toggle from the box as shown here.
Source: Windows Central
If you want to remove additional space around your picture, select Adjust angle & Framing at the top.
Source: Windows Central
 Source: Windows Central
Turn your cut out image into a sticker
You can use your new image as a Sticker for use in other projects. Simply select Make Sticker as shown here, after doing the initial cut out.
Source: Windows Central
Stickers remain in the list as long as you keep the app open, but you can start new projects with the sticker still in-tact. You can save it as a separate file for re-use, as well, using the guide above.
Source: Windows Central
Select the Stamp icon on the left of the box to paint the Sticker onto the canvas background, as shown.
Source: Windows Central
More Windows 10 resources
For more helpful articles, coverage, and answers to common questions about Windows 10, visit the following resources:
![]()
The Dell XPS 15 is our choice for best 15-inch laptop
For a lot of people, a 15-inch laptop is a perfect size that offers enough screen for multitasking, and in a lot of cases, some extra performance from powerful hardware. We’ve rounded up the best of the best at this size.
![]()
Halo: MCC’s live service elements make it better, not worse
Halo: The Master Chief Collection is more popular than ever, but some fans don’t agree with the live service approach 343 Industries has taken with it. Here’s why those elements are, at the end of the day, great for the game and for Halo overall.
![]()
Microsoft’s Surface Duo is not ‘failing up’
Microsoft announced this week that it was expanding Surface Duo availability to nine new commercial markets. While Surface Duo is undoubtedly a work in progress, this is not a sign of a disaster. It’s also doesn’t mean that Surface Duo is selling a ton either. Instead, the reason for the expansion is a lot more straightforward.
![]()
These external monitors go perfectly with the Lenovo ThinkPad X1 Carbon
The Lenovo ThinkPad X1 Carbon is an excellent laptop, but what if you want to project the display onto a larger screen? You’ll need an external monitor for that. Here are our favorite options.


