- How to Transfer Files Between Linux and Windows via LAN
- Create a share in Linux and access it from Windows using Samba
- Create a share in Windows to access it from Linux
- Enable sharing on Windows
- Share the folder
- Access from Linux
- Transferring Files from Linux to Windows (post-exploitation)
- Table of Contents
- Starting the Server
- Downloading the files
- Starting the Server
- Downloading the files
- Starting the Server
- Downloading the Files
- Setting up the Server
- Copying the Files
- Summary
How to Transfer Files Between Linux and Windows via LAN
![]()
You’ve tried to use a flash drive or SD card to transfer files from Linux to a Windows computer, and you found it annoying and tiring, especially when there are lots of files to move, and it’s taking ages to complete.
You don’t have to waste your precious time using storage devices when you can move files quickly and easily over your local network (LAN).
The main methods used to do this are:
- Create a share in Linux to access it from Windows using Samba
- Create a share in Windows to access it from Linux
Create a share in Linux and access it from Windows using Samba
The best and fastest way to do this is by installing the Samba suite. Samba is an ideal solution for sharing files between different devices such as a Windows, Linux or Mac machines. The machines need to be networked with a generic router.
Windows machines come with functionality that allows them to work with Samba out of the box, so you only need to install one package for Linux machines.
1. On your Linux machine open the location containing the files you wish to share.
2. Right-click on the file and select “Sharing Options.”
![]()
3. If you get a prompt asking you to install Samba services, click “Install service.”
4. Click Restart session once Samba service is installed to enable sharing.
5. Check the “Share this folder” and “Allow others to create and delete files in this folder” boxes.
6. Click “Create Share” to complete the process.
7. Open Terminal and type the following commands:
Replace USERNAME with your own user name.
8. Find the global section and add the lines:
9. Press Ctrl + O and Ctrl + X to save and exit.
10. Restart Samba:
11. Go to the Windows machine and right-click Start, then select Run.
12. In the Run box, type the command: \\computer_name\share_name5 .
Note: the computer name in this case can be the IP address of the Linux machine, which you can find by going to the Linux computer and opening terminal, then typing ipconfig .
13. Type the Linux computer name and share the resource name.
14. A prompt will be displayed asking for your credentials.
15. Type in your Linux username and password. Click OK.
16. Try to access the shares from your Windows computer.
The new server should be displayed in “My Network Places” in Windows.
Alternatively, do the following: right click Start and select Run, then enter: //server . Replace server with the name or IP address of the machine that runs your Samba server. A window with the browsable shares from the server will open.
Note: to access non-browsable shares, use this code: \\server\share name
Create a share in Windows to access it from Linux
This will be done in three steps as follows:
- Enable sharing on Windows
- Share the folder
- Access it from Linux
Enable sharing on Windows
Start by ensuring the network settings are configured to allow a connection from the Linux system. To do this:
1. Go to Control Panel and click “Network and Internet.”
![]()
2. Select “Network and Sharing Center.”
![]()
3. The Network and Sharing Center window will open. Click “Change Advanced settings.”
![]()
4. Enable these two settings: “Network Discovery” and “Turn on file and printer sharing.”
![]()
5. Click Save changes.
6. Sharing is now enabled.
Share the folder
Create a shared folder for the Linux system to see, connect and access. You can share anything, so follow these steps:
1. Find the folder you want to share and right-click it.
2. Select “Properties.”
![]()
3. Under the Sharing tab, click “Advanced Sharing.”
4. Under the Advanced Sharing window, enable the “Share this folder” option.
5. Click “Permissions.”
Note: in the Permissions window you can restrict access to the folder to specific users or accounts. Select “Full Control permission to Everyone” to give any user access. This way anyone can read and write changes to the files in the folder you share.
If, however, you want to restrict access to specific user accounts, remove the “Everyone” user, add the users you want and then assign the relevant permissions to them. The user accounts are those that are on the Windows system (not the Linux system).
6. Click OK to close the Permissions window.
7. Click OK to close the Advanced Sharing window.
8. Go to the Security tab in the main properties window.
Note: configure similar permissions as those in the sharing settings so that Linux users can access the shared folder.
If they don’t match, the most restrictive settings are applied.
However, if the user you intend to share with already has security permissions, close the window and move to the third step. Otherwise, click “Edit” to add a user, click “Add” in the Permissions window that opens, and enter the user’s details.
9. Click OK on all windows. The folder should now be shared with your network.
Access from Linux
You can mount the shared folder using Linux GUI or by using a command line. For our example we’ll use Terminal because it works across many distributions, and it’s faster.
To do this, you’ll need the cifs-utils package to mount SMB shares. The complete the following steps.
1. In the terminal, type:
2. Make a directory.
3. Mount the share to the directory
4. Create a folder on the desktop. (It’s easier to access from here.)
5. Create and mount the folder using these commands:
Note: if prompted for the root password of the Linux system and for your user account on Windows, insert each of them and run the command.
You’ll now see the contents of the Windows share and will be able to add data to it.
Are you now able to transfer files to and from Linux and Windows systems? Tell us what worked for you, and if you have a different method, share with us below.
My passion has always been to share every bit of useful information I find on tech, with the ultimate goal of helping people solve a problem.
Transferring Files from Linux to Windows (post-exploitation)
Table of Contents
Often times on an engagement I find myself needing to copy a tool or a payload from my Kali linux attack box to a compromised Windows machine. As a perfect example, on a recent pentest, I found a vulnerable ColdFusion server and was able to upload a CFM webshell. It was a very limited, non-interactive shell and I wanted to download and execute a reverse Meterpreter binary from my attack machine. I generated the payload with Veil but needed a way to transfer the file to the Windows server running ColdFusion through simple commands.
I’m putting this post together as a “cheat sheet” of sorts for my favorite ways to transfer files.
For purposes of demonstration, the file I’ll be copying over using all these methods is called met8888.exe and is located in /root/shells .
Downloading files via HTTP is pretty straightforward if you have access to the desktop and can open up a web browser, but it’s also possible to do it through the command line as well.
Starting the Server
The two ways I usually serve a file over HTTP from Kali are either through Apache or through a Python HTTP server.
To serve a file up over Apache, just simply copy it to /var/www/html and enable the Apache service. Apache is installed by default in Kali:

The other option is to just start a Python webserver directly inside the shells directory. This only requires a single line of Python thanks to Python’s SimpleHTTPServer module:
By default it serves on port 8000, but you can also specify a port number at the end.

While this is running, all files inside the current directory will be accessible over HTTP. Ctrl-C will kill the server when you’re done.
Downloading the files
If you have desktop access, simply browse to http://YOUR-KALI-IP/shell8888.exe and use the browser to download the file:
If you only have command line access (e.g. through a shell), downloading via HTTP is a little trickier as there’s no built-in Windows equivalent to curl or wget . The best option is to use PowerShell’s WebClient object:
You can call this from a normal Windows command prompt as well:

There’s a few other methods outlined here, but I don’t think any of them are as straightforward as the PowerShell snippet above.
Another option to transfer files is FTP. Windows has a built in FTP client at C:\Windows\System32\ftp.exe so this option should almost always work.
Starting the Server
You can definitely install a full-featured FTP server like vsftpd in Kali, but I find that’s often overkill. I just want a simple, temporary FTP server that I can spin up and down to share files. The two best ways to do this are with Python or Metasploit.
Python. The pytftpd library, like the HTTP one above, lets you spin up a Python FTP server in one line. It doesn’t come installed by default, but you can install it with apt:
Now from the directory you want to serve, just run the Python module. With no arguments it runs on port 2121 and accepts anonymous authentication. To listen on the standard port:

One benefit of using FTP over HTTP is the ability to transfer files both way. If you want to grant the anonymous user write access, add the -w flag as well.
Metasploit. There is also an auxiliary FTP server built in to Metasploit as well that is easy to deploy and configure. It’s located at auxiliary/server/ftp . Set the FTPROOT to the directory you want to share and run exploit :
The server will run in the background. Kill it with jobs -k
Downloading the files
As mentioned earlier, Windows has an FTP client built in to the PATH. You can open an FTP connection and download the files directly from Kali on the command line. Authenticate with user anonymous and any password
Now this is great if you have an interactive shell where you can actually drop into the FTP prompt and issue commands, but it’s not that useful if you just have command injection and can only issue one command at a time.
Fortunately, windows FTP can take a “script” of commands directly from the command line. Which means if we have a text file on the system that contains this:
we can simply run ftp -s:ftp_commands.txt and we can download a file with no user interaction.
How to get that text file? We can echo into it one line at at time:
Or, do it all in one long line:
Either way you’ll end up with met8888.exe on the Windows host.
Trivial file transfer protocol is another possiblity if tftp is installed on the system. It used to be installed by default in Windows XP, but now needs to be manually enabled on newer versions of Windows. If the Windows machine you have access to happens to have the tftp client installed, however, it can make a really convenient way to grab files in a single command.
Starting the Server
Kali comes with a TFTP server installed, atftpd , which can be started with a simple service atftpd start . I’ve always had a hell of a time getting it configured and working though, and I rarely need to start and keep running a TFTP server as a service, so I just use the simpler Metasploit module.
Metasploit, like with FTP, has an auxiliary TFTP server module at auxiliary/server/tftp . Set the module options, including TFTPROOT , which determines which directory to serve up, and OUTPUTPATH if you want to capture TFTP uploads from Windows as well.
Downloading the Files
Again, assuming the tftp utility is installed, you can grab a file with one line from the Windows prompt. It doesn’t require any authentication. Just simply use the -i flag and the GET action.

Exfiltrating files via TFTP is simple as well with the PUT action. The Metasploit server saves them in /tmp by default

TFTP is a convenient, simple way to transfer files as it doesn’t require authentication and you can do everything in a single command.
Sidenote: Installing TFTP. As I mentioned, TFTP is not included by default on newer versions of Windows. If you really wanted to, you can actually enable TFTP from the command line:
Might come in handy, but I’d always rather “live off the land” and use tools that are already available.
This is actually my favorite method to transfer a file to a Windows host. SMB is built in to Windows and doesn’t require any special commands as Windows understands UNC paths. You can simply use the standard copy and move commands and SMB handles the file transferring automatically for you. What’s even better is Windows will actually let you execute files via UNC paths, meaning you can download and execute a payload in one command!
Setting up the Server
Trying to get Samba set up and configured properly on Linux is a pain. You have to configure authentication, permissions, etc and it’s quite frankly way overkill if I just want to download one file. Now Samba an actually do some really cool stuff when you configure it to play nicely with Windows AD, but most of the time I just want a super simple server up and running that accepts any authentication and serves up or accepts files.
Enter smbserver.py , part of the Impacket project. Maybe one day I’ll write a blogpost without mentioning Impacket, but that day is not today.
To launch a simple SMB server on port 445, just specify a share name and the path you want to share:
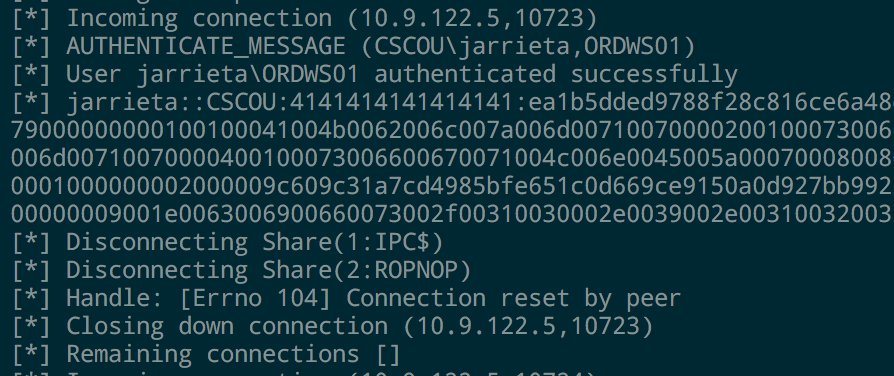
The python script takes care of all the configurations for you, binds to 445, and accepts any authentication. It will even print out the hashed challenge responses for any system that connects to it.
In one line we’ve got an SMB share up and running. You can confirm it with smbclient from Linux:
Or with net view from Windows:
Copying the Files
Since Windows handles UNC paths, you can just treat the ROPNOP share as if it’s just a local folder from Windows. Basic Windows file commands like dir , copy , move , etc all just work:

If you look at the output from smbserver.py , you can see that every time we access the share it outputs the NetNTLMv2 hash from the current Windows user. You can feed these into John or Hashcat and crack them if you want (assuming you can’t just elevate to System and get them from Mimikatz)
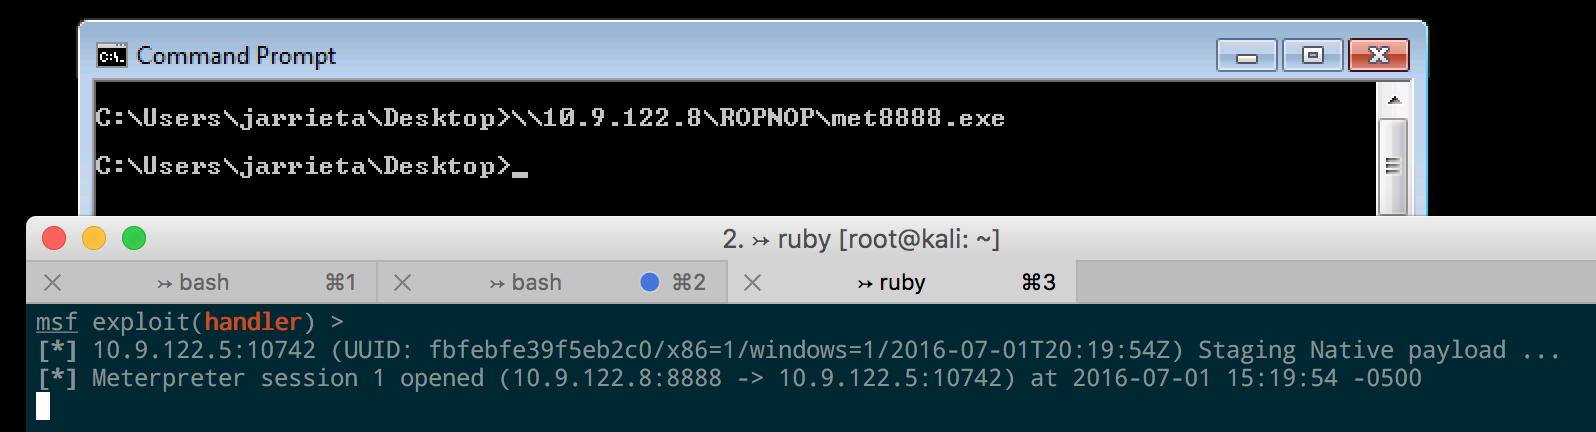
Executing files from SMB. Because of the way Windows treats UNC paths, it’s possible to just execute our binary directly from the SMB share without even needing to copy it over first. Just run the executable as if it were already local and the payload will fire:
This proved incredibly useful during another ColdFusion exploit I came across. After gaining access to an unprotected ColdFusion admin panel, I was able to configure a “system probe” to fire when a test failed. It let me execute a program as a failure action, and I just used a UNC path to execute a Meterpreter payload hosted from my Kali machine:

When the probe failed, ColdFusion connected to my SMB share and executed the payload and I was off and running.
Summary
A good pentester needs to “live off the land” and know several different ways to transfer files. You can’t always count on an interactive shell, let alone a GUI, so understanding different commands and techniques to transfer and execute payloads is crucial.
I outlined a few different techniques using four different protocols:
Their use depends on what’s available on the target and what’s allowed on the network.
Hope this post helps someone and can serve as a “cheat sheet” of sorts. Let me know if I missed any of your favorite techniques!


