- com.unity.toolchain.linux-x86_64
- Choosing the correct toolchain package
- Building a Linux IL2CPP player
- Linux IL2CPP cross-compiler
- Prerequisites
- Linux sysroot package
- Linux toolchain packages
- Required disk space for Linux toolchain packages
- Using the Linux IL2CPP cross-compiler
- Installing Unity from the command line
- Installing individual Unity components on Windows from the command line
- Unity Editor install
- Unity Editor uninstall
- Standard Assets install
- Example Project install
- Installing Unity on OS X from the command line
- Unity Editor install
- Standard Assets install
- Example Project install
- Torrent download
- Installing several versions at once
- Standalone Toolchain
- On this page
- Selecting Your Toolchain
- Selecting Your Sysroot
- Invoking the Compiler
- Simple method
- Advanced method
- Working with Clang
- Invoking Clang
- Clang targets with ARM
- ABI Compatibility
- Warnings and Limitations
- Windows support
- wchar_t support
- Exceptions, RTTI, and STL
- C++ STL support
com.unity.toolchain.linux-x86_64
The com.unity.toolchain.linux-x86_64 package supplies a toolchain and sysroot for building Linux IL2CPP players on a Linux-x86_64 host. It depends on the following packages:
- com.unity.sysroot for common code
- com.unity.sysroot.linux-x86_64 for the Linux x86_64 sysroot
Note: You only need to install the toolchain package. The package manager installs dependent packages automatically. For an overview of Unity sysroot packages, see Unity Sysroot Package documentation.
Before you install your chosen package, make sure you have the Linux-IL2CPP module installed for your editor. For further information about using modules, see Adding modules to the Unity Editor.
Choosing the correct toolchain package
When you install a package to build the Linux IL2CPP player, choose the com.unity.toolchain.* package the based on your host (Editor) platform:
- Linux x86_64: com.unity.toolchain.linux-x86_64
- MacOS x86_64: com.unity.toolchain.macos-x86_64-linux-x86_64
- Windows x86_64: com.unity.toolchain.win-x86_64-linux-x86_64
Building a Linux IL2CPP player
When you have installed your toolchain package, go to Project Settings > Player > Configuration and set the ScriptingBackend to IL2CPP.
To build your project go to File > Build Settings, in the Target Platform dropdown select Linux, then click Build or Build and Run.
Источник
Linux IL2CPP cross-compiler
The Linux IL2CPP A Unity-developed scripting back-end which you can use as an alternative to Mono when building projects for some platforms. More info
See in Glossary cross-compiler is a set of sysroot and toolchain packages that allow you to build Linux IL2CPP Players on any Standalone platform without needing to use the Linux Unity Editor or rely on Mono.
If you meet the prerequisites, Unity automatically installs these packages for you when you choose the Linux build target. If you want to opt out of this process and use your own sysroot and toolchain packages, go to Edit > Project Settings > Toolchain Management and disable the Install Toolchain package automatically checkbox. If you already have these installed, you also need to remove them from the package manager.
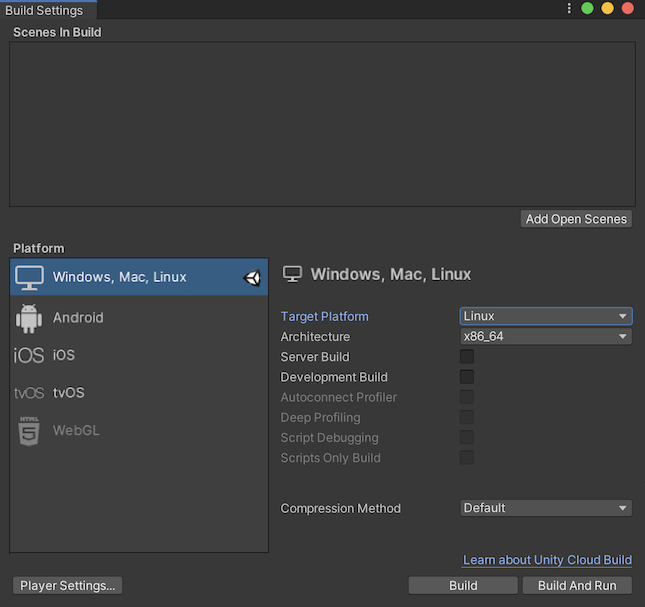 Build settings window with Linux build target selected
Prerequisites
Unity needs the following to install the IL2CPP cross-compiler packages:
- Unity 2019.4 or above
- Enough available disk space for your chosen Linux toolchain package. For further information, see the Required disk space for Linux toolchain packages
- Scripting backend set to IL2CPP. To set the scripting backend to IL2CPP: Go to Edit >ProjectSetting >PlayerSettings >SettingforPC, Mac and Linux Standalone >Other Settings >Configuration. Set the Scripting Backend toIL2CPP.
- IL2CPP module. For information on how to install the IL2CPP module, follow the steps documented on Adding a Module to the Unity Editor.
Linux sysroot package
A Linux sysroot package is a directory which includes all the headers and libraries you need to build for Linux.
Every operating system (OS) has its own build systems which vary from one to another. If you build using the headers and libraries of a particular OS, the built Player might not run on other operating systems. To address this, Unity provides a sysroot to build with which works on all supported Linux platforms.
Linux toolchain packages
Unity provides toolchain packages for macOS, Windows, and Linux. Each of these platforms builds for Linux in a unique way.
A Linux toolchain package is a set of tools (including the compiler and linker) that Unity needs to build for Linux from each of these operating systems.
Required disk space for Linux toolchain packages
Make sure you have enough disk space to account for the package download, decompression, and use.
In the rare instances where you are unsure whether you have enough space, define a UNITY_SYSROOT_CACHE environment variable and use it to store the uncompressed sysroots and toolchain packages. An environment variable is a variable that you set outside of Unity which is available for Unity to reference. In this case, you set a cache that Unity can reference when decompressing the sysroot and toolchain packages. Environment variables are specific to your operating system, so you need to follow your system’s guidelines to set them.
The table below shows the total disk space requirements for each toolchain package.
| Toolchain package | Required disk space |
|---|---|
| com.unity.toolchain.linux-x86_64 | 462MB |
| com.unity.toolchain.macos-x86_64-linux-x86_64 | 2GB |
| com.unity.toolchain.win-x86_64-linux-x86_64: | 2GB |
Using the Linux IL2CPP cross-compiler
If you meet all of the prerequisites on this page, you can build your project as a Linux Player. Unity automatically uses the Linux IL2CPP cross-compiler at build time.
To build a Linux Player, follow these steps:
- Open the Build Settings (menu: File >Build Settings).
- Select the PC, Mac and Linux Standalone option.
- Set the Build Target option to Linux.
- Click the Switch Platform button.
- Build your Player. From Unity’s main menu, go to File and select either Build or Build and Run.
Источник
Installing Unity from the command line
If you want to automate the deployment of Unity in an organization, you can install the Editor and other components from the command line. The components are normal installer executable programs and packages which you can use to automate the deployment of Unity.
To download the components, you use the Unity installer to download the Unity components to a folder on your computer.
Download and run the installer. Release versions of the installer are available from the Unity download archive. For pre-release versions of the installer, see the Beta programs page.
In Choose Components, select all of the components for which you are automating deployment.
In Choose Download and Install locations, click the Download to radio button.
Enter a location in which to store the component installers.
Finish the installation.

Navigate to the download location you specified. In the folder, you will find the installer files for the components you selected and a script file ( install.bat on Windows or install.sh on Linux or OS X) that you can run to install the components.
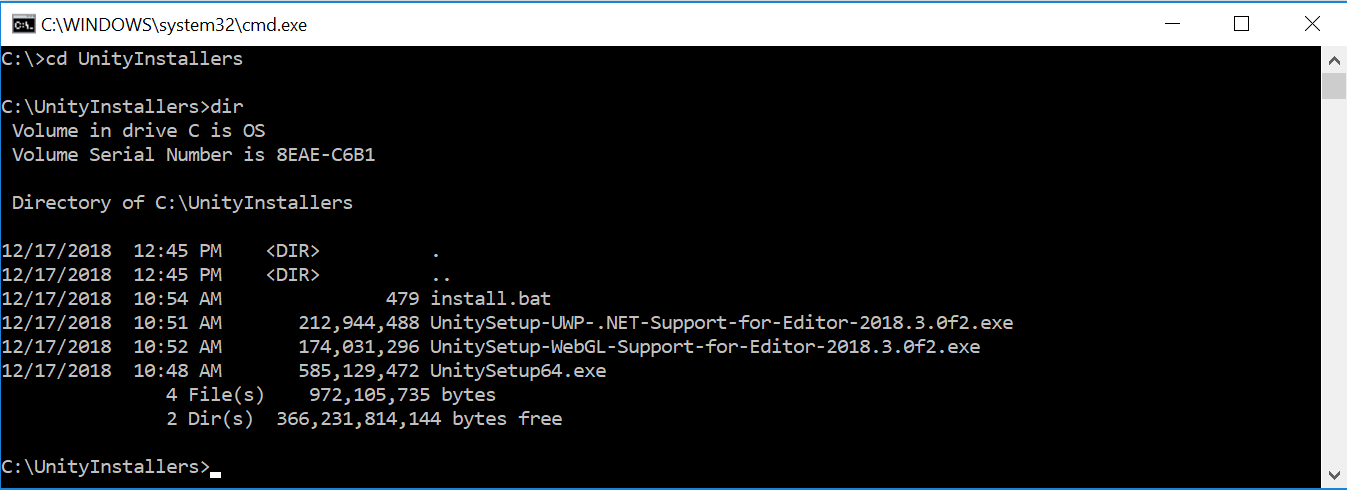 Downloaded installers on Windows
To install Unity on another computer using the downloaded components, copy the contents of the folder to the destination computer and execute the install script.
Installing individual Unity components on Windows from the command line
Use the following options when installing the Editor and other components from the command line on Windows.
Note: Installer command line arguments are case-sensitive.
Unity Editor install
| Command | Details |
|---|---|
| /S | Performs a silent (no questions asked) install. |
| /D=PATH | Sets the default install directory. Useful when combined with the silent install option. The default folder is C:\Program Files (x86)\Unity (32-bit) or C:\Program Files\Unity (64-bit). |
Example:
This example installs Unity silently to a E:\Development\Unity folder, which becomes the root of the Unity installation. In this case, the Editor executable is installed in E:\Development\Unity\Editor\Unity.exe. The default install directory must be the last argument on the command line. The supplied path must not be surrounded by quotes, even if the path contains spaces.
Unity Editor uninstall
To perform a silent uninstall, run Uninstall.exe /S from the command line or a script.
Note: Although the process finishes right away, there is a delay before the files are actually removed. This is because the uninstaller is copied to a temporary location to enable it to remove itself. Make sure that the working directory is not inside the Unity install location. If it is, the uninstaller is unable to remove the folder.
Standard Assets install
To silently install Standard Assets:
Note: If specifying a folder, use the Unity root folder (that is, the folder containing the Editor folder, and not the folder in which Unity.exe is installed.)
Example Project install
To silently install the Example Project, use:
Note: The default folder is C:\Users\Public\Documentation\Unity Projects\Standard Assets Example Project .
Installing Unity on OS X from the command line
The individual Unity installers are provided as .pkg files, which can be installed using the installer command, as described below.
Unity Editor install
To install the Editor into a /Applications/Unity folder on the specified target volume, enter:
Standard Assets install
To install the Standard Assets into a /Applications/Unity/Standard Assets folder on the specified volume, enter:
Example Project install
To install the Example Project into a /Users/Shared/Unity/Standard-Assets folder on the specified volume, enter:
Torrent download
If you prefer to download Unity via a BitTorrent client, you can download get a torrent link from the Unity download archive page. Not all versions have a torrent download. If a version is available to download as a torrent, the option is presented as Torrent download (Win+Mac) in the Downloads dropdown menu.
 Downloading Unity using a Torrent
Installing several versions at once
You can install multiple versions of Unity on the same computer.
On a Mac, the installer creates a folder called Unity, and overwrites any existing folder with this name. To install more than one version of Unity on your Mac, rename the existing Unity folder before installing another version.
On a PC, the install folder is always named Unity X.Y.Z[fp]W, where the f is for an official release, and p is used to mark a patch release.
We strongly recommend that if you rename a Unity folder, you name the new folder logically (for example, add the version number to the end of the name). Any existing shortcuts, aliases and links to the offline docs might no longer point to the old version of Unity. This can be particularly confusing with the offline docs; if you suddenly find that browser bookmarks to the offline docs no longer work, then check that they have the right folder name in the URL.
- Installation advice updated in Unity 2017.2
- Installation advice updated in Unity 2017.4
Источник
Standalone Toolchain
On this page
You can use the toolchains provided with the Android NDK independently, or as plug-ins with an existing IDE, such as Eclipse. This flexibility can be useful if you already have your own build system, and only need the ability to invoke the cross-compiler in order to add support to Android for it.
A typical use case is invoking the configure script of an open-source library that expects a cross-compiler in the CC environment variable.
Note: This page assumes significant understanding of compiling, linking, and low-level architecture. In addition, the techniques it describes are unnecessary for most use cases. In most cases, we recommend that you forego using a standalone toolchain, and instead stick to the NDK build system.
Selecting Your Toolchain
Before anything else, you need to decide which processing architecture your standalone toolchain is going to target. Each architecture corresponds to a different toolchain name, as Table 1 shows.
Table 1. APP_ABI settings for different instruction sets.
| Architecture | Toolchain name |
|---|---|
| ARM-based | arm-linux-androideabi- |
| x86-based | x86- |
| MIPS-based | mipsel-linux-android- |
| ARM64-based | aarch64-linux-android- |
| X86-64-based | x86_64- |
| MIPS64-based | mips64el-linux-android— |
Selecting Your Sysroot
The next thing you need to do is define your sysroot (A sysroot is a directory containing the system headers and libraries for your target). To define the sysroot, you must must know the Android API level you want to target for native support; available native APIs vary by Android API level.
Native APIs for the respective Android API levels reside under $NDK/platforms/ ; each API-level directory, in turn, contains subdirectories for the various CPUs and architectures. The following example shows how to define a sysroot for a build targeting Android 5.0 (API level 21), for ARM architecture:
For more detail about the Android API levels and the respective native APIs they support, see Android NDK Native APIs.
Invoking the Compiler
There are two ways to invoke the compiler. One method is simple, and leaves most of the lifting to the build system. The other is more advanced, but provides more flexibility.
Simple method
The simplest way to build is by invoking the appropriate compiler directly from the command line, using the —sysroot option to indicate the location of the system files for the platform you’re targeting. For example:
While this method is simple, it lacks in flexibility: It does not allow you to use any C++ STL (STLport, libc++, or the GNU libstdc++) with it. It also does not support exceptions or RTTI.
For Clang, you need to perform an additional two steps:
- Add the appropriate -target for the target architecture, as Table 2 shows.
Table 2. Architectures and corresponding values for -target .
| Architecture | Value |
|---|---|
| armeabi | -target armv5te-none-linux-androideabi |
| armeabi-v7a | -target armv7-none-linux-androideabi |
| arm64-v8a | -target aarch64-none-linux-android |
| x86 | -target i686-none-linux-android |
| x86_64 | -target x86_64-none-linux-android |
| mips | -target mipsel-none-linux-android |
Ultimately, a command to compile using Clang might look like this:
Advanced method
The NDK provides the make-standalone-toolchain.sh shell script to allow you to perform a customized toolchain installation from the command line. This approach affords you more flexibility than the procedure described in Simple method.
The script is located in the $NDK/build/tools/ directory, where $NDK is the installation root for the NDK. An example of the use of this script appears below:
This command creates a directory named /tmp/my-android-toolchain/ , containing a copy of the android-21/arch-arm sysroot, and of the toolchain binaries for a 32-bit ARM architecture.
Note that the toolchain binaries do not depend on or contain host-specific paths, in other words, you can install them in any location, or even move them if you need to.
By default, the build system uses the 32-bit, ARM-based GCC 4.8 toolchain. You can specify a different value, however, by specifying —arch= as an option. Table 3 shows the values to use for other toolchains:
Table 3. Toolchains and corresponding values, using —arch .
| Toolchain | Value |
|---|---|
| mips64 compiler | —arch=mips64 |
| mips GCC 4.8 compiler | —arch=mips |
| x86 GCC 4.8 compiler | —arch=x86 |
| x86_64 GCC 4.8 compiler | —arch=x86_64 |
| mips GCC 4.8 compiler | —arch=mips |
Alternatively, you can use the —toolchain= option. Table 4 shows the values you can specify for :
Table 4. Toolchains and corresponding values, using —toolchain .
| Toolchain | Value |
|---|---|
| arm | |
| x86 | |
| mips | |
| arm64 | |
| x86_64 | |
| mips64 | |
Note: Table 4 is not an exhaustive list. Other combinations may also be valid, but are unverified.
You can also copy Clang/LLVM 3.6, using one of two methods: You can append -clang3.6 to the —toolchain option, so that the —toolchain option looks like the following example:
You can also add -llvm-version=3.6 as a separate option on the command line.
Note: Instead of specifying a specific version, you can also use , which defaults to the highest available version of Clang.
By default, the build system builds for a 32-bit host toolchain. You can specify a 64-bit host toolchain instead. Table 5 shows the value to use with -system for different platforms.
Table 5. Host toolchains and corresponding values, using -system .
| Host toolchain | Value |
|---|---|
| 64-bit Linux | -system=linux-x86_64 |
| 64-bit MacOSX | -system=darwin-x86_64 |
| 64-bit Windows | -system=windows-x86_64 |
For more information on specifying a 64- or 32-bit instruction host toolchain, see 64-Bit and 32-Bit Toolchains.
You may specify —stl=stlport to copy libstlport instead of the default libgnustl . If you do so, and you wish to link against the shared library, you must explicitly use -lstlport_shared . This requirement is similar to having to use -lgnustl_shared for GNU libstdc++ .
Similarly, you can specify —stl=libc++ to copy the LLVM libc++ headers and libraries. To link against the shared library, you must explicitly use -lc++_shared.
You can make these settings directly, as in the following example:
Note that if you omit the -install-dir option, the make-standalone-toolchain.sh shell script creates a tarball in tmp/ndk/ .tar.bz2 . This tarball makes it easy to archive, as well as to redistribute the binaries.
This standalone toolchain provides an additional benefit, as well, in that it contains a working copy of a C++ STL library, with working exceptions and RTTI support.
For more options and details, use —help .
Working with Clang
You can install Clang binaries in the standalone installation by using the —llvm-version= option. is a LLVM/Clang version number, such as 3.5 or 3.6 . For example:
Note that Clang binaries are copied along with the GCC ones, because they rely on the same assembler, linker, headers, libraries, and C++ STL implementation.
This operation also installs two scripts, named clang and clang++ , under /bin/@ . These scripts invoke the real clang binary with default target architecture flags. In other words, they should work without any modification, and you should be able to use them in your own builds by just setting the CC and CXX environment variables to point to them.
Invoking Clang
In an ARM standalone installation built with llvm-version=3.6 , invoking Clang on a Unix system takes the form of a single line. For instance:
clang++ invokes clang++31 in the same way.
Clang targets with ARM
When building for ARM, Clang changes the target based on the presence of the -march=armv7-a and/or -mthumb options:
Table 5. Specifiable -march values and their resulting targets.
| -march value | Resulting target |
|---|---|
| -march=armv7-a | armv7-none-linux-androideabi |
| -mthumb | thumb-none-linux-androideabi |
| Both -march=armv7-a and -mthumb | thumbv7-none-linux-androideabi |
You may also override with your own -target if you wish.
The -gcc-toolchain option is unnecessary because, in a standalone package, Clang locates as and ld in a predefined relative location.
clang and clang++ should be easy drop-in replacements for gcc and g++ in a makefile. When in doubt, add the following options to verify that they are working properly:
- -v to dump commands associated with compiler driver issues
- -### to dump command line options, including implicitly predefined ones.
- -x c to dump predefined preprocessor definitions
- -save-temps to compare *.i or *.ii preprocessed files.
For more information about Clang, see http://clang.llvm.org/, especially the GCC compatibility section.
ABI Compatibility
The machine code that the ARM toolchain generates should be compatible with the official Android armeabi ABI by default.
We recommend use of the -mthumb compiler flag to force the generation of 16-bit Thumb-1 instructions (the default being 32-bit ARM instructions).
If you want to target the armeabi-v7a ABI, you must set the following flags:
The first flag enables Thumb-2 instructions. The second flag enables hardware-FPU instructions while ensuring that the system passes floating-point parameters in core registers, which is critical for ABI compatibility.
Note: In versions of the NDK prior to r9b, do not use these flags separately. You must set all or none of them. Otherwise, unpredictable behavior and crashes may result.
To use NEON instructions, you must change the -mfpu compiler flag:
Note that this setting forces the use of VFPv3-D32 , per the ARM specification.
Also, make sure to provide the following two flags to the linker:
The first flag instructs the linker to pick libgcc.a , libgcov.a , and crt*.o , which are tailored for armv7-a. The 2nd flag is required as a workaround for a CPU bug in some Cortex-A8 implementations.
Since NDK version r9b, all Android native APIs taking or returning double or float values have attribute((pcs(«aapcs»))) for ARM. This makes it possible to compile user code in -mhard-float (which implies -mfloat-abi=hard ), and still link with the Android native APIs that comply with the softfp ABI. For more information on this, see the comments in $NDK/tests/device/hard-float/jni/Android.mk .
If you want to use NEON intrinsics on x86, the build system can translate them to the native x86 SSE intrinsics using a special C/C++ language header with the same name, arm_neon.h , as the standard ARM NEON intrinsics header.
By default, the x86 ABI supports SIMD up to SSSE3, and the header covers
93% of (1869 of 2009) NEON functions.
You don’t have to use any specific compiler flag when targeting the MIPS ABI.
To learn more about ABI support, see x86 Support.
Warnings and Limitations
Windows support
The Windows binaries do not depend on Cygwin. This lack of dependency makes them faster. The cost, however, is that they do not understand Cygwin path specifications like cygdrive/c/foo/bar , as opposed to C:/foo/bar .
The NDK build system ensures that all paths passed to the compiler from Cygwin are automatically translated, and manages other complexities, as well. If you have a custom build system, you may need to resolve these complexities yourself.
For information on contributing to support for Cygwin/MSys, visit the android-ndk forum.
wchar_t support
The Android platform did not really support wchar_t until Android 2.3 (API level 9). This fact has several ramifications:
- If you target platform Android 2.3 or higher, the size of wchar_t is 4 bytes, and most wide-char functions are available in the C library (with the exception of multi-byte encoding/decoding functions and wsprintf / wsscanf ).
- If you target any lower API level, the size of wchar_t is 1 byte, and none of the wide-char functions works.
We recommend that you get rid of any dependencies on the wchar_t type, and switch to better representations. The support provided in Android is only there to help you migrate existing code.
Exceptions, RTTI, and STL
The toolchain binaries support C++ exceptions and RTTI by default. To disable C++ exceptions and RTTI when building sources (to generate lighter-weight machine code, for example), use -fno-exceptions and -fno-rtti .
To use these features in conjunction with GNU libstdc++, you must explicitly link with libsupc++. To do so, use -lsupc++ when linking binaries. For example:
You do not need to do this when using the STLport or libc++ library.
C++ STL support
The standalone toolchain includes a copy of a C++ Standard Template Library implementation. This implementation is either for GNU libstdc++, STLport, or libc++, depending on what you specify for the —stl= option described previously. To use this implementation of STL, you need to link your project with the proper library:
- Use -lstdc++ to link against the static library version of any implementation. Doing so ensures that all required C++ STL code is included into your final binary. This method is ideal if you are only generating a single shared library or executable.
This is the method that we recommend.
Alternatively, use -lgnustl_shared to link against the shared library version of GNU libstdc++ . If you use this option, you must also make sure to copy libgnustl_shared.so to your device in order for your code to load properly. Table 6 shows where this file is for each toolchain type.
Note: GNU libstdc++ is licensed under the GPLv3 license, with a linking exception. If you cannot comply with its requirements, you cannot redistribute the shared library in your project.
Use -lstlport_shared to link against the shared library version of STLport. When you do so, you need to make sure that you also copy libstlport_shared.so to your device in order for your code to load properly. Table 6 shows where this file is for each toolchain:
Table 6. Specifiable -march values and their resulting targets.
| Toolchain | Location |
|---|---|
| arm | $TOOLCHAIN/arm-linux-androideabi/lib/ |
| arm64 | $TOOLCHAIN/aarch64-linux-android/lib/ |
| x86 | $TOOLCHAIN/i686-linux-android/lib/ |
| x86_64 | $TOOLCHAIN/x86_64-linux-android/lib/ |
| mips | $TOOLCHAIN/mipsel-linux-android/lib/ |
| mips64 | $TOOLCHAIN/mips64el-linux-android/lib/ |
Note: If your project contains multiple shared libraries or executables, you must link against a shared-library STL implementation. Otherwise, the build system does not define certain global uniquely, which can result in unpredictable runtime behavior. This behavior may include crashes and failure to properly catch exceptions.
The reason the shared version of the libraries is not simply called libstdc++.so is that this name would conflict at runtime with the system’s own minimal C++ runtime. For this reason, the build system enforces a new name for the GNU ELF library. The static library does not have this problem.
Источник


