- Tinc vpn настройка windows
- Example: installing tinc on Windows 2000/XP/7/8
- Downloading and installing tinc
- Configuring tinc
- Configuring the virtual network device
- Starting tinc
- Tinc VPN. Простое соединение сетей через VPN
- Схема подключения Tinc VPN
- Заказать создание и поддержку безопасной IT-инфраструктуры любой сложности
- Строим виртуальную сеть с tinc
Tinc vpn настройка windows
Example: installing tinc on Windows 2000/XP/7/8
This example shows how to install and configure tinc on Windows 2000, XP, 7 or 8. It is not a HOWTO, it is recommended that you read the manual as well.
Downloading and installing tinc
First, download the installer from the website. You don’t have to save it, run it from its current location.
Follow the instructions of the installer. If you already installed a TAP-Win32 or CIPE driver, you can uncheck the TAP-Win32 driver component.
Configuring tinc
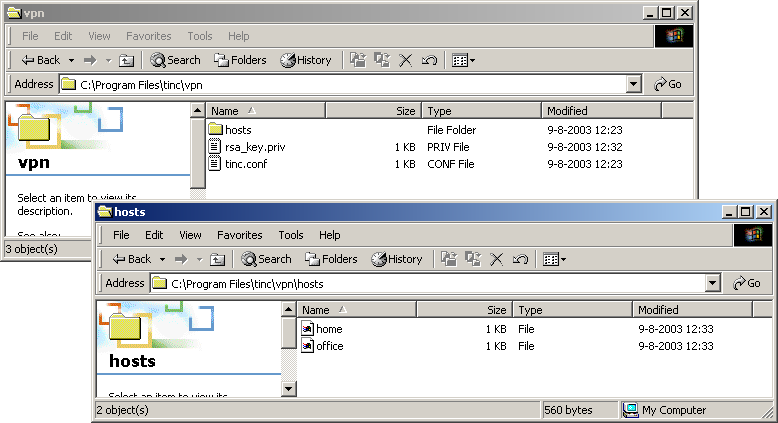
Next, open the explorer and go to the directory where you installed tinc. This probably is C:\Program Files\tinc . To start configuring tinc for your VPN, create a new folder and give it the name of your VPN (if you don’t have a name for it, use vpn or make one up).
In this folder you will have to create a new file named tinc.conf .
Open this file with notepad or wordpad. In this file you have to specify the name of your computer on the VPN. This doesn’t have to be the name you gave to Windows, we assume you’re calling it home . You can also specify to which other tinc daemons you want to connect. You should also specify the network interface that tinc will use. We will create that interface later, we will assume it is called something like VPN .
In the current directory, you have to create a directory called hosts . In this directory the host configuration files are stored. First you have to create one for your own tinc daemon. The name of the file must be the same as the Name you specified in the tinc.conf file: home . This file should contain a Subnet variable, indicating which IP addresses your tinc daemon represents on the VPN. This is probably just a single address, we will assume the subnet is 10.20.40.1/32.
Now you have to generate the public and private key for your tinc daemon. You do this by starting command.com. Go to the directory where tinc is installed. Start tinc with the -n option set to the name of your VPN and use the -K option: tincd -n vpn -K . The keypair will be generated, and you are asked to enter the names of the files to store them. Just press enter twice to use the default filenames.
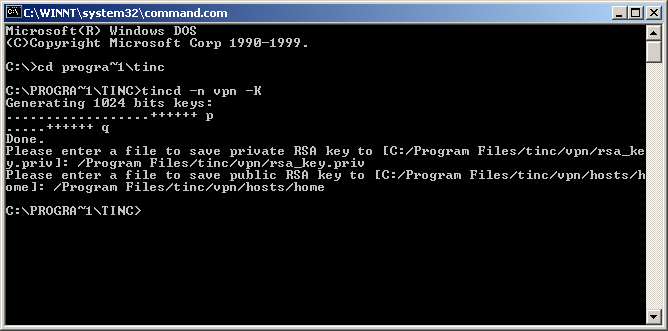
Now that the keys are generated, you should give the office a copy of your hosts\home , and you should get a copy of hosts\office and store it in your hosts\ directory . The configuration of tinc is finished.
Configuring the virtual network device
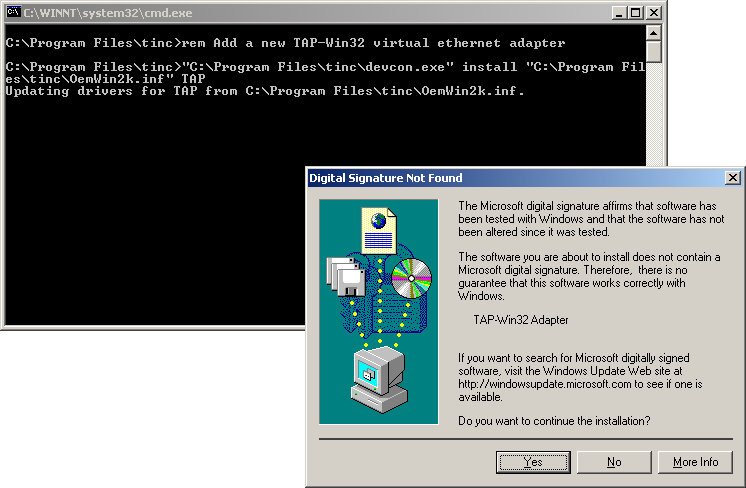
Next you will have to set up the virtual network device. The installer will not create those for you, you have to run addtap.bat in tinc’s installation directory. This will add a new virtual network device. (If you want to run more than one tinc daemon, you will need to create extra virtual network devices.)
After that, open the Network and Dial-up connections control panel, and change the name of the new interface to the same as you specified in tinc.conf , in our case to VPN .
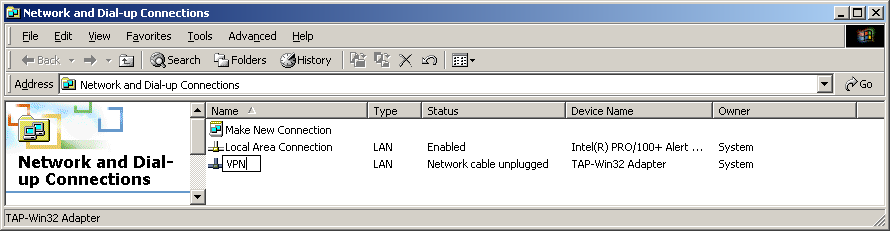
Then, double-click on the new interface. You can enable the icon in the taskbar if you want. Click on Internet Protocol and then on Configure. Manually set the address to that of your computer on the VPN, in this example 10.20.40.1. The subnet mask should be set to that of the entire VPN, in this example 255.255.0.0.
Starting tinc
Now that everything has been set up, it is time to start tinc. Start command.com, go to tinc’s installation directory and start tinc with the right -n option: tincd -n vpn . If everything went well, it will tell you that it installed itself as a service and started it.

If you enabled the taskbar icon, you will notice that it changes form:
You can temporarily stop and start tinc from the Service control panel.
Tinc VPN. Простое соединение сетей через VPN
Когда встает задача соединить несколько сетей в одну то на выбор есть много технологий и средств для того чтобы это сделать, в том числе и аппаратные. Но если это требуется сделать срочно и в качестве шлюзов сети используются Linux машины то можно воспользоваться интересным решением — Tinc VPN. Он позволяет построить VPN канал за несколько минут и с использованием всего одного открытого порта, который можно указать в настройках. Приступим к объединению сетей.
Схема подключения Tinc VPN

apt-get install tinc
Далее создадим виртуальный интерфейс с требуемыми параметрами. Для этого отредактируем /etc/network/interfaces.
Первом шлюзу мы назначим адрес: 172.30.0.1/24 второму, соответственно, 172.30.0.2/24
Конфигурация виртуального интерфейса первого шлюза:
auto tap0
iface tap0 inet static
address 172.30.0.1
netmask 255.255.255.0
pre-up ip tuntap add dev $IFACE mode tap
post-down ip tuntap del dev $IFACE mode tap
Второй шлюз аналогично, но с адресом 172.30.0.2
Объяснение параметров:
iface tap0 inet static — объявляем, что адреса будут заданы вручную.
address 172.30.0.1 — задаем первому VPN серверу адрес 172.30.0.1
netmask 255.255.255.0 — маска для VPN сети (в данном случае используется /24, но можно сделать меньше)
pre-up ip tuntap add dev $IFACE mode tap — создаем tap адаптер, прежде чем его включить.
post-down ip tuntap del dev $IFACE mode tap — при выключении уничтожаем адаптер.
Виртуальный адаптер для Tinc VPN создан и готов к работе (остается только перезапустить сетевые службы).
Соответственно для второго шлюза создаем такие же записи, но с адресом 172.30.0.2.
Перейдем к непосредственной настройке Tinc VPN.
Для этого, первым делом, отредактируем /etc/tinc/nets.boot на первом и втором шлюзе,
дописав в него строчку с названием нашей сети (сети из этого списка будут запускаться автоматически при старте демона).
## This file contains all names of the networks to be started on system startup.
blackdiver
Tinc VPN хранит настройки VPN сетей в отдельных папках. Поэтому создадим требуемую структуру папок для нашей VPN сети (на первом и втором шлюзе).
mkdir /etc/tinc/blackdiver
mkdir /etc/tinc/blackdiver/hosts
Теперь нам нужно создать файл конфигурации (на двух хостах):
и отредактировать его (будем считать, что у нас первый шлюз подключается ко второму):
Name = blackdiver_a
Interface = tap0
Mode = switch
MaxTimeout = 120
PriorityInheritance = yes
ConnectTo = blackdiver_b
Соответственно второй шлюз у нас является принимающим соединение и его конфигурационный файл будет выглядеть так:
Name = blackdiver_b
Interface = tap0
Mode = switch
MaxTimeout = 120
PriorityInheritance = yes
Name = blackdiver_a — имя хоста для VPN подключения
Interface = tap0 — интерфес виртуальной сети
Mode = switch — используем режим коммутатора
MaxTimeout = 120 — максимальный таймаут до переподключения
PriorityInheritance = yes — использовать UDP для транспорта
ConnectTo = blackdiver_b — точка подключения.
Далее генерируем ключи для всех хостов:
tincd -n blackdiver -K4096
На выходе получим 2 файла:
/etc/tinc/perfect/rsa_key.priv — приватный ключ
/etc/tinc/perfect/hosts/blackdiver_a (blackdiver_b для второго хоста) публичные ключи для обмена между серверами.
Далее эти ключами нужно обменяться между серверами (скопировав их в папку /etc/tinc/perfect/hosts/) и в переданной копии добавить адрес подключения
Пример получившегося файла:
——BEGIN RSA PUBLIC KEY——
MIICCgKCAgEAnmj2mHHwNKghO+d16stt3Lj4ZhL9CSvlJNz9CvfIE5L1/dpKZLLS
xxxxxxxxxxxxxxxxxxxxxxxxxxxxxxxxxxxxxxxxxxxxxxxxxxxxxxxxxxxxxxxx
xxxxxxxxxxxxxxxxxxxxxxxxxxxxxxxxxxxxxxxxxxxxxxxxxxxxxxxxxxxxxxxx
xxxxxxxxxxxxxxxxxxxxxxxxxxxxxxxxxxxxxxxxxxxxxxxxxxxxxxxxxxxxxxxx
xxxxxxxxxxxxxxxxxxxxxxxxxxxxxxxxxxxxxxxxxxxxxxxxxxxxxxxxxxxxxxxx
xxxxxxxxxxxxxxxxxxxxxxxxxxxxxxxxxxxxxxxxxxxxxxxxxxxxxxxxxxxxxxxx
xxxxxxxxxxxxxxxxxxxxxxxxxxxxxxxxxxxxxxxxxxxxxxxxxxxxxxxxxxxxxxxx
xxxxxxxxxxxxxxxxxxxxxxxxxxxxxxxxxxxxxxxxxxxxxxxxxxxxxxxxxxxxxxxx
xxxxxxxxxxxxxxxxxxxxxxxxxxxxxxxxxxxxxxxxxxxxxxxxxxxxxxxxxxxxxxxx
xxxxxxxxxxxxxxxxxxxxxxxxxxxxxxxxxxxxxxxxxxxxxxxxxxxxxxxxxxxxxxxx
/uETrXu1a9h9+q7zrMFi2qH6r3OkPs3UMw3mupr0/tc10MZ9ZrZuJPsCAwEAAQ==
——END RSA PUBLIC KEY——
service tinc restart
через несколько секунд туннель должен подняться.
Остается только добавить маршрутизацию между сетями.
Для первого шлюза:
ip route add 10.10.1.0/24 via 172.30.0.1
ip route add 10.10.2.0/24 via 172.30.0.2
Сеть поднята и готова.
Остается только сделать автоматическое добавление маршрутов при перезагрузке.
Например это можно сделать добавив данные команды в post-up параметр адаптера tap0 в файле /etc/network/interfaces:
post-up ip route add 10.10.2.0/24 via 172.30.0.2
На этом настройка полностью закончена.
Предупреждение: конфигурация не оптимальна из-за использования tap интерфейса. Он эмулирует L2 уровень целиком, в связи с чем работает с большими потерями в скорости. При возможности лучше использовать другие типы соединений, например IpSec. Преимущества данного метода в использовании только одного порта для связи, что бывает полезно при различных ограничениях провайдера (например обрезается GRE).
Заказать создание и поддержку безопасной IT-инфраструктуры любой сложности
Быть уверенным в своей IT-инфраструктуре — это быть уверенным в завтрашнем дне.
 Строим виртуальную сеть с tinc
 Строим виртуальную сеть с tinc
Означающая, что демон не может найти файл tinc.vpn_ net.pid. Вероятной причиной появления такого сообщения является отсутствие нужных каталогов. Выход: либо создать все необходимые каталоги, либо указать новое место для pid-файла, использовав опцию —pidfile=/path/to/file. После этого узлы должны соединиться между собой и образовать единый канал. Для контроля можно проверить наличие необходимых интерфейсов командами ifconfig -a (ipconfig для Windows) и просмотреть открытые порты при помощи netstat -a.
Для выявления возможных ошибок могут пригодиться дополнительные параметры запуска. Опция —logfile[=file] указывает на необходимость ведения журнала (по умолчанию запись будет вестись в /usr/local/var/log/tinc.netname.log), опция —debug задает уровень отладочных сообщений (0-5) и —bypass-security отключает шифрование. Вот в принципе и все. Несмотря на то, что написано много, настройка сервиса на отдельном компьютере не занимает времени больше 10-15 минут. Со временем разработчики собираются интегрировать все приложения, от которых зависит работа tinc, в единый пакет, что еще больше должно упростить установку. А так tinc представляет собой довольно удобный, гибкий и простой инструмент, позволяющий быстро создавать и легко наращивать виртуальные сети, доступный к тому же для всех популярных сегодня операционных систем. |
 СЕРГЕЙ ЯРЕМЧУК, фрилансер. Автор более 800 статей и шести книг. С «СА» с первого номера. Интересы: сетевые технологии, защита информации, свободные ОС


