- Which version of Windows operating system am I running?
- Find operating system info in Windows 10
- Related links
- Find operating system info in Windows 8.1 or Windows RT 8.1
- Related links
- Find operating system info in Windows 7
- Related links
- How to Determine Your Operating System
- «This verison of this file is not compatible with the version of Windows you’re running. Check your computer’s system information to see whether you need an x86 (32-bit) or x64 (64-bit) verion of the program.
- Operating System not found or missing: Fix for Windows XP, Vista, 7, 8, 8.1, 10
- About “Operating System not found“
- Description and Symptoms
- Symptom 1: “Operating System not found” error screen on startup
- Causes of this Error
- Cause 1: Bad BIOS configuration
- Cause 2: BCD is damaged
- Cause 3: Faulty data cables
- Fixing “Operating system not found” on Windows
- Fix #1: Rebuild BCD via Easy Recovery Essentials
- Fix #2: Change or reset the BIOS configuration
- Fix #3: Run Automatic Repair
- Fix #4: Rebuild the BCD using bootrec.exe
- Fix #5: Reset BIOS settings on Sony VAIO Laptop
- More Information
- Linked Entries
- Support Links
- Applicable Systems
Which version of Windows operating system am I running?
Find operating system info in Windows 10
To find out which version of Windows your device is running, press the Windows logo key + R, type winver in the Open box, and then select OK.
Here’s how to learn more:
Select the Start button > Settings > System > About .
Under Device specifications > System type, see if you’re running a 32-bit or 64-bit version of Windows.
Under Windows specifications, check which edition and version of Windows your device is running.
Related links
If you’re having a problem with activation, see Activate in Windows 10.
If you forgot the password you use to sign in to Windows devices or email, see How to reset your Microsoft password.
For info about updating Windows, see Windows Update: FAQ.
Find operating system info in Windows 8.1 or Windows RT 8.1
To find out which version of Windows your device is running, press the Windows logo key + R, type winver in the Open box, and then select OK.
If your device is running Windows 8.1 or Windows RT 8.1, here’s how to learn more:
If you’re using a touch device, swipe in from the right edge of the screen, tap Settings, and then tap Change PC settings. Continue to step 3.
If you’re using a mouse, point to the lower-right corner of the screen, move the mouse pointer up, click Settings, and then click Change PC settings.
Select PC and devices > PC info.
Under Windows you’ll see which edition and version of Windows your device is running.
Under PC > System type you’ll see if you’re running a 32-bit or 64-bit version of Windows.

Related links
If you’re having a problem with activation, see Activate Windows 7 or Windows 8.1
If you forgot the password you use to sign in to Windows devices or email, see How to reset your Microsoft password.
For info about updating Windows, see Windows Update: FAQ.
Find operating system info in Windows 7
Select the Start  button, type Computer in the search box, right-click on Computer, and then select Properties.
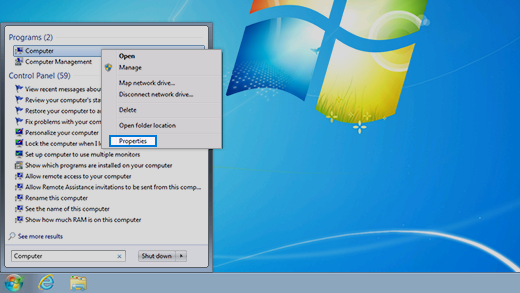
Under Windows edition, you’ll see the version and edition of Windows that your device is running.
Support for Windows 7 ended on January 14, 2020
We recommend you move to a Windows 10 PC to continue to receive security updates from Microsoft.
Related links
If you’re having a problem with activation, see Activate Windows 7 or Windows 8.1.
If you forgot the password you use to sign in to Windows devices or email, see How to reset your Microsoft password.
For info about updating Windows, see Windows Update: FAQ.
How to Determine Your Operating System
Content Type Product Information & Documentation
Article ID 000018246
Last Reviewed 02/11/2020
Follow these steps to determine which Windows* operating system is running on your computer.
Windows® 10
- Click the Start or Windows button (usually in the lower-left corner of your computer screen).
- Click Settings.
- Click About (usually in the lower left of the screen). The resulting screen shows the edition of Windows.
Windows 8* or Windows 8.1*
Option 1: From the desktop
- Swipe in from the upper-right corner of the screen while viewing the desktop to open the menu, and then touch Settings.
- Select PC Info. Under Windows edition, the Windows version is shown.
Option 2: From the Start Screen
- While on the Start screen, type computer.
- Right-click the computer icon. If using touch, press and hold on computer icon.
- Click or tap Properties. Under Windows edition, the Windows version is shown.
Windows 7*
- Click the Start or Windows button (usually in the lower-left corner of your computer screen).
- Right-click Computer and choose Properties from the menu. The resulting screen shows the Windows version.
| Note | Intel® WiDi isn’t supported on Windows XP* or Windows Vista*. |
See the Microsoft sites below for more details:
«This verison of this file is not compatible with the version of Windows you’re running. Check your computer’s system information to see whether you need an x86 (32-bit) or x64 (64-bit) verion of the program.
I seem to be having issues when trying to install a program on my Windows 7 that used to run on my Windows XP and Windows Vista. I have used the Troubleshoot Compatibility tool and selected these settings on the SETUP file but nothing seems to work the error message that i receive is as follows :
«This verison of this file is not compatible with the version of Windows you’re running. Check your computer’s system information to see whether you need an x86 (32-bit) or x64 (64-bit) verion of the program, and then contact the software publisher.»
Is there any way to adjust my computer’s setting to allow for this program to run properly? Any and all solutions would be greatly helpful.
The problem is software that was created for Windows 95, 98, and Windows XP has no way of properly working with an operating system that did not even exist when the software was written. However, the error message you are getting normally means you have a 32-bit software that you are trying to install on a 64-bit system.
To find out if your computer is running 32-bit or 64-bit Windows , do the following:
Open System by clicking the Start button  , clicking Control Panel , click on System.
Under System , you can view the system type. This will describe whether you have 32-bit or 64-bit.
You can also try compatiblity mode.
If the program is not compatible, then you may try to install and run the program in compatibility mode.
Use the following steps:
1) Right click on the Program
2) Click on Properties
3) Click on Compatibility tab
4) Select Run this program in compatibility mode and select Windows Vista or whatever operating system the program was running successfully.
Refer to the link here: Make older programs run in this version of Windows
If you run Windows 7 Professional or Ultimate version, install Windows Virtual PC and Windows XP mode ( http://www.microsoft.com/windows/virtual-pc/default.aspx ) and execute your software in Windows XP.
If you run Windows 7 Home Premium, try VirtualBox ( www.virtualbox.org ) or VMware Player ( www.vmware.com ) or any other 3 rd party virtualization software and install a separate copy of Windows XP (either Home Edition or Professional) for that purpose. You can find virtualization software free of charge that will run on Windows 7 Home Premium.
Hope this helps.
Marilyn
Microsoft Answers Support Engineer
Visit our Microsoft Answers Feedback Forum and let us know what you think
289 people found this reply helpful
Was this reply helpful?
Sorry this didn’t help.
Great! Thanks for your feedback.
How satisfied are you with this reply?
Thanks for your feedback, it helps us improve the site.
Operating System not found or missing: Fix for Windows XP, Vista, 7, 8, 8.1, 10
Get the fix for “Operating System not found” boot error for Windows XP, Vista, 7, 8, 8.1 or Windows 10.
This error is also very common for Sony VIO laptops, including T-Series ultra books and S-Series.
About “Operating System not found“
The following information on this error has been compiled by NeoSmart Technologies, based on the information gathered and reported by our global network of engineers, developers, and technicians or partner organizations.
Description and Symptoms
The error messages, alerts, warnings, and symptoms below are tied to this error.
Symptom 1: “Operating System not found” error screen on startup
When a PC is booting, the BIOS tries to find a operating system on a hard drive to boot from. However, if it is unable to find one, then an “Operating system not found” error is displayed. It may be caused by an error in BIOS configuration, a faulty hard drive, or a damaged Master Boot Record.

Another possible error message is “Missing operating system“. This error is also very common on Sony Vaio Laptops.
Causes of this Error
This error has been known to occur as a result of one of the following causes:
Cause 1: Bad BIOS configuration
Since this error occurs when BIOS is unable to find the operating system, checking the BIOS settings first is often a good solution. The BIOS configuration can become incorrect because of power outages, hardware errors or errors made when configuring the BIOS manually.
Cause 2: BCD is damaged
Similar to the errors outlined in the BCD is missing and BCD is corrupt articles, this error can also appear when BCD becomes damaged.
Cause 3: Faulty data cables
If the BIOS is unable to detect the hard drive, the faulty data cables are often to blame. Try to unplug, and then plug them back, or even replace them altogether and see whether the problem persists.
Fixing “Operating system not found” on Windows
Windows Setup CD/DVD Required!
Some of the solutions below require the use of the Microsoft Windows setup CD or DVD. If your PC did not come with a Windows installation disc or if you no longer have your Windows setup media, you can use Easy Recovery Essentials for Windows instead. EasyRE will automatically find and fix many problems, and can also be used to solve this problem with the directions below.
Fix #1: Rebuild BCD via Easy Recovery Essentials
- Download Easy Recovery Essentials. Make sure to note your Windows version (XP, Vista, 7 or 8) before you download EasyRE. This guide can help you identify what version of Windows you have installed.
- Burn the image. Follow these instructions on how to burn the bootable ISO image very carefully, as making a bootable CD can be tricky! Alternatively, these instructions explain how to create a bootable EasyRE recovery USB stick/drive.
- Boot up your PC from the Easy Recovery Essentials CD or USB you created.
- Once EasyRE is running, choose the “Automated Repair” option and click Continue .

Choose “Automated Repair” in Easy Recovery Essentials

Choose the drive associated with the Windows installation you’re trying to repair.

Easy Recovery Essentials searches for errors and makes corrections to the selected Windows installation.

Windows, booting up successfully.
You can download Easy Recovery Essentials from here.
Fix #2: Change or reset the BIOS configuration
Since this error often occurs when BIOS is unable to find the hard drive, checking BIOS settings might be a good solution.
To check the BIOS settings, follow these steps:
- Restart the computer
- Press the necessary key to open BIOS menu. This key depends on the computer manufacturer and computer model. This is usually listed on the first screen that appears on the monitor. It can be any of the following: Esc , Del , F2 , F8 , F10 or F12 .
- If the screen shows multiple keys, find the key to open “BIOS”, “setup” or “BIOS menu”
- Check the BIOS’ main screen to see whether it detects the hard drive, and the boot order to see if it is set correctly.
Here are the screenshot examples of BIOS’ main screen, with a hard drive and a CD-ROM that were properly detected, and a boot order screen that has a hard drive in the first position.

BIOS main settings screen

BIOS boot order screen
If the hard drive is not detected properly, consider replacing the data cables, or resetting the BIOS settings to default values. Here are the steps to reset BIOS settings:
- Enter the BIOS screen by following the steps outlined above
- Find the “Reset to default” or “Setup default” option – it could be either a hotkey, or an option in the menu
- Choose the reset option, and answer “Yes” when prompted for a confirmation
- Then, select the “Exit -> Exit saving changes” option.

BIOS reset defaults screen
Fix #3: Run Automatic Repair
The Windows Automatic Repair may recover certain boot process related errors in some cases. Here are the steps to access the Automatic Repair from an install disc:
- Boot from Windows install disc
- Click Next in the setup page after selecting proper language, time and keyboard input
- Click Repair your computer and select Troubleshoot
- Click on Advanced options
- Select Automatic Repair and select your operating system.
Here is an example of what the PC’s startup repair should look like once the BOOTMGR file is properly restored:

Corrupt bootmgr fixed by Startup Repair
Fix #4: Rebuild the BCD using bootrec.exe
Just as with the BOOTMGR is Missing error, rebuilding your computer’s BCD can fix boot loading issues.
Here are the steps to rebuild the BCD:
- Boot from the Windows install disc
- Click on Repair your computer after selecting proper language, time and keyboard input.
- Select the Windows installation drive, which is usually C:\ , and click Next
- Choose Command Prompt when the System Recovery Options box appears
- Write the following command and press Enter afterwards:
- If the program finds a Windows installation and asks whether it should add it to the boot list, press Y
Here is an example screenshot of what the PC’s console output should look like once Bootrec is done rebuilding the BCD.

Bootrec utility results screen
Fix #5: Reset BIOS settings on Sony VAIO Laptop
The eSupport section of Sony.com suggests the following solutions if your VAIO laptop is showing this error:
- Remove all removable media, e.g. USB flash drives, CDs, DVDs etc.
- Reset BIOS settings back to default
Here are the steps to reset VAIO’s BIOS settings if you have Windows XP, Vista, 8 or 8.1:
- Remove any peripheral devices you may have connected to the laptop
- Restart the computer and press the F2 key when the VAIO logo appears
- When the BIOS setup screen appears, press the right arrow key ( -> ) to select the Exit menu section
- Select Get Default Values by pressing the down arrow key
- Press Enter at “Load Optimized Defaults”
- In the Load Optimized Defaults make use of the arrow key to select Yes and then press Enter
- Again use the arrow keys to select Exit (Save Configuration) and press Enter
Here are the steps to reset VAIO’s BIOS settings if you have Windows 7:
- Press and hold the Assist button after you restarted the laptop until the VAIO black screen appears on the monitor
- When the VAIO Care Rescue Mode screen appears use the arrow keys to select Start BIOS setup [F2] and press Enter
- Press the F9 key to reset the VAIO’s BIOS to the original default values
In BIOS, make use of the arrow keys to navigate through the screens and options, Enter key to select an option and the ESC key to exit the active window.
More Information
Linked Entries
Support Links
It’s an easy-to-use and automated diagnostics disk. It’s available for Windows 8, Windows 7 and Windows Vista. It’s also available for Windows XP and Windows Server.
Read more at Windows Recovery Disks.
Applicable Systems
This Windows-related knowledgebase article applies to the following operating systems:
- Windows XP (all editions)
- Windows Vista (all editions)
- Windows 7 (all editions)
- Windows 8 (all editions)
- Windows 8.1 (all editions)
- Windows 10 (all editions)


