- Resolution to MS Windows 10 Blue Screen of Death (BSOD)
- Resolution to Microsoft — Blue Screen Error Fixing
- Brief Background:
- Resolution:
- Microsoft Installation Procedure:
- Check Point and Result:
- Blue screen during windows update
- Replies (6)
- March 15, 2021—KB5001567 (OS Builds 19041.868 and 19042.868) Out-of-band
- Highlights
- Improvements and fixes
- Known issues in this update
- How to get this update
- How to troubleshoot and fix Windows 10 blue screen errors
- How to fix blue screen error during upgrade on Windows 10
- Uninstall incompatible app
- Redownload installation files
- Analyze upgrade problem
- Disconnect non-essential peripherals
- Perform clean installation
- How to fix blue screen error without desktop access on Windows 10
- Resolve BSoD with System Restore
- Advanced startup access from boot
- Advanced startup access from USB
- Select Restore Point to fix bug check
- Resolve BSoD with Safe mode
- Advanced startup access from boot
- Advanced startup access from USB
- Use Safe Mode to fix bug check
- Resolve BSoD with Advanced startup
- Advanced startup access from boot
- Advanced startup access from USB
- Uninstall quality or feature updates
- How to fix blue screen error with desktop access on Windows 10
- Update Windows 10 and drivers
- System update
- Driver update
- Remove problematic updates, drivers, apps
- Uninstall system updates
- Uninstall device driver
- Uninstall conflicting apps
- Disconnect non-essential peripherals
- Run DISM and SFC tools
- Repair image files with DISM
- Repair blue screen error with SFC
- Troubleshoot bug check with Event Viewer
- More Windows 10 resources
- Halo: MCC’s live service elements make it better, not worse
- Microsoft’s Surface Duo is not ‘failing up’
- Here’s what you can do if Windows 10 update KB5001330 is causing issues
- These are the best PC sticks when you’re on the move
Resolution to MS Windows 10 Blue Screen of Death (BSOD)

Resolution to Microsoft — Blue Screen Error Fixing
Recently, Microsoft’s latest release for Windows 10 March 2021 Security Update has been found to cause some users to experience system crashes when attempting to print from their computer.
Brief Background:
For customers who are currently using Windows 10, when printing after applying the update program distributed by Microsoft on March 10, 2021, a blue screen error is displayed and a forced restart is required. Printing is ultimately not possible.
Resolution:
Microsoft has established the root cause of this issue and resolved it. Should you have experienced this issue, by reading the below information you can implement the relevant solution to resolve this status for various Windows 10 versions.
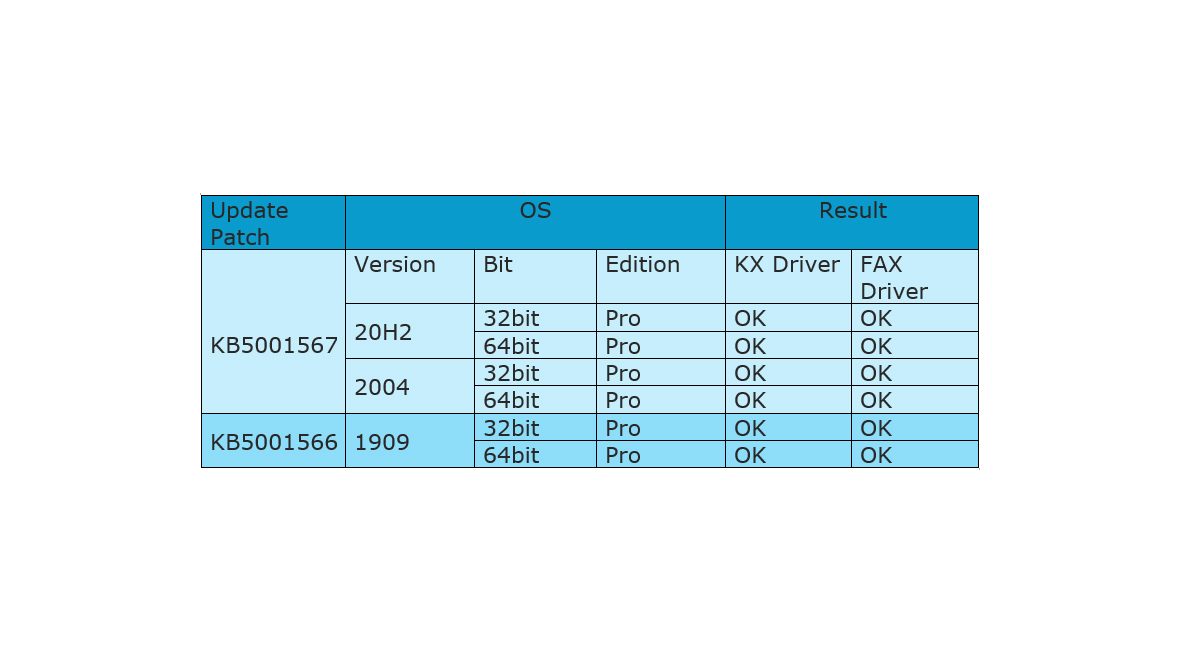
1. Applicable update program: The phenomenon may occur in the environment where the following Windows update program is installed (Defect Patch -9 March release):
- Windows 10 version 20H2 — KB5000802
- Windows 10 version 2004 – KB5000802
- Windows 10 version 1909, — KB5000808
2. Countermeasure Patch (16th March release):
Microsoft Installation Procedure:
Please consult your IT Manager / Administrator who should follow the below procedure to install the Microsoft patches.
For instructions on how to install Countermeasure Patch, please see the following Microsoft site: https://support.microsoft.com/windows/update-windows-10-3c5ae7fc-9fb6-9af1-1984-b5e0412c556a
Check Point and Result:
Thank you for your ongoing trust in Kyocera.
Blue screen during windows update
This is the error information I got — anyone know what caused this?
Problem signature:
Problem Event Name: BlueScreen
OS Version: 6.1.7600.2.0.0.256.1
Additional information about the problem:
OS Version: 6_1_7600
Service Pack: 0_0
Replies (6)
— Since when are you facing this issue?
— Were you able to install updates earlier on this computer?
— Does this happen with any particular update or all the updates?
— Do you have any security software installed on your computer?
Firstly I would suggest you to reset Windows Update components on your computer and check if it helps you fix the update issue.
You may also try following the article below to reset Windows Update components.
http://support.microsoft.com/kb/971058
Also you may try to put the computer in a clean boot state and check if you can install the updates without errors.
Access the link below and follow the steps to troubleshoot a problem by performing a clean boot in Windows Vista or in Windows 7
If your issue is resolved after performing Clean Boot and then installing the updates, then follow the steps mentioned in the above KB article to narrow down the exact source.
Also in the same article, see the section on how return your computer to a Normal startup mode by following the steps under “Reset the computer to start as usual” and put it back to Normal startup.
Hope this helps. Let us know the results.
Thanks and Regards,
Srinivas R Microsoft Support.
Visit our Microsoft Answers Feedback Forum and let us know what you think.
March 15, 2021—KB5001567 (OS Builds 19041.868 and 19042.868) Out-of-band
OS Builds 19041.868 and 19042.868
2/24/21
IMPORTANT As part of the end of support for Adobe Flash, KB4577586 is now available as an optional update from Windows Update (WU) and Windows Server Update Services (WSUS). Installing KB4577586 will remove Adobe Flash Player permanently from your Windows device. Once installed, you cannot uninstall KB4577586. For more details about Microsoft’s plans, see Update on Adobe Flash Player End of Support.
For information about Windows update terminology, see the article about the types of Windows updates and the monthly quality update types. To view other notes and messages, see the Windows 10, version 2004 update history home page.
Note Follow @WindowsUpdate to find out when new content is published to the release information dashboard.
Highlights
Updates an issue that might cause a blue screen when you attempt to print to certain printers using some apps.
Improvements and fixes
Note To view the list of addressed issues, click or tap the OS name to expand the collapsible section.
This update makes quality improvements to the servicing stack, which is the component that installs Windows updates. Servicing stack updates (SSU) ensure that you have a robust and reliable servicing stack so that your devices can receive and install Microsoft updates.
This non-security update includes quality improvements. Key changes include:
This build includes all the improvements from Windows 10, version 2004.
No additional issues were documented for this release.
This non-security update includes quality improvements. Key changes include:
Addresses an issue that might cause a blue screen when attempting to print to certain printers using some apps and might generate the error, APC_INDEX_MISMATCH.
If you installed earlier updates, only the new fixes contained in this package will be downloaded and installed on your device.
Windows Update Improvements
Microsoft has released an update directly to the Windows Update client to improve reliability. Any device running Windows 10 configured to receive updates automatically from Windows Update, including Enterprise and Pro editions, will be offered the latest Windows 10 feature update based on device compatibility and Windows Update for Business deferral policy. This doesn’t apply to long-term servicing editions.
Known issues in this update
System and user certificates might be lost when updating a device from Windows 10, version 1809 or later to a later version of Windows 10. Devices will only be impacted if they have already installed any Latest cumulative update (LCU) released September 16, 2020 or later and then proceed to update to a later version of Windows 10 from media or an installation source which does not have an LCU released October 13, 2020 or later integrated. This primarily happens when managed devices are updated using outdated bundles or media through an update management tool such as Windows Server Update Services (WSUS) or Microsoft Endpoint Configuration Manager. This might also happen when using outdated physical media or ISO images that do not have the latest updates integrated.
Note Devices using Windows Update for Business or that connect directly to Windows Update are not impacted. Any device connecting to Windows Update should always receive the latest versions of the feature update, including the latest LCU, without any extra steps.
If you have already encountered this issue on your device, you can mitigate it within the uninstall window by going back to your previous version of Windows using the instructions here. The uninstall window might be 10 or 30 days depending on the configuration of your environment and the version you’re updating to. You will then need to update to the later version of Windows 10 after the issue is resolved in your environment. Note Within the uninstall window, you can increase the number of days you have to go back to your previous version of Windows 10 by using the DISM command /Set-OSUninstallWindow. You must make this change before the default uninstall window has lapsed. For more information, see DISM operating system uninstall command-line options.
We are working on a resolution and will provide updated bundles and refreshed media in the coming weeks.
When using the Microsoft Japanese Input Method Editor (IME) to enter Kanji characters in an app that automatically allows the input of Furigana characters, you might not get the correct Furigana characters. You might need to enter the Furigana characters manually.
Note The affected apps are using the ImmGetCompositionString() function.
We are working on a resolution and will provide an update in an upcoming release.
When opening a document in Microsoft Word, Microsoft Excel, or any Microsoft Office applications, you might receive the error, «Microsoft Excel cannot open or save any more documents because there is not enough available memory or disk space». This issue only affects devices that have installed Microsoft Office apps from the Microsoft Store and are attempting to open a document that has triggered the use of the Protected View feature.
This issue is resolved using Known Issue Rollback (KIR). Please note that it might take up to 24 hours for the resolution to propagate automatically to non-managed devices. Restarting your device might help the resolution apply to your device faster. For enterprise-managed devices that have installed an affected update and encountered this issue, it can be resolved by installing and configuring a special Group Policy.
Note Devices need to be restarted after configuring the special Group Policy. To find out more about using Group Policies, see Group Policy Overview.
After installing updates released March 9, 2021 or March 15, 2021, you might get unexpected results when printing from some apps. Issues might include:
Elements of the document might print as solid black/color boxes or might be missing, including barcodes, QR codes, and graphics elements, such as logos.
Table lines might be missing. Other alignment or formatting issues might also be present.
Printing from some apps or to some printers might result in a blank page or label.
This issue is resolved in KB5001649.
How to get this update
Before installing this update
Microsoft now combines the latest servicing stack update (SSU) for your operating system with the latest cumulative update (LCU). If you encounter the error, 0x800f0823 – CBS_E_NEW_SERVICING_STACK_REQUIRED, close the error message and install the last standalone SSU (KB4598481) before installing this LCU. You will not need to install this SSU (KB4598481) again for future updates.
Install this update
Windows Update and Microsoft Update
Go to Settings > Update & Security > Windows Update. In the Optional updates available area, you’ll find the link to download and install the update.
Microsoft Update Catalog
To get the standalone package for this update, go to the Microsoft Update Catalog website.
Windows Server Update Services (WSUS)
You can import this update into WSUS manually. See the Microsoft Update Catalog for instructions.
If you want to remove the LCU
To remove the LCU after installing the combined SSU and LCU package, use the DISM/Remove-Package command line option with the LCU package name as the argument. You can find the package name by using this command: DISM /online /get-packages.
Running Windows Update Standalone Installer ( wusa.exe) with the /uninstall switch on the combined package will not work because the combined package contains the SSU. You cannot remove the SSU from the system after installation.
For a list of the files that are provided in this update, download the file information for cumulative update 5001567.
For a list of the files that are provided in the servicing stack update, download the file information for the SSU — version 19041.868 and 19042.868.
How to troubleshoot and fix Windows 10 blue screen errors
 Source: Windows Central
On Windows 10, a Blue Screen of Death (BSoD) — also known as «blue screen,» «stop error,» or «system crash» — will always happen after a critical error occurs, which the system is not able to handle and resolve automatically.
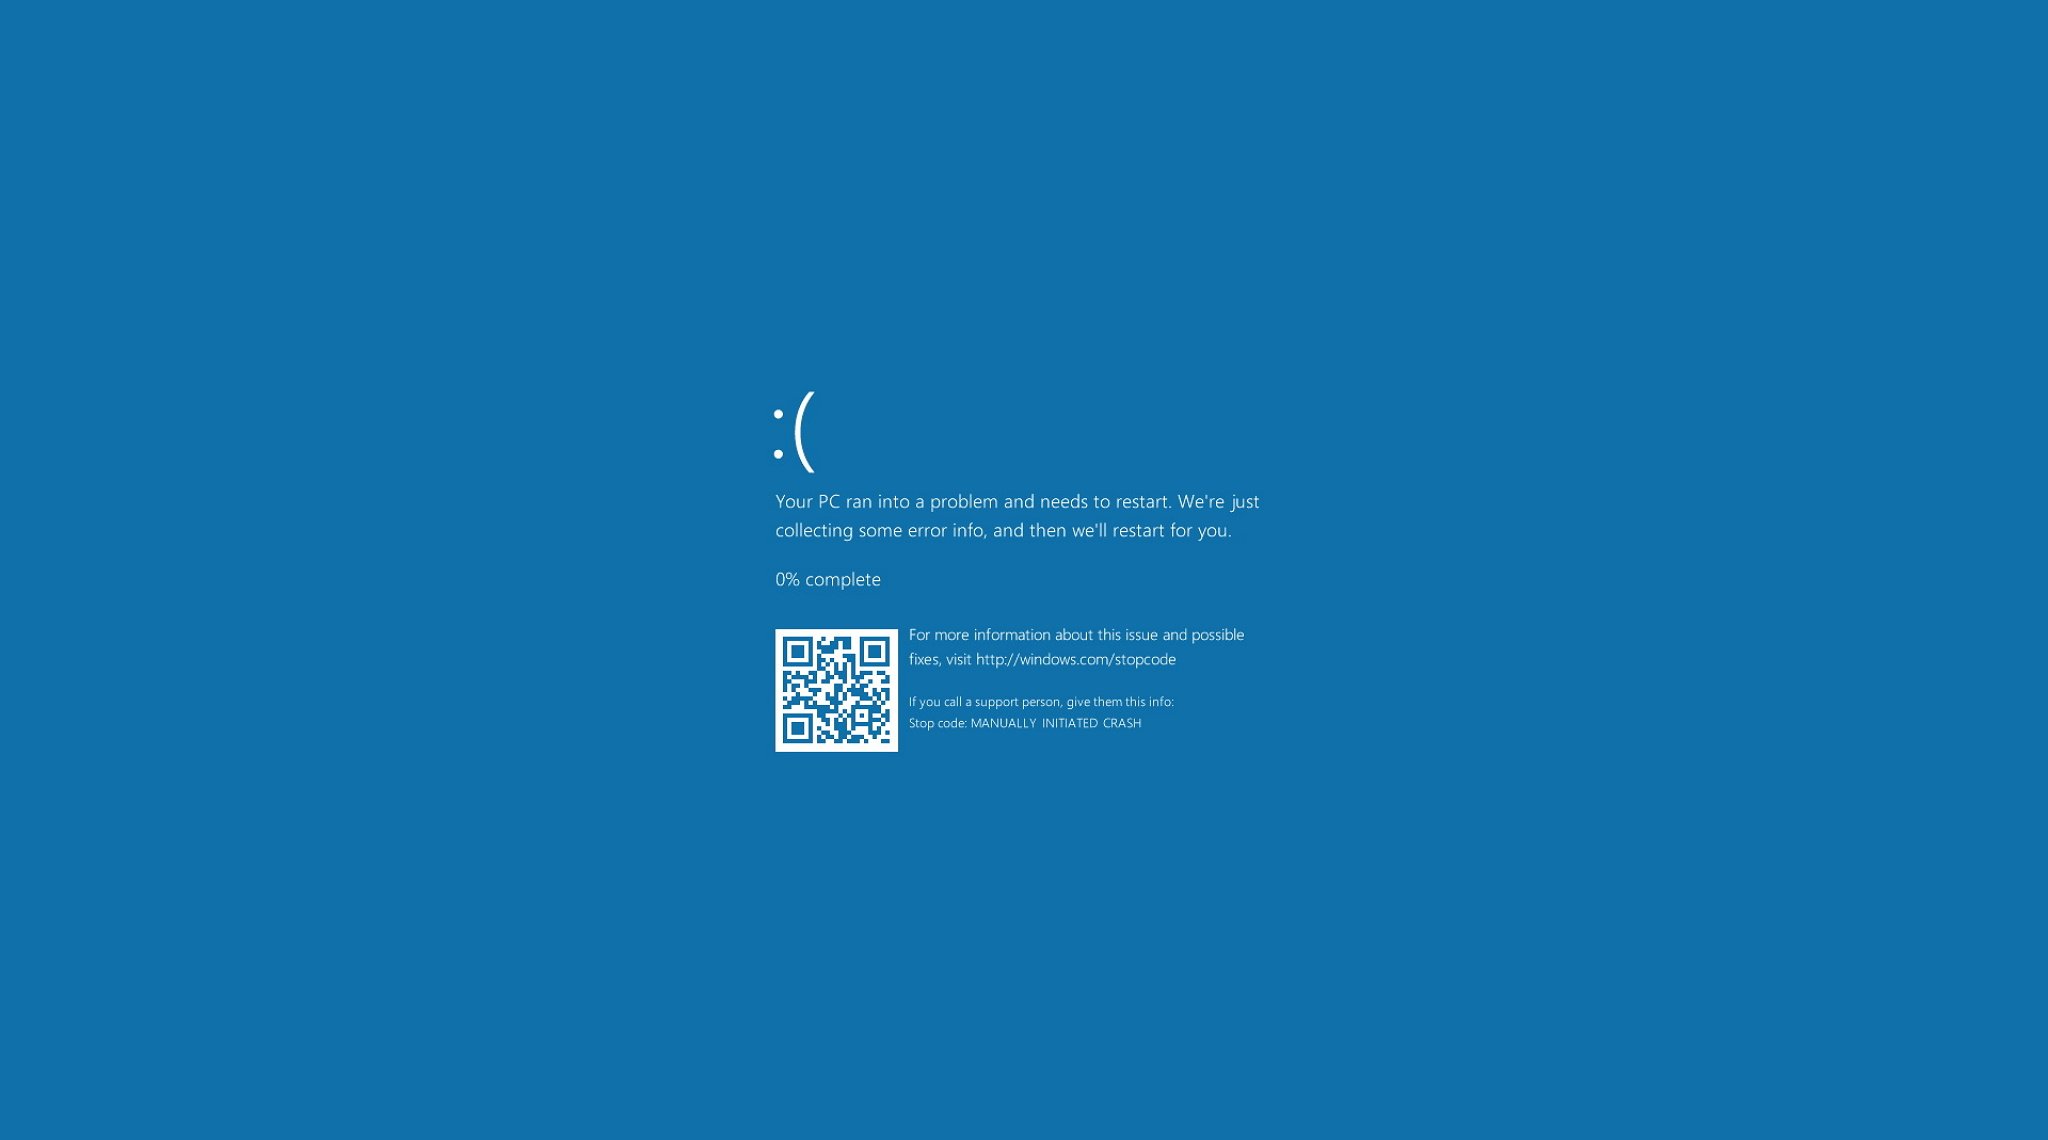
Usually, you’ll experience a blue screen error during the upgrade process of Windows 10, during startup, or randomly when actively using your laptop or desktop. The most frustrating part of all is that you’ll only see a solid blue background and a sad character face without enough valuable information to determine the real cause of the problem.
The screen will output a hint message, such as «Your PC ran into a problem and needs to restart. We’re just collecting some error info, and then we’ll restart for you.» Or general stop error codes (such as VIDEO_TDR_TIMEOUT_DETECTED, PAGE_FAULT_IN_NONPAGE_AREA, CRITICAL_PROCESS_DIED, SYSTEM_SERVICE_EXCEPTION, DPC_WATCHDOG_VIOLATION, or IRQL_NOT_LESS_OR_EQUAL). Or hexadecimal codes (such as 0x000000D1, 0x0000000A, or 0x0000007B), but they’re just hieroglyphics for most users.
Although stop errors don’t have a straight answer, since many factors can play a role, it’s almost always a problem with a quality or feature update for Windows 10, recently installed driver, incompatible application, or hardware related issue.
In this Windows 10 guide, we’ll walk you through the several troubleshooting steps to resolve a blue screen error on your computer.
How to fix blue screen error during upgrade on Windows 10
When upgrading to a new version of Windows 10, you may see blue screen errors, which can happen for many reasons. It could be a result of a compatibility problem with an old program or security software. Or it could be because of corrupted files in the current installation or damaged installation media — to name a few.
Usually, when an error occurs, the setup will revert the changes to the previous installation without reason.
In the case that you are dealing with errors during the installation of Windows 10, uninstalling non-essential apps, clearing out corrupt downloads, disconnecting non-essential peripherals, or even performing a clean install of the OS may resolve the issue.
Uninstall incompatible app
To uninstall an app that may be conflicting with the installation of windows 10, use these steps:
- Open Settings.
- Click on Apps.
- Click on Apps & features.
Select the app that may be causing issues and click the Uninstall button.
 Source: Windows Central
Click the Uninstall button again.
Quick note: If you’re removing a legacy desktop application, you may need to continue with the on-screen directions.
Once you complete the steps, you may need to repeat the steps to uninstall additional apps, and then you can try the upgrade one more time. After the update, you can reinstall the apps again.
Redownload installation files
Sometimes, if you’re using Windows Update to upgrade the system, you may see a Blue Screen of Death when one or multiple installation files have been damaged during the download process. In this case, you can use the Settings app to clear the previous files allowing Windows Update to redownload the files.
To allow Windows Update to redownload the upgrade files, use these steps:
- Open Settings.
- Click on System.
- Click on Storage.
Under the local disk section, click the Temporary files item.
 Source: Windows Central
Check the Temporary Windows installation files option.
 Source: Windows Central
After you complete the steps, open the Windows Update settings and try to upgrade one more time.
If you continue with the same problem, you should consider using the Update Assistant utility to perform an in-place upgrade. Or if the utility didn’t work, you can also try using the Media Creation Tool to create an installation media to install the new version.
Analyze upgrade problem
Alternatively, you can also use the SetupDiag tool to troubleshoot blue screen errors. SetupDiag is a tool that Microsoft provides as an optional download to diagnose and determine why an update or upgrade failed to apply, which is valuable information that can help you resolve the bug check problem.
To use SetupDiag after the upgrade of Windows 10 failed with a blue screen, use these steps:
Click the Download SetupDiag button.
Source: Windows Central
Right-click the «SetupDiag.exe» and select the Run as administrator option.
Source: Windows Central
Once you complete the steps, the default text editor will open the log file with the diagnostic results based on the known rules specified by Microsoft.
If an error was detected, the logs will detail the information to determine why the device blue screened during the update, and if it’s a known issue, you’ll also get the steps to resolve it.
Sometimes you won’t get any recommendations. If this happens, follow the link (if applicable) available in the log file, or use the error code or any meaningful information to research the problem online. (Use this guide for more detailed instructions.)
Disconnect non-essential peripherals
A system crash can also happen as a result of a hardware related problem. So, it’s always recommended to disconnect all non-essential peripherals, including external hard drives, printers, secondary monitors, phones, and other USB or Bluetooth devices, before proceeding with the Windows 10 installation to minimize errors.
The upgrade process only requires a keyboard, mouse, monitor, and an internet connection.
After the installation, you can reconnect the peripherals. If the issue persists, it could be a compatibility problem. You can usually quickly resolve this issue by downloading and installing a newer version of the driver from your manufacturer support website for the affected device.
If the device is using the recent driver, and the problem continues, it could be a compatibility issue with the new version of Windows 10, or you may need to replace the hardware.
You can always visit the Microsoft health dashboard website to check if the company is aware of any issues causing by a specific version of Windows 10.
Perform clean installation
Instead of upgrading the current installation, it’s always better to erase everything and start from scratch with a clean installation. This process will not only avoid many Blue Screen of Death errors, but it can also help to improve system performance and resolve other issues.
If you choose to use the clean install option, first, you want to make sure the device can boot from USB. This means that you may need to change the boot order inside the Unified Extensible Firmware Interface (UEFI) or Basic Input/Output System (BIOS) firmware to configure the correct boot order.
Usually, the process to access the motherboard firmware settings requires pressing one of the function keys (F1, F2, F3, F10, or F12), the ESC, or Delete key as soon as the device starts. However, these settings are always different per manufacturer and even by device model. If you’re not sure, it’s best to check your device manufacturer’s support website for more specific details.
While in the firmware interface, open the «Boot» page, set the boot order to start USB, and save the new changes. Once the boot order is configured, you’ll need to create a bootable installation media, connect the USB flash drive to the device, and then continue with the steps below.
To perform a clean installation of Windows 10, use these steps:
Warning: This is a friendly reminder that you’ll be making changes to your current setup, which can cause problems and even data loss if you don’t do it correctly. It’s recommended to make a temporary full backup before proceeding.
- Start PC with Windows 10 installation media.
On «Windows Setup,» click the Next button.
Source: Windows Central
Click the Install Now button.
Source: Windows Central
Click the I don’t have a product key option to continue (assuming that your PC was already properly activated).
Source: Windows Central
Select the edition of Windows 10 (if applicable).
Source: Windows Central
Quick note: This selection must match the edition that the license activates. Otherwise, the product key won’t work.
Click on the Custom: Install Windows only (Advanced) option.
Source: Windows Central
Select the partition with the current installation of Windows (usually «Drive 0»), and click the Delete button to remove the partition from the hard drive.
Source: Windows Central
Quick tip: If you have multiple partitions on the primary hard drive (Drive 0), select and delete each one. The setup will recreate the required partitions automatically during the installation process. You don’t need to delete partitions from secondary drives to reinstall Windows 10.
Once you complete the steps, the setup will begin installing Windows 10, avoiding many blue screen errors. After the installation, you’ll need to continue with the out-of-box experience (OOBE) to finish setting up the device by creating a new account and selecting the preferred settings. You can use this guide to perform a complete installation of Windows 10.
How to fix blue screen error without desktop access on Windows 10
Sometimes, you may be able to perform a cold reboot to continue using the computer after a bug check, but other times, you may not be even able to access the desktop to troubleshoot the issue.
If you’re stuck with a Blue Screen of Death that won’t let you access the desktop, you may be able to use some advanced features on Windows 10, such as System Restore, Safe mode, or the Advanced startup environment to resolve the problem.
Before we dive into these troubleshooting steps if the error occurs immediately after adding a new piece of hardware, disconnect it to determine if that new device is the reason for the problem.
Resolve BSoD with System Restore
System Restore point is a legacy feature that allows you to undo system changes without affecting your files to return the device to a previous point in time when Windows 10 was working correctly.
The only caveat about this feature is that you must enable it manually before you can use it. If System Restore was previously enabled and configured, you can use a restore point to fix the stop error.
On Windows 10, there are at least two ways to access System Restore through Advanced startup, including through the boot potion menu or USB installation media. (Select one of the options below, and continue with the steps.)
Advanced startup access from boot
To launch the Advanced startup settings to access System Restore, use these steps:
- Start your computer.
As soon as the Windows logo appears on your screen, press and hold the power button to interrupt the boot sequence.
Source: Windows Central
After the third interruption, Windows 10 should open the Advanced startup environment, and then you can continue with the steps below to access System Restore.
Advanced startup access from USB
You can also use a Windows 10 installation media to open the Advanced startup using these steps:
Start your computer using a USB media.
Quick tip: If your device isn’t starting from USB, you’ll need to change your system’s BIOS settings to make sure it can boot from USB. You can usually access the BIOS by powering up your device and pressing one of the functions, Delete, or ESC keys, but make sure to check your manufacturer’s support website for more specific details.
Click the Repair your computer option from the bottom-left corner.
Source: Windows Central
Once you complete the steps, continue with the Restore Point instructions below.
Select Restore Point to fix bug check
To use a Restore Point to fix blue screen problems, use these steps:
Click the Advanced Startup option.
Quick note: If you’re accessing Advanced Startup from a USB media, you’ll see the Troubleshoot option instead (see step No.2).
Click the Troubleshoot option.
Source: Windows Central
Click the Advanced options button. (This is step is not part of the process when using a USB media.)
Source: Windows Central
Click the System Restore option.
Source: Windows Central
Select the most recent restore point to resolve the blue screen error.
Source: Windows Central
Click the Finish button.
Source: Windows Central
After you complete the steps, the feature will undo updates, drivers, apps, and system changes done after the point of restoration was created, hopefully fixing the system crashes you’re experiencing.
Resolve BSoD with Safe mode
Windows 10 also provides «Safe mode,» which is an environment that only starts the basic drivers and features enough to access the desktop to troubleshoot and resolve virtually any kind of issues, including system crashes.
You can access Safe mode using the Advanced startup menu during boot or using a Windows 10 installation media. (Select one of the options below, and continue with the steps below.)
Advanced startup access from boot
To launch the Advanced startup settings to access Safe mode, use these steps:
- Start your computer.
As soon as the Windows logo appears on your screen, press and hold the power button to interrupt the boot sequence.
Source: Windows Central
After the third interruption, Windows 10 should open the Advanced startup menu, and then you can continue with the steps below to access Safe mode.
Advanced startup access from USB
You can also use a USB installation media to enter the Advanced startup menu to enable Safe mode using these steps:
- Start your computer using a USB installation media.
- Click the Next button.
Click the Repair your computer option in the bottom-left corner.
Source: Windows Central
Once you complete the steps, continue with the Safe mode instructions below.
Use Safe Mode to fix bug check
To access Safe mode to troubleshoot and fix blue screen errors on Windows 10, use these steps:
Click the Advanced Startup option.
Quick note: If you’re accessing Advanced Startup from a USB media, you’ll see the Troubleshoot option instead (see step No. 2).
Click the Troubleshoot option.
Source: Windows Central
Click on Advanced options. (This is step is not part of the process when using a USB media.)
Source: Windows Central
Click the Startup Settings option.
Source: Windows Central
Click the Restart button.
Source: Windows Central
After your computer reboots, press the F4 (or 4) key to select the Enable Safe Mode option.
Source: Windows Central
While in Safe mode, depending on the reason causing the system to crash, the steps below will help you uninstall Windows 10 updates and device drivers.
Remove buggy system updates
To uninstall a Windows 10 update causing a blue screen, use these steps:
- Open Control Panel.
Click the Uninstall a program option.
Source: Windows Central
Click the View installed updates option from the left pane.
Source: Windows Central
Click the Uninstall button.
Source: Windows Central
After you complete the steps, restart your computer to finish the task and confirm the error is no longer happening.
Remove buggy device drivers
To uninstall an incompatible driver with Safe mode, use these steps:
- Open Start.
- Search for Device Manager and select the top result to open the console.
- Expand the branch with the device causing the problem.
Right-click the device and choose the Uninstall device option.
Source: Windows Central
Once you complete the steps, restart the device and determine whether the bug check has been resolved.
If, after removing the update, the computer no longer shows a BSoB message, you may want to block the same update or driver from reinstalling automatically until a new update becomes available with a permanent fix.
Troubleshoot bug check with Event Viewer
If you were not able to see the error code during the blue screen, or you want to find more details about the problem, the Event Viewer records every hardware failure, driver malfunction, app crashes, and much more that can help you diagnose the issue.
To troubleshoot blue screens with the Event Viewer, use these steps:
- Open Start.
- Search for Event Viewer and click the top result to open the console.
- Expand the Windows Logs group.
Right-click the «System» category and choose the Filter Current Log option.
Source: Windows Central
Under the «Event level» section, check the Critical and Error options.
![]() Source: Windows Central
Source: Windows Central
Double-click to open each log to learn more details about the problem.
Source: Windows Central
Reivew event log details.
Source: Windows Central
Quick tip: When a blue screen occurs, the system will create a memory dump file, and it’ll restart the device automatically. This means that if you have a list with many errors because the computer rebooted immediately after the bug check, then the error causing the problem is likely to be the one after a critical Kernel-Power event.
In the event log, the «General» tab includes a brief technical description of the error that might give you a hint of the blue screen problem.
For this guide, I forced a bug check using these instructions, so the event notes that the source of the problem was a «BugCheck» that caused the computer to reboot unexpectedly. However, it’s not always easy to determine the source of the issue. If you can’t determine the reason based on the event information, then copy the description, source, and event ID and use it to research online for a possible solution.
Resolve BSoD with Advanced startup
Windows 10 also ships with an option that allows you to uninstall problematic updates directly from the Advanced startup menu.
Select one of the options to access Advanced startup, and continue with the instructions to remove quality or feature updates causing the Blue Screen of Death.
Advanced startup access from boot
To access Advanced startup with the boot option, use these steps:
- Start your computer.
As soon as the Windows logo appears on your screen, press and hold the power button to interrupt the boot sequence.
Source: Windows Central
After the third interruption, Windows 10 should open the Advanced startup environment, and then you can continue with the steps below to boot in Safe mode.
Advanced startup access from USB
To access Advanced startup with a USB installation media, use these steps:
- Start your computer using a USB media.
- Click the Next button.
Click the Repair your computer option in the bottom-left corner.
Source: Windows Central
Once you complete the steps, continue with the Windows 10 Safe mode instructions below.
Uninstall quality or feature updates
To uninstall the most recent quality or feature update causing blue screens on Windows 10, use these steps:
Click the Advanced Startup option.
Quick note: If you’re accessing Advanced Startup from a USB media, you’ll see the Troubleshoot option instead (see step No. 2).
Click the Troubleshoot option.
Source: Windows Central
Click on Advanced options. (This is step is not part of the process when using a USB media.)
Source: Windows Central
Click the Uninstall Updates option.
Source: Windows Central
Click the Uninstall latest quality update to remove a recent monthly update. Or click the Uninstall latest feature update option to rollback to a previous version.
Source: Windows Central
Quick tip: If you select the Uninstall latest feature update option, you can continue with the same steps to remove the recent upgrade of Windows 10 (as long as it’s been less than ten days since the installation).
Click the Uninstall quality update button.
Source: Windows Central
After you complete the steps, Windows 10 will remove the most recent quality update or feature update, fixing the Blue Screen of Death problem.
How to fix blue screen error with desktop access on Windows 10
When a random Blue Screen of Death message appears, and you still have access to the desktop, then the problem is likely to be a driver or missing a critical update. It could also be an issue with an app you installed recently or a specific driver or system update.
Update Windows 10 and drivers
If you have access to the desktop, installing the latest updates for Windows 10 and drivers can help to stop the Blue Screen of Death error.
System update
Windows 10 downloads and installs updates periodically, but sometimes, you may still need to check for updates manually.
To install the latest updates on Windows 10, use these steps:
- Open Settings.
- Click on Update & Security.
- Click on Windows Update.
Click the Check for updates button.
Source: Windows Central
If there’s an update available, but it’s not downloading, then try to download and install the missing quality update manually.
Driver update
When the problem is related to an outdated driver, you’ll need to update the device to a newer version.
To install a newer version of a driver, use these steps:
- Open Settings.
- Click on Update & Security.
- Click on Windows Update.
- Click the Check for updates button (if applicable).
Click the View optional updates option.
Source: Windows Central
Quick tip: If the option isn’t available, then Windows Update doesn’t have any new drivers or other kinds of optional updates for your system configuration.
Select the driver update.
Source: Windows Central
Once you complete the steps, the newer driver should solve the problem. If no updates were available, you might need to check your device manufacturer’s support website to download and install a newer driver using their instructions. In the case the support website doesn’t have a newer update, you may also want to try a beta version of the driver since it may contain a fix that the company is planning to release in on upcoming release.
Remove problematic updates, drivers, apps
Software and hardware companies can also release buggy updates that can cause problems like BSoD.
Uninstall system updates
To uninstall a buggy system update, when you still have access to the desktop environment, use these steps to remove it:
- Open Settings.
- Click on Update & Security.
Click the View update history option.
Source: Windows Central
Click the Uninstall updates option.
Source: Windows Central
Select the most recent update (refer to the «Installed On» column).
Source: Windows Central
After you complete the steps, the problematic update will be uninstalled, fixing the Blue Screen of Death error. You can also use these steps to prevent the Windows Update settings from trying to install the same update again.
Uninstall device driver
To uninstall a buggy driver on Windows 10, use these steps:
- Open Start.
- Search for Device Manager and click the top result to open the console.
Right-click the device and select the Uninstall device option.
Source: Windows Central
Once you complete the steps, you should no longer see the bug check error on the computer.
Rollback device driver
Sometimes, it’s also possible to roll back the previous version of the driver to resolve the issue until another update replaces the buggy update.
To roll back to a previous version of the driver on Windows 10, use these steps:
- Open Start.
- Search for Device Manager and click the top result to open the console.
- Expand the category of the device with the problem.
Right-click the device and select the Properties option.
Source: Windows Central
Click the Roll Back Driver button (if available).
![]() Source: Windows Central
Source: Windows Central
Quick tip: If the option isn’t available, then the system doesn’t have a backup of the previous driver.
After you complete the steps, the older version of the driver will control the device, hopefully fixing the system crashes.
Disable device driver
If the option to rollback the driver isn’t available, you can also disable the device to prevent it from interacting with the system to mitigate the blue screen error until a new update becomes available to fix the issue permanently.
To disable a device on Windows 10, use these steps:
- Open Start.
- Search for Device Manager and click the top result to open the console.
- Expand the category of the device with the problem.
Right-click the device and select the Disable device option.
Source: Windows Central
Once you complete the steps, you should no longer experience system crashes.
Uninstall conflicting apps
If you have an application that happens to have compatibility problems with the current setup, then the Blue Screen of Death is likely at random times or every time you launch the application.
Downloading and installing a new version of the app from the software support website can usually resolve it. If an update isn’t available, it’s recommended to uninstall that program to mitigate the problem until a permanent solution arrives from the app developer or through Windows Update.
To uninstall a problematic application with Windows 10, use these steps:
- Open Settings.
- Click on Apps.
- Click on Apps & features.
Select the app that may be causing issues and click the Uninstall button.
Source: Windows Central
Click the Uninstall button again.
Quick note: If you’re removing a legacy desktop application, you may need to continue with the on-screen directions.
Once you complete the steps, you should no longer experience blue screen error codes on your computer.
Disconnect non-essential peripherals
On Windows 10, you may also see a Blue Screen of Death message after connecting a new piece of hardware (such as a graphics card or USB device). When this happens, it’s likely because the hardware is not compatible, broken, or the system is attempting to install the wrong driver.
If it’s a compatibility issue, you may have to contact the manufacturer for support or determine a compatible replacement.
In the case that the system keeps applying the wrong driver, use the previous steps to uninstall the driver and install the correct driver manually using the manufacturer instructions.
Run DISM and SFC tools
When dealing with a blue screen error, you can also use the System File Checker (SFC) combined with the Deployment Servicing and Management (DISM) tool to repair damaged system files to resolve the problem.
Repair image files with DISM
To repair the locally available image with DISM, use these steps:
- Open Start.
- Search for Command Prompt, right-click the top result, and select the Run as administrator option.
Type the following command to repair the Windows 10 image and press Enter:
DISM /Online /Cleanup-Image /RestoreHealth
Source: Windows Central
Once you complete the steps, the tool will download and replace any damaged files in the local image of Windows 10.
Repair blue screen error with SFC
To use the SFC command tool to repair the installation using the local image, use these steps:
- Open Start.
- Search for Command Prompt, right-click the top result, and select the Run as administrator option.
Type the following command to repair the installation of Windows 10 and press Enter:
Source: Windows Central
Quick tip: If errors are found, you may want to run the command multiple times to ensure that everything is fixed correctly.
After you complete the steps, SFC will repair any system files using the local image files to fix the blue screen problem.
You can also refer to this guide to learn more about using the DISM and SFC tool on Windows 10.
Troubleshoot bug check with Event Viewer
If you have access to the desktop, you can also use the Event Viewer to help you determine the reason of the problem to find a solution.
To check the event logs for hints about the blue screen, use these steps:
- Open Start.
- Search for Event Viewer and click the top result to open the console.
- Expand the Windows Logs group.
Right-click the «System» category and choose the Filter Current Log option.
Source: Windows Central
Under the «Event level» section, check the Critical and Error options.
![]() Source: Windows Central
Source: Windows Central
Double-click to open each log to learn more details about the problem.
Source: Windows Central
Reivew event log details.
Source: Windows Central
In the event log, the «General» tab includes a brief technical description of the error that might give you a hint of the blue screen problem. If you can’t determine the reason based on that information, then copy the description, source, and event ID and use it to research online for a possible solution.
When you experience a blue screen error, it’s always a sign that a piece of software or hardware isn’t behaving correctly. Although there are a lot of troubleshooting steps you can use, you may still need assistance to resolve the problem. If you made it through all our recommendations, and the problem persists, you may want to consult the Windows Central forums or the official Microsoft forums. At this time, it’s also a good idea to contact your device manufacturer for assistance.
Alongside the Blue Screen of Death, you may also come across a black screen problem, which usually occurs because of a issue with the graphics driver, connection issue, or something in the installation. If you have screen flickering issues, it’s likely an problem with an application or video driver.
More Windows 10 resources
For more helpful articles, coverage, and answers to common questions about Windows 10, visit the following resources:
We may earn a commission for purchases using our links. Learn more.
![]()
Halo: MCC’s live service elements make it better, not worse
Halo: The Master Chief Collection is more popular than ever, but some fans don’t agree with the live service approach 343 Industries has taken with it. Here’s why those elements are, at the end of the day, great for the game and for Halo overall.
![]()
Microsoft’s Surface Duo is not ‘failing up’
Microsoft announced this week that it was expanding Surface Duo availability to nine new commercial markets. While Surface Duo is undoubtedly a work in progress, this is not a sign of a disaster. It’s also doesn’t mean that Surface Duo is selling a ton either. Instead, the reason for the expansion is a lot more straightforward.
![]()
Here’s what you can do if Windows 10 update KB5001330 is causing issues
In this guide, we’ll show you the steps to get rid of the update KB5001330 to fix profile, gaming, and BSoD problems with the Windows 10 October 2020 Update and May 2020 Update.
![]()
These are the best PC sticks when you’re on the move
Instant computer — just add a screen. That’s the general idea behind the ultra-portable PC, but it can be hard to know which one you want. Relax, we have you covered!


