- Установка драйверов на устройства беспроводной сети Broadcom
- Содержание
- Список проблем, которые будут решены:
- Определение оборудования
- Подготовка системы
- Установка необходимого пакетa
- Установка Offline
- How to Update Firmware on Ubuntu and Other Linux Distributions
- Method 1: Updating firmware in Ubuntu and other Linux via Software Center
- Method 2: Updating firmware in Ubuntu via command line
- Step 1: Check if your system is supported by LVFS
- Step 2: Using fwupd for updating fimrware
- How to update computer firmware in Linux
- Before we begin
- Installing Fwupd on Linux
- Ubuntu
- Debian
- Arch Linux
- Fedora
- OpenSUSE
- Generic Linux
- Check for updates with Fwupd manager
- Installing firmware updates with fwupdmgr
- Updating firmware in Gnome Software
Установка драйверов на устройства беспроводной сети Broadcom
Содержание
Данное руководство реализовано, учитывая интенсивность поиска решения проблемы установки драйверов на сетевые карты, известные как Broadcom Wireless Cards. В совокупности, есть желание помочь начинающим и не только пользователям, определить и установитъ аппроприативные 1) драйвера на адаптер беспроводной сети. После применения изменений, настоятельно рекомендуется протестировать соединение как минимум в течениe двух часов непрерывного использования, лучше всего — до восьми часов UP-a.
Список проблем, которые будут решены:
Само решение проблемы систематизируется в ТРИ основных ступени:
Определение оборудования
Существует множество модификаций сетевых карт Broadcom и постоянно появляются всё новые версии. Посему, лучшим решением остаётся определение модели
по PCI.ID. Для этого, необходимо открыть терминал Ctrl+Alt+T и ввести 2) :
Примерным ответом будет:
В данном случае установлен bcmwl-kernel-source. 3)
Обладая этой информацией, мы можем определить правильную версию драйвера из списка Broadcom, который будет приведён ниже.
Например, как только мы выяснили, что PCI.ID карты — [14e4:4320] (rev 03), то oбратившись к списку драйверов мы увидим, что данный PCI.ID
соответствует пакету firmware-b43-installer который и необходимо будет впоследствии установить для правильной работы беспроводного адаптера.
Hеважно, что иcпользовалось для установки пакета: терминал, Synaptic, Центр Приложений, dpkg или же ручная компиляция.
Нам необходимо начать с нуля и очистить систему от всего, что может помешать работе аппропреативного драйвера.
Т.е., если был установлен пакет bcmwl-kernel-source, его нужно удалить:
Подготовка системы
Если у нас свежеустановленная система, то первым делом необходимо обновить списки источников приложений:
Также, крайне рекомендуется обновить списки PCI.ID:
это на случай, если специфичный драйвер устройства появился совсем недавно. Во избежание возможных проблем, установку будем проводить исключительно через терминал.
Установка необходимого пакетa
Как уже упомяналось выше, мы будем рассматривать установку пакета firmware-b43-installer
Для этого набираем в терминале:
и перезагружаемся для применения изменений:
Формат установки пакета крайне прост:
Надеюсь, понятно, что вместо
нужно подставить имя пакета из списка ниже:
Special Case #1 — используется комбинация драйверов bcma и brcmsmac. Требуется прошивка, устанавливаемая по умолчанию пакетом linux-firmware.
Special Case #2 — в аппаратных средствах, таких как например Lenovo S10-2, Ваша карта может зациклиться в процессе соединения SSID.
Альтернативным решением может послужить установка пакета bcmwl-kernel-source.
Следует упомянуть, что в некоторых особых случаях после установки firmware-b43-installer, нужно будет удалить модуль b43, a затем активировать его заново и произвести разблокировку средствами rfkill:
Если устройство определилось с иным PCI.ID, задайте свой вопрос автору данной инструкции: AskUbuntu
Установка Offline
В том случае, когда проводная сеть недоступна, есть возможность установить bcmwl-kernel-source с установочного диска.
Для этого нужно вставить установочный CD/DVD или USB и скопировать эти файлы в домашнюю директорию.
На установочном диске (флешке) эти файлы находятся в директориях:
После чего, запускаем саму установку:
Если у Вас Ubuntu 14.04.2 4) , пакет придётся скачивать из сети:
64-BIT
32-BIT
Скопируйте нужную версию в домашнюю директорию и установите тем же способом как показано выше. В обоих случаях необходимо доустановить dkms с установочного диска или USB. Его можно скачать отдельно тут.
Пакет firmware-b43-installer, при полном отсутствии любого подключения к сети придётся скачать иным путём, например через смартфон. Нужно будет скачать эти два файла и положить их опять-таки в домашнюю директорию:
Для 64-BIT
Первый файл, Второй файл
Для 32-BIT
Первый файл, Второй файл
После этого, выполняем в терминале:
Если будут какие-то ошибки, то продолжать не надо. Значит что-то сделал не так. Проверьте правильность введения команд.
Осталось переподключить модуль ядра:
В случае установки Ubuntu 16.04 в режиме dualboot, необходимо отключить SecureBoot. В противном случае, драйвер не запустится.
На этом всё.
Удачи в освоении системы.
Особая благодарность chili555 и Pilot6
Источник
How to Update Firmware on Ubuntu and Other Linux Distributions
Last updated July 23, 2021 By Abhishek Prakash 66 Comments
You know how to update your Ubuntu system for all the software. You might wonder about updating firmware in Ubuntu.
Like the software, Ubuntu also provides firmware updates for all the supported hardware through various channels. Some firmware updates come through the manufacturer like Intel while some come from the community. This is what I have seen with my Dell XPS laptops.
Usually, the default software center in Ubuntu and other Linux distributions handle the update of the firmware of your system. But if you encounter errors with it, you can use fwupd command line tool for updating the firmware of your system.
I’ll show both methods to you in this tutorial.
Method 1: Updating firmware in Ubuntu and other Linux via Software Center
If you are using a laptop, keep it on AC power otherwise some firmware updates will refuse to be installed.
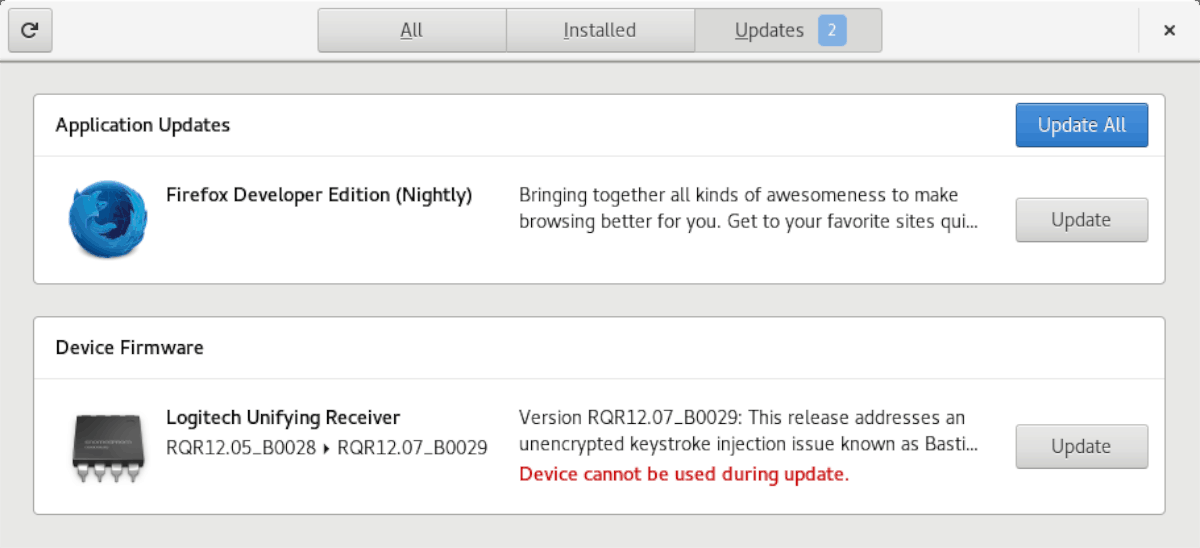
Open the Software Center application on your distribution and go to the Updates tab. You might see both software and firmware updates listed here. The firmware updates are under the ‘Device Firmware‘ section.
You just have to click on the Update button in front of the available firmware updates.
It takes some time to install the firmware updates and you may see errors like ‘unable to update’ or ‘device cannot be used’ or something similar.
Unable to update “Thunderbolt NVM for Xps Notebook 9360”: could not detect device after update: timed out while waiting for device

Please do not panic just yet. I have noticed that despite the error message, the firmware is updated.
Now, the important thing to know is that the firmware updates are installed when you restart your Linux system. You’ll see messages about firmware updates on the power on screen. If there were more than one firmware update, they will be installed one by one.
firmware update in progress ubuntu
Once it completes, your system should turn off. You can turn it on again afterwards and enjoy your systems with the latest firmware.
Method 2: Updating firmware in Ubuntu via command line
The software center in Ubuntu is capable of updating the firmware. But in situations when it fails for some reasons, you can use the command line tool fwupd .
fwupd is an open source daemon that handles firmware upgrades in Linux based systems. It is created by GNOME developer Richard Hughes. Developers from Dell also contributed to the development of this open source tool.
Basically, it utilizes the LVFS, Linux Vendor Firmware Service. Hardware vendors upload redistributable firmware to the LVFS site and thanks to fwupd, you can upgrade those firmware from inside the operating system itself. fwupd is supported by major Linux distributions like Ubuntu and Fedora.
Step 1: Check if your system is supported by LVFS
Since LVFS depends upon hardware vendors, it’s a good idea to check if your system manufacturer supports this feature or not.
Find out your system model and then go to this web page and see if it’s listed:
Step 2: Using fwupd for updating fimrware
Normally, fwupd should already be installed on your Linux system. If not, install it using the package manager of your distribution.
Open a terminal and update your system first (commands applicable for Debian and Ubuntu-based distributions):
After that you can use the following commands one by one to start the daemon, refresh the list of available firmware updates and install the firmware updates.
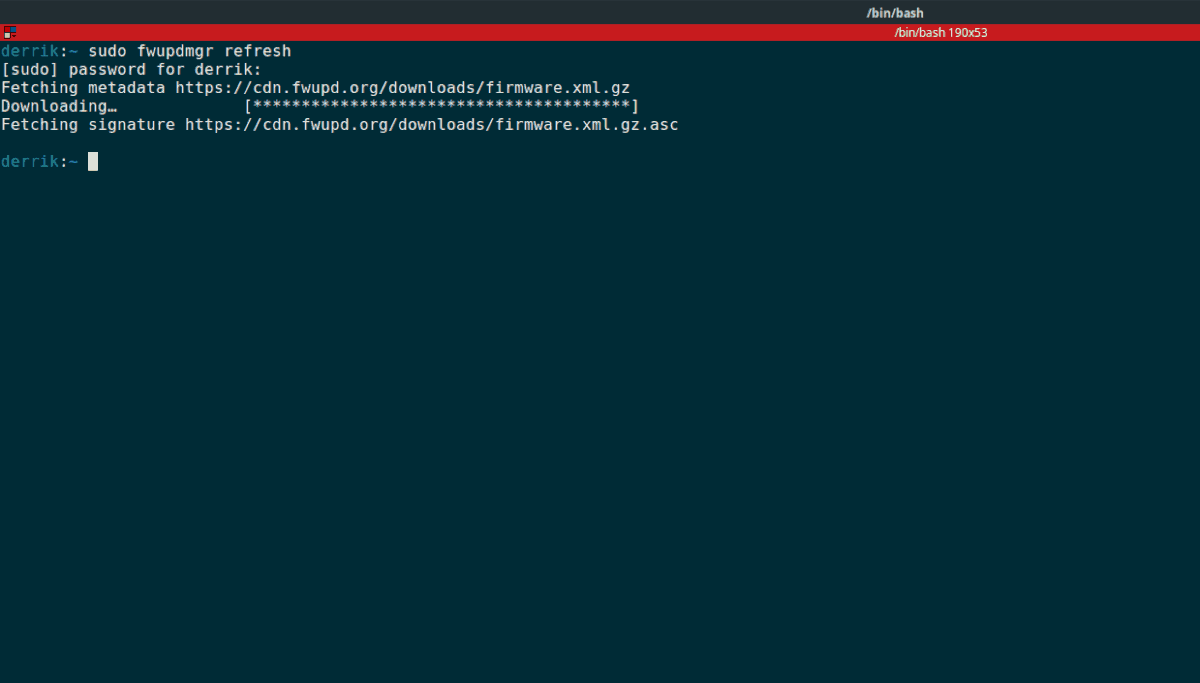
Once the daemon is running, check if there are any firmware updates available.
The output should look like this:
Fetching metadata https://cdn.fwupd.org/downloads/firmware.xml.gz
Downloading… [****************************]
Fetching signature https://cdn.fwupd.org/downloads/firmware.xml.gz.asc
After this, run the firmware update:
The output of the firmware update could be similar to this:
No upgrades for XPS 13 9360 TPM 2.0, current is 1.3.1.0: 1.3.1.0=same
No upgrades for XPS 13 9360 System Firmware, current is 0.2.8.1: 0.2.8.1=same, 0.2.7.1=older, 0.2.6.2=older, 0.2.5.1=older, 0.2.4.2=older, 0.2.3.1=older, 0.2.2.1=older, 0.2.1.0=older, 0.1.3.7=older, 0.1.3.5=older, 0.1.3.2=older, 0.1.2.3=older
Downloading 21.00 for XPS13 9360 Thunderbolt Controller…
Updating 21.00 on XPS13 9360 Thunderbolt Controller…
Decompressing… [***********]
Authenticating… [***********]
Restarting device… [***********]
This should handle the firmware update in Ubuntu. I hope this quick tip helped you with firmware updates in Linux.
If you have questions or suggestions, please feel free to use the comment section below.
Like what you read? Please share it with others.
Источник
How to update computer firmware in Linux
Nov 26, 2019
Comment
For a long time, it wasn’t possible to update firmware on Linux. Instead, users would need to install Windows on a separate hard drive or partition to get the latest updates for their devices, and BIOS. Thankfully, times are changing. In this guide, we’ll go over how you can update the vendor firmware on your Linux PC.
Note: it is only possible to update Linux firmware inside of UEFI. If you are using a BIOS version of your Linux operating system, please re-, install it in UEFI mode.
Before we begin
Fwupd is what is used to update the firmware in Linux, through the Linux Vendor Firmware project. However, please understand that not all computer manufacturers participate in providing firmware to the LVFS project. As a result, following this guide may not update the firmware on your system. If this is the case, you may need to do it in Windows.
There are lots of Linux-friendly computer manufacturers that are participating in the LVFS project. They are Dell, HP, Logitech, Thinkpad, and others. If you’re looking to update the firmware on your Linux laptop or desktop, check out the Linux Vendor Firmware website. They have information on who’s participating in LVFS, and who plans to in the future.
Installing Fwupd on Linux
To update the firmware of your laptop or desktop computer, you must install the Fwupd tool. As it stands, some Linux operating systems come with the Fwupd app pre-installed. However, this isn’t the case with every Linux distribution on the market. So, we must demonstrate how to install Fwupd on Linux.
To start the installation of Fwupd on your Linux PC, open up a terminal window. To do this, press Ctrl + Alt + T or Ctrl + Shift + T on the keyboard. Then, once the terminal window is open and ready to use, follow the command-line instructions outlined below that correspond with the Linux operating system you are currently using.
Ubuntu
On Ubuntu, users can install Fwupd with the following Apt command.
Debian
Those using Debian can get Fwupd up and running with the Apt-get command.
Arch Linux
Arch Linux users can get their hands on the Fwupd firmware update program with the following Pacman command.
Fedora
On Fedora Linux, users can install the Fwupd application with the Dnf command in a terminal.
OpenSUSE
OpenSUSE users can easily install the Fwupd firmware updater app with the Zypper command.
Generic Linux
The Linux vendor firmware project is new, but supporting a lot of modern Linux operating systems, so chances are your distribution has it in its software repositories. To install Fwupd, open up a terminal, search for “fwupd,” and install it the way you typically install programs.
Check for updates with Fwupd manager
The Fwupd manager needs to download updates on your computer before it can be used to get new firmware for devices. To get updates from the Fwupd manager, open up a terminal window by pressing Ctrl + Alt + T or Ctrl + Shift + T on the keyboard. Then, run the service fwupd start.
After starting the service on your system, run the fwupdmgr refresh command to check for available firmware updates for your devices.
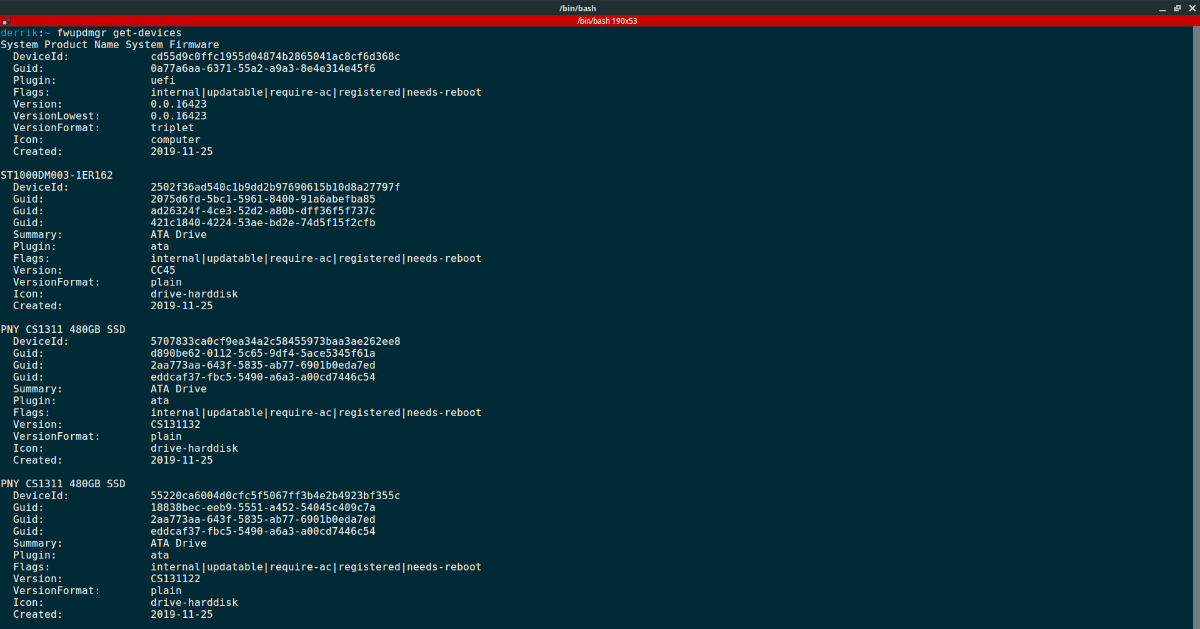
Please note that if you run the fwupdmgr refresh command, you may not see any updates available. For best results, run the fwupdmgr get-devices command. It can scan all hardware devices connected to your Linux PC, and determine if updates are available for it. Best of all, it can tell you why firmware updates cannot be downloaded.
Or, save the fwupd device information to a text file for later reading with:
Installing firmware updates with fwupdmgr
Firmware updates can quickly be installed (once Fwupd is refreshed) with the update command. In a terminal window, use the fwupdmgr update command to install any pending firmware updates.
Note: installing computer firmware is a delicate process. Do not turn off your computer, unplug it, or suspend it during the update process. You could permanently damage your hardware!
Updating firmware in Gnome Software
Updating the firmware for Linux computers in the terminal is pretty useful. However, if you’re new to Linux, you may not want to deal with the command-line. Thankfully, Gnome Software can handle Linux firmware updates as well! So, if you’re using a desktop environment that has Gnome Software, do the following to update your firmware.
Step 1: Find “Updates” and click on it with the mouse to access Gnome Software’s software updater.
Step 2: Click the refresh button for the latest updates. If you have firmware updates for your Linux PC, they will show up in the list of updates ready to install.
Step 3: Click the “Update All” button to install the firmware updates.
Источник


