- How to Check Your SSD Health on macOS
- What Is Disk Health?
- Check Your SSD Health Using SMART Status System Reports
- Check Your SSD Health Using smartmontools
- Check Your SSD Health with DriveDx
- Wrapping Up
- How to Check Your Mac’s SSD Health
- How to Check the SSD Health of Your Mac
- Use Smartmontools to Get Detailed Health Status of Your Mac’s SSD
- Утилиты для контроля состояния SSD-дисков на Mac
- DriveDx
- Chameleon SSD Optimizer
- Disk Sensei
- OCZ SSD Guru
How to Check Your SSD Health on macOS

Storage media of all kinds is consumable. To put it simply, it will fail one day. To keep ahead of the game, there are plenty of ways to check your SSD health on the Mac. Here we show you how to check your SSD health on your Mac and also take a quick look at some third-party tools to help you.
Also read:  How Much Storage Do You Need on Mac?
What Is Disk Health?
Spinning HDD drives have a failure curve sometimes described as a “bathtub.” When you first get an HDD, there’s a high chance of failure thanks to so-called Dead On Arrival (DOA) units. If the drive spins up properly, it will likely last for years before suffering wear-based failure.
In other words, there’s a high chance of failure at the beginning and end of a drive’s service life (i.e. the walls of the bathtub). In contrast, there’s a relatively low rate of failure in the middle (i.e. the base of the bathtub).

On the other hand, SSDs show a different failure curve. They still have the same high rates of early failure. but the flash memory used in SSDs can only survive a certain number of write cycles. When it reaches the limit, it will suffer total failure and no data recovery is possible. As such, it pays to keep an eye on the health of a drive that might fail without warning.
You can predict and plan for both failure types in advance based on certain characteristic failure patterns. Self-Monitoring, Analysis and Reporting Technology (SMART) is an automated self-test system for SSDs and more traditional HDDs. This helps macOS keep track of the SMART status of all your drives by default, and there are several tools that read this status with varying levels of detail.
Check Your SSD Health Using SMART Status System Reports
The process to check your SSD health on your Mac is straightforward and takes about a minute.
1. Click the Apple icon in the upper-left corner (in the toolbar), then hold the Option key. You’ll see “About this Mac” change to “System Information.”

2. When the screen opens, find the Storage panel under the Hardware section in the left-hand tree directory:

3. Next, select the drive you want to examine from the list on the right side.

4. You’ll find the SMART status at the bottom of the right panel, often as the last item in the list.

“Verified” in this instance means the drive has no reported problems. “Failing” means the drive has an error that will soon become “Fatal”. SMART’s numerical error code system provides more information about the drive’s specific calamity, but the broad headline delivered by macOS is enough for guessing how soon a drive will fail.
Also read:  How to Enable TRIM for 3rd Party SSDs on Mac
Check Your SSD Health Using smartmontools
If you have Homebrew installed, you can install smartmontools to check the SSD health on your Mac. This will display the SMART status through the Terminal.
1. Open your chosen Terminal and run the following command to install smartmontools with Homebrew:
2. Next, run diskutil list to find the drive identifier for the volume you want to test:

As an aside, you can also find the drive identifier in System Information by looking for the BSD Name.

3. run the following command to get the SMART status for the specified drive:
Note that you’ll want to replace the placeholder BSD name with your own. Regardless, this will produce a detailed SMART report in standard output.

If you want to save the SMART report to disk, you can send it to a text file using the > control character:
This report will offer a detailed look at the drive’s health. The most relevant data is the verdict, which appears halfway down the report. At the bottom, the vendor-specific SMART status can provide a glimpse into the drive’s deeper condition.
Check Your SSD Health with DriveDx
If you’ d like a premium solution to check your SSD health on your Mac, DriveDx is a good option.
It’s a drive diagnostic tool that provides the most detailed picture of your SSD’s health. This app can scan all of your connected drives and provide a complete picture of your storage system’s health.

While the app is open, it continually monitors the SMART status for indication of failure or problems. It’s the easiest way to a detailed picture of your disk’s health without sifting through technical logs.
Also read:  3 Ways to Fix the Service Battery Warning on Mac
Wrapping Up
It’s a good idea to carry out a casual check of your SSD health for your Mac, but it shouldn’t be an obsession. The above methods allow you to quickly check your SSD health on your Mac.
If you’re still running an HDD and want to upgrade, we can show you how to do it.
Tom Rankin is a quality content writer for WordPress, tech, and small businesses. When he’s not putting fingers to keyboard, he can be found taking photographs, writing music, playing computer games, and talking in the third-person.
Источник
How to Check Your Mac’s SSD Health
![]()
Apple’s M1 Macs have set a new standard with their performance and battery life. However, they are not without their fair share of issues. It was recently reported that the SSD usage on M1 Macs is unnecessarily high, which could greatly shorten their lifespan. If you are worried about your Mac’s SSD health, here’s how you can check it.
It is important to check your Mac’s SSD’s health, irrespective of whether you are using an Intel or M1-based Mac. If the SSD is under heavy stress, you should backup all your data on it in case it fails. Due to the way Macs are engineered, each SSD is tied to the logic board. This means that if the SSD in your Mac stops working, you won’t be able to retrieve the data stored on it.
There are two ways you can check the health of the SSD on your M1 Mac. One is via the built-in System Report feature in macOS. The second involves using a utility called Smartmontools, which needs to be run through the Terminal.
How to Check the SSD Health of Your Mac
Step 1: Click on the Apple logo on the top-left corner of your Mac, followed by About this Mac. From the window that opens, click on System Report….
Step 2: In the System Report window, select Storage under Hardware from the left pane. This will show all the hard disks attached to your Mac.
Step 3: Click on the SSD name under Volume Name from the right pane window. In the bottom pane window, see the S.M.A.R.T Status of the drive. If it is being reported as “Verified,” your Mac’s SSD has no serious issues.
If you want to see even more details regarding your M1 Mac’s SSD’s health, you will need to use Smartmontools.
Step 1: Download and install Xcode on your Mac.
Step 2: Install Homebrew on your Mac. Open Terminal and copy-paste the following command:
/bin/bash -c “$(curl -fsSL https://raw.githubusercontent.com/Homebrew/install/HEAD/install.sh)”
In case Xcode is not already installed in your Mac, you will be prompted to do in Terminal. You can simply press Enter to proceed with the Xcode and Homebrew installation. Depending on the internet connection’s speed and your Mac’s age, this process can take a while.
![]()
Step 3: With Homebrew installed, it is now time to install Smartmontools on your Mac. Simply copy-paste the following command in Terminal and press Return:
brew install smartmontools && sudo smartctl –all /dev/disk0
During the installation process, you’ll be prompted to enter your Mac’s password.
Step 4: After smartmontools is installed, it will automatically scan the “/disk0” SSD on your Mac and output its health details. The log will provide an in-depth S.M.A.R.T status of your hard disk.
Use Smartmontools to Get Detailed Health Status of Your Mac’s SSD
If you want to run smartmontools manually again to check the health of another hard disk or SSD on your Mac, you will first have to find its mount point. The simplest way of doing it is via Disk Utility.
Step 1: Launch Disk Utility. Proceed to right-click on the storage drive from the left pane followed by Get Info.
Step 2: Check the BSD device node of the storage drive as this is the mount point that smartmontools will scan to assess the drive’s health.
![]()
Step 3: Open Terminal and paste the below command. Make sure to add the BSD device node of the hard disk you want to scan at the end. So, for example, I will be scanning “disk2” here.
This will output the health status of the storage drive that you have scanned in Terminal. Understanding the resultant output is important, with the main things you need to be concerned about are the Available Spare Threshold and Percentage Used. Ideally, if you have an M1 Mac, both these numbers should be 0% or 1% at the very maximum.
![]()
If you own an M1 Mac and the number is higher than 1-2%, you should wait for Apple to resolve the issue via a software update. It is possible that the upcoming macOS 11.3 Big Sur update will fix the issue.
You can use the same method to assess the health of the storage drives on your Intel-based Macs as well. If you have a relatively old Mac that has been used heavily, the ‘Percentage Used’ number could be anywhere between 5-30%.
If the number is relatively high, you should back up your data as your Mac’s SSD has been used heavily which could impact its lifespan. You can use the same method to find the health of your external storage drives.
Источник
Утилиты для контроля состояния SSD-дисков на Mac
 Привет, Geektimes! Описывать преимущества SSD или твердотельного накопителя над HDD нет смысла – кто ценит быстрый запуск операционной системы, отсутствие шума и низкое энергопотребление, наверняка уже успел обзавестись таким диском. Но на этом приключения с SSD не заканчиваются: подобно автомобилю или даже смартфону данный накопитель требует бережного обращения и ухода. Поэтому периодически за ним нужно следить.
Если вы установите Vector или другой твердотельный накопитель от OCZ вместо HDD (или совместно с ним) на Mac, сделать это можно будет довольно просто – производитель предлагает собственную утилиту SSD Guru, которая позволяет поддерживать диски в надлежащем состоянии (о ней мы уже подробно писали в блоге). Однако и сторонние разработчики не спят – многие давно выпустили на рынок собственные решения, заслуживающие пристального внимания. О них мы и поговорим.
На случай, если вы установили SSD вместо HDD в MacBook (с Optibay или нет), для вас это особенно актуально.
DriveDx
Данная утилита предоставляет исчерпывающую информацию об SSD-накопителе. Во вкладке с названием диска можно найти основные сведения, возникшие проблемы, индикаторы здоровья накопителя и другую полезную информацию.
Здесь мы видим, что диск абсолютно здоров – показатель «общего здоровья» составляет 100%, правда, «жить» нашему SSD осталось уже немного меньше. Ёмкость накопителя составляет 480 ГБ, а общее время работы – 982 часа. Количество циклов превысило 3 000, что вполне нормально для молодого диска.  Отсутствие проблем и хорошее состояние индикаторов здоровья свидетельствует о том, что за диском наблюдают и поддерживают его работоспособность на максимальном уровне.
  Полный список индикаторов доступен в соответствующей вкладке.
Во вкладке со статистикой можно найти такие интересные факты, как количество записанных и прочтенных логических секторов, наличие ошибок интерфейса и данные по принудительным перезагрузкам. 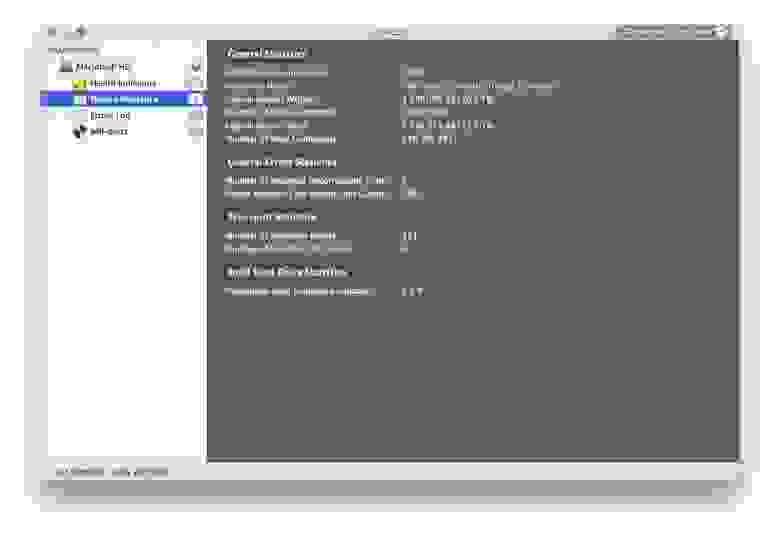
При возникновении ошибок все они фиксируются в логе, поэтому вы всегда узнаете, в чем причина той или иной проблемы, и сможете оперативно её устранить. Чтобы проверить SSD на наличие таких ошибок, можно запустить специальный тест, который их выявит. На выбор представлены два варианта – быстрый и долгий тест. Они автоматически проводятся при запуске программы.
Единственный, пожалуй, минус приложения – оно платное. За персональную лицензию придется заплатить 24,99 доллара, а за семейную – 49,99 долларов. Разработчики периодически устраивают распродажи, так что при удачном стечении обстоятельств программу можно урвать с 20-процентной скидкой. 
Chameleon SSD Optimizer
Отличная бесплатная альтернатива DriveDx с одной важной особенностью – возможностью активировать TRIM для SSD. Стоит её активировать или нет – зависит от самого накопителя: некоторые диски демонстрируют настолько низкие показатели скорости и производительности, что для них это необходимость.
Утилита отключает электронную подпись расширений ядра (.kext), которую Apple ввела в OS X Yosemite для борьбы с программами вроде Trim Enabler, но на OS X El Capitan Chameleon SSD Optimizer прекрасно с этим справляется. Для этого надо не забыть наделить её правами администратора.

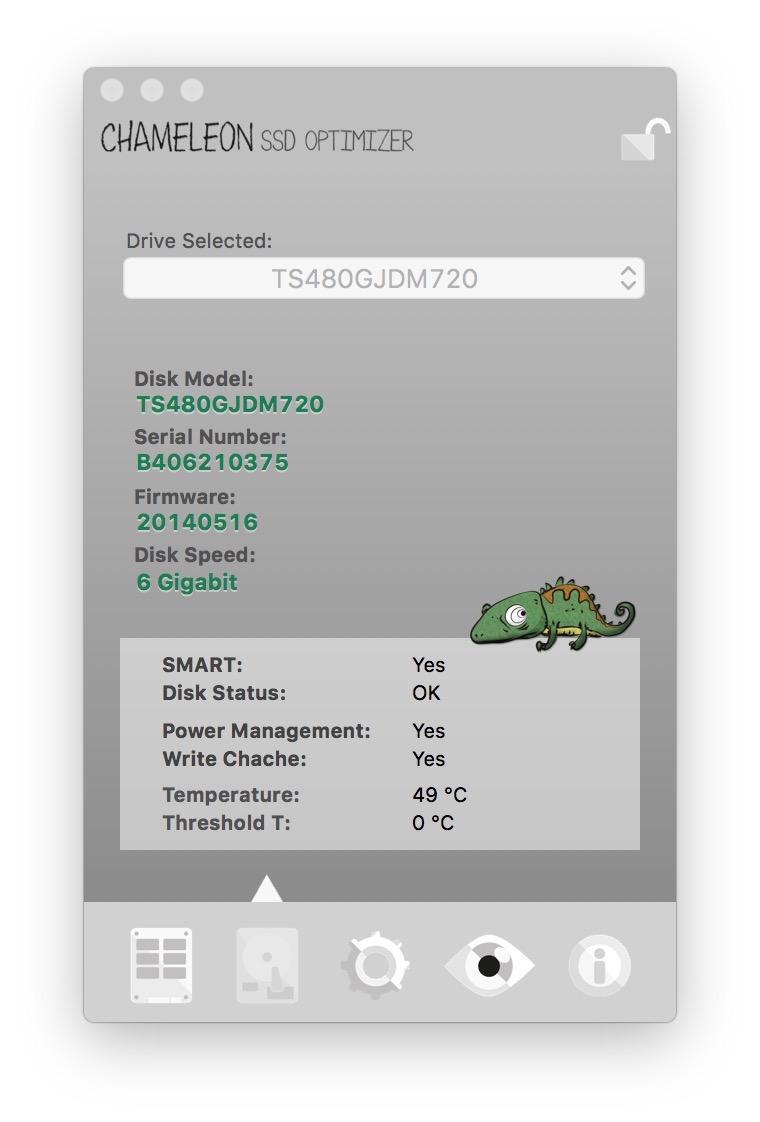
Программа имеет четыре основные информационные вкладки – главные сведения, которыми, в целом, и можно ограничиться, доступны в разделе More Disk Info. Приложение также сканирует SSD вплоть до модели, серийного номера, скорости и температуры. Миниатюрно и минималистично, но зато все понятно.
Во вкладке «Настройки» можно отключить сенсор движения Sudden Motion Sensor ввиду отсутствия движущихся головок в SSD-накопителе. А вот функцию NOATIME, наоборот, стоит активировать: она предотвращает запись времени последнего обращения к файлу, таким образом, его ресурсы становятся доступнее.

Особого внимания заслуживают режимы сна – Set Sleep Mode. Предусмотрено три режима: A – при котором содержимое оперативной памяти не записывается на диск, если закрывается крышка ноутбука; B – при котором система хранит копию содержимого оперативной памяти в режиме сна; С – при котором система восстанавливается с образа диска. В последнем случае «засыпание» ноутбука происходит медленнее, но зато улучшаются показатели автономной работы. Первые два режима установлены на компьютере по дефолту.
Самое лучшее сочетание – перевести режим сна в положение A и включить запрет создания дампа оперативной памяти в спящем режиме.
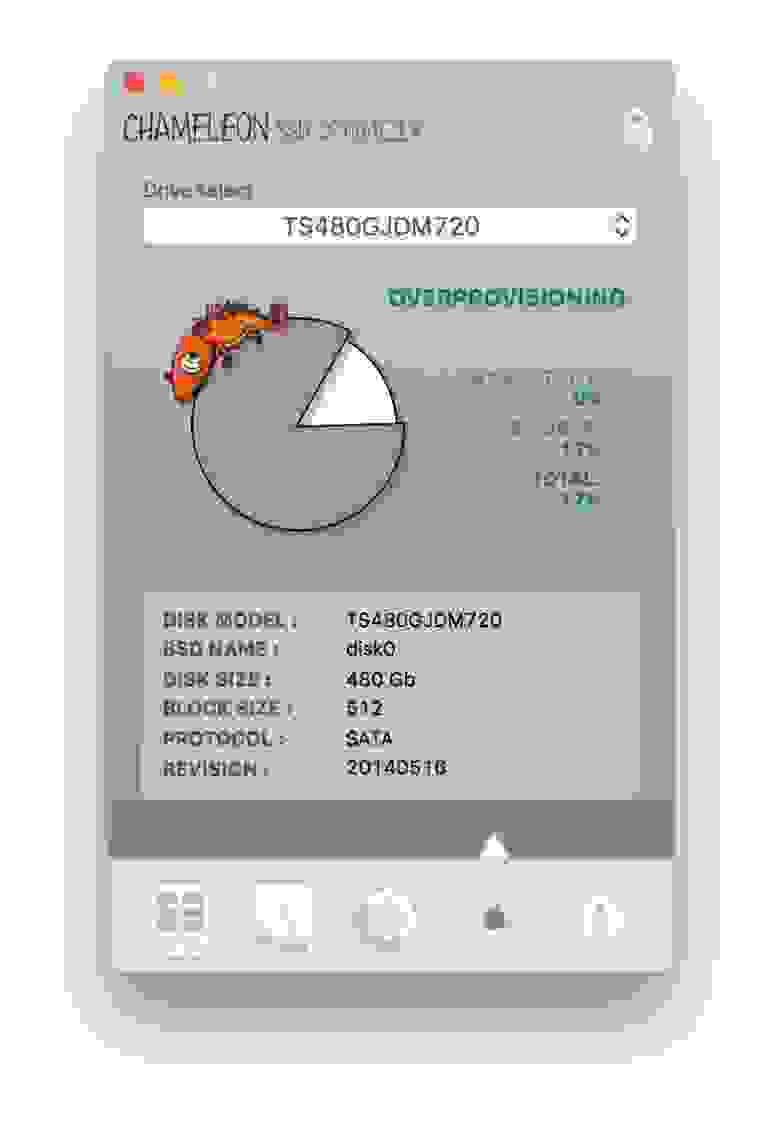
Что касается данных о емкости диска, протоколе и over provisioning, с ними можно ознакомиться в следующей вкладке. В нашем случае 17 % приходятся на долю пользователя и 0 % – на производителя. Хороший результат.
Как мы уже отметили, программа с открытым ходом распространяется абсолютно бесплатно и «живет» за счет добровольных пожертвований. Учитывая, что она мало чем уступает первому приложению, это не может не радовать.
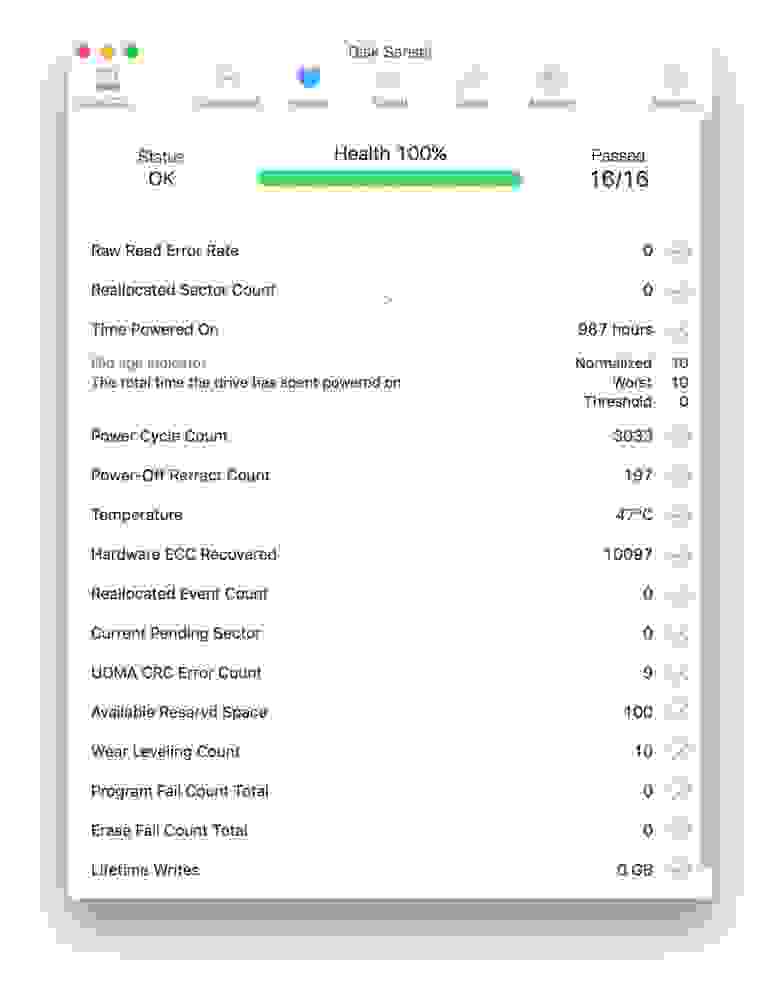
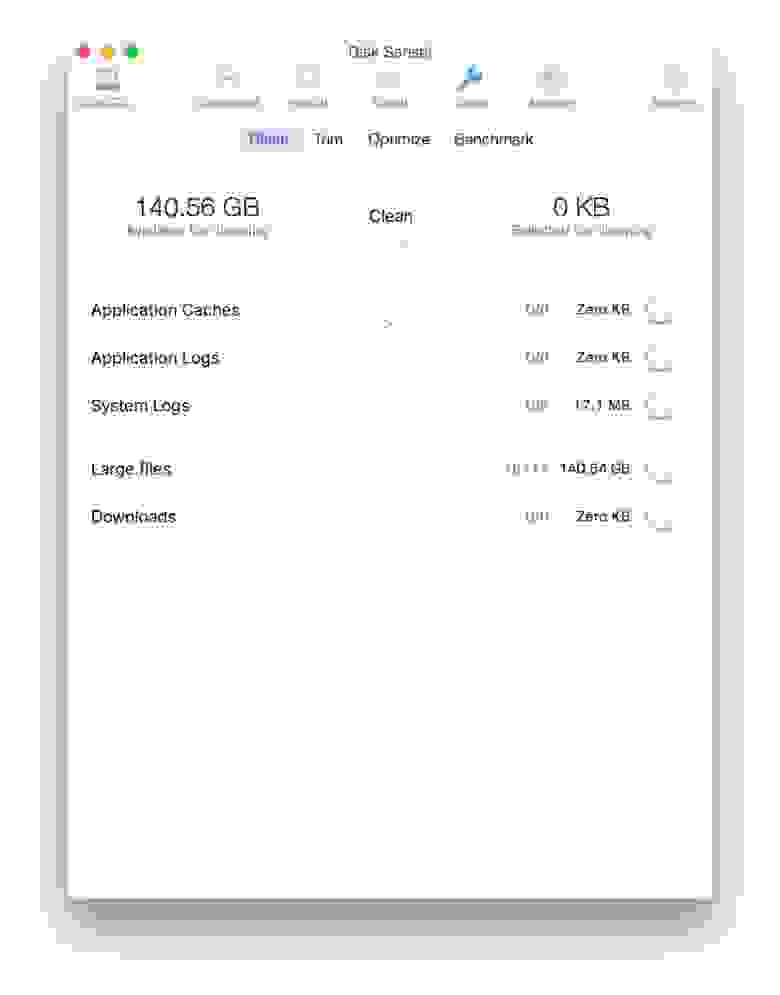
Disk Sensei
Помните знаменитый Trim Enabler? Разработчики приложения полностью переосмыслили дизайн и возможности своего продукта и выдали его в новом виде, с новым названием. Теперь это не просто утилита для активации Trim, а полноценная программа для наблюдения за состоянием и «здоровьем» SSD.
Во вкладке Dashboard отображается вся необходимая информация о твердотельном накопителе: производитель, серийны номер, объем записанных и прочтенных данных, емкость (включая заполненное пространство), температура и даже общий показатель здоровья диска. Данные представлены в удобном для восприятии виде, без лишних показателей и прочего мусора.
Информация о жизнедеятельности SSD представлена во вкладке Health – здесь и количество циклов, и данные по ошибкам, а также любопытные сведения вроде времени работы диска на данный момент. Всего доступны 16 показателей, каждый из которых «здоровый» SSD должен пройти без проблем. Как мы видим, в нашем случае это 16/16 – значит накопитель абсолютно здоров. Впрочем, об этом стало известно и по прошлым утилитам.
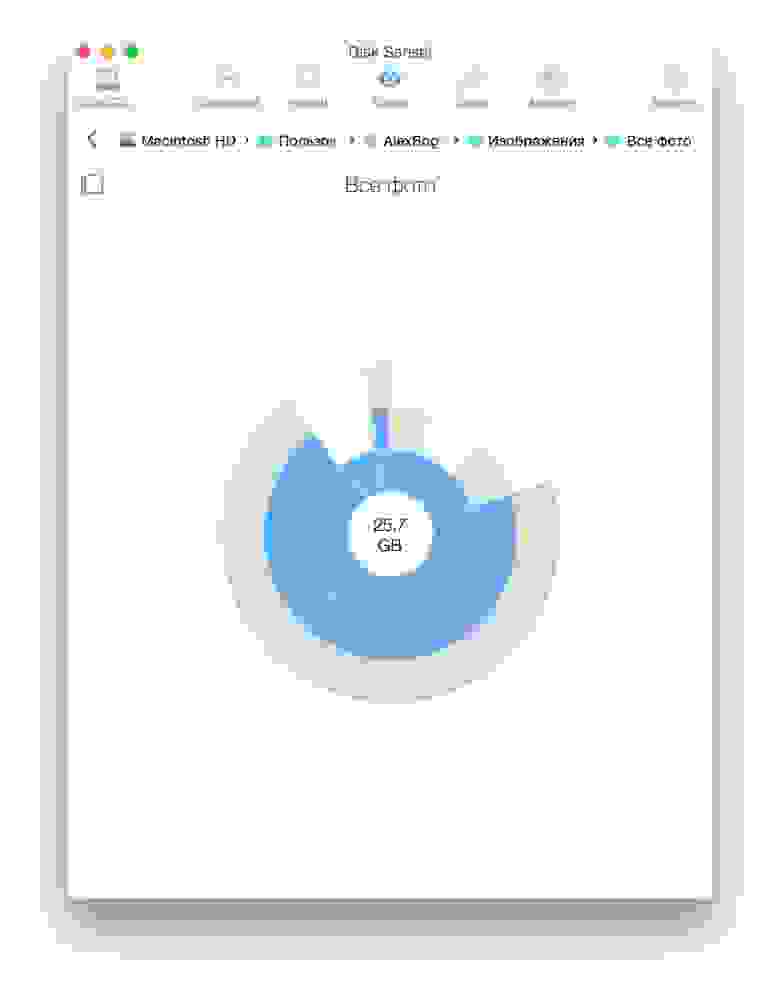
А теперь, пожалуй, об одном из главных преимуществ Disk Sensei. Переключаемся в раздел Visual, где представлена наглядная информация о контенте, размещенном на SSD. Данные хитро отсортированы по секторам (привет, Daisy Disk), и можно сразу посмотреть, какие файлы занимают больше всего места на накопителе.


OCZ SSD Guru
Крутая утилита для управления и наблюдением за твердотельными накопителями от компании OCZ (от нас, да :)). Версии для OS X пока нет, но эта проблема решается быстрым созданием загрузочной флешки с соответствующим приложением.
Сделать это можно очень просто. Вам понадобится обычная флешка и дистрибутив программы в формате .dmg, который можно скачать с сайта OCZ совершенно бесплатно, выбрав нужный продукт. Для начала форматируем флешку в формате FAT и в качестве названия указываем SSDSUPPORT. Для данной задачи подойдет даже стандартная дисковая утилита.
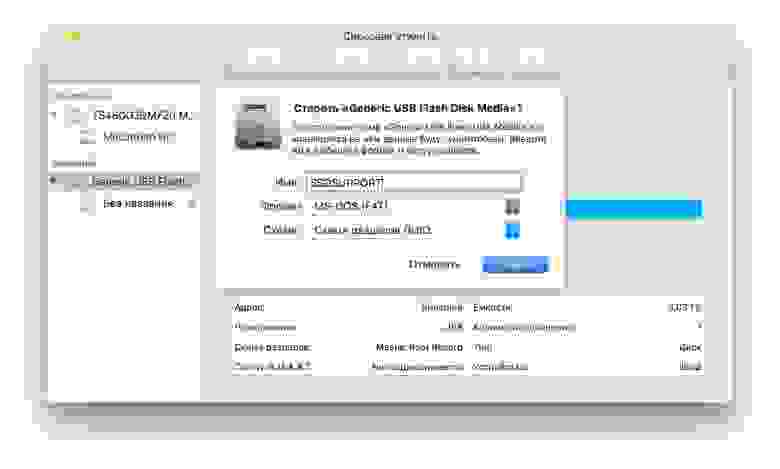
Как только форматирование будет завершено, смонтируйте загруженный образ и скопируйте все имеющиеся на нем файлы на флешку.

После этого необходимо извлечь флешку, выключить Mac, вставить её обратно, а затем включить компьютер с начатой клавишей Option (Alt). Выберите флешку в качестве загрузочного тома.

После этого вы получите доступ к утилите SSD Guru и сможете полноценно ею пользоваться.
На что же способно бесплатное решение от OCZ? Во-первых, программа предоставляет общую информацию о накопителе, в том числе емкость, здоровье, занятое пространство, интерфейсы, модель и серийный номер диска.

Во вкладке Tuner можно включить Trim без использования программ от сторонних разработчиков и просмотреть данные об over provisioning. OCZ предоставляет собственное удобное решение для этих целей.
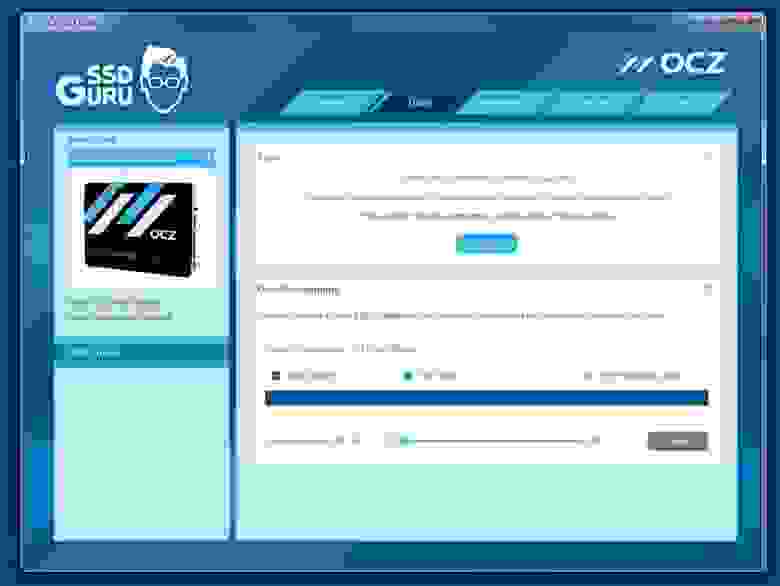
Здесь же можно загрузить необходимые обновления и запустить безопасное форматирование диска.
В общем, настоящий must-have для владельцев SSD от OCZ. Распространяется абсолютно бесплатно.
Источник


