- Simplify3D 4.1.2 Mac Free iMac Torrent
- Simplify3D 4.1.2 Mac OS X Torrent Features :
- Download Simplify3D 4.0.1 for Mac
- Features of Simplify3D 4.0.1 for Macbook
- Simplify3D 4.0.1 App for Mac OS – Technical Details
- System Requirements of Simplify3D 4.0.1 for Mac OS X
- Download Simplify3D 4.0.1 for Mac Free
- Improve your print quality with
- Improve your print quality with
- powerful 3D printing software
- THE EXPERTS AGREE: SOFTWARE MATTERS
- TRUSTED BY INNOVATORS WORLDWIDE
- COMPATIBLE WITH HUNDREDS OF 3D PRINTERS
- GREAT SOFTWARE MAKES YOUR 3D PRINTER BETTER
- Simplify3d ��� mac os
Simplify3D 4.1.2 Mac Free iMac Torrent
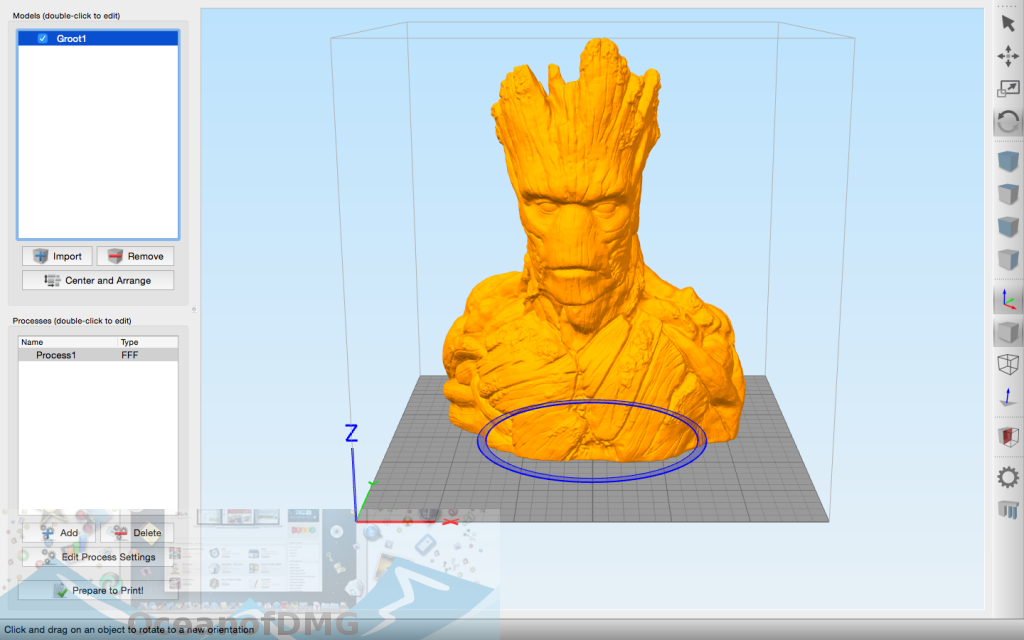
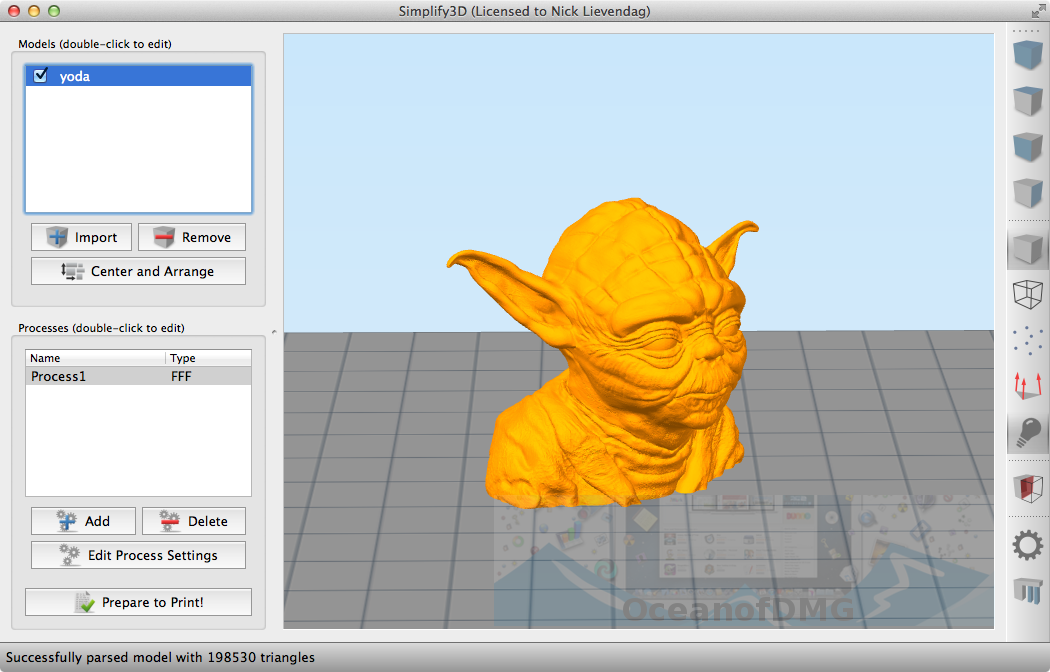
Simplify3D 4.1.2 mac torrent is one to use for your 3D printing projects. If you are an electronic engineer, or you like 3D printing you may require sometime a tool to help you slice your 3D printing samples, but what software to choose ? and is it worth it? Simplify3D 4.1.2 Mac Hack is diffidently the one and only software that will help you control and optimize and Slice your 3D printing samples.
Simplify3D 4.1.2 Mac Free iMac Torrent
» data-image-caption data-medium-file=»https://imac-torrents.com/wp-content/uploads/2019/09/Simplify3D-4.1.2-Mac-Free-iMac-Torrent-2-200×152.jpg» data-large-file=»https://imac-torrents.com/wp-content/uploads/2019/09/Simplify3D-4.1.2-Mac-Free-iMac-Torrent-2.jpg» loading=»lazy» src=»https://imac-torrents.com/wp-content/uploads/2019/09/Simplify3D-4.1.2-Mac-Free-iMac-Torrent-2.jpg» alt=»Simplify3D 4.1.2 Mac Free iMac Torrent» width=»551″ height=»420″ data-lazy-srcset=»//imac-torrents.com/wp-content/uploads/2019/09/Simplify3D-4.1.2-Mac-Free-iMac-Torrent-2.jpg 551w, //imac-torrents.com/wp-content/uploads/2019/09/Simplify3D-4.1.2-Mac-Free-iMac-Torrent-2-200×152.jpg 200w, //imac-torrents.com/wp-content/uploads/2019/09/Simplify3D-4.1.2-Mac-Free-iMac-Torrent-2-80×60.jpg 80w» data-lazy-sizes=»(max-width: 551px) 100vw, 551px» data-lazy-src=»https://imac-torrents.com/wp-content/uploads/2019/09/Simplify3D-4.1.2-Mac-Free-iMac-Torrent-2.jpg?is-pending-load=1″ srcset=»data:image/gif;base64,R0lGODlhAQABAIAAAAAAAP///yH5BAEAAAAALAAAAAABAAEAAAIBRAA7″>
Simplify3D 4 mac crack is fully compatible with all desktop 3D printers out there, and its slicer software is also compatible with the Marlin, Sprinter, Repetier, etc. Besides all the tools that Simplify3d 4 for mac download free has, it has a big community to help you and guide on your 3D printing projects. The features and the tools will make like the software and have fun using it.
Simplify3D 4.1.2 Mac OS X Torrent Features :
- A very pleasing preview to help you have a wide look at the entire print process on screen or jump to a particular section.
- The ability to have a single or multiple layers when you building your 3D model.
- An advanced Dual Extrusion Wizard built to help you configure dual extrusion prints for two-color prints.
- Users can adjust and configure print settings before printing.
- Full control over your model using support structures, users can also add additional support pillars or remove them.
- The dual extruder printers users have the possibility to print support structures in a different material.
- Supports 3 modes when printing and multiple models simultaneously (Single process, continuous printing, sequential printing).
- The Single Process Printing Mode is used For printing identical 3D models.
- Continuous Printing can be used for building models that require different settings. Sequential Printing is a great mode that will give you the best results and a cleaner surface finish.
- No limits when it comes to using layers, you can use different layer settings to improve the quality of the model built with maya or ZBrush.
- It has a powerful simulation to your 3D prints before you actually begin the printing process.
- You no longer will waste time and resources on failed prints. The simulations let you verify all the settings of the print, including exact speed and sequences. These animations will give you more insight into your prints than ever before.
- Free add-ons to expand the capability of Simplify3d torrent such as the Convert image to 3D wish is used to produces astonishing models.
- The Advanced mode gives you the opportunity to tweak every aspect of your print.
- Supports a wide range of file formats such as : STL, obj, and 3mf, jpg ,png ,Gcode, x3g, MakerBot, 3w, g3drem, bfb, and HSV.
Is it worth it? based on the features and the tools we have seen so far, I totally recommend you to use it. you can tell a lot of time and resources went into the development of this product, and it is meant to be user-friendly for all levels of users.
Источник
Download Simplify3D 4.0.1 for Mac
Download Simplify3D 4.0.1 for Mac Free. it is full Latest Version setup of Simplify3D 4.0.1 Premium Pro DMG for Apple Macbook OS X.
Brief Overview of Simplify3D 4.0.1 for Mac OS X
Simplify3D 4.0.1 for Mac is an impressive 3D printing and slicing software which will control all the aspects of 3D print. With this application 3D models can be translated onto instruction which can be understood very easily by the printer. If the instructions are better the print will also be enhanced. This application will take your project to a whole new level.

This application is compatible with lots of 3D printers and there is no need to learn different software programs for every 3D printing hardware as you can now use the same application for the 3D printing hardware. Simplify3D 4.0.1 for Mac has got realistic pre-print simulation which lets you see the exact actions which your 3D printer will perform before actual printing will start. The simulation includes the information about sequences, settings and exact speed used for your print in order to verify the settings. Simplify3D 4.0.1 for Mac also lets you change the slicing settings for different regions of your print.
Features of Simplify3D 4.0.1 for Macbook
Below are some main features which you’ll experience after Simplify3D 4.0.1 for Mac free download.
- Impressive 3D printing and slicing software which will control all the aspects of 3D print.
- 3D models can be translated onto instruction which can be understood very easily by the printer.
- Compatible with lots of 3D printers.
- Got realistic pre-print simulation which lets you see the exact actions.
- Lets you change the slicing settings for different regions of your print.
Simplify3D 4.0.1 App for Mac OS – Technical Details
- Mac App Full Name: Simplify3D 4.0.1 for Mac
- Simplify3D 4.0.1 Version # 4.0.1
- Setup App File Name: Simplify3D_4.0.1_macOS.zip
- Full Application Size: 22.6 MB
- Setup Type: Offline Installer / Full Standalone Setup DMG Package
- Compatibility Architecture: Apple-Intel Architecture
- MD5 Checksum: d39487b4be83ca40e6e1edb24e5169e6
- Latest Version Release Added On: 10th Jan 2018
- License Type: Full Premium Pro Version Working Free
- Developers Homepage:Simplify3D
System Requirements of Simplify3D 4.0.1 for Mac OS X
Before you download Simplify3D 4.0.1 for Mac free, make sure your Apple Mac OS X meets below minimum system requirements on Macintosh.
- Operating System: Mac OS X 10.9 or later.
- Machine: Apple Macbook
- Memory (RAM): 1 GB of RAM required.
- Hard Disk Space: 80 MB of free space required.
- Processor: Intel Dual Core processor or later.
Download Simplify3D 4.0.1 for Mac Free
Click on below button to start Simplify3D 4.0.1 Download for Mac OS X. This is completely Tested and Working Latest Version Mac OS App of Simplify3D 4.0.1. It is offline installer and standalone setup for Simplify3D 4.0.1 for Apple Macbook Macintosh. We provide Resumable single direct link Simplify3D 4.0.1 Download for Mac.
Источник
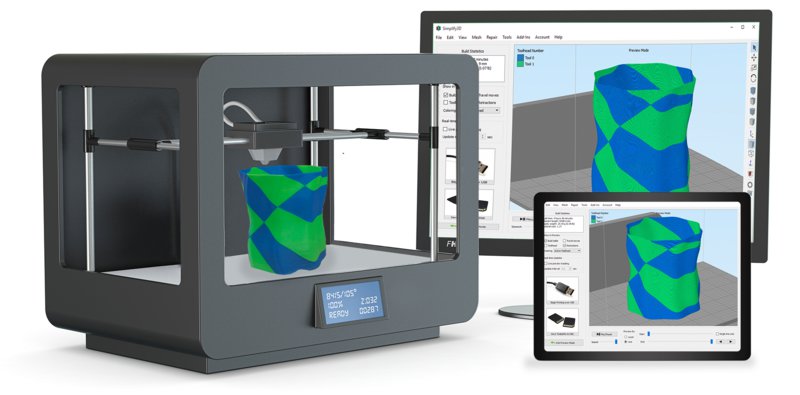
Improve your print quality with
Expand your 3D printer’s capabilities for amazing results
Improve your print quality with
powerful 3D printing software
Expand your 3D printer’s capabilities for amazing results
THE EXPERTS AGREE: SOFTWARE MATTERS
3D printing slicing software controls every aspect of your 3D print.
It translates 3D models into instructions your printer understands. Better instructions mean better prints, so a simple software upgrade makes all the difference in the world.
In fact, more than 90% of experts agree thatВ 3D printing software has the greatest impact on print quality, even more so than the 3D printer itself!
TRUSTED BY INNOVATORS WORLDWIDE

Engineers, architects, designers, and research professionals rely on Simplify3D to deliver exceptional results with complete control over the printing process.

Passionate entrepreneurs, makers, and designers take advantage of powerful software controls that unlock new capabilities and take their designs to the next level.

Professors, teachers and students learn one software interface to control all their 3D printers. Extensive online resources keep students challenged throughout the learning process.
COMPATIBLE WITH HUNDREDS OF 3D PRINTERS
Simplify3D is compatible with more 3D printers than any other software available. Chances are, your printer is supported!
Click below to confirm compatibility with your 3D printer.
GREAT SOFTWARE MAKES YOUR 3D PRINTER BETTER
You invested a lot of time and money into your 3D printer – in fact, most people spend more than 80 hours researching their first 3D printer! 1
Isn’t it worth spending five minutes learning how to optimize your printer with Simplify3D, the most powerful 3D printing software?
1 : Open Survey of 3D Printing Users, September 2015
Источник
Simplify3d ��� mac os
How do I download the software after my purchase?
Simplify3D Software is an electronic download. Following your purchase, a verification email will be sent to you from no-reply@simplify3d.com. You can follow the instructions in this email to download and install the software. If you do not see this email within 30 minutes, please check your spam folders.В PleaseВ Contact UsВ if you need additional help locating the verification email. If you ever need to download the software again in the future, you can do this by logging in to your Simplify3D account on our website and then proceeding to the Downloads page.
How do I obtain a receipt for my purchase?
An order confirmation will be sent to you immediately following your purchase of the software.В This email contains a “Click here for a printable version of this document” link near the bottom that can be used to view your official proof of purchase.
How can I get an receipt with my company’s VAT number or a relevant PO number?
If you are purchasing on behalf of a company, please enter the company name during the checkout process.В You will also have the option of entering a PO number or a VAT number during checkout.В В This information will then be included in the order confirmation that is sent to you.
How do I purchase a license for someone else while still receiving the receipt for the purchase?
During the checkout process, please select that the license is “for someone else” and enter the name and email address of the person who will be using the software. After completing the purchase, the order confirmation will be sent directly to you, while the software download instructions will be sent to the licensee.
How can I add an additional license to my existing account?
If you need to add an additional license to your account, please complete the normal checkout process making sure that you enter the same email address that is currently associated with your account.В If the same email address is used, the new license will be automatically merged into your existing account.
Does Simplify3D offer an education discount for makerspaces, robotics teams, or administrators?
Yes, we currently offer a 25% discount to makerspaces and robotics teams. The team or space needs to be an official part of the school in order to qualify for the discount. Please review our Education page for more details. Once you are ready to place your order, please select the “Education programs” option on our Contact Form. Please contact us prior to placing your order, as this discount cannot be applied after the purchase has been submitted.
Do you offer an educational discount for students and teachers?
Yes, we currently offer a 25% educational discount for all enrolled university students and faculty. This discount is for the same professional version of Simplify3D that we offer to all other customers, so you will have access to all of the great features and performance that our software is known for. Once you are ready to purchase, please select the “Education programs” option on our Contact Form. Please contact us prior to placing your order, as this discount cannot be applied after the purchase has been submitted.
Do you offer bulk discounts for purchasing a large quantity of licenses?
Yes, we offer bulk discounts for organizations that need to purchase many licenses at once.В PleaseВ Contact UsВ for additional details.
Is Simplify3D available in other languages?
Simplify3D is available in English,В Japanese, Spanish, German, French, Italian, and Portuguese. To change the display language,В go to Help > Change Language in the Simplify3D menu bar.
How many computers can I install the software on? What if I have multiple computers?
Installation: The software can be installed on up to 2 computers that you personally own and use.
Usage: You can use the software on 1 computer at a time.
For example, if you had a laptop and a desktop, you could install the software in both locations, but you should only use the software in 1 location at a time.
Please note: Simplify3D licenses are sold as individual user licenses. A single user license should never be shared by multiple individuals.
Can I download the software for different operating systems (such as Mac and Windows)?
Yes, you may install the software on different operating systems as long as you do not exceed theВ number of allowed installationsВ permitted by your license.
Does my license allow me to use the software with multiple 3D printers?
Yes, even if you only have a single software license, you may use the software with multiple 3D printers that you own and operate.В If you need to configure the software for a new 3D printer, you can do this by going to Help > Configuration Assistant and selecting your printer from the list. In the future, if you need to switch between different 3D printers, just click “Edit Process Settings” and select the printer you want to use from the “Select Profile” drop-down list. Please watchВ this videoВ for more information about how to manage your settings for multiple 3D printers.
Note: If you need to use the software with an exceptionally large number of 3D printers, pleaseВ contact usВ in advance to discuss options.
How long is the license valid? What is the term of the license?
You can continue using the version of the software that you purchased for as long as you like without any additional payments, however, each software version is only officially supported for up to 1 year after its original release date. To receive the latest updates and support, we recommendВ upgrading to the latest version of the software.
What updates are included with my purchase? How much will future updates cost?
Simplify3D includes 1 year of free software upgrades along with your license purchase. This means that if you purchase the software now, you can still upgrade to any new version that is released within the next 12 months.
After that time, there may be a small upgrade fee required to continue receiving the latest updates and support. Information about features and pricing will be provided in advance so that you can make decisions about upgrade needs.
Is technical support included? How long will I receive technical support?
Simplify3D provides 1 year of complimentary email technical support along with each license that you purchase.
Simplify3D customers also have access to an extensive list of articles, troubleshooting guides, video tutorials, FAQs, and our amazing user community. Visit our support page to learn more.
How can I easily manage licenses for multiple computers such as an entire lab or classroom?
Simplify3D offers a bulk license that allows you to easily manage multiple computers from one single interface.В This also makes it quite easy to automate the installation process, since each computer will use the exact same license information.В PleaseВ Contact UsВ if you need additional assistance with these options.
How can I move my Simplify3D license to a new computer?
To move your license to a new computer, simply uninstall the software from the old computer and select “Yes” when asked if you want to remove your license from that machine.В You can now install the software on the new computer, and your license will automatically be transferred to this location.
How can I transfer my license after a crashed hard drive or reinstalling my operating system?
In extreme circumstances such as a hardware failure, re-imaged operating system, or a crashed hard drive, it may be impossible to uninstall the software from its previous location.В In this case, you can remotely remove the installation by logging in to your Simplify3D account on our website and then choosing the “Software Installations” menu option.В Follow the instructions on that screen to remotely deactivate your license.
How do I change the name or email address associated with my account?
Please login to your Simplify3D account on our website and then choose the “Account Settings” menu option.В You can use this screen to change the name and email address associated with the account.
I forgot my username or password
If you cannot remember your Simplify3D account information, please use the self-help tools at the bottom of the login form.В You can use these options to reset your password or retrieve your username using only your email address.
What operating systems are compatible with Simplify3D?
The software is cross-platform and can be installed on Windows, Mac OS X, or Linux systems.
Do you support Ubuntu, Linux Mint, Debian, Fedora, etc?
Simplify3D provides 64-bit Linux installers.В These installers can be used on Ubuntu, Debian and Fedora-based distributions.
What are the system requirements for the software?
Please review theВ Technical SpecificationsВ page for more information on supported operating systems and system requirements.
Does Simplify3D require a constant internet connection?
Simplify3D requires an internet connection for the initial installation and for future use of the software, however, the program can be used temporarily without an internet connection such as when traveling or during a power outage. В While these short-term outages won’t cause any issues, please keep in mind that the software cannot be installed on a computer that is permanently disconnected from the internet.
What file formats can the software import?
The software currently supports the 3 most common 3D printing file formats: STL, OBJ, and 3MF files. STL is the most common and recommended format. Every major CAD package is capable of outputting to this format although some packages such as SketchUp may require an additional plugin.
Can I use the software on my tablet? Is it touch screen compatible?
The software is fully touch screen compatible and has already been successfully used with dozens of different tablet computers.В The only requirement is that the tablet must run a desktop operating system such as the Surface Book or Surface Pro.В The software cannot be installed on tablets that run a mobile operating system such as Android or iOS.
I received an Unidentified Developer Warning when installing the software on my Mac
If you see this message on Mac OS X 10.8+, simply right-click on the installer and choose Open from the context menu. At that point, you will be asked if you still want to open the installer even though it is from an unidentified developer. Click Open and you can proceed with the installation.
How will I be notified about new software updates?
The software includes an automatic update notification to alert you when new software updates are available. In addition, your name and email address will allow us to stay in touch concerning the latest news and software releases.
Will all of my settings and profiles be lost when I update the software?
All of your settings and profiles will be retained, even when upgrading to new versions of the software.
Can I have multiple versions of the software installed at the same time?
We know that many people use Simplify3D in a production environment where reliability is incredibly important.В For this reason, each new version of the software will be installed into a unique folder so that you can test and use multiple versions of the software at the same time.В You can wait to remove older versions of the program until you have successfully started using a newer version.
What is the recommended upgrade process? Do I need to uninstall the old version first?
New software updates are installed the same way as previous software updates.В Login to your Simplify3D account and proceed to the Downloads page.В Follow the instructions to unzip and install the latest version.В The new version will be installed into a separate folder, so there is no requirement to uninstall previous versions of the software.В For more information please see thisВ question.
How do I uninstall the software?
Browse to the Simplify3D installation folder and launch the uninstall executable in this directory. Follow the on-screen prompts to remove the software from your computer.
What should I do if I still have payment-related questions?
For all normal inquiries, please contact us using this form which will automatically route your email to the correct department.
Please make sure to include your order number, date of purchase, and the email address that was used for the order to expedite the process.
If you are unable to use the form above or you need to manually send postal mail in regards to your order, you may use the information below:
support [at] simplify3d.com
11305 Reed Hartman Hwy
Suite 106
Blue Ash OH 45241
How do I choose what models are sliced by a process?
Double click on your process and then choose the “Select Models” button in the bottom left. В Click and highlight the models you want to slice with the current process or choose “Select All” to choose all currently imported models.
What is a .factory file?
Factory files contain everything you need to re-create your current session in Simplify3D.В These files include the 3D models, orientation details, custom support structures, process settings, and best of all, the final file is compressed to save space on your hard drive.В This file is ideal for sharing with others if you want them to be able to re-create your exact print in Simplify3D.В To save a factory file, just go to File > Save Factory File As.
Does the software support multiple extruders?
Yes, Simplify3D supports machines with up to 6 different extruders and includes many convenient tools such as the Dual Extrusion Wizard that make it incredibly easy to create multi-extruder parts on your 3D printer.
How do I retract or change the filament in my printer?
You can manually control the extruders on your printer by going to Tools > Machine Control Panel.В First, make sure the extruder is properly heated by using the preheat options on the right-hand side.В If you have more than one extruder, make sure to select the correct extruder from the “Active Toolhead” drop down list first.В Once the extruder is fully heated, you can use the Retract and Extrude options on the Jog Controls tab to manually unload or reload the filament.В For example, if you click the orange “-10” square below the Retract heading, it will retract 10mm of filament out of the extruder.
Can I unplug the USB cord after the print has started?
If you are printing from the SD card, you can unplug the USB cable from your printer after the print has started.В The firmware will continue printing the file on the SD card.В In addition, if you are using a machine that transfers the entire print file before starting the print, you may also unplug the USB cable after the print has started since there is no more information to transfer.
Can I control multiple 3D printers from the same computer?
You can control multiple printers at the same time by opening multiple instances of the software.В This allows each instance to be dedicated to a specific printer with full control over that machine.В Another common option is to copy files onto an SD card so that prints can be started remotely without the software being attached to the printer.
What should I do if my printer is not listed in the Configuration Assistant or is a homebuilt/DIY machine?
Simplify3D can be configured to work with many different types of printers, even if your specific machine is not listed in the Configuration Assistant. To setup the software for your custom machine, go to Help > Configuration Assistant and then select “Other” from the bottom of the list. The software will ask for several basic printer parameters and then it will configure a custom profile that has been customized for your printer. This allows you to quickly find a good starting point for your custom machine.
How can I backup my profiles?
The profiles that you create in the software are already saved locally within Simplify3D, however, if you wish to create a second backup for these profiles, you can do so by going to File > Export FFF Profile.В This will save the profile to your hard drive which can be easily re-loaded into the software by going to File > Import FFF Profile.
How do I change the model that is used for the printer build platform?
Many of the profiles provided by Simplify3D already include a default model that represents the build platform of the printer.В This can be very useful for quickly recognizing the orientation of your parts relative to the print bed.В If you wish to change or disable the model that is used, please go to Tools > Options (or Simplify3D > Preferences on the Mac) and then go to the Machine tab.В The printer models can be modified at the bottom of this window.
Please note that if your profile is set to override the printer model each time it is loaded (as is the case with many of the profiles from Simplify3D), then you will need to export the profile and make the change directly in the profile XML.
Does Simplify3D support auto-leveling?
Yes, Simplify3D already supports many printers using an auto-leveling probe.В The software allows you to customize the starting script that is used at the beginning of each print, so if you wish to add auto-leveling to this script, go to the Scripts tab of your process settings and make sure you have a G28 and then a G29 command at the beginning of this script.В Please note that the G28 command needs to come before the G29 to ensure that you have properly homed your axes before attempting to probe the bed surface.
How can I move the nozzle away from the part at the end of my print?
Simplify3D allows you to customize the ending script that is run at the very end of each print.В If you wish to move the nozzle away from the part, simply add a command such as “G28 X0” to the beginning of this script to move the X-axis towards the homing endstop switch and away from the finished part. For more information about these G-Code commands, please refer to ourВ 3D Printing G-Code Tutorial.
My prints aren’t centered or seem to be printing in the wrong location
NOTE: If you recently installed the Sailfish firmware on your printer, this issue is most likely due to incorrect homing offsets. Please refer to theВ Sailfish configuration pageВ for instructions on how to property restore these offsets. Otherwise, please continue reading.
If your prints are not centered, then there are 2 settings you should check within Simplify3D – build volume and origin offsets. The build volume determines the maximum print size possible on your machine, while the origin offset determines the location of the X=0, Y=0, Z=0 position. Both of these settings need to be correct so that the software can correctly control the position of the parts on the print bed.
To check the build volume, measure the usable print area on your print bed, and ensure these values match the X and Y build volume values on the G-Code tab of your process settings.В Once you have verified that the build volume is correct, you can move on to verifying the origin location of your printer.
The origin is the location that the printer will move to when it is told to go to X=0, Y=0, Z=0.В The origin offset defines the origin location relative to the bottom left corner of your print bed.В В For many Cartesian printers that accept gcode files, the origin offset is 0,0,0, which means that the origin is in the bottom left corner of the bed. For Cartesian printers that use x3g files or for most delta printers, the origin is in the center of the bed, which means the X and Y origin offsets are half of the X and Y build volume. For example, if the build volume was 200x200x500, then the origin offset would be 100x100x0.В These are the most common values, but there are other possibilities.
For many printers that print using normal .gcode files, you can easily find the origin location by homing all axes in the Machine Control Panel, and then sending “G1 X0 Y0 F1200” in the Communication tab.  The distance that the toolhead moves after sending this command is equal to the X and Y origin offsets. For example, if the head moves 10mm to the right after sending this command, then the origin offset should be 10,0,0. Once the build volume and origin offsets are properly configured, the location of your prints should match the location of the parts in Simplify3D.
My parts are printing backwards from how they appear in Simplify3D
This typically means that one of the axes on your printer is moving in the opposite direction of what Simplify3D expects. You can changes the axis directions by toggling the “Flip build table axis” checkboxes on the G-Code tab of your process settings.
The software is filling in holes in my model or is missing large sections of my model
If the preview you are seeing in Simplify3D looks drastically different than the original part, you should first verify that there are no issues with the mesh. You can do this using the Repair menu in Simplify3D.В If the software identifies non-manifold or self-intersecting surfaces, you will need to repair your model before slicing.В Many users have had great success using free online repair sites such as Netfabb or MakePrintable, so this may be a useful thing to try first.В For more information about identifying and repairing these issues, please see theВ Identifying and Repairing Common Mesh ErrorsВ tutorial.
Once you have verified that your model does not contain any errors, another setting you may want to check is the “merge all outlines into a single solid model” optionВ on the Advanced tab of your process settings. В If this setting is enabled, it will turn your entire model into a solid object, removing all holes and internal features from the part. В This can be a very useful for working with models that contain errors or are not completely water-tight, but if it is enabled by accident, it will also fill in all the holes in your model. В Make sure this option is disabled and then try to slice the file a second time.
I am having trouble slicing models with very small or thin features
Please refer to the following section in the Simplify3D print quality guide:В Small Features Not Printed.
One of my extruders always seems to print in a different location than the other extruder
This typically means that the toolhead offsets in the firmware are not properly configured.В В Each extruder has different toolhead offsets, which define the position of that extruder relative to the others.В If one of these offsets is not correct, it means that whenever you print with this extruder, the toolhead will not be properly positioned.В Please consult with your printer manufacturer for instructions on changing and saving the toolhead offsets in the firmware.
My prints always seem to start too far above the build platform and have problems sticking
Please refer to the following section in the Simplify3D print quality guide:В Not Sticking To The Bed
What should I do if I am unhappy with the software?
The first thing to do is to contact our support team to make them aware of your issue. Our 3D printing experts can frequently help with any common printing or setup issues you might encounter. In the event that they are not able to help with your issue, we offer a 14-day refund policy and the same support team can guide you through that process.
My extruder is starting too close to the bed and sometimes even scrapes the surface
Please refer to the following section in the Simplify3D print quality guide:В Not Extruding at Start of Print
My prints do not have the proper dimensions and always seem to be a bit too large or too small
Please refer to the following section in the Simplify3D print quality guide:В Dimensional Accuracy
One of my extruders is offset relative to the other, how do I fix the dual extrusion alignment?
Your printer already includes an internal setting known as the toolhead offsets, which defines the position of each extruder relative to one another. In most cases, this setting is already correctly configured in the printer’s firmware, so you can start printing right away. However, if this setting was not configured correctly by the manufacturer, you will need to correct this error first before your extruders can be properly aligned.
So how do you determine the correct value for your toolhead offsets? The toolhead offset tells the printer how far each extruder will need to move along the X and Y axes before it ends up in the same spot as the primary extruder (Tool 0). You can look on the Extruder tab of your Simplify3D process settings to verify the toolhead number for each extruder. So if your primary extruder is on the right, and your second extruder is 34mm to the left of this extruder, then you know the second extruder would need to move 34mm to the right before it ends up in the same position as the primary extruder. So the correct offset would be an X offset of +34mm, and a Y offset of 0mm. You can go to Tools > Machine Control Panel in Simplify3D, and use the Job Controls tab to simulate this movement to confirm the correct values.
Now that you know the correct toolhead offsets, we will explain how to update the printer with the new values. We always recommend trying to update this setting directly on the printer’s firmware first. There are 3 different ways this can be accomplished depending on what printer you have:
Some machines include an option on the printer’s LCD menu to calibrate this nozzle offset, or enter the offset distance directly. So if your printer has an LCD menu, check for this option first.
If your machine uses the Marlin firmware, then you also have the option of sending gcode commands directly to the printer to update this setting. To do this, go to Tools > Machine Control Panel, and then click on the Communication tab. Send the command “M218” to the printer. The machine should respond by listing the current toolhead offsets.
Hotend offsets: 0,0 20,0
The example reply above indicates that the toolhead offset for the second extruder is +20mm in the X-axis and 0mm in the Y-axis. To update this value, send the following command:
That tells the printer to change the X-axis offset to 34mm for the second extruder (Tool 1). The machine should reply confirming the change. You can then send the “M500” command to save these setting to the printer’s internal EEPROM memory (more information about these EEPROM commands can be foundВ here). This ensures that this setting will be maintained even after the printer is turned off. If your machine does not support EEPROM storage, you can also place the correct M218 command at the very top of your Simplify3D starting script so that it gets sent to the machine before each print.
If you were not able to update the toolhead offsets using either of the options above, you also have the option of editing the Configuration.h file for your printer’s firmware, and then re-compiling and re-uploading this new firmware directly to the printer. Please contact the printer manufacturer for instructions on this process.
If you were able to update the toolhead offsets on the printer’s firmware, then your extruders should now be properly aligned and you can go back to printing. If you were not able to update the toolhead offsets using the instructions above, then the software includes one other option you can use to account for the misconfigured firmware. Click on “Edit Process Settings” and go to the G-Code tab. Enter your toolhead offsets in the “Update Machine Definition” section. Be sure to select “Tool 1” from the drop down list before entering the X and Y offsets to ensure these values are correctly applied to the second extruder. You can then enable the checkbox on the left side labeled “apply toolhead offsets to G-Code coordinates”. After enabling this option, the software will actually shift all of the coordinates in your gcode files anytime you are printing with the second extruder. To verify this setting, setup aВ Dual ExtrusionВ print in Simplify3D, click “Prepare to Print”, and then change the preview coloring mode to “Active Toolhead”. You should notice that all of the extrusions for Tool 1 have now been shifted by the amount you entered. This verifies that the setting is working correctly.
How can I reset a profile back to the stock settings?
To re-download a profile provided by Simplify3D, go to Help > Configuration Assistant from within the software and select your printer model from the list.В This will download a fresh copy of this profile and configure the software for this machine.
I’m having issues with the previewer running out of memory or taking too long to render
By default, the preview used in Simplify3D is very detailed, so if you are running on a machine with limited resources, you may want to alter these settings.В First, go to Tools > Options (or Simplify3D > Preferences on a Mac), then click on the Visualization tab and change the preview type to “Low Detail” mode. This will render a much simpler preview that will use fewer system resources.
If this still causes problems, another option would be to disable the “automatically load preview after slicing” option on that same tab. That will export the toolpath files right away so that you don’t have to wait for the preview to render.
I’m having trouble opening the software on my Linux computer
The easiest way to open Simplify3D on your Linux machine is to open a Terminal and cd to the installation directory.В Then type the following command:
This ensures that Simplify3D will be able to correctly access the serial port for your printer and will have the necessary permissions for saving your application preferences.
The software doesn’t appear to be saving my settings
This usually means that there is a permissions issue where the software does not have sufficient access to save and restore your settings.В On Windows, you may want to try right-clicking and choosing Run As Administrator to see if this resolves the issue.В If you are using a Linux machine, please see the recommended instructions in thisВ question.
How do I completely wipe and remove all settings and files used by the software
The process for removing the settings and files used by the software is different depending on which operating system you are using.
Windows:
Open the Registry Editor and then go to the HKEY_CURRENT_USER\Software directory and delete the Simplify3D folder and all sub-keys.
Delete all files in the following directory: C:\Users\%USERNAME%\AppData\Local\Simplify3D. This is a hidden directory, so you may need to enable viewing hidden files and folders to see it in an explorer window.
Mac:
Open a Terminal window and type the following commands:
rm /Users/$USER/Library/Preferences/com.Simplify3D.S3D-Software.plist
rm -rf /Users/$USER/Library/Application\ Support/Simplify3D
Linux:
Open a Terminal window and type the following commands:
rm $HOME/.config/Simplify3D/S3D-Software.conf
rm -rf $HOME/.local/share/Simplify3D
The software won’t open or crashes every time I try to launch it
If you are able to open the software, the first thing you want to try is going to Help > Reset All Settings. This will revert the program back to it’s stock configuration, so be sure to export any profiles that you need first by going to File > Export FFF Profile. However, if you are unable to open the software at all, then this typically means that there is a problem with the system requirements or the settings that are saved and reloaded when the application starts. To verify the cause for this problem, it can be useful to look at the crash log generated by the software. On Windows, this can be found by opening the Event Viewer application and then navigating to Windows Logs > Application in the left menu. Look for the latest event with “Error” in the Level column and “Application Error” in the Source column. This should be the latest crash report for the software. Once you find this entry, check the “Faulting module path”. If this ends with something like ig4icd*.dll or atigkt*.dll, this typically means that the graphics driver on the computer does not have sufficient support for the application. Please try going to the manufacturer’s website (typically either ATI or Nvidia) and manually updating the graphics drivers to the latest possible version to see if this fixes the issue. On Mac OS X, you can typically view the crash log by clicking on “Report” when the application closes and the error message is displayed. Please copy this report in case you need to reference it later. If you are still unable to open the software after following the instructions above, then the next thing to try is clearing the settings and saved files that are loaded when the application starts. Please see thisВ questionВ for more details.
My printer won’t connect to the software
First of all, please keep in mind that you can only have one program connected to your 3D printer at any given time.В Close any other programs that could be communicating with the printer.В Some programs such as MakerBot Desktop have background services that need to be stopped from within the application by opening the software and going to Services > Stop Background Service.
If you are using the software on Windows, you will also need to make sure that you have installed the USB drivers required by your printer.В If you are able to connect to the printer from a different software program, then you likely already have the necessary drivers installed.В If you do not know which drivers to use, please consult with the printer manufacturer.
After completing the steps above, go ahead and turn on the printer and then plug it into your computer.В Open Simplify3D and go to Tools > Machine Control Panel.В If you click on the Communication tab, you can see all of the commands that are sent back and forth to the printer.В In most cases, the software will automatically establish a connection with your printer.В If the software does not automatically connect, make sure that you have selected the correct port and baud rate in the top-left of the Machine Control Panel. If either of these options are incorrect, the software will not be able to communicate with the printer.В Most printers use a baud rate of 115200 or 250000 bps, but you can consult with your printer manufacturer for exact specifications.В Click Connect to try to manually connect to the printer using your port and baud rate settings.
During the connection process, Simplify3D tries to exchange several different commands with your printer. Once it receives a successful response, it can verify that the printer is ready to proceed. However, if you are certain the port and baud rate for your printer are set correctly, you can also disable this option so that Simplify3D does not wait for a specific response during initialization. This can be useful if your printer is having trouble responding to the commands that Simplify3D sends during the connection process. To disable this option, go to Tools > Firmware Configuration, and then select the Communication tab and disable the “wait for startup command” option. Save the new settings and then go back to the Machine Control Panel to retry the connection.
The software is warning me that my width/height ratio is below 1.2, what does this mean?
When the software prints one layer of plastic on top of another layer, it runs several checks to make sure that these two layers will successfully bond together.В One of the checks that is performed analyzes the shape of the plastic you are trying to extrude out of the nozzle.В For example, if you are printing a 0.1mm thick layer with an extrusion width of 0.4mm, then you can imagine a long thin rectangular shape that is 0.1mm tall and 0.4mm wide.В These long thin shapes provide great adhesion to the layer below.В However, if you tried to print with a 0.6mm layer height and the same 0.4mm extrusion width, the shape now resembles a tall thin pillar that is 0.6mm tall and 0.4mm wide.В This will have a much harder time bonding to the layer below.
For this reason, the software will give you a warning if you are trying to use an extrusion width that is less than 120% of your layer height.В So if you receive this warning, you should increase your extrusion width or decrease your layer height.
Another common reason for this error message is when printing infill or supports that are multiple layers thick using the “print every X layers” options. For example, if you set the infill to print every 2 layers and you are using a layer height of 0.3mm, this means that your infill layers will actually be 0.6mm thick since they are only printed every other layer. If you were still using an extrusion width of 0.4mm, this would cause adhesion issues. You should either decrease your layer height, increase the extrusion width, or decrease the “print every X layers” option.
The software says that I have exceeded my number of allowed activations
This error message means that you have installed the software on more computers that is allowed by your license.В To install the software on another computer, you will first need to uninstall the software from one of the locations where it was previously installed.В In the event that one of your previous installations is no longer accessible due to a hard drive failure or a re-imaged operating system, please see thisВ question.
I get an error saying the software is unable to connect to the internet even though I have an active connection
This error message means that something is preventing the application from reaching the internet. В This is typically due to things such as a software firewall, a restrictive anti-virus program, incorrect proxy settings, or external network filters. В Keep in mind that even if you are able to access the internet from your web browser, these items can still block the software from reaching the internet. В Please be sure these items are configured correctly to allow an exception for the software before continuing. If you are using a corporate network, you may need to contact your IT team to make the appropriate changes. If you are using a proxy server to connect to the internet, click the Network Settings button at the bottom of the Simplify3D login and enter your proxy settings.
I receive an error saying that api-ms-win-crt-runtime-l1-1-0.dll is missing
This error message means that one of the dependencies provided by Microsoft failed to install on your computer. The most common reason for this problem is that Windows is too far out-of-date. Please make sure that all of the latest recommended updates for your operating system have been installed (you may need to reboot your computer during this process). After the updates have been installed, go to Control Panel > Programs and Features, select Microsoft Visual C++ Redistributable 2015 and click Repair. After this process is complete, you should be able to re-launch Simplify3D.
If this does not work, you may need to install the Visual C++ Redistributable manually to identify the cause of the issue. You can download the redistributableВ directly from Microsoft by clicking here. Most users should choose the vc_redist.x64.exe file for 64-bit operating systems, but you can also download vc_redist.x86.exe if you are using a 32-bit operating system.
I was unable to login to the forum using the same username and password I used when installing Simplify3D
The forum is managed separately from your Simplify3D account. Before you can post on the forum, you will first need to register and choose your username and password. You are welcome to use the same username and password that you selected for your Simplify3D account if that is easier for you.
Can I work with Simplify3D to offer the software along with the 3D printers that my company makes?
Источник


