- How to shrink C drive volume Windows 10/8/7
- Shrink C drive with Windows 10/8/7 native Disk Management
- Why cannot shrink C drive partition beyond half
- How to shrink C drive beyond limit with free partition editor
- Как разбить диск на разделы в Windows 10
- Сжатие тома с помощью управления дисками Windows 10
- Сжатие тома из командной строки Windows
- Сжатие тома с помощью PowerShell
- How to Shrink Partition in Windows 10
- 3 Ways to Shrink Partition in Windows 10
- Method 1. Shrink Windows 10 Partition with EaseUS Partition Master
- Method 2. Shrink Partition with Windows 10 Built-In Disk Management
- Method 3. Shrink Partition in Windows 10 Using DiskPart
- Pick the Best Solution
How to shrink C drive volume Windows 10/8/7
by John, Updated on: April 13, 2021
When installing Windows to a hard disk, if you forgot to create more volumes, all disk space will be used by C drive except some small reserved partitions. As we know, it is not a good idea to use such big C drive and put everything into it. Instead, you’d better create separate volumes for applications and personal data. What to do if there are no data volumes on the system disk? Is there a way to shrink C drive and create more volumes without reinstalling Windows and programs». The answer is yes. In this article I’ll introduce how to shrink C drive in Windows 10/8/7 with native Disk Management tool and best free partition software.
Shrink C drive with Windows 10/8/7 native Disk Management
The same with Windows 7/8, Windows 10 build-in Disk Management tool has Shrink Volume function, which can decrease C drive and data partition without losing data and on the fly. However, it can only shrink NTFS partition, there are more shortages and I’ll explain in next section.
How to shrink C drive in Windows 10/8/7 using Disk Management tool:
Step 1: Press Windows and R together on the keyboard, type diskmgmt.msc and press Enter to open Disk Management. (Press Windows key and X in Windows 10)
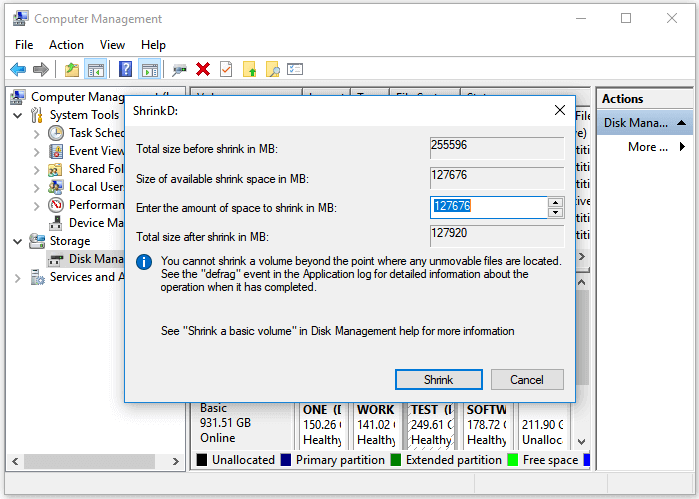
Step 2: Right click C: drive and select Shrink Volume
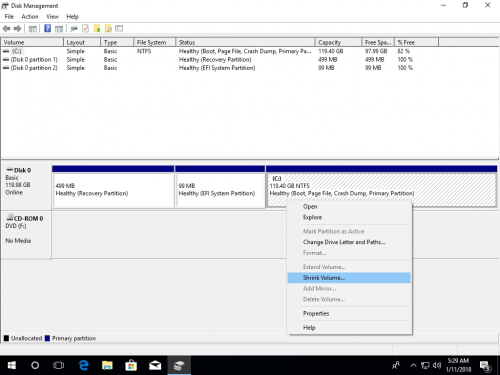
Step 3: Enter the amount of space and then click Shrink to execute.
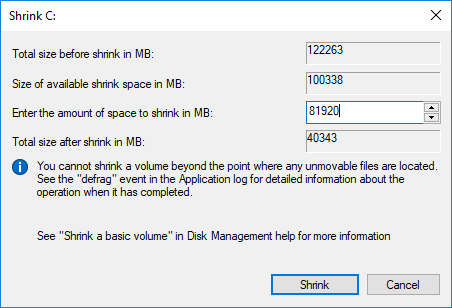
If you don’t enter an amount manually, the maximum available free space will be used by default.
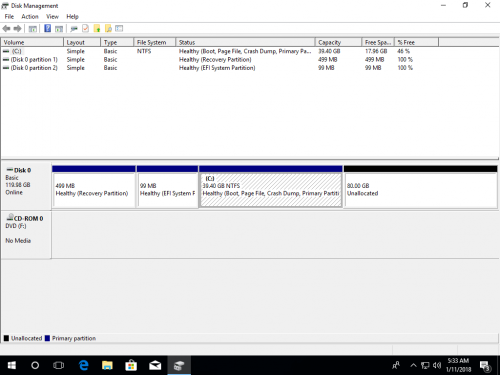
If everything goes well, C drive will be shrunk in a short time.
Why cannot shrink C drive partition beyond half
Windows Disk Management is easy to use, but it has 3 major shortages when shrinking a partition:
- It cannot change the start location, so it cannot shrink a volume towards right and make Unallocated space on the left side.
- As I mentioned above, it can only shrink NTFS partition. It is not an issue to system C drive, but many data partitions are formatted with FAT32 file system.
- It is unable to shrink C drive beyond the point where unmovable files are located.
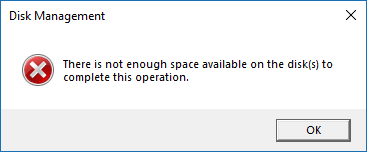
As I said above, maximum available space is used by default. Many people click Shrink button directly without modifying the amount. It is very likely to receive the error message «There is not enough space available on the disk(s) to complete this operation.»
After you running Shrink Volume function, available free space is calculated, but Windows Updates or other types of files are saved to this partition continuously. That means, the available space is changed. So, you’d better enter an smaller amount by yourself.
The most common issue when shrinking C drive partition is related to «unmovable» files.
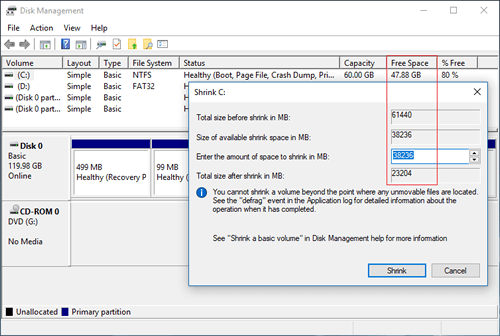
As you see in my test computer, there is 47.88GB free space in C drive, but Disk Management give me maximum 38226 (37.33GB).
There’s a tip on the bottom of this dialog box: «You cannot shrink a volume beyond the point where any unmovable files are located.«
For example: C drive is made up of 4 blocks. If the unmovable files are located in block 3, you cannot shrink C drive to block 2 or 1 even though there is free space.
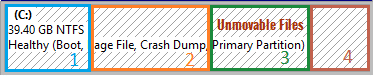
«Unmovable» files include Paging file, Hibernation, system backup and other large files. Windows cannot move these files. This is the reason why many people feedback that they cannot shrink C drive beyond half or to 100GB.
How to shrink C drive beyond limit with free partition editor
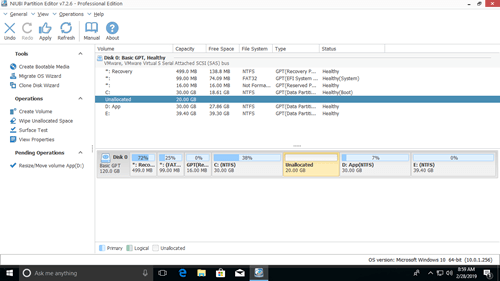
Comparing to Windows Disk Management, NIUBI Partition Editor has more advantages such as:
- It is able to shrink both NTFS and FAT32 partitions.
- It can change the start location of a partition, so Unallocated space can be made on either left or right.
- It can move the «unmovable» files, so it can shrink volume to minimum size if you want.
- It can move the position of Unallocated space or any volume on the same disk.
To shrink C drive in Windows 10/8/7 laptop or desktop, you just need to click and drag on the disk map. It has free edition to Windows 10/8/7/Vista/XP home computer users.
How to shrink C drive partition in Windows 10/8/7 with NIUBI:
Download the free edition, right click the partition that you want to decrease and select «Resize/Move Volume».
Option 1: If you drag left border towards right in the pop-up window,
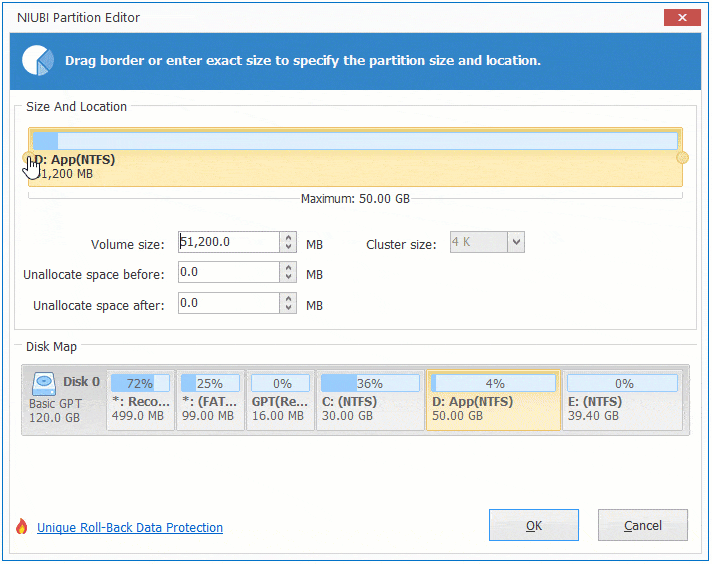
Unallocated space will be made on the left side.
Option 2: If you drag right border towards left in the pop-up window,
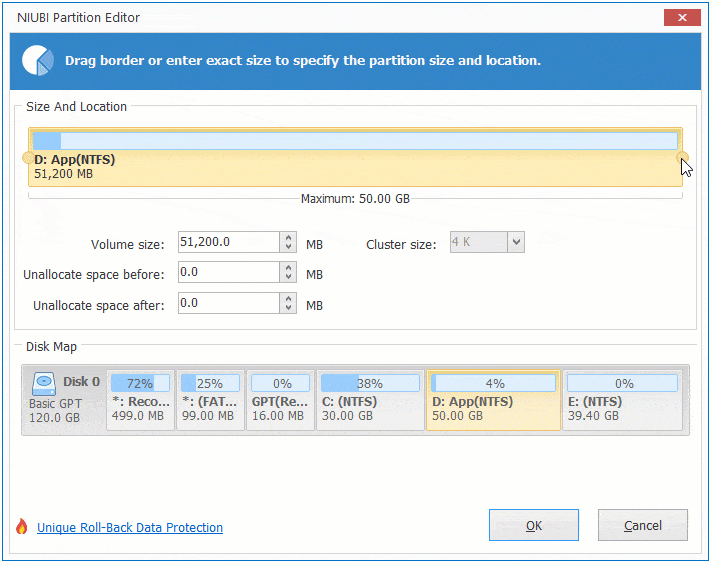
Unallocated space will be made on the right side.
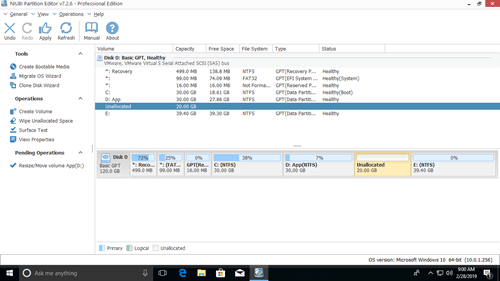
This software is designed to work in virtual mode to avoid mistake, to change real disk partition, remember to click Apply on top left to take effect. Follow the steps if you want to increase D drive or extend system reserved partition after shrinking C drive.
Besides shrinking partition, NIUBI Partition Editor helps you extend, merge, copy, move, convert, defrag, wipe, hide partition, scan bad sectors, etc.
Как разбить диск на разделы в Windows 10
Довольно часто мне приходится разбивать жёсткие диски на разделы, в основном, чтобы отделить пользовательские данные от системных и программ. Для Windows это весьма актуально, особенно если вам часто приходится, по разным причинам, переустанавливать систему и нет желания всякий раз заморачиваться с сохранением всего нажитого непосильным трудом на внешний жёсткий диск.
Встречается и обратная проблема, когда выделено недостаточно места на системном диске при наличие большого объёма не используемого пространства на соседнем томе.
Применять для разбивки дисков какие-то специализированные программы я особого смысла не вижу, тем более что в Windows 10 делается это довольно просто, хоть в графическом режиме, хоть из командной строки — кому что больше нравится. Давайте расскажу как сжимать тома в Windows 10 чтобы окончательно снять все возникающие затруднения.
Сжатие тома с помощью управления дисками Windows 10
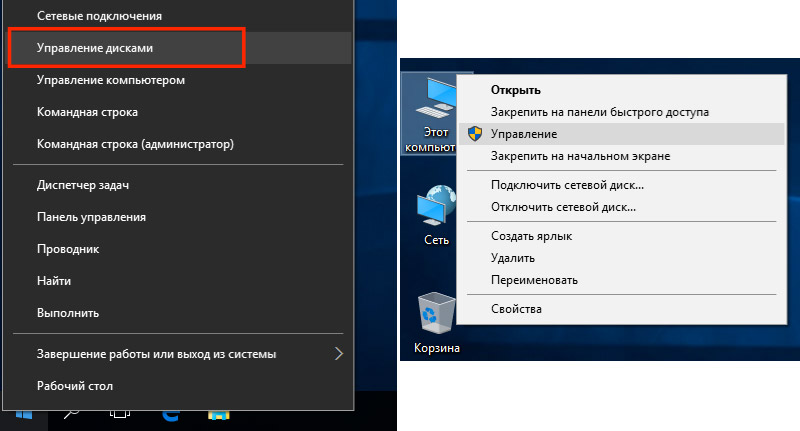
Для начала рассмотрим вариант с привычным графическим интерфейсом «Управление дисками», как самый популярный (командная строка многих пугает). Вызвать утилиту «Управление дисками» можно несколькими способами:
- кликнув правой кнопкой мыши меню «Пуск» и выбрав соответсвующий пункт в открывшемся списке;
- кликнув правой кнопкой мыши по значку «Этот компьютер», далее выбрав «Управление» перейти в «Управление дисками»;
- в строке поиска ввеcти команду diskmgmt.msc и нажать Enter.
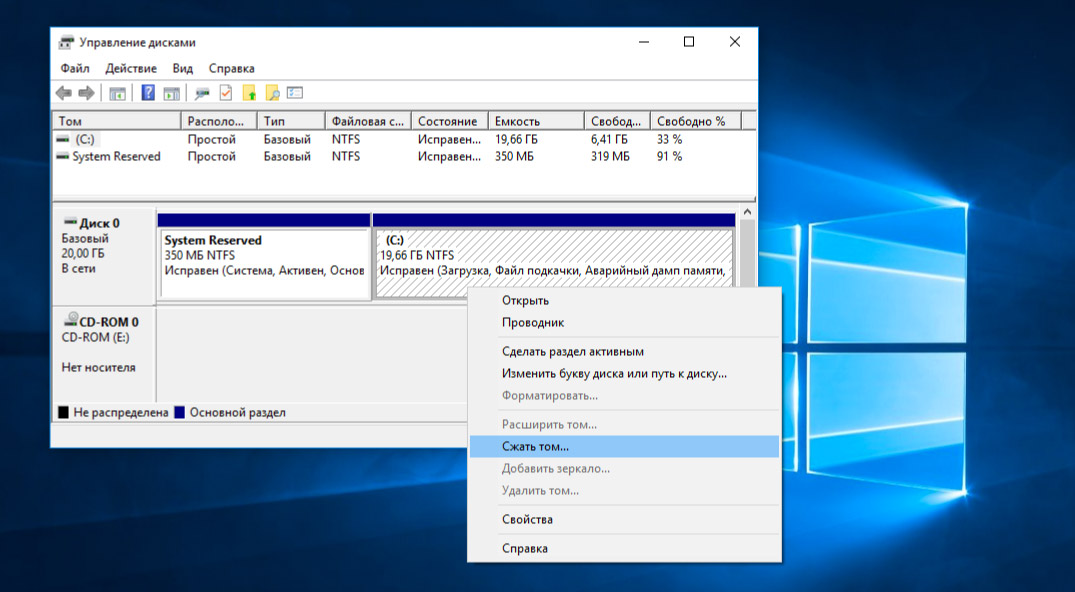
Теперь нужно определиться с диском (томом), размер которого будем изменять, высвобождая место для дополнительного раздела. Кликаем по нему правой кнопкой мыши и выбираем «Сжать том».
Открывается простой диалог с более подробной информацией о разделе диска (томе), но тут случаются непонятки, потому давайте немного поясню. В поле Доступное для сжатия пространство указано сколько всего свободного места есть на диске, а в поле Размер сжимаемого пространства от нас требуется ввести желаемый размер нового раздела в МБ, который, естественно, должен быть меньше оставшегося свободного места на диске.
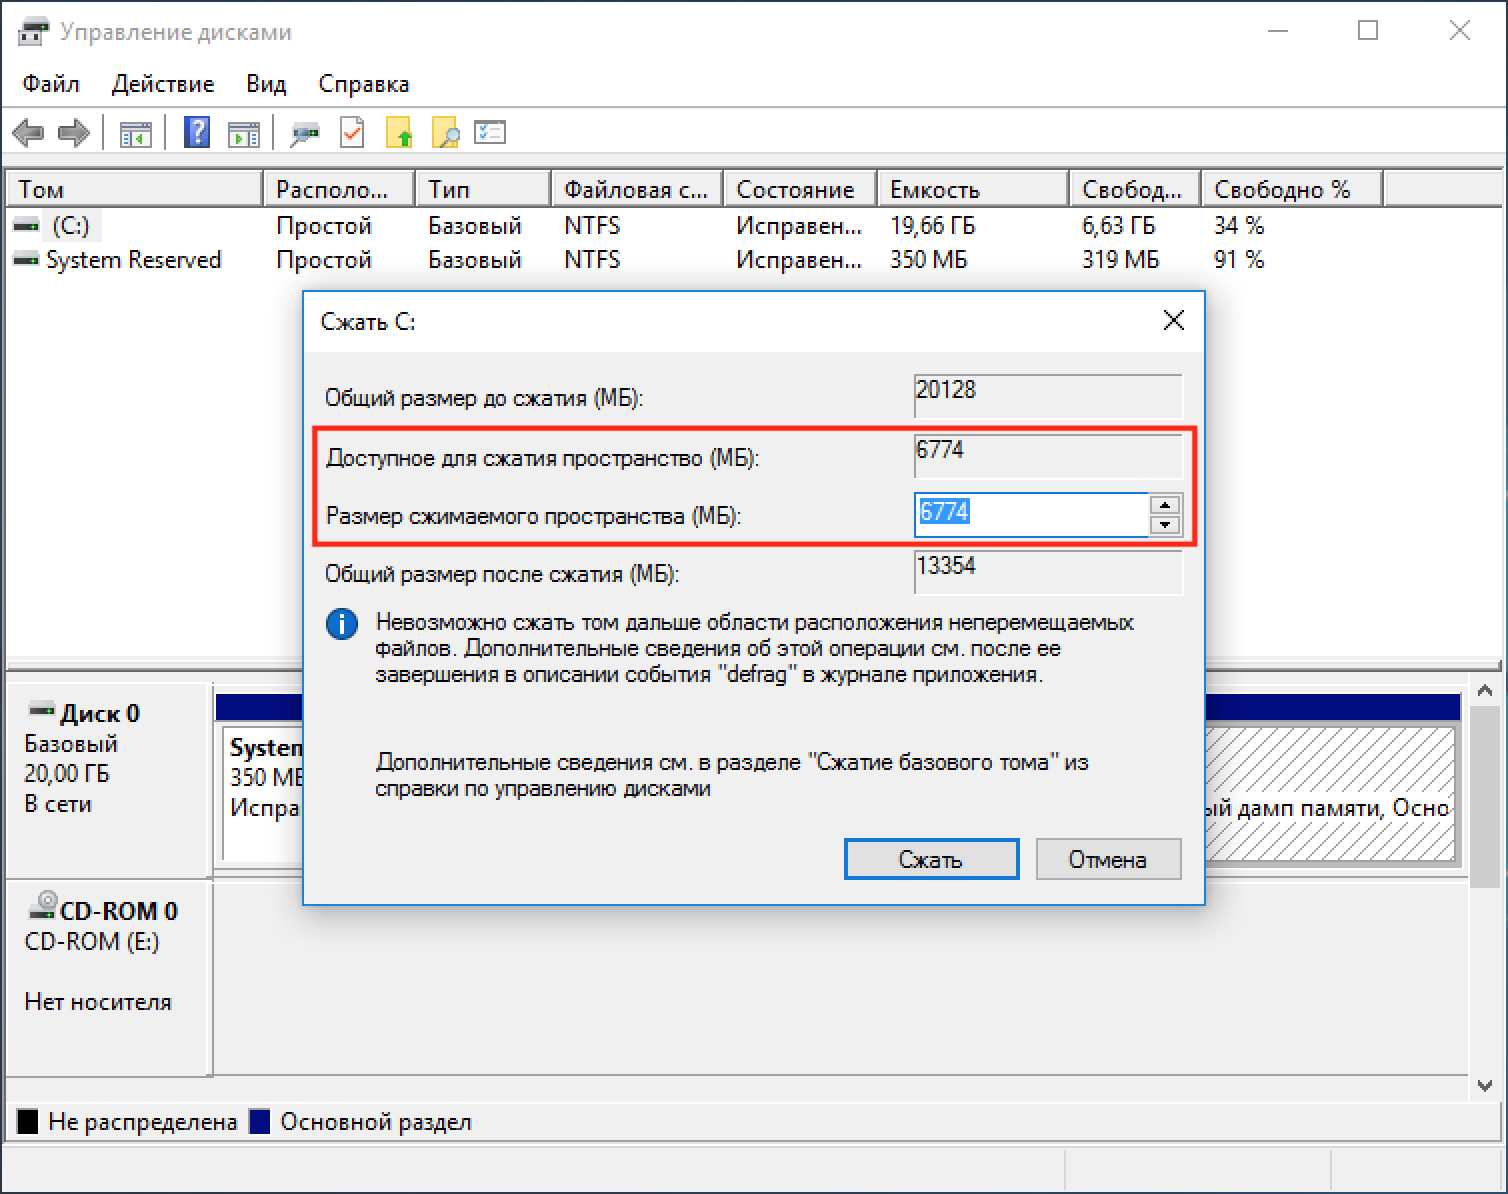
Выделяем место мы обычно в гигабайтах, потому при выделении точного объема под новый раздел обратите внимание что в 1ГБ содержится 1024МБ, то есть создавая 100ГБ раздел, в поле «Размер сжимаемого пространства» следует написать число 102400.
После того как мы, таким образом, выделили на диске нераспределённое место, для создания раздела остаётся кликнуть по нему правой кнопкой мыши и выбрать «Создать простой том».
Сжатие тома из командной строки Windows
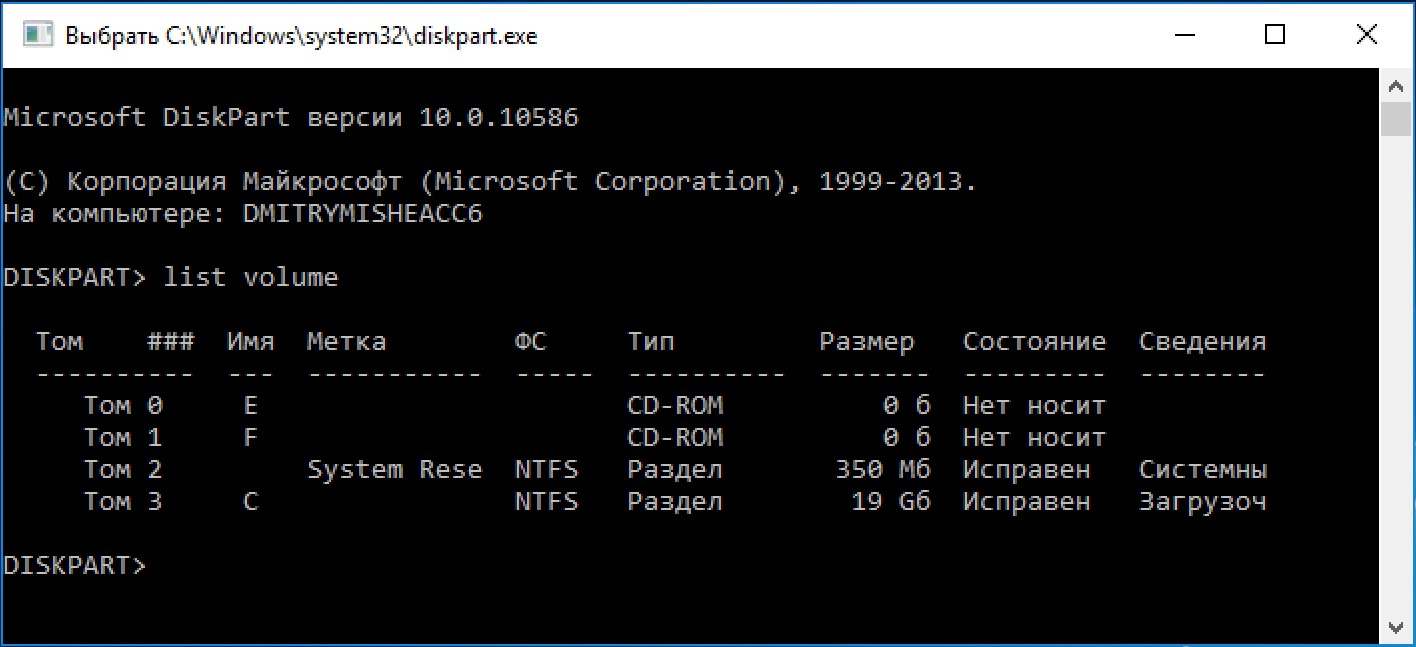
Запускаем командную строку (обязательно от имени администратора) и даём команду DiskPart. Далее выведем список разделов введя команду list volume:
DISKPART > list volume
Снова находим в списке нужный раздел, который будем сжимать, но теперь нам потребуется его номер (в моём примере это будет «Том 3»).
Командой select volume 3 выбираем этот раздел:
DISKPART > select volume 3
Команда shrink querymax поможет узнать свободное на диске (в байтах).
Непосредственно сжатие выбранного раздела производится командой shrink desired= , где — величина дискового пространства в МБ, на которую будет уменьшен раздел. По аналогии с первым вариантом, для создания незамеченной области размером 100 ГБ команда примет такой вид:
DISKPART > shrink desired=102400
Сжатие тома с помощью PowerShell
Работа с PowerShell подразумевает более высокий уровень пользователей, потому подробные разжёвывания о запуске оболочки и действиях от имени администратора опускаем. Осталось пояснить суть команд, которые вы видите на скриншоте:
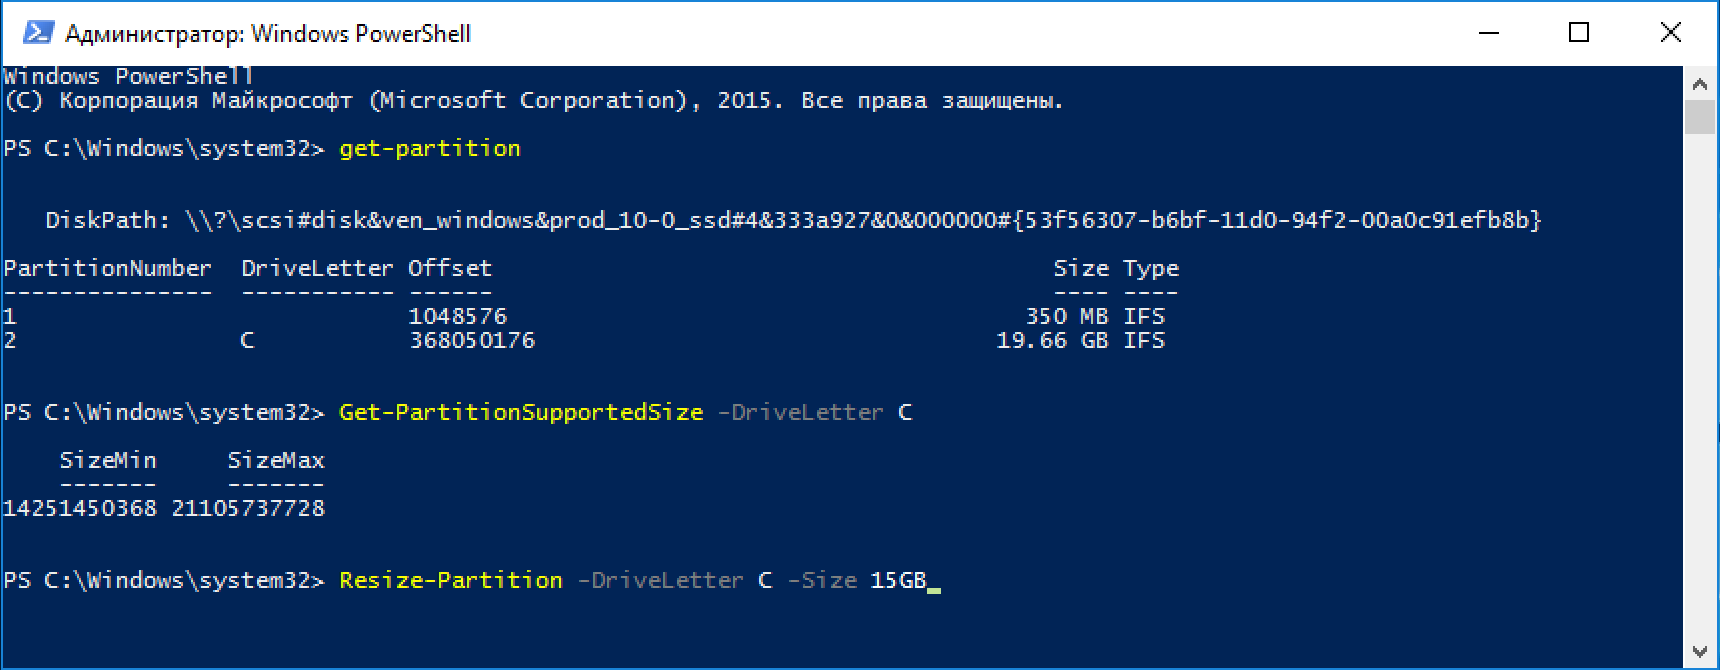
- Команда Get-Partition выводит список томов (нам понадобится буква тома, в примере диск C);
- Команда Get-PartitionSupportedSize -DriveLetter C показывает (в байтах) на сколько возможно минимально и максимально сжать выбранный том;
- Командой Resize-Partition -DriveLetter C -Size 15GB сжимаем раздел, указывая его размер после сжатия. Принципиальное отличие от первых двух методов заключается в указании нового размера исходного тома, а не того, для которого освобождается место. Кроме того, задавать размер можно в любом удобном виде, хоть в гигабайтах (GB), хоть и в мегабайтах (MB).
Если считаете статью полезной,
не ленитесь ставить лайки и делиться с друзьями.
How to Shrink Partition in Windows 10
Shrinking a partition is needed when you want to create a new volume or extend another volume on the same disk. In most cases, you can shrink the partition directly without worrying about data loss. For coping with this hassle, we hold three solutions to shrink volume in Windows 10.
3 Ways to Shrink Partition in Windows 10
Generally, users use three ways to shrink Windows 10 partition, third-party software, Disk Management, or DiskPart.В Any of them can help you do the Windows 10 shrink partition. So, which method is best?
ForВ seeking an easest way, EaseUS Partition Master is the «One Size Fits All» solution for you, which allows you to shrink volume flexibly, even shrink the non-adjacent space. While Disk Management and Diskpart still run well, but adopting Diskpart may eat up your time than the third-party software. And the Windows built-in tool also holds limits. Stay hereВ and pick a meaningful tool!
Method 1. Shrink Windows 10 Partition with EaseUS Partition Master
Suppose you prefer to shrink a partition in Windows 10 by the most straightforward step like dragging and dropping, in that case,В the partition resizingВ tool — EaseUS Partition Master allows you to escape the redundant process. Whether you want to shrink or extend a partition, you can directly drag the volume to the size you want instead of entering the size in number.
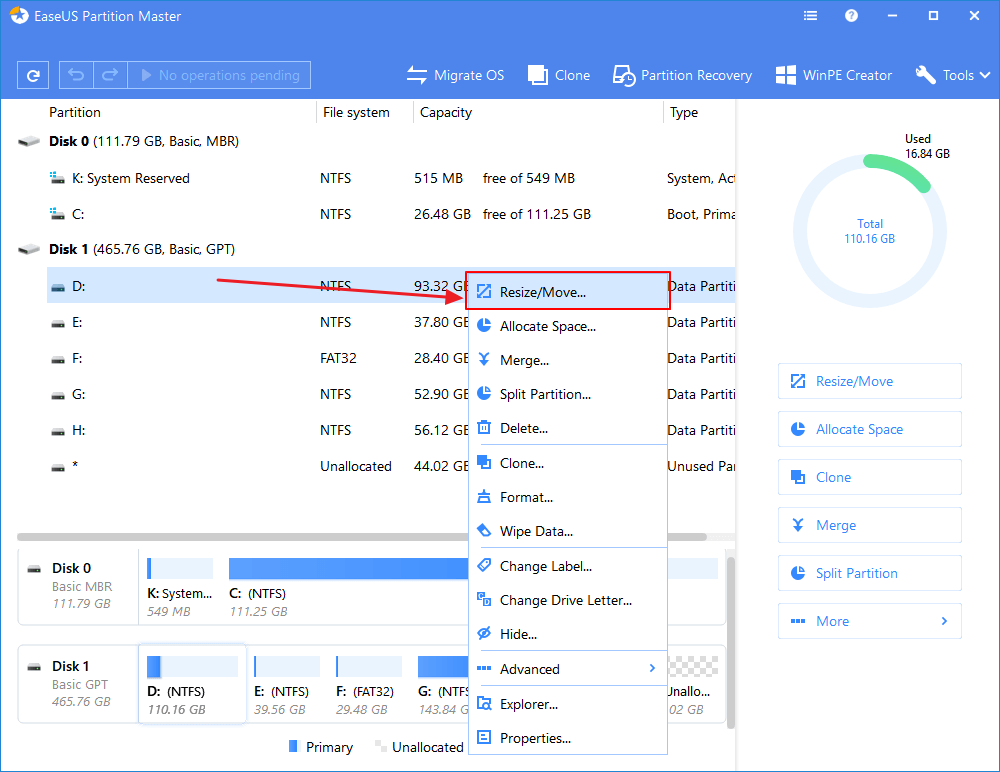
Step 1: Locate and select target partition to shrink
On the main window, right-click on the partition that you want to shrink and select «Resize/Move».
Step 2: Adjust to shrink partition
Use your mouse to drag one of its ends to shrink partition space.
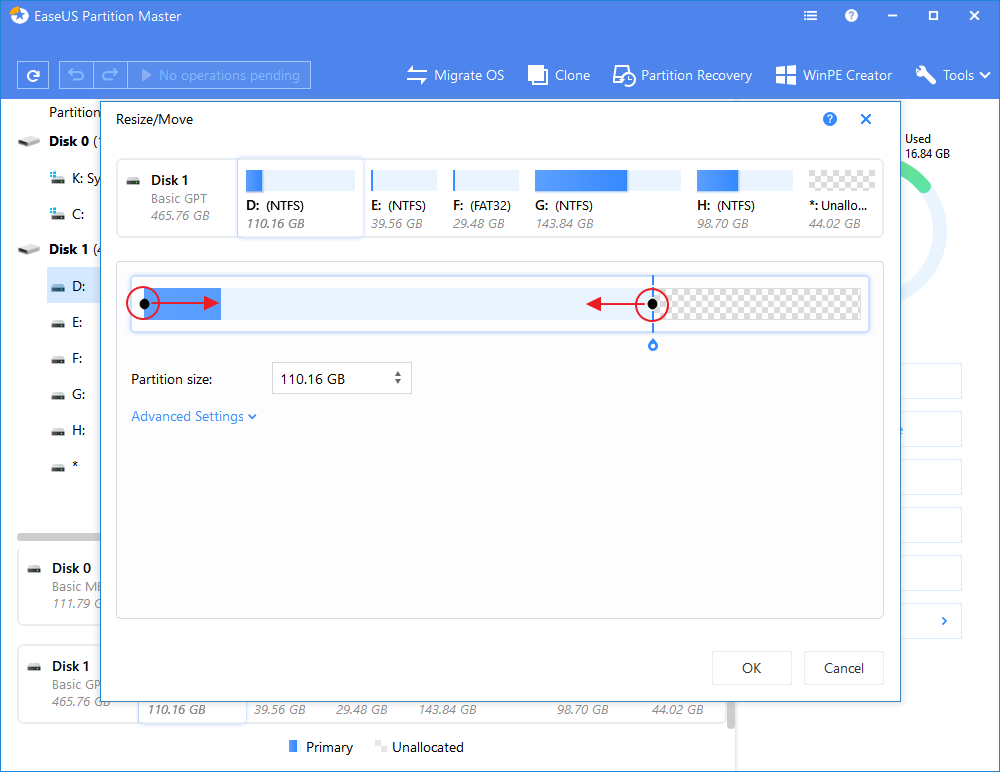
You can also adjust the partition size box to shrink the target partition. Once done, click «OK» to continue.

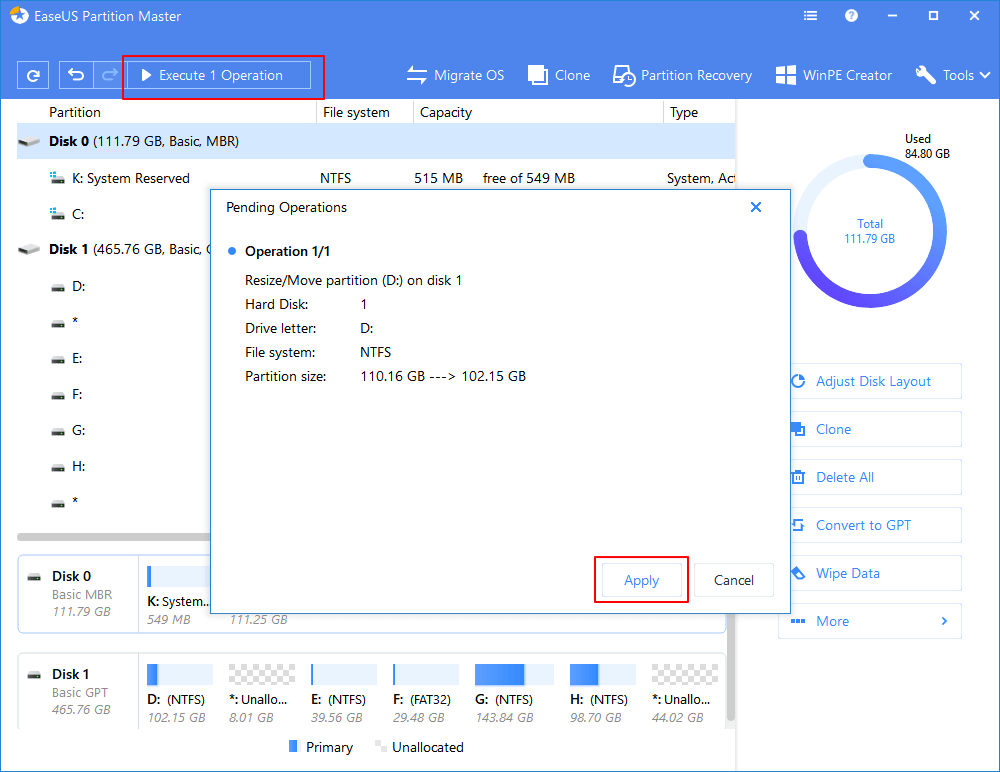
Step 3: Execute operation
Click the «Execute Operation» button and «Apply» to keep all changes.
EaseUS Partition Master is the professional partition management software to extend or shrink Windows 10 partition without data loss. It also has other disk management features like merging partitions, formatting partitions, converting MBR to GPT disk,В and more.

How to extend C drive or system partition in Windows 10? Powerful partition manager — EaseUS Partition Master can easily resize/move/merge/split partition in Windows 10.

Method 2. Shrink Partition with Windows 10 Built-In Disk Management
Windows 10 built-in Disk Management enables you to view and manage your disk drives. It can shrink volume and extend volume. However, itВ doesn’t support the shrink operation on your non-adjacent space.
Step 1. Right-click on «This PC», choose «Manage», and choose «Disk Management» in the pop-up window.
Step 2. Then you need to right-click on the partition which you want to shrink, and choose «Shrink Volume. «
Step 3. In the dialog box, set the amount of space to shink and click «Shrink».
Step 4. After shrinking the partition, you will create more free space on your disk. Then you can create a new volume or extend a partition as you like.
Method 3. Shrink Partition in Windows 10 Using DiskPart
Although using DiskPart to shrink Windows 10 volume is practical, it’s a relatively complicated method among the three. In case you need it, we also detail the steps here as an alternative way.
Step 1. Click the «Start» button and type cmd.
Step 2. Right-click «Command Prompt» and choose «Run as administrator». In the prompt, click «Yes» to continue.
Step 3. To shrink a Windows 10 partition, enter the following commands in order:
- diskpart
- list volume
- select volume 1 (the volume number of the partition you want to shrink)
- shrink desired=123464 (the amount of space in megabytes you want to shrink your partition to)
Pick the Best Solution
As you can see from the details above, using EaseUS partition toolВ and Disk Management is much easier than using DiskPart. However, there are limits on the partition you can resize while using Disk Management. Thus, EaseUS Partition Master can meet the needs of more users.
Besides, after the shrink operation, most of you will create a new partition or extend an existing partition. If you want to extend a partition with a non-adjacent space, using a third-party tool is your only choice because Disk Management doesn’t support such operations.


