- How to Share a Printer in Windows 10
- Sharing Printers over the Network in Windows 10
- Connect to a Windows 10 Shared Printer
- Conclusion
- Share your network printer
- Share the printer on the primary PC
- Connect the shared printer to another PC
- Set up Sharing settings
- Find your PC name
- How to Share a Printer on a Home Network in Windows 7
- Cite This!
- More Awesome Stuff
- How to share a USB printer over the network on Windows 10
- How to share a printer on Windows 10
- How to install a shared printer on Windows 10
How to Share a Printer in Windows 10

In Windows 10, you can take a printer, plug it into one computer, and then print to it from another computer. It’s all made possible because of network printer sharing. We covered this before in our article on sharing printers in Windows 7, but some of the steps and screens have changed slightly in Windows 10. Read on for more details.
Sharing Printers over the Network in Windows 10
Before you can share a printer, it must first be set up, connected and powered on. Click Start > Settings > Devices, then open the Devices and Printers link. Right-click your printer, then click Printer properties.
Click Start > Settings > Devices, then open the Devices and Printers link. Right-click your printer, then click Printer properties.

Select the Sharing tab then check the box to share your printer.
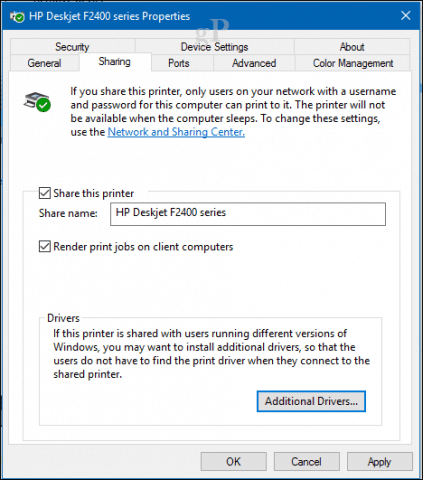
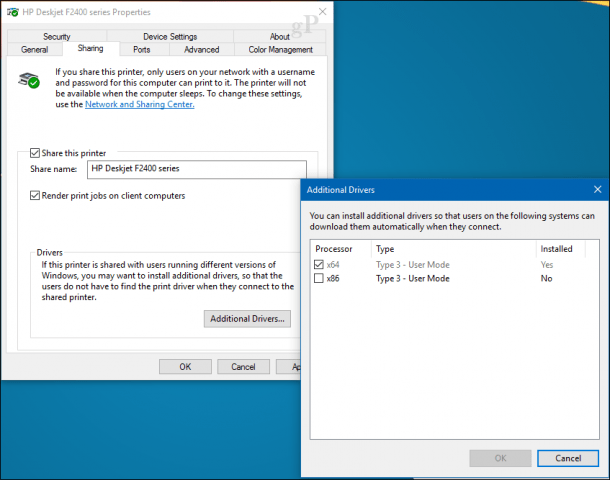
Users should take into account, if you are sharing a printer with multiple devices running a mixture of Windows client architectures – 32 or 64 bit -, you should enable the “Render print jobs on client computers” option. This will ensure other users can easily install the printer when connecting over the network.
Connect to a Windows 10 Shared Printer
After setting up your shared printer, you can connect to it multiple ways. The first method is from within Devices and Printer. Click the Add Printer button, then click the link, The printer that I want isn’t listed. Choose the Select a shared printer by name radio box then browse to the printer on your network then click open.

You will be prompted to install the driver. Click Next to complete the installation of the printer.

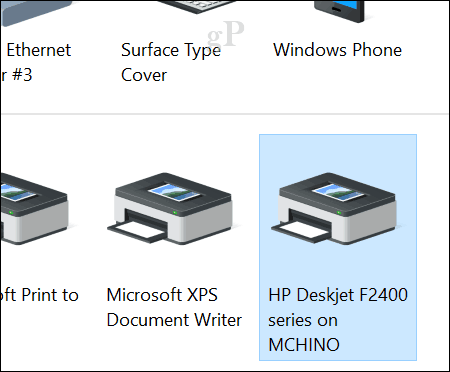
That’s it! The printer will now show up in Devices and printers as a local device.
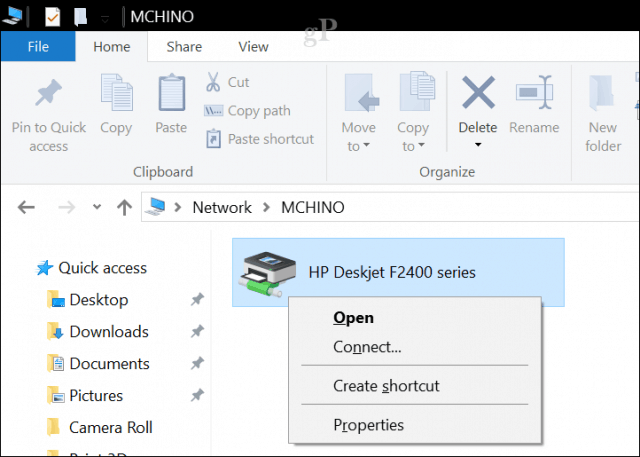
Another way you can connect to a shared network printer is from within File Explorer. Open the Network folder, browse the computer containing the shared printer, right-click it then click Connect.
Conclusion
And there you have it. Sharing printers over a Windows 10 network is a great way to hook up multiple devices to the same printer. This lets you print files and documents without emailing them between devices. This is just one of the ways you can easily share files, storage, and printers in Windows 10.
Have a question about printer shares on the network? Ask in the comments below or visit our Windows 10 forum.
Share your network printer
In Windows 10, you can share your printer with many PCs on your network. To share a printer from the PC that the printer is connected to (the primary PC) with secondary PCs that the printer is not connected to, you must set up sharing settings for the printer, connect the printer to the primary PC (either wirelessly or by using a USB cable), and then turn on the printer. Also make sure the primary PC is turned on, connected to the printer, and connected to the network.
Note: When sharing a printer, make sure that sharing settings are set up on the primary and secondary PCs. Also, make sure you know the name of the primary PC. For more info, see the Set up Sharing settings and Find your PC name sections at the end of this topic.
Share the printer on the primary PC
There are two ways to share your printer: using Settings or Control Panel.
Share your printer using Settings
Select the Start button, then select Settings > Devices > Printers & scanners.
Choose the printer you want to share, then select Manage.
Select Printer Properties, then choose the Sharing tab.
On the Sharing tab, select Share this printer.
If you want, edit the share name of the printer. You’ll use this name to connect to the printer from a secondary PC.
Share your printer using Control Panel
In the search box on the taskbar, type control panel and then select Control Panel.
Under Hardware and Sound, select View devices and printers.
Select and hold (or right-click) the printer you want to share, select Printer properties, and then choose the Sharing tab.
On the Sharing tab, select Share this printer.
If you want, edit the share name of the printer. You’ll use this name to connect to the printer from a secondary PC.
Select the Start button, then select Settings > Devices > Printers & scanners.
Choose the printer you want to share, then select Manage.
Select Printer Properties, then choose the Sharing tab.
On the Sharing tab, select Share this printer.
If you want, edit the Share name of the printer. You’ll use this name to connect to the printer from a secondary PC.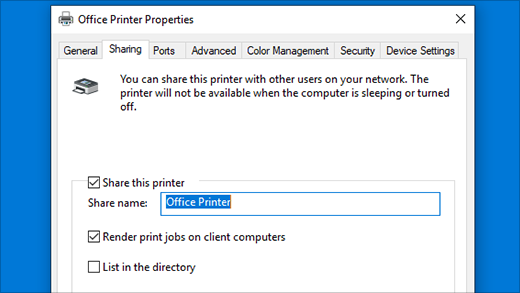
In the search box on the taskbar, type control panel and then select Control Panel.
Under Hardware and Sound, select View devices and printers.
Select and hold (or right-click) the printer you want to share, select Printer properties, and then choose the Sharing tab.
On the Sharing tab, select Share this printer.
If you want, edit the share name of the printer. You’ll use this name to connect to the printer from a secondary PC.
Connect the shared printer to another PC
There are two ways to connect a shared printer to another PC: using Settings or Control Panel.
Select the Start button, then select Settings > Devices > Printers & scanners.
Under Add printers & scanners, select Add a printer or scanner.
Choose the printer you want, and then select Add Device.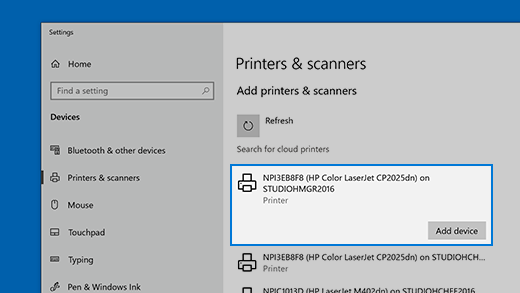
If you don’t see the printer you want, select The printer that I want isn’t listed.
In the Add printer dialog box, select Select a shared printer by name, and then enter the computer or device name of the primary PC and the share name of the printer using one of these formats:
When prompted to install the printer driver, select Next to complete the installation.
For more info about the computer or device name, see the Find your PC name section in this topic. By default, you need the user name and password of the primary PC to access the printer.
In the search box on the taskbar, type control panel and then select Control Panel.
Under Hardware and Sound, select View devices and printers, and then select Add a printer.
Select the printer you want, select Next. When prompted, install the printer driver.
If you don’t see the printer you want, select The printer that I want isn’t listed.
In the Add a device dialog box, select Select a shared printer by name, and then enter the computer or device name of the primary PC and the share name of the printer using one of these formats:
When prompted to install the printer driver, select Next to complete the installation.
For more info about the computer or device name, see the Find your PC name section in this topic. By default, you need the user name and password of the primary PC to access the printer.
Set up Sharing settings
The settings you use to share devices is often turned on by default. If not, follow the steps in this section to turn settings on using settings or Control Panel.
Select the Start button, then select Settings > Network & Internet > Wi-Fi.
Under Related settings, select Change advanced sharing options.
In the Advanced sharing settings dialog box, expand the Private section. Next, under Network discovery, select Turn on network discovery.
Under File and printer sharing, select Turn on file and printer sharing.
In the search box on the taskbar, type control panel and then select Control Panel.
Select Network and Internet > Network and Sharing Center > Change advanced sharing settings.
In the Advanced sharing settings dialog box, expand the Private section. Next, under Network discovery, select Turn on network discovery.
Under File and printer sharing, select Turn on file and printer sharing.
Find your PC name
You’ll need the name of your primary PC, also called the computer name or device name, to connect the secondary PC to the printer.
In the search box on the taskbar, type computer name.
Select View your PC name.
Under Device name, you’ll see the PC (computer) name.
In the search box on the taskbar, type control panel and then select Control Panel.
Select System and Security > System > See the name of this computer.
Under Computer name, you’ll see the PC (computer) name.
How to Share a Printer on a Home Network in Windows 7
Just because you have more than one computer doesn’t mean you have to have a printer for each computer [Spector, Strohmeyer]. We will now show you how to share a printer between several computers on a network in Windows 7.
Before sharing your printer, you have to set up File and printer sharing. Here’s how to set up File and printer sharing:
- Click on Start in the bottom left corner of your screen. A popup list will appear.
- Select Control Panel from the popup list. Type the word network in the search box.
- Click on Network and Sharing Center.
- Click on Change advanced shared settings, in the left pane.
- Click on the down arrow, which will expand the network profile.
- Select File and printer sharing and choose Turn on file and printer sharing.
- Click on Save changes.
You’re now ready to share your printer.
- Click on Start in the bottom left corner of your screen. A popup list will appear.
- Click on Devices and Printers, from the popup list.
- Right click the printer you want to share. A dropdown list will appear.
- Select Printer properties from the dropdown list.
- Click on the Sharing tab
- Select the Share this printer check box.
In order for other people to connect to the printer, they just have to add the network printer that you just opened for sharing to their computers. Here’s how to do this.
- Click on Start in the bottom left corner of your screen. A popup list will appear.
- Click on Devices and Printers from the popup list.
- Select Add a printer.
- Click on Add a network, wireless or Bluetooth printer.
- Click the shared printer.
- Click Next. Continue according to the instructions on the screen [source: Microsoft].
Cite This!
Please copy/paste the following text to properly cite this HowStuffWorks.com article:
More Awesome Stuff
Explore More HowStuffWorks:
Learn How Everything Works!
Copyright © 2021 HowStuffWorks, a division of InfoSpace Holdings, LLC, a System1 Company
We use cookies to personalise content and ads, to provide social media features and to analyse our traffic. We also share information about your use of our site with our social media, advertising and analytics partners who may combine it with other information that you’ve provided to them or that they’ve collected from your use of their services. You consent to our cookies if you continue to use our website.
Do not sell my data
Information that may be used
- Type of browser and its settings
- Information about the device’s operating system
- Cookie information
- Information about other identifiers assigned to the device
- The IP address from which the device accesses a client’s website or mobile application
- Information about the user’s activity on that device, including web pages and mobile apps visited or used
- Information about the geographic location of the device when it accesses a website or mobile application
How to share a USB printer over the network on Windows 10
Turn your USB printer into a network printer that everyone can use with just a few clicks on Windows 10.
If you have a USB printer, which doesn’t feature Wi-Fi or Ethernet network connectivity, Windows 10 makes it super easy to turn your computer into a print server by letting you share your USB printer in the network for everyone to access it with just a few click.
Printer sharing is nothing new, it’s a feature that has been part of the operating system for a long time, and you can still use it on Windows 10.
In this guide, you’ll learn the steps to share a printer on Windows 10 over the network without the need to set up Homegroup.
How to share a printer on Windows 10
To connect a USB printer to a Wi-Fi network without extra accessories, you can use Windows 10 “printer sharing”, here’s how to do it:
Open Settings.
Click on Devices.
Select your printer from the list.
Click the Manage button.
 Printer settings
Click the Printer properties link.
 Printer properties settings
Open the Sharing tab.
Click the Change Share Options button.
 Change sharing options
Check the Share this printer option.
Change the printer share name as needed, but not required.
 Share this printer option on Windows 10
Click Apply.
Click OK to complete the task.
Once you completed the steps, your USB printer will now be available in the network for anyone to connect and use.
How to install a shared printer on Windows 10
Installing a shared printer is an easy process, but it’s not the same as it would be to install a wireless printer.
To install a printer that you’re sharing in the network on another computer, do the following:
Open Settings.
Click on Devices.
Click the Add printer & scanner button.
Click The printer that I want isn’t listed.
 The printer that I want isn’t listed
Check the Select a shared printer by name option.
Type the network path to the printer. For example, \\computerName\printerName . You can also use the IP address for the computer sharing the printer if for some reason the name doesn’t work.
Click Next.
 Select a shared printer by name
Leave the default printer name.
Click Next to install the shared printer on the computer.
 Shared printer successfully installed
Click Finish to complete the task.
 Print a test page & finish
After completing the steps, you should now be able to send print jobs through the network, to your computer, and to the USB printer.
Remember that users will only be able to print as long as the computer sharing the printer is turned on.
Although most new printers include a print server to connect it to a network using Wi-Fi or Ethernet connection, there are still a lot of printers that only feature USB or parallel cable connectivity, and Windows 10 offers an easy solution to enable you to share a printer with other people over the network.
We may earn commission for purchases using our links to help keep offering the free content. Privacy policy info.
All content on this site is provided with no warranties, express or implied. Use any information at your own risk. Always backup of your device and files before making any changes. Privacy policy info.


