- Player.playState
- Syntax
- Possible Values
- Remarks
- Examples
- Get Windows Media Player
- Разворачиваем домашний DLNA сервер на Windows 8
- Как активировать DLNA в Windows 8
- DLNA сервер на базе Windows Media Player
- Using Windows Media Player Playlist Files in Web Playlists
- Prerequisites
- Saving WPL Playlist Files as ASX Playlist Files in Windows Media Player
- Importing ASX Playlist Files to the Web Playlists Feature
- Enabling your Imported Web Playlist
- Serve the media files from user folders
- Serve the media files from the Web site
- Setting Playback Options
Player.playState
The playState property retrieves a value indicating the state of the Windows Media Player operation.
Syntax
player .playState
Possible Values
This property is a read-only Number (long). The C-style enumeration constant can be derived by prefixing the state value with «wmpps». For example, the constant for the Playing state is wmppsPlaying.
| Value | State | Description |
|---|---|---|
| 0 | Undefined | Windows Media Player is in an undefined state. |
| 1 | Stopped | Playback of the current media item is stopped. |
| 2 | Paused | Playback of the current media item is paused. When a media item is paused, resuming playback begins from the same location. |
| 3 | Playing | The current media item is playing. |
| 4 | ScanForward | The current media item is fast forwarding. |
| 5 | ScanReverse | The current media item is fast rewinding. |
| 6 | Buffering | The current media item is getting additional data from the server. |
| 7 | Waiting | Connection is established, but the server is not sending data. Waiting for session to begin. |
| 8 | MediaEnded | Media item has completed playback. |
| 9 | Transitioning | Preparing new media item. |
| 10 | Ready | Ready to begin playing. |
| 11 | Reconnecting | Reconnecting to stream. |
Remarks
Windows Media Player states are not guaranteed to occur in any particular order. Furthermore, not every state necessarily occurs during a sequence of events. You should not write code that relies upon state order.
Examples
The following JScript code shows the use of the player.playState property. An HTML text element, named «myText», displays the current status. The Player object was created with .
Get Windows Media Player
Windows Media Player is available for Windows-based devices. Use this table to find the right version of the Player for your system. (If you’ve got a Mac, you can download Windows Media Components for QuickTime to play Windows Media files.)
Windows Media Player 12
Learn more
Included in clean installs of Windows 10 as well as upgrades to Windows 10 from Windows 8.1 or Windows 7. In some editions of Windows 10, it’s included as an optional feature that you can enable. To do that, select the Start button, then select Settings > Apps > Apps & features > Manage optional features > Add a feature > Windows Media Player, and select Install.
DVD playback isn’t included. Go to the DVD playback for Windows page to find out how to add DVD playback to Windows 10.
Windows Media Player 12
Learn more
Included in Windows 8.1 and Windows 8.1 Pro, but doesn’t include DVD playback. Go to the DVD playback for Windows page to find out how to add DVD playback to Windows 8.1. For Windows Media Player 12 for Windows 8.1 N and KN editions, get the Media Feature Pack.
Windows Media Player isn’t available for Windows RT 8.1.
Windows Media Player 12
Learn more
Included in Windows 7 Starter, Home Premium, Professional, Ultimate, and Enterprise editions. For Windows 7 N or KN editions, get the Media Feature Pack.
Windows Media Components for QuickTime
If you want to reinstall Windows Media Player, try the following:
Click the Start button, type features, and select Turn Windows features on or off.
Scroll down and expand Media Features, clear the Windows Media Player check box, and click OK.
Restart your device. Windows Media Player should be uninstalled.
Scroll down and expand Media Features, select the Windows Media Player check box, and click OK.
Restart your device. Windows Media player should now be reinstalled.
Note: To troubleshoot issues like playback and codec problems, see the «Get help» section in Windows Media Player.
Разворачиваем домашний DLNA сервер на Windows 8
DLNA (Digital Living Network Alliance) — технология, позволяющая в реальном времени транслировать медиа-контент (видео, музыку, фото) через локальную сеть (Ethernet/Wi-Fi) или интернет. В качества источника такого контента могут выступать компьютеры, смартфоны, планшетные устройства (и т.д.), а потребителями телевизоры, ресиверы, плееры, принтеры, игровые приставки (xBox, Playstation) и другие устройства, поддерживающие технологию DLNA. По сути, с помощью DLNA, возможно создать единую цифровую сеть, включающую в себя всю домашнюю электронику. Задача создания такой сети упрощается благодаря тому, что устройства с поддержкой спецификации DLNA могут настраиваться и объединиться в единую сеть в автоматическом режиме.
Источником DLNA медиа-контента (DLNA сервером) может быть как отдельный «железный девайс», так и программное решение на базе ПК. Для организации DLNA сервера на базе Windows существует достаточно много программ (как бесплатных, так и платных). Но не все знают, что в Windows 8 (как и в Windows 7) уже имеется встроенный DLNA сервер. Этот функционал интегрирован в саму систему и в проигрыватьель Windows Media Player версий 11 и 12. Помимо того, Windows Media Player поддерживает потоковое вещание медиа информации на DLNA (UPnP) устройства (клиенты и плееры). DLNA клиенты видят компьютер с Windows 8 как DLNA сервер с содержимым его библиотек Видео/Музыка/Изображения.
В этой статье мы разберемся об особенностях настройки и работы DLNA сервера на базе Windows 8.
Как активировать DLNA в Windows 8
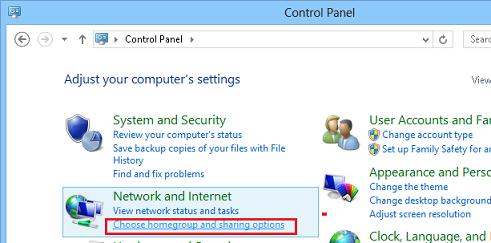
Откройте панель управления Windows 8 и в разделе Network and Internet выберите пункт Choose home group and sharing options.
Выберите пункт Choose what you want to share, and view the home group password. 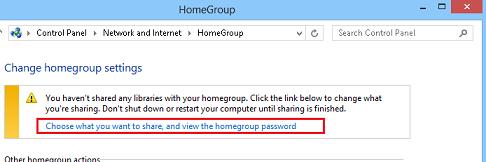
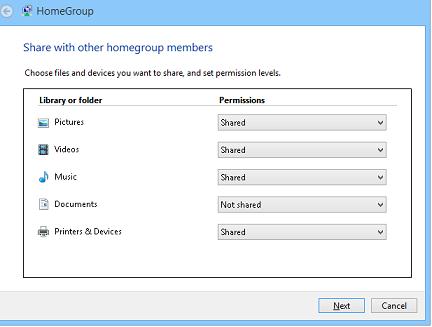
Выберите библиотеки Windows и устройства, к которым необходимо предоставить общий доступ (нас интересуют библиотеки Picture, Videos, Music) и нажмите Next.
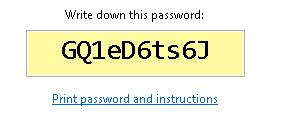
Далее система сгенерирует и отобразит на экране пароль, который будет использоваться для сетевого доступа к этому компьютеру (его в дальнейшем можно будет изменить).
Затем нажмите кнопкуAllow all devices on this network such as TVs and game console to play my shared content .

Укажите имя создаваемого вами DLNA сервера. Windows автоматически построит список всех обнаруженных в сети DLNA клиентов. Чтобы разрешить всем устройствам доступ к нашему DLNA-серверу, нажмите Allow All, либо настройте доступ индивидульно.
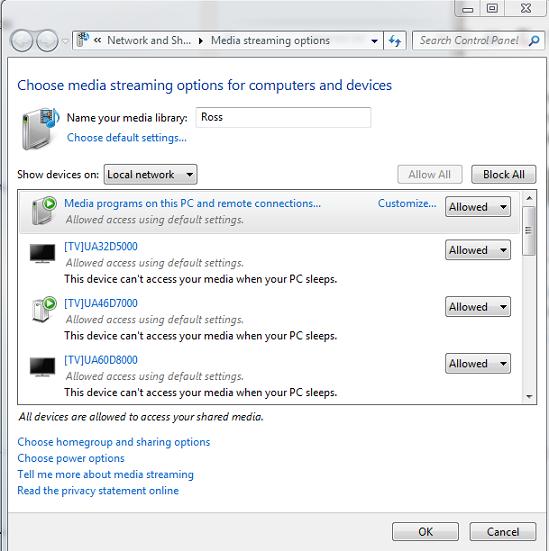
На этом настройка DLNA сервера на Windows 8 окончена. Теперь все домашние устройства могут получать доступ к информации в библиотеках Windows (каталог C:\Users\Public и пользовательским библиотекам Видео/Музыка/Изображения).
- В том случае, если на компьютере работает брандмауэр Windows или другой межсетевой экран, необходимо учесть что для работы DLNA сервере нужно открыть порты TCP 50001,50002 и UDP 1900.
- Если в системе зарегистрировано несколько пользователей, то DLNA видят такой компьютер не как один DLNA медиа-сервер, а как 4 (!) медиа сервера (по одному на каждую учетку). Чтобы скрыть лишние медиа серверы, нужно под каждой учетной записью, у которой необходимо отключить потоковое аудио\видео, необходимо в параметрах потоковой передачи мультимедиа контента выбрать Deny All (запретить все).
DLNA сервер на базе Windows Media Player
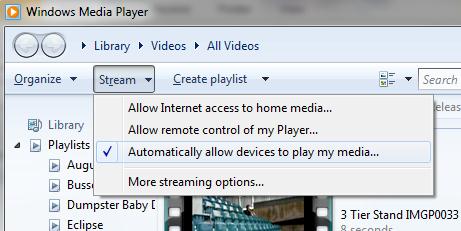
В Windows 8 DLNA сервер также может быть организован на базе Windows Media Player. Основная особенность Windows Media Player – возможность трансляции потокового мультимедиа (Media Streaming) и управление воспроизведением. Функционал DLNA сервера в WMP реализуется на базе службы Windows Media Player Network Sharing Service.
Функция Media Streaming позволяет организовать DLNA сервер с транскодированием видеоформатов, которые в настоящий момент не поддерживаются в качестве DLNA контента (например, MP4 , WMV).
Чтобы активировать DLNA сервер на базе Windows Media Player, включите опции Automatically allow devices to play my media и Allow remote control of my Player .
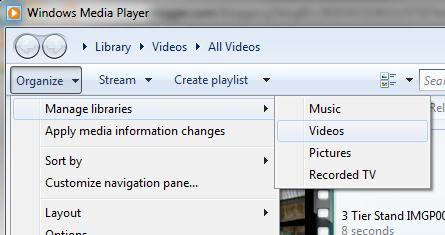
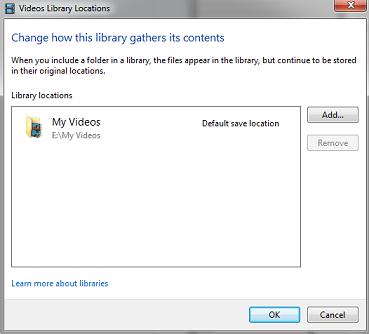
Если нужно добавить в раздаваемый DLNA контент дополнительные каталоги, выберите пункт Manage libraries->Videos.
И добавить соответствующий каталог
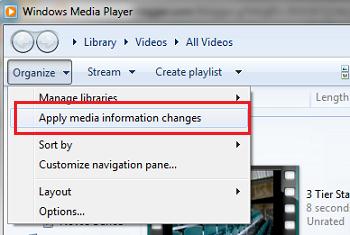
Что касается неудобных моментов – то в первую очередь бросается в глаза то, что Windows Media Player недостаточно быстро обновляет содержимое библиотек (строит списки файлов для воспроизведения). Т.е. пользователь скачивает в свою библиотеку новый фильм/фото/музыкальный контент, но сразу не видит его на своем DLNA клиенте (например, телевизоре). Чтобы заставить Windows Media Player перестроить списки медиа-контента, выберите в меню Organize пункт Apply media information changes.
С помощью кнопки Play To из WMP возможно запустить потоковое воспроизведение медиа на конкретном устройстве (естественно, сертифицированном на совместимость со стандартом DLNA). Просто щелкните ПКМ по медиа-файлу и в контекстном меню выберите пункт “Play to” и выберите DLNA устройство, на котором необходимо его воспроизвести.
Using Windows Media Player Playlist Files in Web Playlists
By default, Windows Media Player 11 in Windows Server 2008 creates playlists in WPL format (files with .wpl file name extensions). This article describes how to create copies of the playlist files in ASX format (files with .asx file name extensions) so that you can import them into the Web Playlists extension for Internet Information Services (IIS). When you import the ASX files in Web Playlists, the equivalent Web playlist files (files with .isx file name extension) are created, which you must then edit to enable them in the Web Playlists feature. This article describes how to edit ISX files in two different ways, depending upon whether you want to serve the media files referenced in the playlist media entries either from the original user folder or from a Web site directory.
This article contains the following sections:
Prerequisites
To install the Web Playlists extension for IIS 7.0 and above, see the Installation Notes section in the IIS Media Services Readme.
This article assumes that you have created playlists in Windows Media Player on the local server computer using default Player settings. For more information about installing Windows Media Player 11 and creating Windows Media Player playlists, see the Related Articles section.
Saving WPL Playlist Files as ASX Playlist Files in Windows Media Player
Windows Media Player creates its playlists in WPL format by default. This section shows how to create an ASX-formatted version of a Windows Media Player playlist (.wpl) file to import into the Web Playlists feature.
To create ASX-formatted playlist files
In the Windows Media Player Library, in the Contents pane, select the playlist that you want to add to the Web Playlists feature. Then, in the Details pane, click Edit in List Pane. 
This will add the playlist to the List pane in Windows Media Player. In the following example, we show in the List pane a simple playlist (named playlist1) that contains two tracks (named track1 and track2). 
Click the down arrow next to the playlist name, and then click Save Playlist As. 
This action will open the Save As dialog box with default values. 
In the Save As dialog box, in Save as type, select Any Playlist (*.wpl, *.asx, *.m3u). 
In the Save As dialog box, in File name, change the file name extension from wpl to asx. 
In the Save As dialog box, click Save. 
Importing ASX Playlist Files to the Web Playlists Feature
This section shows how to import the ASX-formatted Windows Media Player playlist file that you created in the previous section.
To import ASX-formatted playlist files
In IIS Manager, select the Web site or virtual directory from which you want to serve your Windows Media Player playlist files (.wpl files), and then in the Contents pane, click the Web Playlists icon. 
In the Actions pane, click Open Feature. 
This action displays the Web Playlists feature page. If you have not previously created Web playlists for the site or virtual directory, the page will be empty as shown below. 
In the Actions pane, click Import ASX Playlist. 
In the Open dialog box, navigate to the location where the playlist file in ASX format is stored, select it, and then click Open. 
The Windows Media Player playlist file (playlist1.asx) in imported to the Web Playlists feature as a Web playlist file (playlist1.isx), as shown below: 
Enabling your Imported Web Playlist
After you import your ASX-formatted Windows Media Player playlist file, there are a couple of approaches to take regarding how you want to serve the media that is referenced in it. You can either leave the media files where they reside in your user folder, or you can copy them to a folder in your Web site root directory or virtual directory. Your choice really depends on whether you want to maintain multiple copies of your media files.
If you choose the first option (leave the media files where they are), then you must do the following:
- In the Web Playlists feature, set impersonation settings so that it can access the files in the user folder.
- In the Web Playists feature, enable Absolute/UNC paths.
- In the ISX file, change relative URIs for the media entries to physical paths.
- In the ISX file, change the srcType from relative URI to physical path.
- In the ISX file, remove the param container with invalid extraparam attributes.
If you choose the second option (copy the media files to your Web site or virtual directory), then you must do the following:
- Copy your media files to a folder in the Web root directory or to the virtual directory.
- In the ISX file, update the relative URIs for the media entries.
- In the ISX file, remove the param container with invalid extraparam attributes.
The following sections provide details on both approaches:
Serve the media files from user folders
In the Web Playlists feature, set impersonation settings so that it can access the files in the user folder. For detailed instructions, see Web Playlists for IIS — Serving Media Content from User Folders.
In the Web Playlists feature, enable Absolute/UNC paths.
a. In the Actions pane, click Edit Feature Settings. 
b. In the Edit Feature Settings dialog box, select Allow absolute/UNC paths. 
In a text editor, such as Notepad, change the relative URI for each media entry in the ISX to a physical path. For example:
You can use the Replace feature in Notepad to make this change to all media entries at once.
In the text editor, change the srcType for each media entry in the ISX to a physical path. For example:
You can use the Replace feature in Notepad to make this change to all media entries at once.
When you import the Windows Media Player ASX playlist file, the Web Playlists feature groups the unsupported playlist attributes as extraParam values in a param container in the ISX playlist file. You must remove (or comment-out) the param container with invalid extraParam attributes for each media entry in the ISX.
In the following example, we comment-out the param (beginning and ending comment marks shown in red). Also, for brevity, we show only the first and last extraParam values (for the track length and number) in the example:
Because extraParam values vary for each track, do the following when using the Replace feature in Notepad:
This will comment-out the param container with the extraParam attributes, as shown in the above example.
Serve the media files from the Web site
Copy the media files referenced in the Windows Media Player playlist (.wpl) file to a folder in the Web site directory or to a virtual directory. For example, if you imported the .asx version of the playlist to the Default Web site, copy the files to: \inetpub\wwwroot\media.
In a text editor, such as Notepad, update the relative URI for each media entry in the ISX. For example:
You can use the Replace feature in Notepad to make this change to all media entries at once.
When you import the Windows Media Player ASX playlist file, the Web Playlists feature groups the unsupported playlist attributes as extraParam values in a param container in the ISX playlist file. You must remove (or comment-out) the param container with invalid extraParam attributes for each media entry in the ISX.
In the following example, we comment-out the param (beginning and ending comment marks shown in red). Also, for brevity, we show only the first and last extraParam values (for the track length and number) in the example:
Because extraParam values vary for each track, do the following when using the Replace feature in Notepad:
This will comment-out the param container with the extraParam attributes, as shown in the above example.
Setting Playback Options
After updating the ISX, clients will be able to play the media items referenced in it. By default, clients will have full control of the playback experience, such as the ability to skip (both forward and backward) to different entries in the playlist and to seek within a currently playing track. You can limit a client’s ability to seek or skip playlist media entries by configuring media entry settings in the Web Playlists feature. For more information, see IIS Media Services Help.
To access this help, press F1 while using the Web Playlists feature in IIS Manager.


