- Fax from Windows 7
- Windows 7 Fax
- Part 1: How to Fax from Windows 7
- 1.1 Cocofax- The Complete Windows 7 Fax Solution
- Why Do You Need Cocofax
- Salient Features of Cocofax
- Web Service:
- Windows 7 Compatible
- Data Security
- Pricing
- Ways to Fax from Windows 7 through Cocofax
- Using Cocofax Web App
- Using Cocofax’s Email to Fax Technology
- 1.2 How to Send and Receive Fax from Windows 7 via CocoFax Web App
- Sending a Fax through Cocofax Web App
- Receiving a Fax through Cocofax’s Web App
- 1.3 How to Send and Receive Fax via Email Using Cocofax
- Sending a Fax Using Cocofax’s Email-to-fax
- Receiving a Fax using Cocofax’s Fax-to-email
- Part 2: Send and Receive Fax from Windows 7 Using Windows Fax and Scan
- Sending Fax from Windows 7 using Windows Fax and Scan
- Receiving Faxes on Windows 7 through Windows Fax and Scan
- Endnotes
Fax from Windows 7
Cocofax provides a cost-effective alternative to fax machines and in-house fax servers, ideal for your growing business, and high-volume faxing.
- Send & Receive Faxes from Anywhere
- No Fax Maintenance or Phone Charges
- Safe, Secure & Encrypted Faxing
- View and Store All Your Faxes Online
Windows 7 Fax
Windows 7 and Faxing- both have something in common. There have been much more evolved successors since they were in use. Yet, people love Windows 7 and Fax even after all these years.
We understand this love since we know how awesome Fax is and how easy Windows 7 is to use. And when you combine these two, you get an efficient system on which your entire office can rely.
.This is why today we will describe a complete guide through which you can fax from Windows 7 without having to purchase any hardware or installing any software. Yes, that is true. You won’t have to buy a fax machine or spend on the maintenance that it costs.
This is a scalable solution that you can use on your own level at your home and even all your employees can use it if you wish to employ it at work.
I will also give you an alternative method through which you can fax from Windows 7 for free. Therefore, keep reading to learn how to fax from Windows 7.
Part 1: How to Fax from Windows 7
If you know anything about faxing, you know all the things that it requires. For starters, you need a dedicated telephone line that is connected to your fax machine (yes you need one of those too). And if you want to go into specifics, you need to purchase paper, ink, maintenance plan for the fax machine, and additional things as well.
When it comes to a high end fax machine, the costs can run to thousands of dollars. However, the method I am going to suggest you fits right into your pocket.
1.1 Cocofax- The Complete Windows 7 Fax Solution
Cocofax is an online fax service that allows you to send and receive faxes to anyone right from your computer. The faxes that you send and receive from Windows 7 through Cocofax communicate through the other person’s fax machine. For them, the process is just the same.
However, for you, there is the added convenience of not having to use any of the fax related equipment you use already. You can select any document on your Windows 7 computer. This document can be sent as fax to anyone, you just have to know their fax number.
Why Do You Need Cocofax
Faxes travel on analog electronic signals, such as those offered by a telephone lines. This is why traditionally you had to get a telephone line to your fax machine (or computer through a fax modem) if you wanted to fax through it.
Since your computer works on digital language (same as the internet), it cannot directly communicate with the other person’s fax machine since the two employ different signals.
Cocofax acts as this translator and communicates your fax document sent from your computer to the receiver’s end. When someone sends you a fax, Cocofax receives this and forwards it to you.
All that occurs without any hardware except the one you already have. There are no additional costs too.
Therefore, in order to know more, let us have a quick overview of Cocofax:
Salient Features of Cocofax
Here are a few of the design features of Cocofax online fax service:
Web Service:
You won’t have to download Cocofax on your computer in order to use it. You can simply log in to their website, go to their dashboard, and use the application. This offers an ultra-portable service to be used from anywhere.
Windows 7 Compatible
Even if Microsoft pulls out support for Windows 7, Cocofax wouldn’t. We understand your love for this Windows (after all, it is so awesome). This is why our services will ALWAYS be available for it. CocoFax can also help you to fax from Windows 10 and Windows 8.
Data Security
Cocofax offers you unparalleled data security. We understand that users prefer fax due to its data confidentiality. Therefore, all the faxes that you send and receive are just for your eyes. No one on Cocofax’s team can view them as the entire process is automated.
Pricing
Cocofax is available for astonishingly low prices that feel like free when you compare it to the price of an entire fax machine setup. Not to forget that Cocofax offers more features than even the most high-end fax machine.
There are a lot more things that make Cocofax the choice of fax app for millions of people. If you feel Cocofax is for you, you can
Ways to Fax from Windows 7 through Cocofax
When it comes to Cocofax, you get multiple ways to send a fax from Windows 7 and receive it too. Here are a couple of these ways:
Using Cocofax Web App
You don’t have to download any app on your system to use Cocofax. Cocofax’s web app opens on any web browser of your choice on your Windows 7 device. In fact, when you don’t have your Windows 7 computer with you, Cocofax’s web app can also open on another device.
Using Cocofax’s Email to Fax Technology
Cocofax gives you the latest in fax technology- Email to fax service. The email to fax service gives you the freedom to send and receive faxes directly from your email. Through this service, you can fax through your Gmail account, Yahoo account, or any other email client that you use.
For this service, you don’t have to install any added plugin or software. You can use this from the email client’s web address on the web browser or through any email app on Windows 7.
The method you choose to fax from Windows 7 is up to you. In fact, both methods come in the package with Cocofax!
1.2 How to Send and Receive Fax from Windows 7 via CocoFax Web App
Faxing through Windows 7 using Cocofax’s web app is a piece of cake. All you have to do is follow these steps and you will get the hang of it:
Sending a Fax through Cocofax Web App
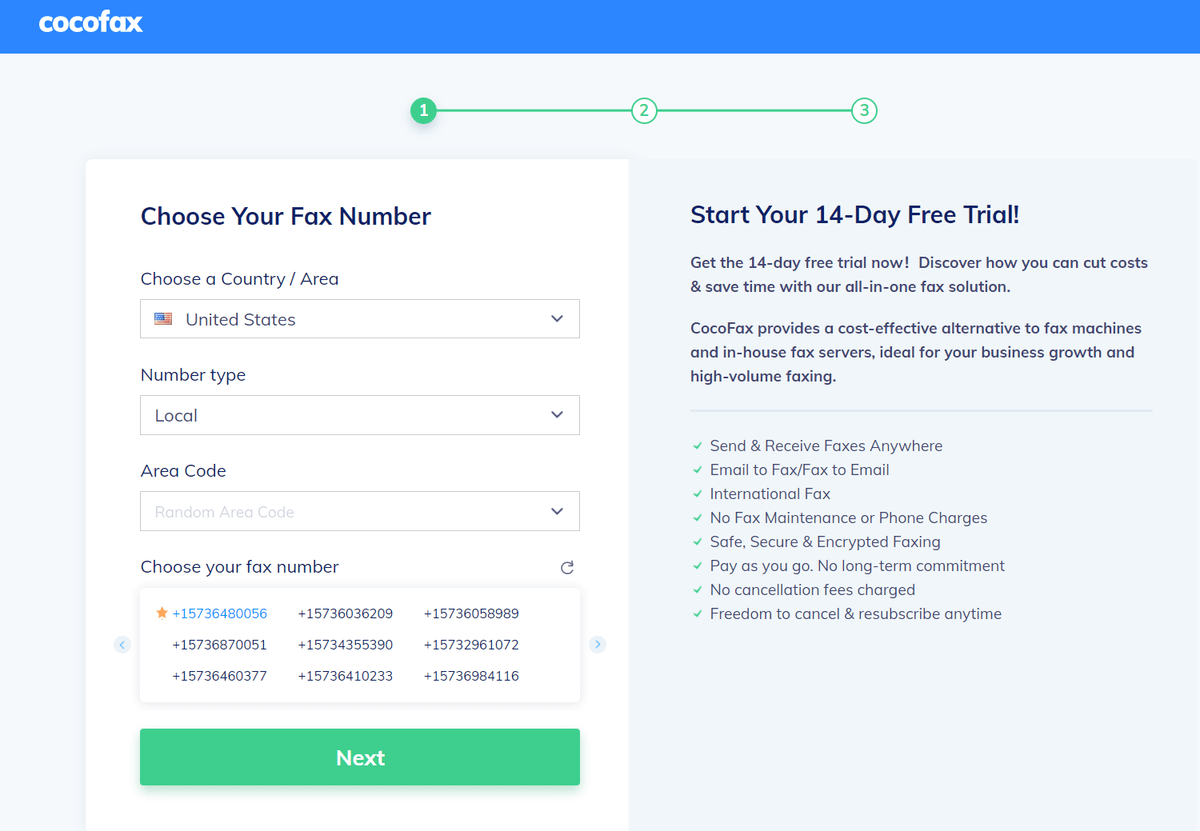
Step 1: Sign up for a Cocofax account. You will get to try Cocofax’s 14-day free trial period. You can send and receive faxes for free using this within this time period. Cocofax will give you the option of choosing your own fax number.
Step 2: When you sign up, you will be led to your Cocofax dashboard. You can also access this dashboard by signing in at any time.
Click on the вЂSend Fax’ button on the corner of the dashboard. The new fax window will open.
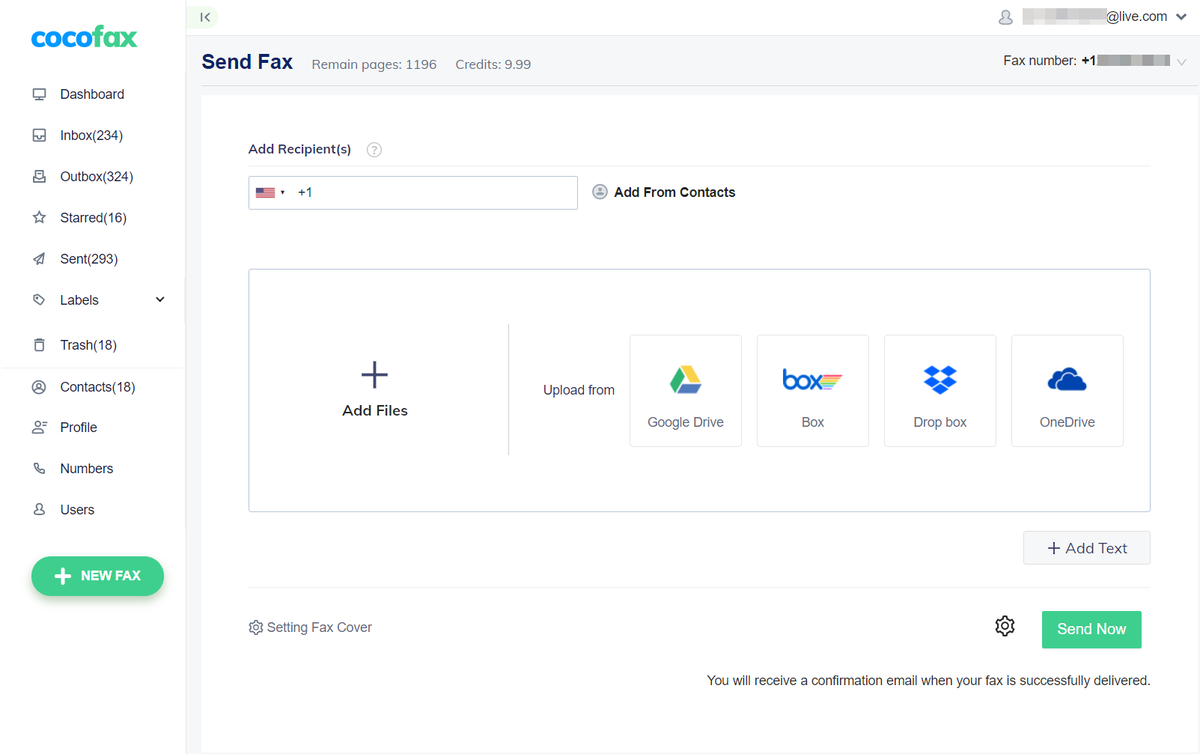
Step 3: In the вЂNew Fax’ window, there are many fields you can fill. Some are compulsory yet the other ones are optional.
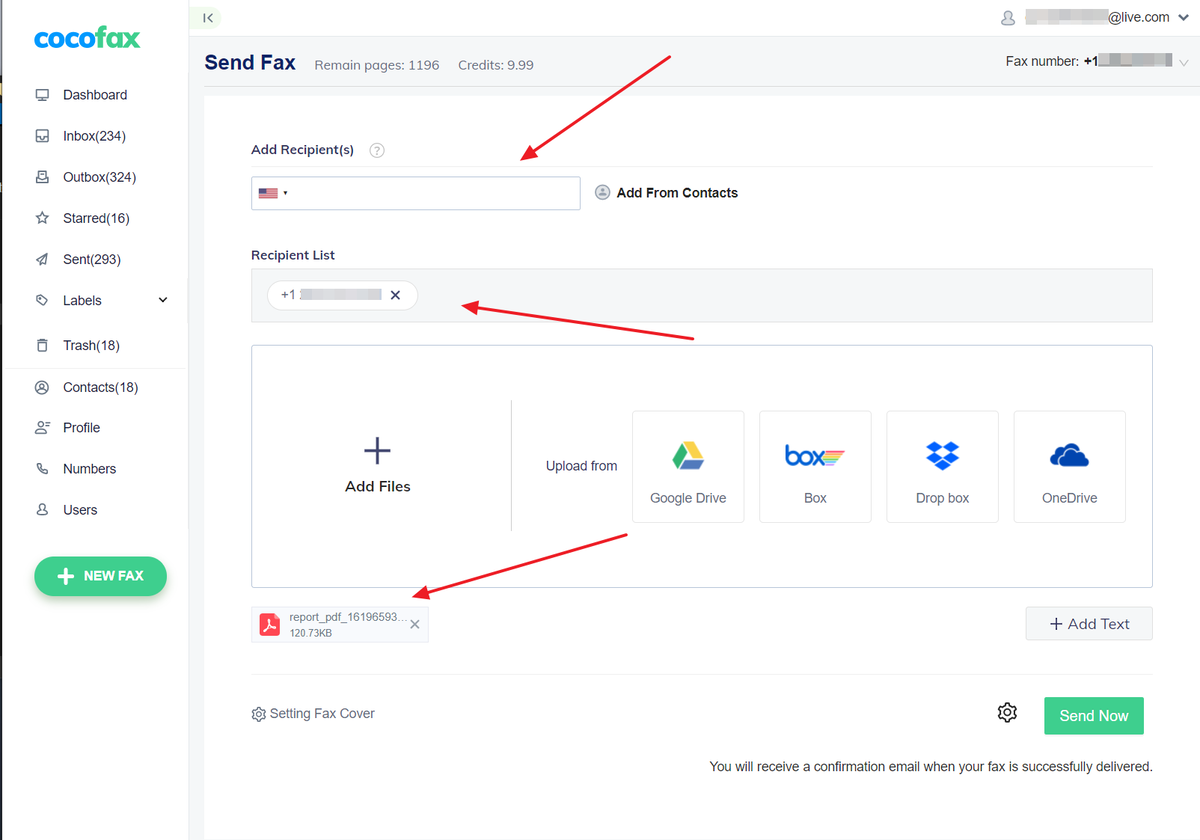
In the вЂTo’ field, you can type in the fax address of the recipient. You can even send the fax to multiple users by entering their fax numbers together and separating them with a semicolon.
You can enter the subject to the fax too. This subject will appear on top of the fax document that the receiver gets.
You also have the option to add a cover page to the fax. This page is the first page that is printed out on the receiver’s end.
Now comes the most important part- you can attach the fax file in the new fax popup window. You can either choose the document from your Windows 7 computer or you can upload it from the cloud storage link. The supported formats are doc, docx, xls, xlsx, png, jpg.
You can also send multiple documents through this method. Just upload these documents to the вЂNew Fax’ window. This documents will be merged together on the receiver’s end.
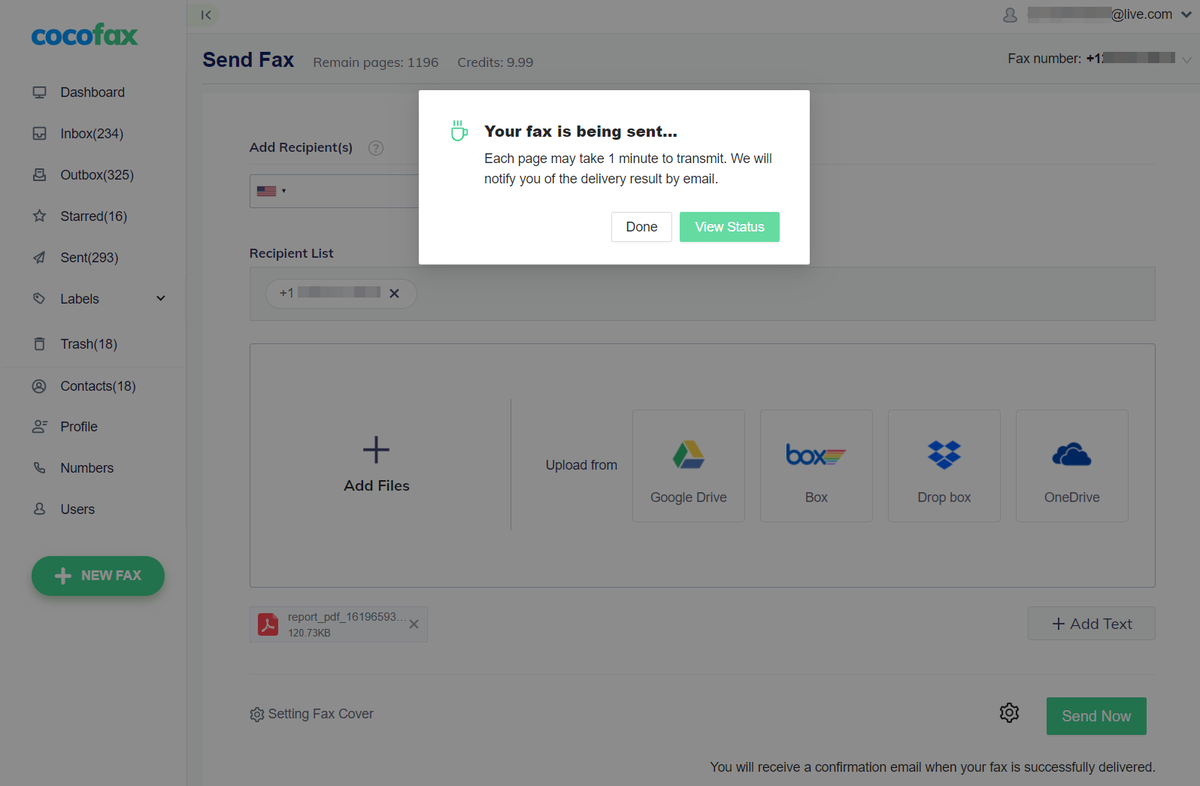
Step 4: Once you fill out all the fields, double check all the information that you have entered. When you do, click on the вЂSend’ button. Cocofax will dial the receiver’s fax machine and send your fax to them.
Step 5: When the fax is sent, you will get a confirmation from Cocofax on the Cocofax dashboard if the fax was delivered. Even if the fax is undelivered, you will get a notification about the same too. These notifications are also forwarded to your email inbox.
**If your fax is undelivered, the probable reasons are that the receiver’s fax machine is busy, it is switched off, or you entered an incorrect fax number. Theoretically speaking, there will be no fault at Cocofax’s end.**
Receiving a Fax through Cocofax’s Web App
If you go with the traditional method and use a fax machine to send and receive faxes, you have to keep the fax machine switched on at all times if you want to receive a fax. This can lead to missing faxes countless times if the machine was turned off by any chance.
However, Cocofax is different. It receives your faxes automatically no matter whether your computer is turned on or turned off. Whenever you wish to check the faxes you have received, you can go to the Cocofax dashboard (through the steps mentioned in the previous section). You will find all your received faxes here.
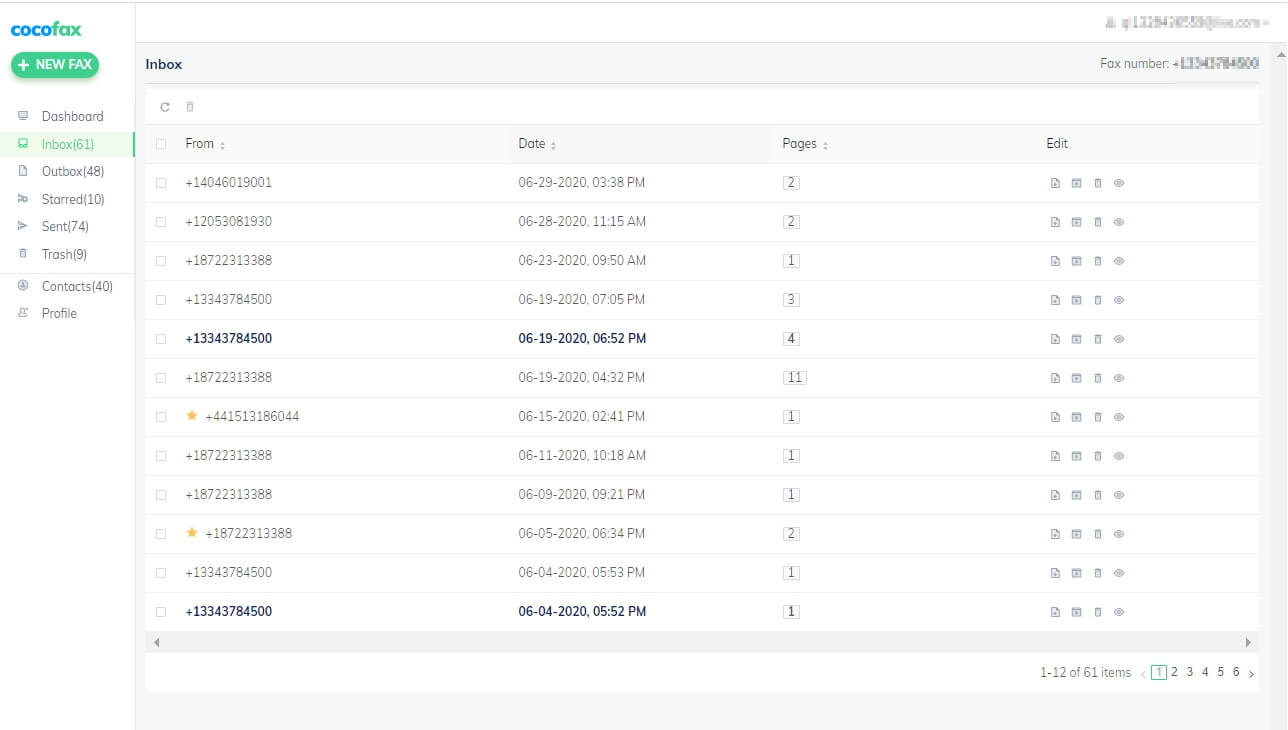
Further, you also get an immediate email notification when you receive a fax. Therefore, you will never be missing out on any faxes.
Lastly, remember that when you use a fax machine, all the faxes that you receive are printed out. This is mandatory whether that fax is important or just trash. However, with Cocofax, you can choose to print out the faxes that you receive.
1.3 How to Send and Receive Fax via Email Using Cocofax
As we mentioned before, you can also send and receive faxes directly through your email client, no matter which email client you use.
However, emails by default aren’t designed to be compatible with faxes. If you send an email to a fax number directly, the email will end up being undelivered (you can try if you don’t believe us).
However, once you have a Cocofax account, this is not only possible but very easy. All you have to do is follow these easy steps:
Sending a Fax Using Cocofax’s Email-to-fax
Step 1: Register for Cocofax with your email address. Be sure that you register the email address which you will use to send and receive faxes. Cocofax will give you a fax number (of your own choice).
Step 2: Open the email client on Windows 7. You can either do this from the web browser (by going to the client’s website, like gmail.com). You can also use email applications such as Outlook on Windows 7.
Step 3: Click on the option to create a new email. The new email popup will open. The details of the fax you will be sending are filled here.
In the вЂTo’ field, you can enter the fax number of the receiver followed by вЂ@cocofax.net’. For example, if their fax number is 123456, you will have to enter:
In the вЂSubject’ field where you generally enter the subject to the email, whatever you enter will turn out as a note on top of the fax document.
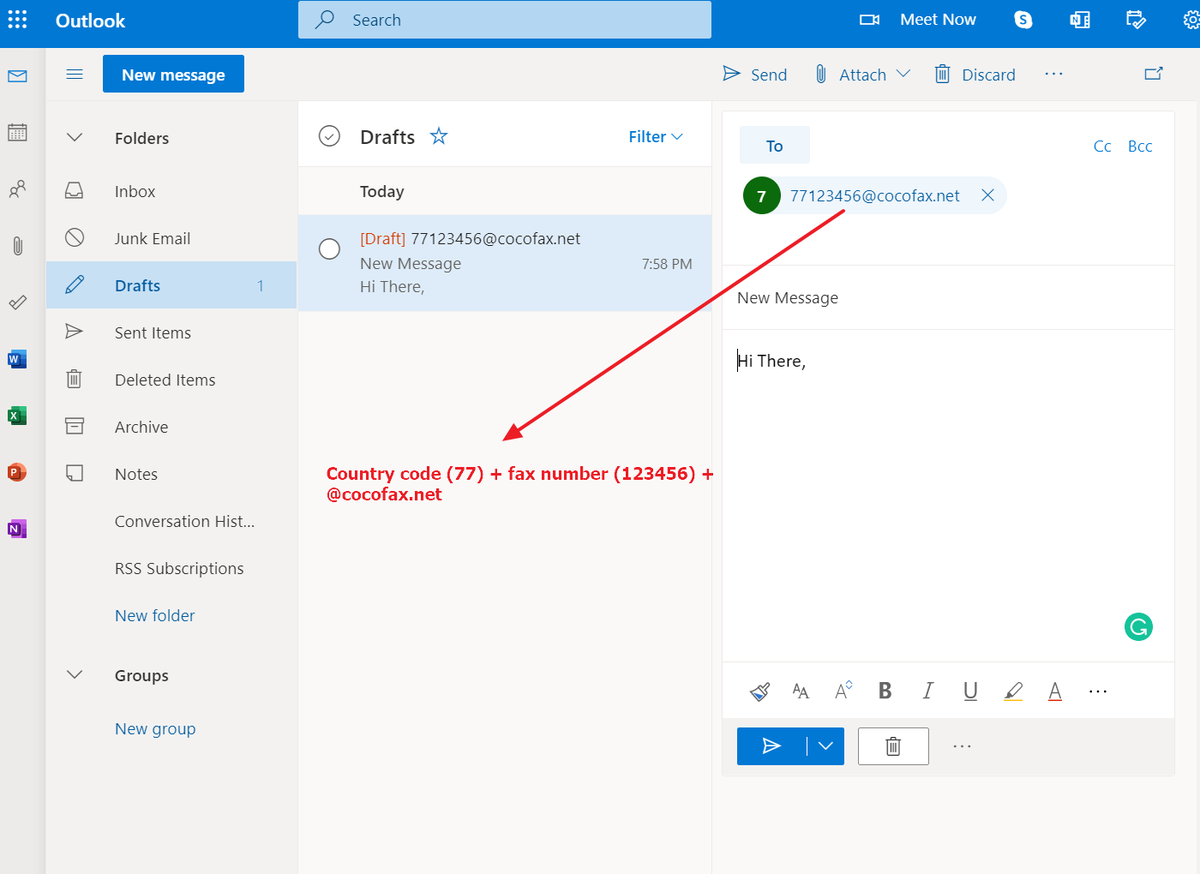
The email body is the cover page of the fax. This is the first page of the fax document that the receiver will receive.
You can attach the document that you wish to be faxed. The document has to be uploaded from your computer. Make sure that the document does not have a special character in its name. Also, the formats that are supported are: doc, docx, xls, xlsx, png, jpg.
Step 4: Once the fax is sent, Cocofax will receive it and translate it for the receiver’s fax machine. Once the fax is delivered (or if the transmission fails on the receiver’s end), you will get a confirmation in your email inbox. This notification will also have all the details of the fax.
Receiving a Fax using Cocofax’s Fax-to-email
Cocofax’s fax to email makes sure that all the faxes you receive on your fax number (provided by Cocofax) are forwarded to your email address. The option to receive faxes work 24×7 even if your computer is switched off.
When you receive a new fax notification in your email inbox, you can option it to view the new fax details. The email will contain all the details of the received fax along with the fax number of the sender and the time logs.
The actual fax document is attached to this email in the form of a pdf file. You can open this file on your computer to view your fax document.
As you can see, the email to fax technology offers unparalleled convenience as opposed to any other fax method. And even if your Windows 7 computer is not with you (say when you are taking a walk or commuting), you can still check your faxes through your smartphone.
Part 2: Send and Receive Fax from Windows 7 Using Windows Fax and Scan
Most Windows 7 users do not know this but Windows 7 comes with a Fax and Scan option by default. You can use this option to send and receive faxes directly from your computer.
However, unlike Cocofax, Windows Fax and Scan is not that simple or independent. It relies on other hardware that you will need in addition to your computer.
While Windows Fax and Scan is free to use, you will have to add a Fax Modem to your computer in order to use it. You should note that computers don’t come with a fax modem installed by default. Therefore, you will have to purchase it yourself.
For the Scanner feature to work your computer must be connected to a scanning machine. Otherwise, you can only fax documents that are already present on your computer.
You also have to keep in mind that you will need to get a fax number yourself to use Windows Fax and Scan. And if you think that the process is as simple as getting a free fax number from Cocofax, it is not!
Even though Windows Fax and Scan is inconvenient to use, we will detail the steps to use this app anyway:
**Windows Fax and Scan is a Windows only software. You can learn how to fax from a Mac here.**
Sending Fax from Windows 7 using Windows Fax and Scan
Step 1: Get a fax modem and connect it to your computer using the instructions on the fax modem. Different modems come with different installation processes. Therefore, make sure you follow the process that your modem’s OEM provides.
Step 2: Connect the telephone line to the fax modem. Your computer doesn’t come with any port for a telephone cable. Therefore, the telephone line can be connected to fax modem only (this is why the fax modem is mandatory).
Step 3: Once all the connections have been made and the drivers are installed, open Windows Fax and Scan. You can do this by going to вЂStart’>>’All Programs’>>’Windows Fax and Scan’.
Step 4: When the вЂWindows Fax and Scan’ window opens, select the вЂNew Fax’ option. You will be asked to connect to a Fax modem or a fax server. You can choose the fax modem option. The New Fax popup will then open.
You can fill in the fax details for the new fax document here.
On top of the Windows Fax and Scan, there is an option to add a cover page. You can choose if you wish to add a cover page to the fax document since it is optional. If you go with вЂNone’, no cover page will be added.
In the вЂTo’ field, you can enter the fax number of the receiver. You can also enter multiple fax numbers as well.
The вЂSubject’ field will contain any note that you wish to be added to the fax document. This field can also be left blank if you wish so.
The fax body contains the text of the fax. All the text that you enter here will be printed on the receiver’s end. You can also attach a fax document to this popup.
Step 5: When you are done with filling all the fields, you can click on the вЂSend’ button. Your fax will be sent. You will receive a confirmation message after that shortly.
Receiving Faxes on Windows 7 through Windows Fax and Scan
Windows Fax and Scan is a free Windows fax software that offers you receiving faxes as well. However, if you are expecting that the process is simple and automatic as Cocofax, you will be disappointed.
In order to receive faxes on Windows Fax and Scan, your computer needs to be turned on at all times. If your computer is turned off even for a short while, any faxes that you receive within that time period will not be delivered to you.
While Windows Fax and Scan is free to use, you must have the additional hardware (like a fax modem and telephone line) ready. Further, don’t forget about the fax number you will have to get from your telephone company.
If all that is fine by you, you can use the Windows Fax and Scan feature happily.
Endnotes
If you have been wondering вЂHow to Fax from Windows 7’, you now have the answer to that. You can use Cocofax and do the job right from your computer without adding any driver, software, or hardware.
You get all the features of the best fax machines out there, without even buying them!


