- Source Code Debugging in WinDbg
- Source Path
- Opening and Closing Source Files
- Opening the Source Window
- Using the Source Window
- Source Window Colors and Hover Evaluation
- Additional Information
- Setting up a Source Initiated Subscription
- Setting up a source-initiated subscription where the event sources are in the same domain as the event collector computer
- Configuring the event source computer
- Configuring the event collector computer
- To validate that the subscription works correctly
- Forwarding the security log
- Setting up a source initiated subscription where the event sources are not in the same domain as the event collector computer
- Certificates requirements
- Setup the listener on the Event collector
- Configure certificate mapping on the Event Collector
- Event Source computer Configuration
Source Code Debugging in WinDbg
Source Path
The source path specifies the directories where the C and C++ source files are located. For more information about viewing source code in the debugger, see Source Code.
NoteВ В If you are connected to a corporate network, the most efficient way to access source files is to use a source server. You can use a source server by using the srv* string within your source path. For more information about source servers, see Using a Source Server.
To control the source path in WinDbg, do one of the following:
Choose Source File Path from the File menu or press CTRL+P.
When you start the debugger, use the -srcpath or -lsrcpath command-line option. See WinDbg Command-Line Options.
Before you start the debugger, set the _NT_SOURCE_PATH environment variable.
Opening and Closing Source Files
To open or close a source file directly, do one of the following:
Choose Open Source File from the File menu, or press CTRL+O. You can also use the Open source file button ( ) on the toolbar.
NoteВ В When you use the menu or the toolbar button to open a source file, the path of that file is automatically appended to the source path.
Choose Close Current Window from the File menu.
Select the Close button in the corner of the Source window.
Choose Recent Files from the File menu to open one of the four source files that you most recently opened in WinDbg.
In WinDbg, the Source window displays source files that have been loaded into the debugger.
Opening the Source Window
The debugger opens a source window when it loads a new source file. To restore or switch to an open Source window, go to the Window menu and choose from the list of windows at the bottom of the menu.
The following screen shot shows an example of a Source window.
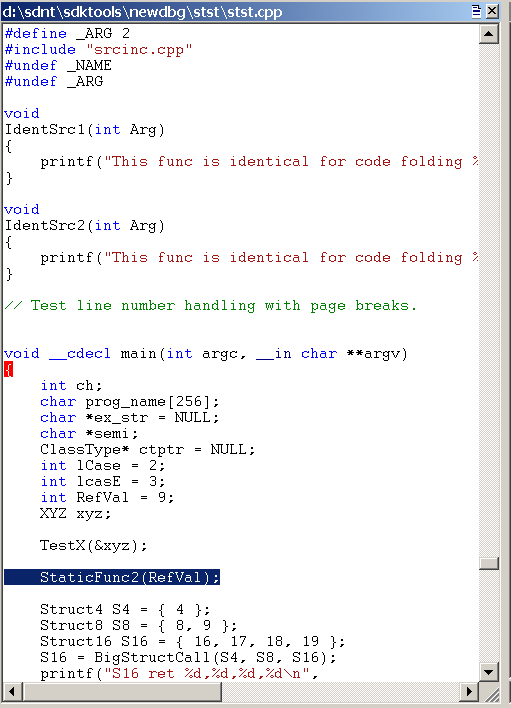
Each source file resides in its own Source window. The title of each Source window is the full path of the source file.
Using the Source Window
Each Source window displays the text of one source file. You cannot edit a source file in the debugger. For more information about changing the font and tab settings, see Changing Text Properties.
Each Source window has a shortcut menu with additional commands. To access the menu, select and hold (or right-click) the title bar or select the icon that appears near the upper-right corner of the window ( ). The following list describes some of the menu commands:
Set instruction pointer to current line changes the value of the instruction pointer to the instruction that corresponds to the current line. This command is equivalent to using the Edit | Set Current Instruction command or pressing CTRL+SHIFT+I.
Edit this file opens the source file in a text editor. The editor is determined by the WinDiff editor registry information or by the value of the WINDBG_INVOKE_EDITOR environment variable. For example, consider the case when the value of WINDBG_INVOKE_EDITOR is the following.
In this case, Myeditor.exe will open to the one-based line number of the current source file. The %l option indicates that line numbers should be read as one-based, while %f indicates that the current source file should be used. Other substitution possibilities include %L, which indicates that line numbers are zero-based, and %p, which can also indicate that the current source file should be used.
Evaluate selection evaluates the currently selected text by using the C++ expression evaluator. The result appears in the Debugger Command window. If the selected text includes more than one line, a syntax error results. This command is equivalent to using the Edit | Evaluate Selection command, pressing CTRL+SHIFT+V, or using the ?? (Evaluate C++ Expression) command with the selected text as its argument.
Display selected type displays the data type of the selected object. This display appears in the Debugger Command window. If the selected text includes more than a single object, a syntax error or other irregular results might be displayed. This command is equivalent to using the Edit | Display Selected Type command or pressing CTRL+SHIFT+Y.
Open memory window for selection opens a new docked Memory window that displays memory starting at the address of the selected expression.
Add selection to Watch window appends the selected source token to the Watch window.
Disassemble at current line causes the instruction that corresponds to the current line to appear in the Disassembly window. The selected line is highlighted in the Source window and in the Disassembly window, but this command affects only the display—the instruction pointer is not changed. If the Disassembly window is closed when this command is selected, it is opened.
Select source language displays a list of programming languages. Select the programming language that you used to generate the source file, and then select OK to enable basic syntax highlighting for the current Source window. Select to disable syntax highlighting for the current Source window.
Source Window Colors and Hover Evaluation
If the debugger recognizes the source file name extension, the Source window displays certain syntax elements in color. To turn off or change the colors, do the following:
To turn the syntax colors off in a single window, open the Source window’s shortcut menu, select Select source language, and then select .
To turn the syntax colors off for all Source windows, choose Options from the View menu. Then clear the Parse Source Languages check box.
To change the syntax colors, choose Options from the View menu. Then, in the Colors area, select a syntax element and select the Change button to change the color.
The parsing method that is used for the highlighting is determined by the programming language that is associated with the file extension for the source file. To change the programming language that is associated with a specific file extension, use the File Extensions for Source Languages dialog box. To open this dialog box, choose Source language file extensions from the View menu.
The line that represents the current program counter is highlighted. Lines at which breakpoints are set are highlighted as well.
If you select a Source window and then use the mouse to hover over a symbol in that window, the symbol will be evaluated. The evaluation is the same as that produced by the dt (Display Type) command. To deactivate this evaluation, choose Options from the View menu. Then clear the Evaluate on hover check box.
Additional Information
For more information about source debugging and related commands, see Debugging in Source Mode.
Setting up a Source Initiated Subscription
Source-initiated subscriptions allow you to define a subscription on an event collector computer without defining the event source computers, and then multiple remote event source computers can be set up (using a group policy setting) to forward events to the event collector computer. This differs from a collector initiated subscription because in the collector initiated subscription model, the event collector must define all the event sources in the event subscription.
When setting up a source-initiated subscription, consider whether the event source computers are in the same domain as the event collector computer. The following sections describe the steps to follow when the event sources are in the same domain or not in the same domain as the event collector computer.
Any computer in a domain, local or remote, can be an event collector. However, when choosing an event collector, it is important to select a machine that is topologically close to where the majority of the events will be generated. Sending events to a machine at a distant network location on a WAN can reduce overall performance and efficiency in event collection.
Setting up a source-initiated subscription where the event sources are in the same domain as the event collector computer
Both the event source computers and the event collector computer must be configured to set up a source initiated subscription.
These instructions assume that you have administrator access to the Windows Server domain controller serving the domain in which the remote computer or computers will be configured to collect events.
Configuring the event source computer
Run the following command from an elevated privilege command prompt on the Windows Server domain controller to configure Windows Remote Management:
winrm qc -q
Start group policy by running the following command:
%SYSTEMROOT%\System32\gpedit.msc
Under the Computer Configuration node, expand the Administrative Templates node, then expand the Windows Components node, then select the Event Forwarding node.
Right-click the SubscriptionManager setting, and select Properties. Enable the SubscriptionManager setting, and click the Show button to add a server address to the setting. Add at least one setting that specifies the event collector computer. The SubscriptionManager Properties window contains an Explain tab that describes the syntax for the setting.
After the SubscriptionManager setting has been added, run the following command to ensure the policy is applied:
gpupdate /force
Configuring the event collector computer
Run the following command from an elevated privilege command prompt on the Windows Server domain controller to configure Windows Remote Management:
winrm qc -q
Run the following command to configure the Event Collector service:
wecutil qc /q
Create a source initiated subscription. This can either be done programmatically, by using the Event Viewer, or by using Wecutil.exe. For more information about how to create the subscription programmatically, see the code example in Creating a Source Initiated Subscription. If you use Wecutil.exe, you must create an event subscription XML file and use the following command:
wecutil cs configurationFile.xml
The following XML is an example of the contents of a subscription configuration file that creates a source-initiated subscription to forward events from the Application event log of a remote computer to the ForwardedEvents log on the event collector computer.
When creating a source initiated subscription, if AllowedSourceDomainComputers, AllowedSourceNonDomainComputers/IssuerCAList, AllowedSubjectList, and DeniedSubjectList are all empty, then «O:NSG:NSD:(A;;GA;;;DC)(A;;GA;;;NS)» will be used as the default security descriptor for AllowedSourceDomainComputers. The default descriptor grants members of the Domain Computers domain group, as well as the local Network Service group (for the local forwarder), the ability to raise events for this subscription.
To validate that the subscription works correctly
On the event collector computer complete the following steps:
Run the following command from an elevated privilege command prompt on the Windows Server domain controller to get the runtime status of the subscription:
wecutil gr
Verify that the event source has connected. You might need to wait until the refresh interval specified in the policy is over after you create the subscription for the event source to be connected.
Run the following command to get the subscription information:
wecutil gs
Get the DeliveryMaxItems value from the subscription information.
On the event source computer, raise the events that match the query from the event subscription. The DeliveryMaxItems number of events must be raised for the events to be forwarded.
On the event collector computer, validate that the events have been forwarded to the ForwardedEvents log or to the log specified in the subscription.
Forwarding the security log
To be able to forward the Security log you need to add the NETWORK SERVICE account to the EventLog Readers group.
Setting up a source initiated subscription where the event sources are not in the same domain as the event collector computer
These instructions assume that you have administrator access to a Windows Server domain controller. In this case, since the remote event collector computer or computer(s) are not in the domain served by the domain controller, it is essential to start an individual client by setting Windows Remote Management to «automatic» using Services (services.msc). Alternatively, you can run «winrm quickconfig» on each remote client.
The following prerequisites must be met before the subscription is created.
On the event collector computer, run the following commands from an elevated privilege command prompt to configure Windows Remote Management and the Event Collector service:
winrm qc -q
wecutil qc /q
The collector computer should have a server authentication certificate (certificate with a server authentication purpose) in a local computer certificate store.
On the event source computer, run the following command to configure Windows Remote Management:
winrm qc -q
The source machine should have a client authentication certificate (certificate with a client authentication purpose) in a local computer certificate store .
Port 5986 is opened on the event collector computer. To open this port, run the command:
netsh firewall add portopening TCP 5986 «Winrm HTTPS Remote Management»
Certificates requirements
A server authentication certificate has to be installed on the Event Collector computer in the Personal store of the Local machine. The subject of this certificate has to match the FQDN of the collector.
A client authentication certificate has to be installed on the Event Source computers in the Personal store of the Local machine. The subject of this certificate has to match the FQDN of the computer.
If the client certificate has been issued by a different Certification Authority than the one of the Event Collector then those Root and Intermediate certificates needs to be installed on the Event Collector as well.
If the client certificate was issued by an Intermediate certification authority and the collector is running Windows 2012 or later you will have to configure the following registry key:
HKEY_LOCAL_MACHINE\SYSTEM\CurrentControlSet\Control\SecurityProviders\Schannel\ClientAuthTrustMode (DWORD) = 2
Verify that both the server and client are able to successfully check revocation status on all certificates. Use of the certutil command can assist in troubleshooting any errors.
Setup the listener on the Event collector
Set the certificate authentication with the following command:
winrm set winrm/config/service/auth @
A WinRM HTTPS listener with the server authentication certificate thumb print should exist on the event collector computer. This can be verified with the following command:
winrm e winrm/config/listener
If you do not see the HTTPS listener, or if the HTTPS listener’s thumb print is not same as the thumb print of the server authentication certificate on collector computer, then you can delete that listener and create a new one with the correct thumb print. To delete the https listener, use the following command:
winrm delete winrm/config/Listener?Address=*+Transport=HTTPS
To create a new listener, use the following command:
Configure certificate mapping on the Event Collector
Create new local user and add it to the local Administrators group.
Create the certificate mapping using a certificate that is present in the machine’s “Trusted Root Certification Authorities” or “Intermediate Certification Authorities”.
This is the certificate of the Root or Intermediate CA that issued the certificates installed on the Event Source computers (to avoid confusion, this is the CA immediately above the certificate in the certificate chain):
winrm create winrm/config/service/certmapping?Issuer= +Subject=*+URI=* @
From a client test the listener and the certificate mapping with the following command:
winrm g winrm/config -r:https:// :5986 -a:certificate -certificate:» «
This should return the WinRM configuration of the Event collector. Do not move past this step if the configuration is not displayed.
What happens at this step?
- The client connects to the Event Collector and sends the specified certificate
- The Event Collector looks for the issuing CA and checks if the is a matching certificate mapping
- The Event Collector validates the client certificate chain and revocations status
- If the above steps succeeds the authentication is completed.
You might get an Access denied error complaining about the authentication method, which could be misleading. To troubleshoot, check the CAPI log on the Event Collector.
- List the configured certmapping entries with the command: winrm enum winrm/config/service/certmapping
Event Source computer Configuration
Logon with an administrator account and open the Local Group Policy Editor (gpedit.msc)
Navigate to the Local Computer Policy\Computer Configuration\Administrative Templates\Windows Components\Event Forwarding.
Open “Configure the server address, refresh interval, and issuer certificate authority of a target Subscription Manager” policy.
Enable the policy and click the SubscriptionManagers “Show. ” button.
In the SubscriptionManagers window enter the following string:
Server=HTTPS:// :5986/wsman/SubscriptionManager/WEC,Refresh= ,IssuerCA=
Run the following command line to refresh Local Group Policy settings:Gpupdate /force
These steps should produce event 104 in your source computer Event Viewer Applications and Services Logs\Microsoft\Windows\Eventlog-ForwardingPlugin\Operational log with the following message:
«The forwarder has successfully connected to the subscription manager at address followed by event 100 with the message: «The subscription is created successfully.»
On the Event Collector, the Subscription Runtime Status will show now 1 Active computer.
Open the ForwardedEvents log on the Event Collector and check if you have the events forwarded from the Source computers.


