- How to take and annotate screenshots on Windows 10
- Take a screenshot
- Annotate snips with Snip & Sketch
- Screenshot to file windows
- How to create a screenshot and automatically save it as a file in Windows 8
- Users who read this also read:
- How to Take Screenshot in Windows 10
- Take Screenshot in Windows 10
- Using Built-in Tools in Windows 10
- 1] Keyboard Shortcut – Print Screen – Quickest and easiest way
- 2] Windows key + Print Screen
- 3] Windows key + Shift +S
- 4] Alt + Print Screen
- 5] Windows Logo + Volume Down (For Surface users)
- 6] Screen Snip
- 7] Snipping Tool
- 8] Snip & Sketch
- 9] Game Bar
- Take Screenshot in Web Browsers
- 1] Firefox
- 2] Chrome
- Take Screenshot Using OneNote
- Take Screenshot in Windows 10 Using 3rd Party Tools
- 1] Lighshot
- 2] ShareX
How to take and annotate screenshots on Windows 10
Sometimes the easiest way to make a copy of something is to take a snapshot of your screen. While you can already capture your screen using your keyboard’s PrtScn button, you can now press Windows logo key + Shift + S to open the new modern snipping experience (also called the snipping bar), then drag the cursor over the area you want to capture.
Here are some common ways to take and annotate screenshots in Snip & Sketch on Windows 10.
Take a screenshot
Option 1: Using the Snip & Sketch app
Press the Start button and enter Snip & Sketch in the search field.
Press the New button to start snipping with the snipping bar.
The snipping bar allows you to capture the following types of snips:
Rectangular snip. Drag the cursor around an object to form a rectangle.
Free-form snip. Draw a free-form shape around an object.
Full-screen snip. Capture the entire screen.
Once you snip an area of your screen — the snipped image is added to your clipboard and you can paste it immediately in another app. A screen prompt will also allow you to annotate, save or share it using the Snip & Sketch app.
Option 2: With the Print Screen key
While the PrtScn key already captures your full screen and sends it to your clipboard, opening the snipping bar provides you with more snipping tools you can use for precise snipping. For better control of your screen capturing options, you can opt to have your PrtScn key open the new snipping bar instead of having to type Windows logo key + Shift + S.
To turn on the new snipping feature keyboard shortcut Select Start > Settings > Ease of Access > Keyboard
Option 3: With the Window logo key + Shift + S shortcut
Pressing the S key + Windows logo + Shift keys down initiates the snipping bar at any time.
Annotate snips with Snip & Sketch
Opening images for editing with Snip & Sketch
To open an image from Snip & Sketch, select Open File or drag and drop an image from apps like File Explorer or Photos in the Snip & Sketch window.
Annotating images with Snip & Sketch
Snip & Sketch provides a few tools for annotating images, namely pen, pencil and highlighter. Once you click a tool to select it, you can click it again to change its color or thickness.
The tools work better with a pen device, but they can also be used with mouse or touch if you select the Touch Writing button icon.
Use the Eraser tool to remove specific strokes or click it twice to get the option to erase all ink.
Use the ruler or protractor tools and draw straight lines or arches.
Press the ruler/protractor button again to hide the ruler/protractor
Reside or rotate the ruler/protractor by using two finger touch gestures (if the Touch Writing button is selected) or with the mouse wheel.
Use the crop tool to crop the annotated image.
To undo cropping, select the crop tool again and press Cancel to restore the image to its full original area.
Panning the view
Some of the images you annotate might be larger than the size of the Snip & Sketch window. You can use the scroll bars to pan the view, but you can also pan the view with touch input (if the Touch Writing button is not selected) or by dragging with your mouse button while holding the Ctrl key down.
Zoom in and out of screenshots to make them easier to mark up using the magnifying glass icon. You can also zoom in and out of screenshots by pressing the Ctrl key down and tapping the + or — buttons.
Sharing and saving snips
Snip & Sketch copies the annotated snip to your clipboard when you open it and every time you make edits. Snip & Sketch allows you to save the annotated image to a file, share it or open with another app, or print it on paper or to a pdf file.
Using keyboard in Snip & Sketch
While annotating is best done using a pen or mouse — Snip & Sketch provides a lot of keyboard shortcuts you can use. Access keys are activated if you press and hold the Alt key.
Screenshot to file windows

- Home
- Tutorials & Tech Support Guides
- Windows 8 Tutorials
- How to create a screenshot and automatically save it as a file in Windows 8
How to create a screenshot and automatically save it as a file in Windows 8
Lawrence Abrams
- November 27, 2012
- Read 260,000 times
In the past, the built-in method to create a screenshot in Windows was to use + or to copy a screenshot into the clipboard. You would then have to paste that image into another program that has the ability to save it as an image file. Though this method works, it was inconvenient, required an extra program, and was confusing for less experienced computer users. With the release of Windows 8, Microsoft included a really useful feature where you can automatically take a screen shot and save it as a file. There is only one issue with this method and that is to automatically create a file you will be taking a screenshot of the entire screen and not just a particular Window.
To take a screenshot and automatically save it as a file in Windows 8 you can use the new Windows+PrintScreen ( + ) keyboard combination. When you hold those two keys down at the same time, Windows 8 will dim the screen to indicate that you took the screenshot. The file will then be saved inside a folder called Screenshots, which will be created in your My Pictures folder. This location is C:\Users\ \My Pictures\Screenshots .
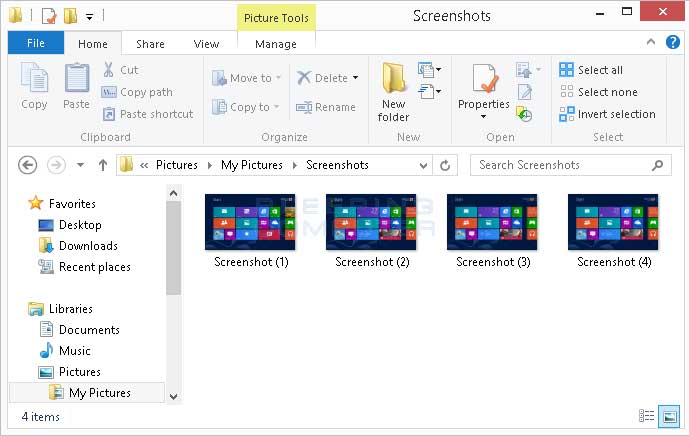
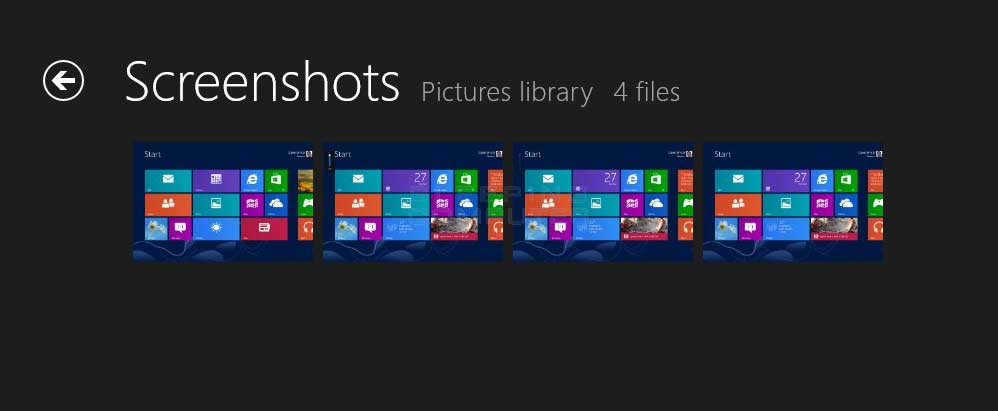
You can also access these screenshots from your Pictures library by navigating to the screenshots folder.
Now that you know how to quickly and easily create screenshots, you will be able to more effectively show off your Windows 8 computer online.
Users who read this also read:
How to take and share a screen shot in Windows
Windows gives you the ability to take a snapshot of what is shown on your computer screen and save it as a file. You can then view this image at a later date to see what your screen looked like or share this image with other people to view. You may be asking why this is important and why you would want to share screen shots of your computer.
How to create a start screen tile for a web site in Windows 8
In Windows 8 you are able to create a Start Screen tile, or pinned site, that is associated with a particular web site. You can then click on the pinned site tile and Internet Explorer will automatically open to that site. When launching a web site in this way, the Internet Explorer 10 Pin button may become a jump list button which contain common tasks for that web site that help you navigate the .
How to add Gmail to Windows 8 Mail
This tutorial will explain how to add Gmail to the Windows 8 Mail app. This tutorial will also walk you through troubleshooting issues you may encounter when using 2-step verification on your Google account.
How to download and create a bootable Windows 8 Upgrade DVD
If you had upgraded Windows 8 using the Windows8-Setup.exe executable, rather than through a DVD, it can be difficult to troubleshoot your computer in the event that it is not starting properly or you cannot access the Advanced Startup Options menu. This tutorial will walk you through creating a Windows 8 DVD on another computer that can be used to troubleshoot problems starting or using Windows .

How to add a Start Menu to Windows 8 using Classic Shell
Windows 8 no longer includes the traditional Start Menu that Windows users have become associated with using. Instead they replaced it with a new interface called the Windows Start Screen that many people find to be not as intuitive as the traditional Start Menu. This is especially the case if you are not using a touch screen. With this in mind, a free program called Classic Shell has been updated .
How to Take Screenshot in Windows 10
Ways to Take Screenshot in Windows 10 using all the methods such as built-in tools, 3rd party utilities, and browsers.
Oftentimes when working on a computer, the most interesting question that might come to mind is How to Take Screenshot in Windows 10. The need for capturing screen events depends on person to person. Most of the time, it is useful during sharing an image from PC, presentation, education and so on. But each one of you might have a different type of screenshot requirements. Some may want to capture only the active window; whereas a few of them prefer a full-screen snap. Or if you are a game lover, then capturing the achievements with a screenshot might be a preference.
Windows 10 itself includes a wide range of built-in options that satisfy most of the screenshot requirements. However, there are multiple Windows applications, paid or free that lets you take snapshots. So in this article, you will see all the built-in tools, 3rd party apps, and also the way to take screenshots in web pages as well. Let us explore the below section to get familiar with all the methods –
Take Screenshot in Windows 10
Here is How to Take Screenshot in Windows 10 –
Using Built-in Tools in Windows 10
Windows 10 includes some of the impressive tools that lets you easily capture the screen happenings. Among them, some are certain keyboard shortcuts as well. Let us explore all of them in details –
1] Keyboard Shortcut – Print Screen – Quickest and easiest way
The simplest method to take screenshot in Windows 10 requires a tap on the PrtScn key only. After this action, Windows will capture the entire screen and will further save the same in the clipboard. Here are the steps –
- Press Print Screen (PrtScn or Prt sc) key on the keyboard of laptop or computer.
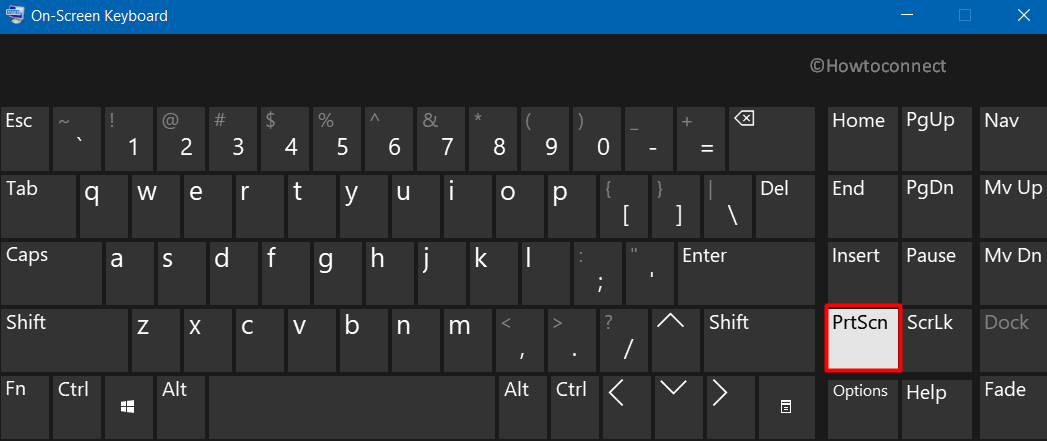
- It will copy the image in the clipboard and will not automatically get saved.
- So open a tool such as Microsoft Paint, MS Word, PowerPoint, or other and press Ctrl + V to paste the screenshot.
- Click File and choose Save as option to store the picture.
2] Windows key + Print Screen
Another easy way to take screenshot in Windows 10 is by using Windows+PrtScn. It does not require any image editor to save the snapshot. By default, it automatically stores it in the Screenshot folder.
- Press Windows logo and PrtScn keys at a time on the keyboard.
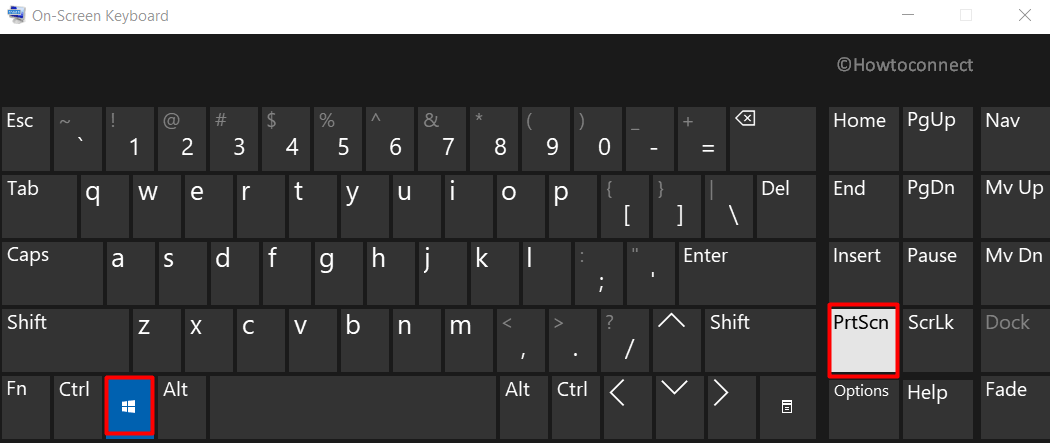
- It will dim the screen for a little while which indicates the successful capture of the snapshot.
- Finally, to view the image go to File Explorer > Pictures > Screenshots.
3] Windows key + Shift +S
“Win logo+shift+S” immediately launches Snip & Sketch app on the screen. It will dim the screen briefly and the tiny menu will appear on the top of the screen. Just go ahead with the type of snip you prefer to capture.

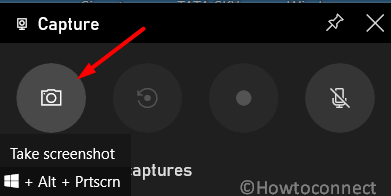
4] Alt + Print Screen
To take screenshot of an active window, this keyboard shortcut works wonderfully. See the steps below to do the same –
- Simply hit the key combination Alt+PrtScn.
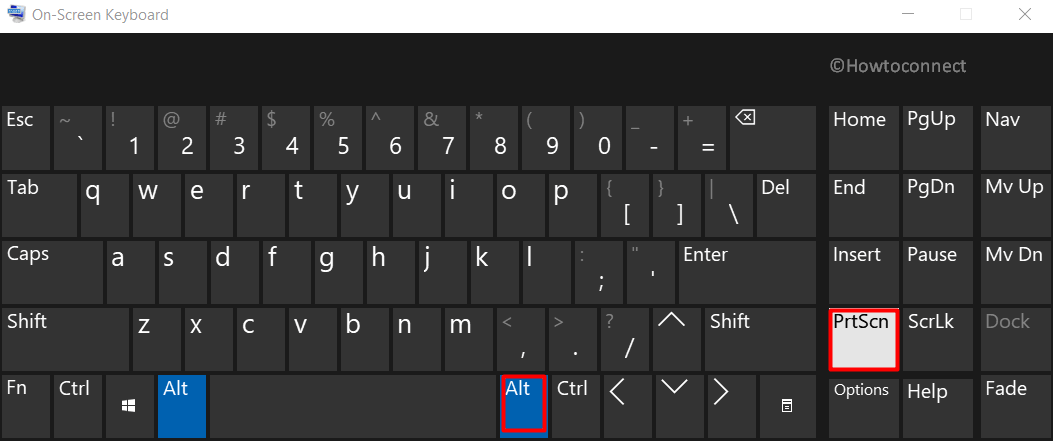
- This will take screenshot of the active window and the same will be copied in clipboard.
- So, get access to any image editor like Paint and paste the picture to save in a directory.
5] Windows Logo + Volume Down (For Surface users)
This method is applicable to the users with Microsoft Surface device. Just like people take entire screen screenshot on any smartphone or tablet, here also the physical buttons will do the job.
- Hold down the Windows Logo touch button.
- Then hit the physical volume-down button. This available at the side of the tablet.
- Doing this will dim the screen briefly and save the screenshot to the Pictures > Screenshots folder.
6] Screen Snip
You will get this Screen Snip option in the Action Center. This will launch the Snip & Sketch app to proceed further.
- Hit Win logo and A on the keyboard to show up Action Center.
- Click Expand to view all the tiles.
- Find out and select Screen snip tile.
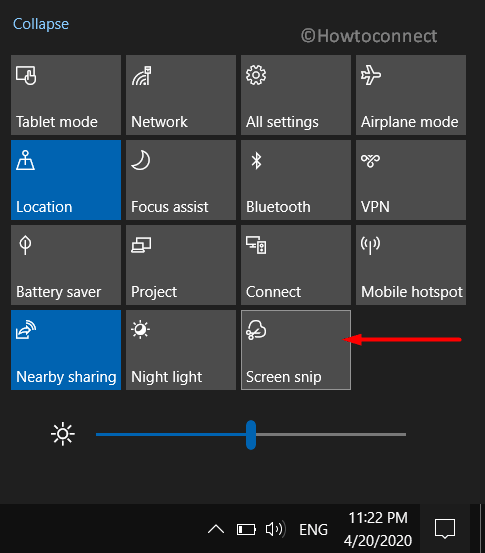
- Now, select the type of screenshot and take it.
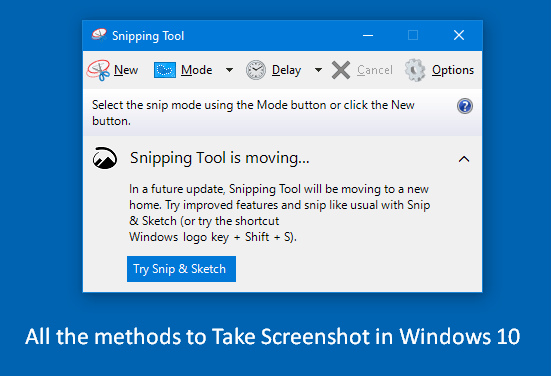
7] Snipping Tool
This is one of the oldest desktop apps in Windows 10 for taking screenshots. It provides several snipping options with a few editing tools as well.
- Launch taskbar search box using Win+S keyboard shortcut.
- Type in snipping in the text field and hit Enter.

- Once the utility appears, click Mode. Choose the type of snip.
- Otherwise, click New.
- Select the Save as option on the top to save the screenshot in your preferred location and format.
8] Snip & Sketch
Basically, this is meant to replace the traditional Snipping Tool. As the name suggests, the main function of this tool is to modify the screenshots after you capture them. Similar to Snipping tool, it also provides four types of snip to choose from.
- Press Windows logo key, type Snip & Sketch and then press Enter.
- Once the app opens up, click the New button on the upper left corner. This will immediately launch a tiny box at the top of the screen.

- Select the type of snip which includes “Rectangular”, “Freeform”, “Windows”, and “Fullscreen” respectively.
- Simply choose the type and capture the screenshot.
9] Game Bar
- Open Game Bar using WinLogo + G shortcut key.
- Once the app comes into view, click the screenshot button.
- Alternatively, while playing a game, simply use the default keyboard shortcut “Windows+Alt+PrtScn“.
Take Screenshot in Web Browsers
1] Firefox
- Open the page whose screenshot you wish to capture.
- Right-click somewhere on the “page” and select Take a Screenshot option.
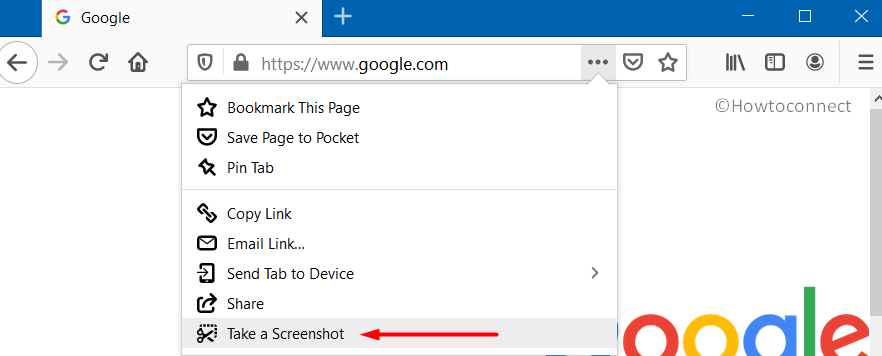
- Drag the area you wish to capture.
- The browser will display 2 options – Copy and Download.
- Click on Copy to save the image in clipboard and then use it on an image editor.
- Or click Download to save a copy of the snapshot on the Downloads folder.
2] Chrome
- Navigate to Chrome Web Store and search for Full Page Screen Capture extension.
- After the page becomes visible, click Add to Chrome.
- Upon pop-up, click on Add extension.
- Once the installation gets over, click on the tiny camera icon of the Full Page Screen Capture.
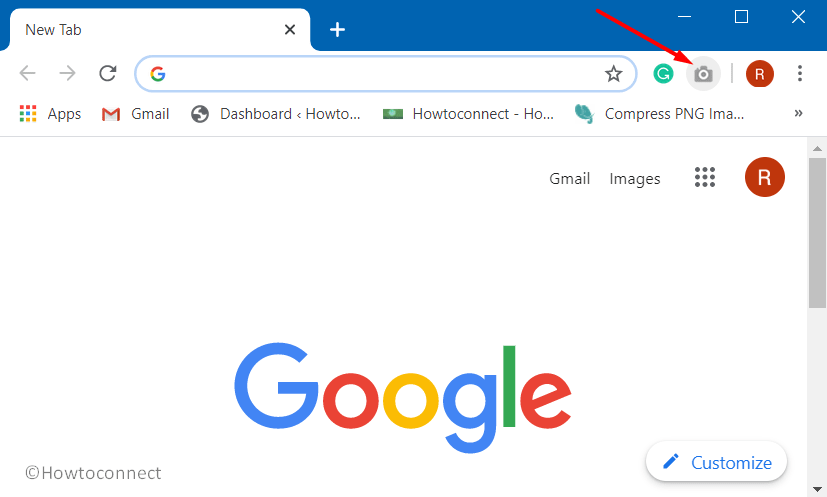
- Chrome will immediately capture the entire page and will further display certain options to annotate, share, edit, or save the image.
Take Screenshot Using OneNote
Microsoft Office OneNote gives you the ability to capture screenshots of web pages or other applications. All you need to do is –
- Launch the webpage or application whose screenshot you wish to capture.
- Then, open OneNote.
- Click Insert on the menu bar and choose Screen clipping.

- This will immediately minimize the OneNote app and the entire screen will be dimmed. With the help of the cursor, drag the desired area and the same will be copied in OneNote.
Note – This method is not applicable to the built-in Windows 10 OneNote app.
Take Screenshot in Windows 10 Using 3rd Party Tools
Plenty of third-party utilities are available on the Internet that lets you take snapshots. Some of the interesting tools are –
1] Lighshot
- Download Lightshot simply from here.
- Install and press PrintSc key.
- Shape the screenshot by moving mouse cursor and click on Save icon.
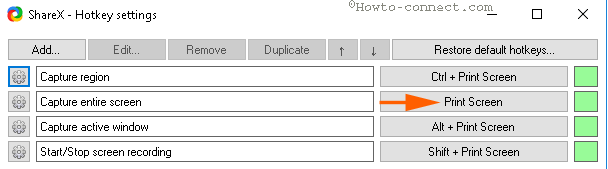
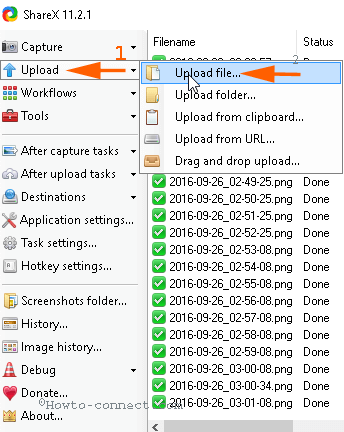
2] ShareX
Download the Sharex application first. Install it following the guide suggested on-screen suggestions.
- Before starting the capturing we recommend click Upload and uncheck Upload File. It is enabled by default and if you leave the option checked then the captured snaps will be itself uploaded to Imgur.
- For determining a new location, click on After capture tasks. Find the option Save Image to File in the Drop-down menu and check it.
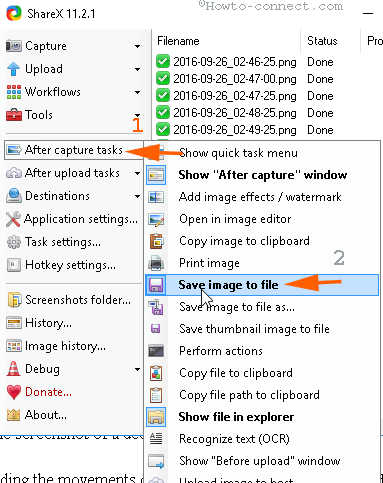
- To collect the captured files in the desired folder click Application Settings => Path.
Take Screenshot in Windows 10 –
- Now click Capture which will open a list of options.
- On the menu, select the option accordingly need, such as
To snap overall screen – Full screen
To take screenshot with cursor visible of a decided segment – Region.
For recording the movements on system’s screen – Screen recording.
In addition a few more options
To draw the snap for only write up of a web page – Text Capture (OCR)
To snap the complete web page – Webpage capture
Record screen for Animation – Screen recording (GIF)
- So, click on the option suitable for you.
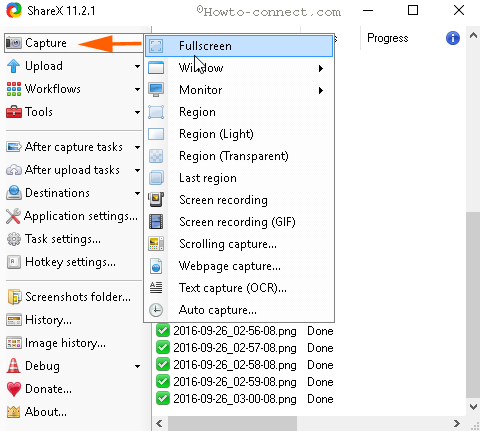
- Noteworthy is you can also grab screenshots using Sharex simply by pressing the Prt sc key.