- Learn about Samsung Recovery Solution in Windows 10 Here!
- Overview of Samsung Recovery Solution in Windows 10
- How to factory reset a Samsung laptop in Windows 10 step by step?
- Alternative way to perform Samsung laptop recovery
- Verdict
- Samsung Recovery Solution
- Samsung Recovery Solution 5
- Информация о программе
- Описание
- Как вернуть ноутбук к заводскому состоянию: Samsung
Learn about Samsung Recovery Solution in Windows 10 Here!
Wanna use Samsung Recovery Solution in Windows 10 to recover your Samsung laptop? Learn a quick guide to the tool from this page.

By Lily  / Last Updated August 20, 2020
Quick Navigation:
Overview of Samsung Recovery Solution in Windows 10
If you own a Samsung laptop, you may be familiar with Samsung Recovery Solution. It is an application provided by Samsung which helps users backup their computer and restore it to a working state when problems occur. From Windows XP to Windows 7, the software has upgraded from Samsung Recovery Solution 3 to 5. In Windows 10, it is called Samsung Recovery. Following are the main features of Samsung Recovery:
Backup the current system or user data.
Restore the computer to the backed up state or factory default settings.
Create a factory state disk or create a disk copy so as to replace the current drive.
Now you know what Samsung Recovery Solution in Windows 10 is used for. Since many users choose to factory reset their Samsung laptop when they encounter stubborn malware or serious system errors, I’ll show you how to perform factory reset via Samsung Recovery in detail below.
How to factory reset a Samsung laptop in Windows 10 step by step?
Follow the guidance below to restore your Samsung laptop to factory default settings in Windows 10:
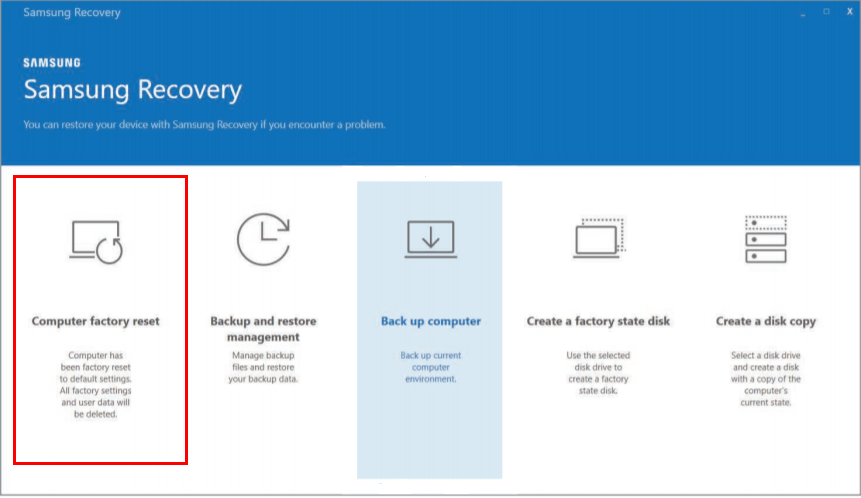
1. Boot your computer, click the Start button, and select Samsung Recovery.
Tips: If your computer fails to boot, press the F4 key several times before the Samsung logo appears. It will bring you Samsung Recovery automatically.
2. Select Computer factory reset from the initial menu screen.
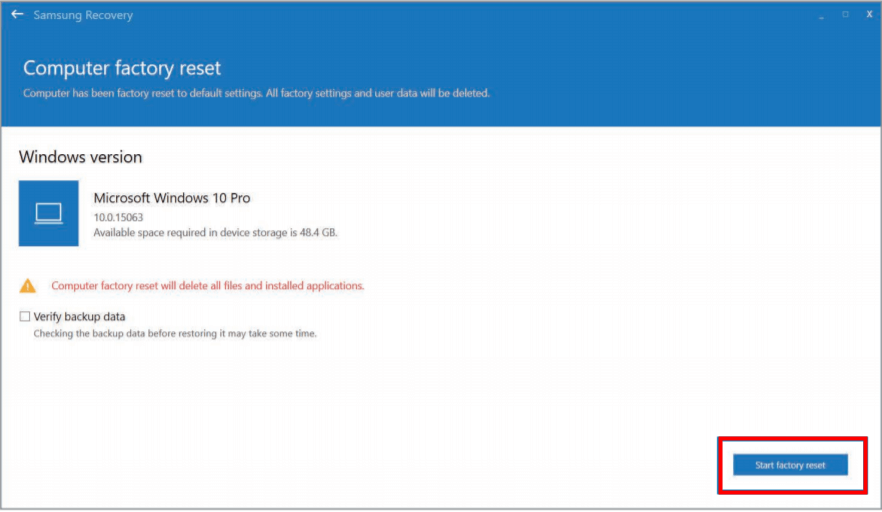
3. Click Start factory reset. Follow the on-screen instructions to complete the recovery to its initial status.
Notes:
Computer factory reset will delete all files and installed applications. Backup important data using the Back up Computer function or the Back up user data function (in the F4 mode) before running factory reset.
For computers running Windows 7, you can learn Samsung Windows 7 recovery from here.
Alternative way to perform Samsung laptop recovery
Although it is not difficult to recover a Samsung laptop via Samsung Recovery Solution, your laptop may not be equipped with the tool depending on your model. What’s more, users find Samsung laptop recovery not working sometimes. Therefore, it is necessary to install another backup and recovery utility on your Samsung laptop.
AOMEI Backupper Standard is highly recommended here. It is free to use and it supports all Windows PC operating systems including Windows 10/8.1/8/7/Vista/XP. It not only enables you to backup the system and user data, but also allows you to backup a specific disk or partition. It is suggested that you run scheduled backups for your computer, thus ensuring newly added or modified data are backed up.
Just download this freeware to have a try. After you have performed System Backup with AOMEI Backupper, you can follow the steps below to run system restore when your computer is in serious troubles:
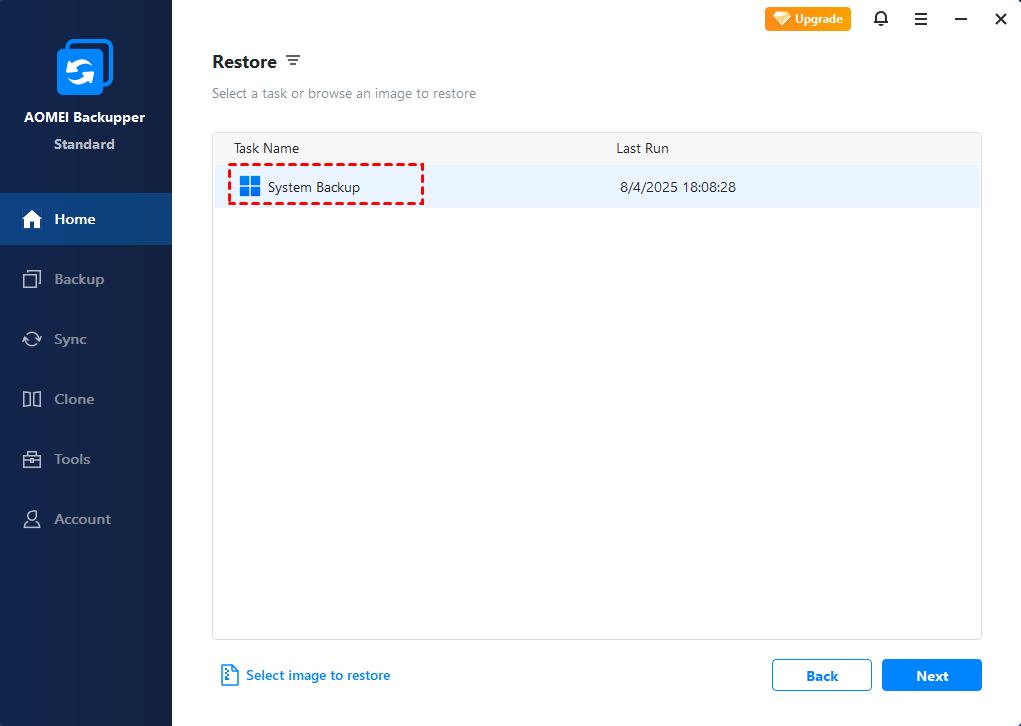
Step 1. Launch AOMEI Backupper. Click “Restore” and then “Select Task”.

Step 2. Select the system backup task from the list and click “Next”.
Step 3. Select “Restore this system backup” and click “Next”.
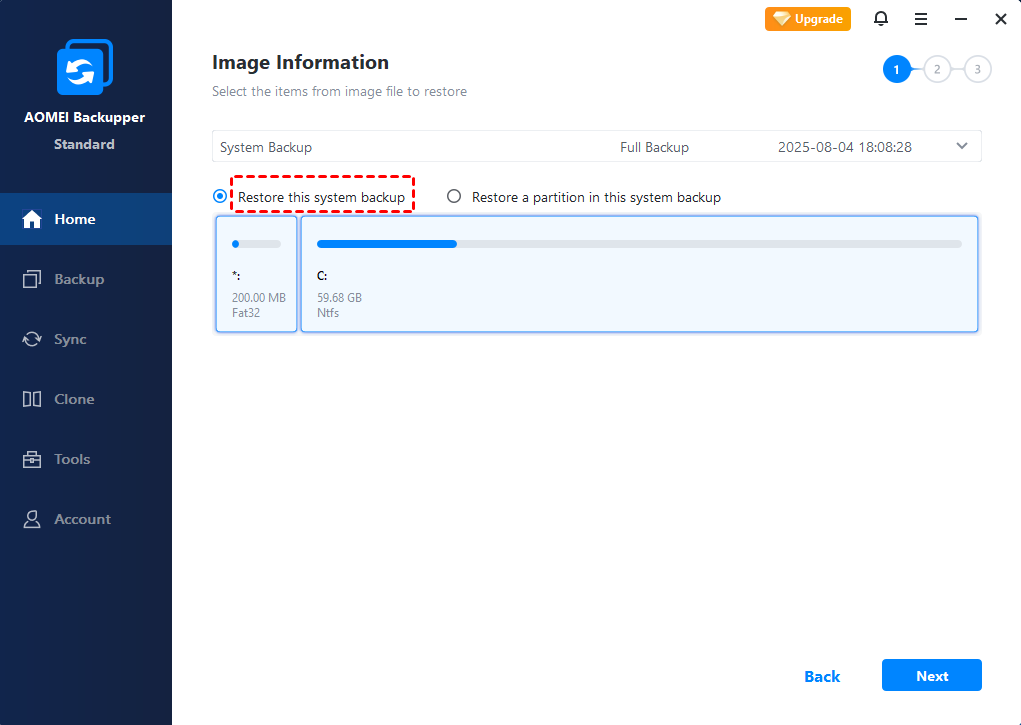
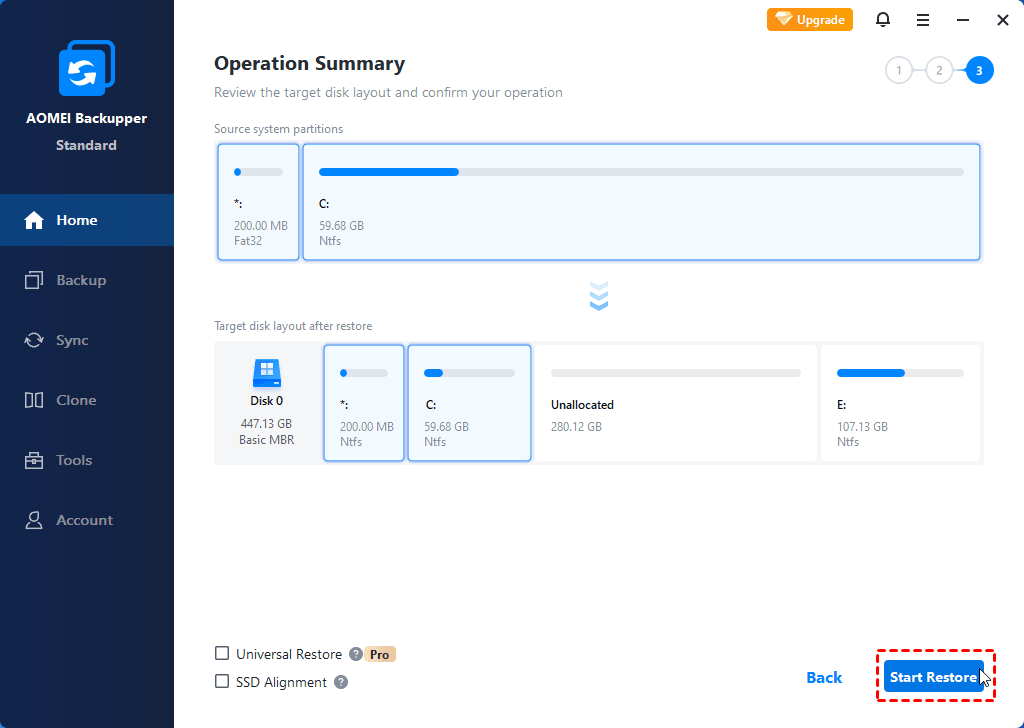
Step 4. Confirm operations on the “Operation Summary” page and click on “Start Restore” button.
Tips:
To boot your computer in case of boot failure, you can create bootable media with AOMEI Backupper.
If you want to restore the system image to another computer, you should check Universal Restore in Step 4, thus ensuring the system is bootable after recovery. You may upgrade to higher edition to enjoy this feature.
Verdict
You have learned a quick guide to Samsung Recovery Solution in Windows 10 in this article. To doubly secure your Samsung laptop, you can turn to AOMEI Backupper. It offers you all-around backup solutions with advanced options. Apart from the backup and restore functions, it owns the clone feature. You can use AOMEI Backupper to migrate OS to non Samsung SSD when you encounter the issue of Samsung Data Migration not working on non Samsung SSD. Try it out at once!
Samsung Recovery Solution
Samsung Recovery Solution 5.0.2.6 LATEST
Windows 7 / Windows 8 / Windows 10 / Windows 7 64 / Windows 8 64 / Windows 10 64
Samsung Recovery Solution 2021 full offline installer setup for PC 32bit/64bit
Samsung Recovery Solution is a highly competitive Backup and Recovery manager app that can help users of all knowledge levels to easily create backup points for their main and secondary drives and restore the contents of the hard drive any time they have experienced unexpected data loss, hard drive failure or some other event. To provide better security to every one of its users, It also provides a built-in tool for making secure backups of your entire hard drives, selective choosing of backup directories, and even tool for easier backup or reinstallation of software driver packages.
Primarily offered to users of Samsung laptops, Samsung Recovery Solution is a complete package for data recovery and backup for anyone running a modern Windows OS, either at home, school, or work, but only if you are actually running Samsung hard drives!
This limitation exists because this software is taking advantage of the special Samsung Recovery Area found in Samsung hard drives, which is responsible for making sure your data remains protected in situations when the drive becomes unreliable or affected by malicious software. It is important not to attempt formatting the entire hard drive when any data loss occurs, because that format will also wipe the data from this important Recovery Area.
While this application was built and optimized for Windows 7, it can safely be used on all modern versions of this OS that were released up to today (Windows Vista, 8, and 10).
Installation and Use
Samsung Recovery Solution comes in a setup package that weighs just over 100 MB, and it features an automated installer that will help you transfer the app onto your local storage. However, the default distribution method of this app is inside a compressed ZIP archive that you need to unpack somewhere on your PC.
Once active, Samsung Recovery Solution will present to you a very simple main window that features buttons for activating three of its central features – Restore, Backup, and management of System Software (backing up and reinstalling device drivers on your PC). Backup feature is split into two modes – a full backup that will create 1:1 copy of the entire selected drive, and Data Backup where you can selectively pick which directories to protect.
Restore feature also comes with support for several modes of operation. You can perform Complete Restore that will return your hard drive into the state when you made the selected backup point, or even return the computer into its “Initial Status”, a mode of operation when it exited the factory with a fresh OS. This all can be done in moments, requiring from you just a few mouse clicks and a few minutes of time while your hard drive is becoming reshaped.
Features and Highlights
- The official data backup and restore the application of Samsung Corporation.
- All-in-one solution for creating the backup and restore points for your Samsung hard drives.
- Optimized for use on Samsung laptops.
- Built from the ground up to reliably serve both home and corporate users.
- Restore your OS to the initial factory status or return to any previously recorded backup point in minutes.
- Reinstall or backup device drivers necessary for stable OS operation.
- Available on Windows 7. Compatible with newer versions of Windows OS.
- 100% FREE!
Samsung Recovery Solution 5
Информация о программе
Описание
Samsung Recovery Solution — это официальная утилита, которая совместима только с ноутбуками фирмы Самсунг. Ее главная цель — восстановление образа системы Windows. Данная функция похожа на опцию сброса системы до заводских настроек на устройствах под управлением Android.
Запустив Recovery Solution, вы увидите главное меню с разделами «Восстановление» и «Резервное копирование». Второй раздел позволяет создать архивную копию данных — своего рода слепок системы с данными пользователя. А пункт восстановления предназначен для отката операционной системы.
Доступны 3 способа восстановления ОС:
Общее восстановление затрагивает только ключевые файлы Windows, но не удаляет личные данные. Полный режим — радикальный способ отката — он стирает диски и ставит «чистый» образ Windows. При этом вы сможете изменить объемы виртуальных дисков C и D. Третий способ — это откат ОС с помощью резервной копии, сделанной ранее.
Функции и особенности Samsung Recovery Solution 5:
- Создание резервных копий ОС
- Откат Windows
- Русская локализация
- Распространение на бесплатной основе
- Официальное программное решение от Самсунг
Скачать последнюю версию Samsung Recovery Solution 5 можно с официального сайта или с нашего ресурса (ссылки внизу описания). Программа совместима с 32 и 64 битными системами Windows 7, 10 и 8.1.
Как вернуть ноутбук к заводскому состоянию: Samsung
Итак, продолжим разговор о возвращении ноутбуков к заводскому состоянию. Сегодня речь пойдет о восстановлении к первоначальному виду ноутбуков от компании Samsung. Традиционно перед описанием процедуры восстановления я настоятельно рекомендую вам ознакомиться со статьей «Как вернуть ноутбук к заводскому состоянию: вступление», если вы не сделали это ранее.
Нужно сказать, что механизм восстановления ноутбуков Samsung несколько отличается от аналогичных средств, используемых большинством прочих производителей мобильных компьютеров, в которых жесткий диск полностью форматируется, после чего на него из раздела восстановления загружаются данные.
В ноутбуках Samsung все происходит почти так же, но есть небольшое отличие.
При первом включении мобильного компьютера производства компании Samsung нам предлагают разметить жесткий диск на два логических диска: C и D. Эта процедура производится только один раз. После восстановления системы она не повторяется. Поэтому, строго говоря, стопроцентного возвращения к заводскому состоянию не предусмотрено.
Все процедуры восстановления затрагивают исключительно диск C. Диск D вы можете либо самостоятельно отформатировать, либо использовать его для хранения данных с диска C. После восстановления системы их можно будет вернуть обратно.
Ну а если операционная система находится в таком состоянии, что уже не может загрузиться, воспользуйтесь для сохранения данных рекомендациями статьи «Как сохранить данные, если операционная система не загружается».
Для запуска процедуры реанимации системы из раздела восстановления сразу после включения компьютера необходимо начать клацать по кнопке F4. Кроме того, на некоторых моделях может присутствовать функциональная кнопка восстановления, используемая в паре с клавишей Fn.
 Горячие клавиши восстановления Samsung
Но метод F4 универсален и к тому же требует нажатия только одной клавиши, поэтому он попросту удобнее. Но это я оставляю на ваше усмотрение. Нам важен конечный результат.
Если все сделано правильно, на экране появится заставка утилиты Samsung Recovery Solution. Прекращаем нажатия кнопок и ждем.

Через некоторое время нам предложат ознакомиться с текстом соглашения. Читаем его и принимаем, если хотим продвинуться дальше.

Нам на выбор будет предложен набор доступных действий. Выбираем пункт «Восстановление».

Из доступных параметров выбираем «Полное восстановление».

Появится список доступных резервных копий системы. Если их несколько, выбирайте самую раннюю. Она автоматически создается системой при первом запуске компьютера. После этого нажмите «Далее».

Нас предупредят, что все данные будут уничтожены. Поскольку предполагается, что вы уже сохранили всю необходимую информацию, нажмите «Да».

Запустится подготовка к операции полного восстановления ноутбука.

После этого начнется непосредственно процедура восстановления. Она требует некоторого времени. Запаситесь терпением.

По завершении на дисплее появится вот такое сообщение:

Нажимаем OK. Компьютер перезагрузится и начнется подготовка к первому запуску. Ничего не трогайте и не нажимайте. Если ноутбук снова начнет перезагружаться, значит так нужно. Не мешайте ему. Вам необходимо дождаться, пока на дисплее не покажется следующее сообщение:
 Система готова к первому запуску
Его появление означает, что процедура восстановления закончена и операционная система находится в режиме первого запуска.
Вот и все. Теперь вы умеете восстанавливать ноутбуки Samsung к первоначальному состоянию.
Если моя статья оказалась для вас полезной, посоветуйте пожалуйста ее своим друзьям с помощью кнопок социальных сетей или просто поделившись ссылкой.


