- SSH Без Пароля, или Как Настроить SSH-доступ по Ключу в Linux
- Преимущества Входа в SSH Без Пароля
- SSH-доступ по Ключу в Ubuntu и CentOS:
- Копирование Открытого Ключа для Включения Беспарольного SSH
- Метод 1: С Помощью Команды ssh-copy-id
- Метод 2: Копирование Закрытого Ключа с Помощью SSH
- Метод 3: Копирование Открытого Ключа Вручную
- Проверка Входа в SSH Без Пароля
- Как Отключить SSH-доступ по Ключу
- Итоги
- Linux for Network Engineers: How to Connect to ssh Without a Password
- Password-based ssh
- Passwordless ssh
- For the more paranoid ones…
- 3 Steps to Perform SSH Login Without Password Using ssh-keygen & ssh-copy-id
- Step 1: Create public and private keys using ssh-key-gen on local-host
- Step 2: Copy the public key to remote-host using ssh-copy-id
- Step 3: Login to remote-host without entering the password
- Using ssh-copy-id along with the ssh-add/ssh-agent
- Three Minor Annoyances of ssh-copy-id
SSH Без Пароля, или Как Настроить SSH-доступ по Ключу в Linux
SSH, или Secure Shell — это сетевой протокол с открытым исходным кодом, который можно использовать для входа на серверы и удалённого выполнения команд, что отлично подходит для пользователей VPS.
Есть два способа включить SSH:
- Вход на основе пароля
- Аутентификация на основе открытого ключа
Аутентификация на основе открытого ключа также известна как вход в SSH без пароля, или беcпарольный доступ по SSH.
Преимущества Входа в SSH Без Пароля
Защищённое паролем подключение пользователи зачастую находят неудобным. Пароли сложно запоминать, к тому же, если вы работаете в среде, где вам часто приходится вводить пароль, вы просто тратите на это лишнее время.
Здесь можно выделить несколько преимуществ входа в SSH без пароля:
- Простой и не интерактивный вход в систему. Пользователям не нужно вводить пароль для каждого нового сеанса
- Более безопасный по сравнению с паролями, криптографическая защита (открытый/закрытый ключ шифрования)
- Более надёжный
- Лучшее управление аутентификацией и авторизацией
- Подходит, как для маленькой, так и для большой инфраструктуры
- Легко настроить и поддерживать
Чтобы начать использовать SSH без пароля, вам нужно сгенерировать открытый SSH-ключ. В этом руководстве мы сосредоточимся на SSH версии 2, последнем и более безопасном протоколе.
Подключитесь к вашему VPS-серверу по SSH и мы начнём!
Во-первых, нам нужно проверить, существует ли SSH-ключ для клиентского компьютера. Это предотвратит перезапись текущей конфигурации. Чтобы узнать, используйте следующую команду:
Если ключ уже существует, вы можете а). пропустить следующий шаг — генерацию SSH-ключа; б). отменить текущую настройку; в). создать резервную копию существующего ключа. Если ключ не существует, вы увидите следующий вывод:
Далее мы можем приступить непосредственно к генерации SSH-ключа.
SSH-доступ по Ключу в Ubuntu и CentOS:
Чтобы сгенерировать открытый и закрытый SSH-ключ в Ubuntu или CentOS, используйте команду:
Параметр -t означает тип, а RSA — протокол, используемый для генерации ключей. RSA является типом по умолчанию, поэтому вы также можете использовать упрощённую версию команды — ssh-keygen.
Длина ключа по умолчанию — 2048 бит. Однако, если вы хотите усилить защиту, измените значение на 4096 бит. В этом случае команда будет выглядеть так:
Это интерактивный процесс генерации ключей, и вас попросят выполнить несколько действий, таких как:
- Enter file in which to save the key (/home/.ssh.id_rsa), или «Ввести файл для сохранения ключа (/home/.ssh.id_rsa)»
- Enter passphrase (empty for no passphrase), или «Ввести кодовую фразу (оставьте пустым для отключения кодовой фразы)»
Если вы хотите, чтобы были заданы значения по умолчанию, просто нажмите Enter в ответ на каждый из этих запросов. Кодовая фраза используется для шифрования закрытого ключа; однако она не является обязательной и может быть пропущена. Закрытый ключ будет сохранён в папке по умолчанию — .ssh/id_rsa.
Открытый ключ будет сохранён в файле .ssh/id_rsa.pub. На этом генерация ключа будет завершена. Вы можете проверить файлы с помощью любого редактора.
Копирование Открытого Ключа для Включения Беспарольного SSH
Скопировать открытый ключ на машину предназначения можно тремя способами:
- С помощью команды ssh-copy-id
- С помощью SSH
- Вручную
Первый вариант является наиболее оптимальным и быстрым. Команда ssh-copy-id по умолчанию включена в большинство дистрибутивов Linux. Однако, если вы столкнулись с проблемами при использовании ssh-copy-id или не имеете доступа к этой команде, вы можете попробовать следующие опции.
Метод 1: С Помощью Команды ssh-copy-id
Основной синтаксис этой команды:
На этом этапе вам нужно будет ввести пароль удалённого компьютера. Если аутентификация пройдёт успешно, сгенерированный открытый ключ SSH будет добавлен в файл author_keys удалённого компьютера. После добавления записи соединение закроется автоматически.
Метод 2: Копирование Закрытого Ключа с Помощью SSH
При этом методе, мы копируем закрытый ключ, используя SSH. Этот вариант сработает только в том случае, если у вас есть SSH-доступ к серверу на основе пароля. Команда ниже сделает всю работу. Вам нужно только ввести имя и IP-адрес удалённого пользователя.
Запись будет добавлена в файл author_keys удалённой машины.
Метод 3: Копирование Открытого Ключа Вручную
Третий метод немного сложнее, так как вам придётся всё делать вручную. Однако, вариант вполне рабочий и вы можете использовать его в отдельных случаях, когда другие методы не работаю. Вам нужно будет вручную добавить содержимое файла id_rsa.pub в файл
/.ssh/authorized_keys удалённого сервера.
Вы можете посмотреть содержимое файла id_rsa.pub с помощью редактора vi или команды cat:
Команда выведет ключ, он начинается с ssh-rsa. Скопируйте эго! Затем на удалённом сервере войдите в систему и создайте файл .ssh, если он не существует.
Также само вы можете создать файл author_keys. Добавьте скопированный открытый SSH-ключ в пустой файл, как показано ниже:
SSH_public_key — это открытый ключ, который вы скопировали с исходного компьютера. Он должен начинаться с ssh-rsa.
После того как ключ будет скопирован, вы сможете настроить необходимые разрешения для каталога .ssh удалённых серверов с помощью команды chmod.
Проверка Входа в SSH Без Пароля
К этому моменту SSH-доступ по ключу должен быть успешно активирован и настроен. Чтобы протестировать эту функцию, можно попробовать подключится к удалённому серверу через исходный сервер. Синтаксис команды будет выглядеть так:
Если всё прошло успешно, вы войдёте в систему автоматически без ввода пароля.
Как Отключить SSH-доступ по Ключу
Если вы решите, что беспарольный SSH вам не подходит, вы можете отключить эту функцию, выполнив следующие действия. Для этого откройте файл конфигурации SSH — /etc/ssh/ssh_config. Подойдёт любой текстовый редактор, мы используем nano. Здесь вы найдёте запись с PasswordAuthentication. Измените строки, как показано ниже:
Чтобы изменения вступили в силу, сохраните файл и перезапустите SSH. Вот как это сделать в Ubuntu 18.04:
Команда для CentOS 7:
Итоги
На этом мы завершаем наше руководство о том, как настроить вход в SSH без пароля, а также отключить SSH-доступ по ключу, если вы решите, что вам не подходит эта функция. Надеемся, что эта инструкция была полезной! Успехов, берегите себя и свои данные!
Ольга уже около пяти лет работает менеджером в сфере IT. Написание технических заданий и инструкций — одна из её главных обязанностей. Её хобби — узнавать что-то новое и создавать интересные и полезные статьи о современных технологиях, веб-разработке, языках программирования и многом другом.
Источник
Linux for Network Engineers: How to Connect to ssh Without a Password
In the early days, network engineers and regular Linux/Unix users, used to use telnet to connect to remote or local hosts. The main drawback of telnet is that, on un-secure networks, all communication is sent as clear text – even passwords are sent as clear text!
Secure Shell (ssh) came along in 1995 to close the security hole. It has become the standard for remote host access. In this post, we’ll review how to use it, and more importantly, how to get rid off the password while making ssh more secure and functional.
NOTE: although there are GUI tools for ssh’ing, (e.g. Putty) from now on we’ll be using Command Line Interface (CLI) tools such as the MAC OS Terminal, Windows Bash Shell, or Cygwin. If you are looking to familiarize yourself with the Linux CLI, you might as well purge of as many GUI tools as possible.
Password-based ssh
If you use a terminal (MAC OS Terminal, Windows 10 Bash Shell, Cygwin), the command to connect to a remote host (e.g. 172.31.0.13) is:
In which case, user_name is the user login name of the account you are connecting to, and destination (IP or FQDN) is the host that you are connecting to. You will be prompted to enter a password, and after that, you will connect to the remote Linux host.

The two main drawbacks of using passwords are that you have to remember them and they are insecure against brute force and dictionary attacks. In addition, if you need to write a script that includes accessing remote hosts, then using password authentication makes the script impractical.
Passwordless ssh
Passwordless ssh is based on public key cryptography. It allows you to connect to a remote host without necessarily having to type in a password. Let’s see how this works:
1) Create a private-public kay pair
On your CLI type the command ssh-keygen. and hit ENTER. NOTE: For all the following prompts just hit enter. When asked to enter a passphrase, just hit ENTER (we’ll get back to this later). You will see an output as follows:
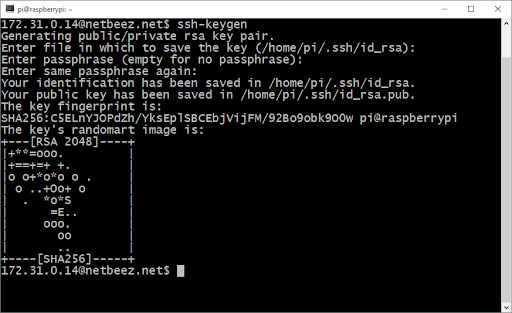
From the output, we can see that it created a private-public key pair saved in /home/pi/.ssh/id_rsa and /home/pi/.ssh/id_rsa.pub respectively. It also tells you that your key length is 2048 bits which is the default value and is considered secure these days. In simple terms, the longer the key the more secure it is against attackers. If you are bit more paranoid, you can use 4096-big long key by using “ssh-keygen -b 4096.” If you try this you will notice that it takes much longer to generate the key pair–security comes at a cost.
From those two files, the private key (/home/pi/.ssh/id_rsa) is the one you need to save and keep private. The public key can be freely distributed to anyone without compromising security.
2) Copy public key to remote host
In order to connect to a remote host with your private key, first you need to copy the public key on it. This needs to be done only once. You can use the following command:

Get real-time metrics from all your network locations and from the user perspective.
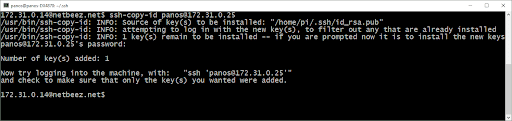
The output informs you that it has copied your public key to the destination. What this does on the backend is to append your public key in the file /home/user_name/.ssh/authorized_keys. The destination host uses that authorized_keys file to determine which private keys are trusted. If you don’t have ssh-copy-id you can use the following command:
cat .ssh/id_rsa.pub | ssh user_name@destination ‘cat >> .ssh/authorized_keys’
Now, the next time you try to connect to to the destination host, you only have to type ‘ssh user_name@destination’ and you will be welcomed without any password. The first time I used this, it felt like magic! Of course, you need to copy your public key to each host you need to connect to.
Similar to using a password, the security of passwordless ssh is contingent upon on keeping your private key private. It is much more difficult to break key-pair encryption with brute force attack than using a password.
For the more paranoid ones…
Now if you want to add another level of security to your private key, you can enter a passphrase when prompted by the command ‘ssh-keygen’ The passphrase is like a password (I am not sure why they call it a passphrase and not a password), and it’s tight to your private key. You can remove it or change it in the future if need be. Keep in mind that each time you ssh with your private key, you will have to enter the passphrase.
A practical use of the private-public key encryption is when you need to give or get temporary access to a remote Linux host. Let’s say a friend is asking for help to troubleshoot something on his Linux box. If he wants to give you access to it, you can send him your public key (/home/pi/.ssh/id_rsa.pub–remember you can freely share this without compromising security), he can append it in his /home/user_name/.ssh/authorized_keys, and then you can ssh to the machine with ssh user_name@destination. When you are done, he can just remove your public key from his /home/user_name/.ssh/authorized_keys. Compare that to giving you the password of a local account, and then having to change the password or delete the account.
Another important benefit of passwordless ssh is the ability to write scripts that run independently and can get access to remote hosts to perform various tasks. We’ll give examples of those in a future post. I hope that you enjoyed learning about ssh, stay tuned for the next Linux for Network Engineers blog post!
Источник
3 Steps to Perform SSH Login Without Password Using ssh-keygen & ssh-copy-id
 You can login to a remote Linux server without entering password in 3 simple steps using ssky-keygen and ssh-copy-id as explained in this article.
ssh-keygen creates the public and private keys. ssh-copy-id copies the local-host’s public key to the remote-host’s authorized_keys file. ssh-copy-id also assigns proper permission to the remote-host’s home,
/.ssh/authorized_keys.
This article also explains 3 minor annoyances of using ssh-copy-id and how to use ssh-copy-id along with ssh-agent.
Step 1: Create public and private keys using ssh-key-gen on local-host
Step 2: Copy the public key to remote-host using ssh-copy-id
Note: ssh-copy-id appends the keys to the remote-host’s .ssh/authorized_key.
Step 3: Login to remote-host without entering the password
The above 3 simple steps should get the job done in most cases.
We also discussed earlier in detail about performing SSH and SCP from openSSH to openSSH without entering password.
If you are using SSH2, we discussed earlier about performing SSH and SCP without password from SSH2 to SSH2 , from OpenSSH to SSH2 and from SSH2 to OpenSSH.
Using ssh-copy-id along with the ssh-add/ssh-agent
When no value is passed for the option -i and If
/.ssh/identity.pub is not available, ssh-copy-id will display the following error message.
If you have loaded keys to the ssh-agent using the ssh-add, then ssh-copy-id will get the keys from the ssh-agent to copy to the remote-host. i.e, it copies the keys provided by ssh-add -L command to the remote-host, when you don’t pass option -i to the ssh-copy-id.
Three Minor Annoyances of ssh-copy-id
Following are few minor annoyances of the ssh-copy-id.
- Default public key: ssh-copy-id uses
/.ssh/identity.pub as the default public key file (i.e when no value is passed to option -i). Instead, I wish it uses id_dsa.pub, or id_rsa.pub, or identity.pub as default keys. i.e If any one of them exist, it should copy that to the remote-host. If two or three of them exist, it should copy identity.pub as default.
If you like this article, please bookmark it on Delicious and Stumble it.
Источник


