- Как установить Redis в ОС Windows без использования Docker
- Установка Chocolatey
- Требования к системе
- Проверяем версию системы
- Проверяем версию PowerShell
- Проверяем версию.NET Framework
- Установка Chocolatey
- Run redis on windows
- About
- How to Run Redis on Windows 10
- What is Redis?
- Is Redis Compatible with Windows 10?
- STEPS
- Install Ubuntu on Windows 10
- 1. Open Microsoft Store
- 2. Install Ubuntu
- 3. Launch Ubuntu
- Install Redis on Ubuntu
- 1. Download Redis
- 2. Extract and Make
- 3. Start Redis server
Как установить Redis в ОС Windows без использования Docker
Пошаговое руководство по работе с популярной NoSQL базой данных.
Просто и быстро установить Redis в ОС Windows позволяет Chocolatey. Это менеджер пакетов в среде Windows, аналогичный apt-get в мире Linux. С его помощью можно устанавливать множество программ и обновлять их, не скачивая каждый раз дистрибутив с сайта.
Установка Chocolatey
Действуем по инструкции с официального сайта проекта Chocolatey.
Требования к системе
- Windows 7+ / Windows Server 2003+;
- PowerShell v2+. Для установки с сайта требуется как минимум v3 (из-за требований TLS 1.2);
- .NET Framework 4+. Программа попытается установить .NET 4.0, если он не установлен. Минимальная необходимая версия для установки с этого веб-сайта — 4.5 (из-за требований TLS 1.2).

Преподаватель Skillbox. Пишет про Java, учит Go. Помнит рассвет PHP и как «грабить корованы».
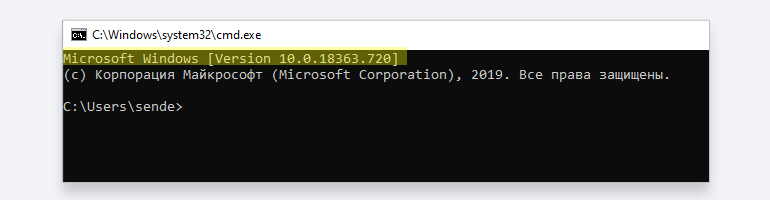
Проверяем версию системы
Запустите консоль запуска команд, нажав WIN + R, и введите команду cmd. Если вверху выведена версия Windows, как на скриншоте, этого достаточно.
Если нет, введите команду systeminfo. В начале вывода должна появиться версия Windows.
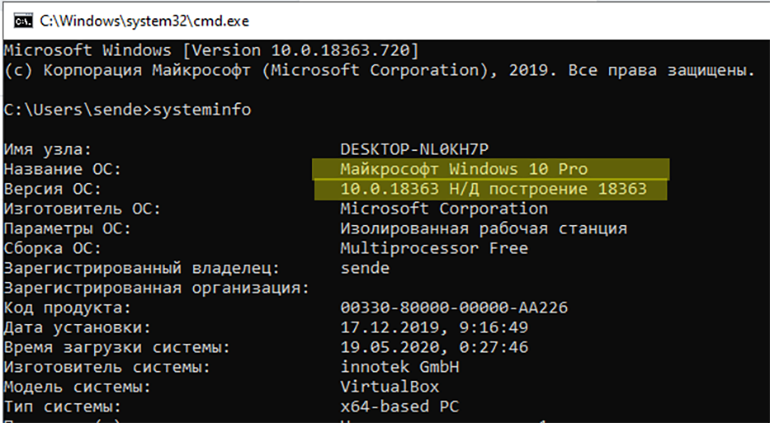
Если у вас установлена версия 7 или выше — переходим к следующему шагу.
Проверяем версию PowerShell
Для этого открываем PowerShell, вводим команду $PSVersionTable.PSVersion и получаем ответ:
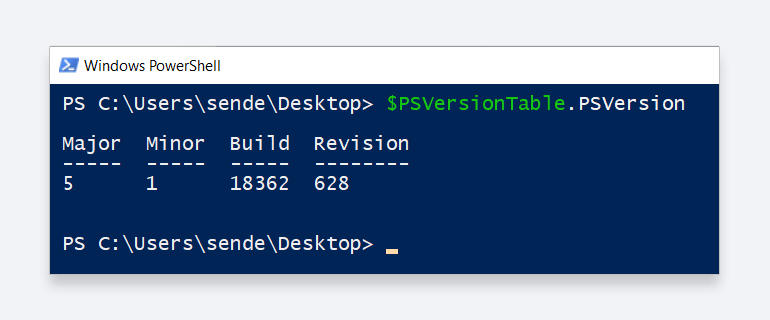
На нашем скриншоте версия PowerShell 5.1. Если у вас версия ниже 3, необходимо установить PowerShell версии 3 (или выше). Инструкция есть по этой ссылке.
Проверяем версию.NET Framework
Запускаем редактор реестра: нажимаем WIN + R и выполняем команду regedit.
Переходим в раздел
HKEY_LOCAL_MACHINE\SOFTWARE\Microsoft\NET Framework Setup\NDP и смотрим, какие папки там присутствуют:
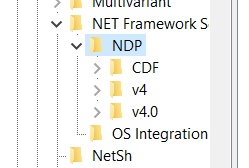
Если нет такой ветки или отсутствует версия 4.0 и выше, то необходимо её установить. Подробная инструкция находится по этой ссылке.
Установка Chocolatey
После всех подготовительных действий устанавливаем Chocolatey. Это делается одной командой PowerShell.
Важно! До начала установки необходимо проверить, есть ли на это права. Если прав недостаточно, их нужно добавить.
В PowerShell необходимо убедиться, что Get-ExecutionPolicy не является Restricted. Рекомендуется использовать Bypass для снятия ограничений или AllSigned для более безопасного использования.
Выполните команду Get-ExecutionPolicy. Если она вернёт Restricted, запустите Set-ExecutionPolicy AllSigned (рекомендуется) или Set-ExecutionPolicy Bypass -Scope Process.
Run redis on windows
Redis on Windows
This project contains the binary releases of MS Open Tech redis port of windows as well as a vagrant configuration for redis letting you run the native version of Redis in a Virtual Box VM.
Whilst it’s recommended to use Redis on Linux in production, it is often useful for developers on Windows platforms to have their own local version of redis running to develop with.
The 3 most popular ways of running redis on windows is to use the binary releases of Microsoft’s native port of redis, but as this is an unofficial port it always lags behind the latest official development of redis on Linux/OSX.
Thanks to Vagrant you can choose to run the latest linux version inside a Virtual Box Linux VM where you’ll be able to run the official native version of redis.
Or if you have the latest version of Windows 10 you can install Bash on Ubuntu on Windows which will let you run the official version of Redis on Ubuntu on Windows 🙂 This is our preferred approach as it lets you run native Ubuntu binaries on Windows more efficiently than running Linux in a VM:
Option 1) Install Redis on Ubuntu on Windows
- From Start, search for Turn Windows features on or off (type turn )
- Select Windows Subsystem for Linux (beta)
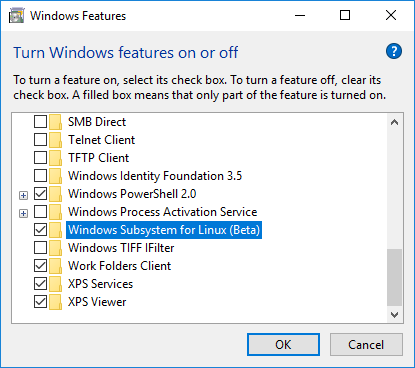
Once installed you can run bash on Ubuntu by typing bash from a Windows Command Prompt. To install the latest version of Redis we first need to install some prerequisites:
Then follow the official installation guide to download, build and install the latest stable version. NOTE: Installing the binaries using make install will not work. You need to copy them manually to /usr/bin (just like described in the guide, except that they use /usr/local/bin — which is the problem).
You’ll then be able to launch redis with:
Which will run redis in the background freeing your shell so you can play with it using the redis client:
Which you can connect to from within bash or from your Windows desktop using the redis-cli native Windows binary from MSOpenTech.
Option 2) Running the latest version of Redis with Vagrant
2. Download the vagrant-redis.zip vagrant configuration
3. Extract vagrant-redis.zip in any folder, e.g. in c:\vagrant-redis
4. Launch the Virtual Box VM with vagrant up
This will launch a new Ubuntu VM instance inside Virtual Box that will automatically install and start the latest stable version of redis.
The vagrant configuration was originally from JasonPunyon/redishobo and has been modified to use the latest stable release of Redis.
Option 3) Running Microsoft’s native port of Redis
These 64-bit binary releases are created by building the Microsoft’s native port of redis which have also been published on NuGet, but as it’s more convenient we provide a zip of the 64-bit binaries here.
MS Open Announcements
Current Version: 3.0.503 (June 28, 2016)
1. Download the redis-latest.zip native 64bit Windows port of redis
2. Extract redis64-latest.zip in any folder, e.g. in c:\redis
3. Run the redis-server.exe using the local configuration
4. Run redis-cli.exe to connect to your redis instance
5. Start playing with redis 🙂
The MSOpenTech of Redis adds some useful extensions for better integration with Windows:
Running Redis as a Service
If you installed Redis using the MSI package, then Redis was already installed as a Windows service. Nothing further to do. If you would like to change its settings, you can update the redis.windows-service.conf file and then restart the Redis service (Run -> services.msc -> Redis -> Restart).
During installation of the MSI you can either use the installer’s user interface to update the port that Redis listens to and the firewall exception or run it silently without a UI. The following examples show how to install from the command line:
default install (port 6379 and firewall exception ON):
set port and turn OFF firewall exception:
set port and turn ON firewall exception:
install with no user interface:
If you did not install Redis using the MSI package, then you still run Redis as a Windows service by following these instructions:
In order to better integrate with the Windows Services model, new command line arguments have been introduced to Redis. These service arguments require an elevated user context in order to connect to the service control manager. If these commands are invoked from a non-elevated context, Redis will attempt to create an elevated context in which to execute these commands. This will cause a User Account Control dialog to be displayed by Windows and may require Administrative user credentials in order to proceed.
Installing the Service
This must be the first argument on the redis-server command line. Arguments after this are passed in the order they occur to Redis when the service is launched. The service will be configured as Autostart and will be launched as «NT AUTHORITY\NetworkService». Upon successful installation, a success message will be displayed and Redis will exit.
This command does not start the service.
Uninstalling the Service
This will remove the Redis service configuration information from the registry. Upon successful uninstallation, a success message will be displayed and Redis will exit. This does command not to stop the service.
Starting the Service
This will start the Redis service. Upon successful startup, a success message will be displayed and Redis service will be started.
Stopping the Service
This will stop the Redis service. Upon successful termination, a success message will be displayed and Redis will exit.
Naming the Service
This optional argument may be used with any of the preceding commands to set the name of the installed service. This argument should follow the service-install, service-start, service-stop or service-uninstall commands, and precede any arguments to be passed to Redis via the service-install command. The following would install and start three separate instances of Redis as a service:
Redis Vue is a simple, lightweight, versatile Redis Admin UI developed using Vue and ServiceStack .NET Core Web Apps. It supports Redis’s core Strings, Lists, Sets, Sorted Sets and Hash data structures and custom Redis commands with its entire functionality contained in a single /app/index.html using the dynamic ServiceStack Templates language, making it easy to customize and further enhance.

Redis React is a simple user-friendly UI for browsing data in Redis servers which takes advantages of the complex type conventions built in the ServiceStack.Redis Client to provide a rich, human-friendly UI for navigating related datasets, enabling a fast and fluid browsing experience for your Redis servers.
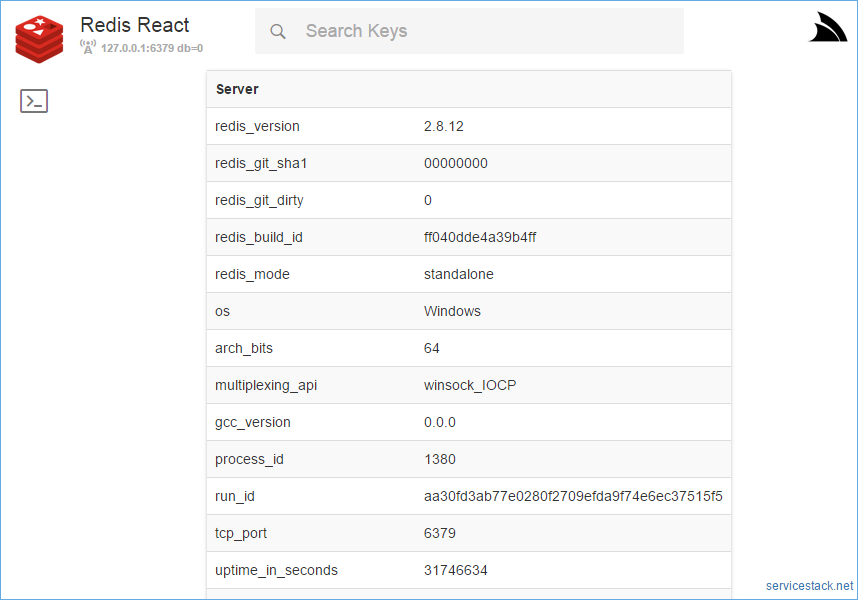
Windows, OSX and Linux downloads available from Redis React Home Page
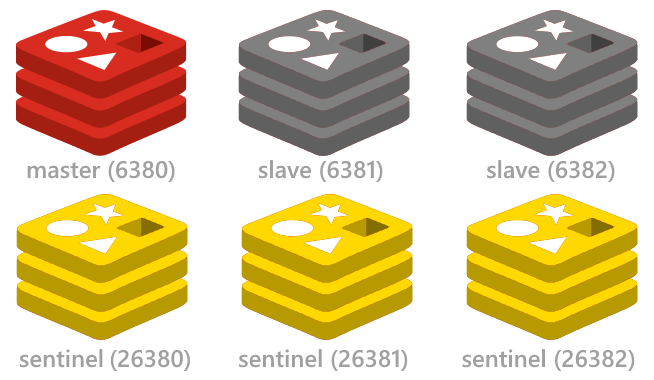
See the redis config project for a quick way to setup up the minimal highly available Redis Sentinel configuration including start/stop scripts for instantly running multiple redis instances on a single (or multiple) Windows, OSX or Linux servers.
About
Vagrant redis configuration and the binary releases of MS Open Tech redis port of windows
How to Run Redis on Windows 10
While the audience of our application is increasing rapidly, it requires more requests to the database. But each request to the database needs a sufficient amount of time. Sometimes we also need to pay more for the requests to the database. So we need to decrease the request to the database in possible situations. Redis is the solution for this.
What is Redis?
Redis is an open-source (BSD licensed), in-memory data structure store, used as a database, cache and message broker. It supports various data structures such as Strings, Hashes, Lists, Sets, etc.
In simple words, we can store the data from our database in our backend storage as a cache. Afterward, this data is served to our front-end for the same API request through a specific amount of time period.
Redis is made using ANSI C programing language and it uses NoSQL structure to store data which makes it more popular nowadays.
Currently, tech giants like GitHub, Weibo, Pinterest, Snapchat, Craigslist, Digg, StackOverflow, Flickr, etc. are using Redis. So we can trust Redis in using within our application.
Is Redis Compatible with Windows 10?
Redis is made for work with servers. POSIX systems like Linux, *BSD, OS X without external dependencies and is not compatible with Windows systems because Windows servers are not using widely.
But if we are developing an application using Redis on a Windows system, Running Redis in our system is necessary.
So here in this tutorial, we are going to explain the steps in running Redis on a Windows 10 system.
STEPS
Install Ubuntu on Windows 10
We have already told that Redis is not developed to work within Windows systems because Windows servers not using widely. So it requires a Unix based operating system like Ubuntu, or macOS to run Redis server. macOS can only be installed on Windows 10 using Virtualbox and it’s most complicated. But Ubuntu can be easily installed within our Windows 10 operating system easily because it’s available in Microsoft store. We can simply install the LTS version of Ubuntu from Microsoft store using the link below.
Ubuntu is not mandatory to set up the Redis server. It supports other Linux versions such as Debian and Kali Linux. Use the below link to download it.
In this tutorial, we are going to set up a Redis server in Ubuntu operating system. Without using any URL’s above, we are manually downloading it from the Microsoft store.
1. Open Microsoft Store
First, open the Microsoft Store by searching “store” in the left-bottom Windows 10 search box.

2. Install Ubuntu
The Microsoft Store will be opened and now search for Ubuntu. In the top-right search box, search for Ubuntu and click on the latest version(18.04 LTS) from the suggestions and Get the app.

3. Launch Ubuntu
So the Ubuntu is installed on our Windows system and now we need to launch it. So search for “ubuntu” in the Windows search box.

An Ubuntu terminal will be opened and this terminal is used to set up Redis.

Install Redis on Ubuntu
So we have successfully set up an Ubuntu server inside our Windows operating system.
Now we can install Redis on this Ubuntu system by following the below steps.
1. Download Redis
To install Redis-server, we need to download the stable version of Redis from the official website. This can be done with the below command.

2. Extract and Make
Now extract the file we have downloaded using the below command.

Now, enter the directory we have created.
Now, execute the make command. The purpose of the make utility is to determine automatically which pieces of a large program need to be recompiled, and issue the commands to recompile them.

3. Start Redis server
After the successful installation Redis server, we can start the Redis server using the redis-server command.
The above commands start the Redis server on our system as shown in the below screenshot.

Now we can close the Ubuntu terminal window. This will not stop the Redis server we have started earlier.
But we have to note that, it needs to start Redis server after each system reboot by running redis-server command.


