- How to Create Restore Point in Windows Server 2008 (R2)?
- How do I create restore point in Windows Server 2008 (R2)?
- Overview of Windows Server 2008 (R2) system restore point
- Method 1: Create Windows Server 2008 (R2) restore point with command line
- Method 2: Create restore point in Windows Server 2008 (R2) via Windows Server Backup
- Method 3: Create System Restore Point in Server 2008(R2)using AOMEI Backupper Server
- Conclusion
- How to Create Restore Point in Windows Server 2012 (R2)?
- What Is Restore Point?
- Can You Create Restore Point in Windows Server 2012 (R2)?
- Create System Image Backup Using Windows Server Backup Feature
- Easier Way to Create System Restore Point in Windows Server 2012 R2
- Conclusion
How to Create Restore Point in Windows Server 2008 (R2)?
This article will introduce you three methods to create restore point in Windows Server 2008 R2 to undo the harmful changes or restore the computer to a previous date. Swipe to learn more.

By Ivy  / Last Updated February 2, 2021
How do I create restore point in Windows Server 2008 (R2)?
It’s disappointing that Windows Server 2008 (R2) does not have system restore feature, nor do other server-based computers. As a matter of fact, it’s a useful feature in Windows 7/8/10 to create a restore point for system files, Windows registry, local user profiles and system settings, then undo changes you made or just restore the computer to previous date.
Well then, you may wander if there is a similar feature in server computer. Yeah, in server 2008(R2)/2012(R2)/2016/2019, you could use system state backup to replace system restore point in Windows 7/8/10.
As for how to enable system restore in windows 2008 (R2) server, you could use Windows Server Backup and command line. Both way supports all kinds of server operating system, from Windows Server 2003 to 2019. In addition, you still could use a full system image backup as a restore point, which can prevent your computer from suffering any disasters, such as startup failure.
Overview of Windows Server 2008 (R2) system restore point
System restore point in Windows Server 2008 (R2) refers to the System State backup, which is a copy of all related information of your operating system and configurations. According to Microsoft, a System State backup includes the following things.
Boot files, including the system files, and all files protected by Windows File Protection (WFP)
Active Directory (on a domain controller only)
Sysvol (on a domain controller only)
Certificate Services (on certification authority only)
Cluster database (on a cluster node only)
Performance counter configuration information
Component Services Class registration database
Then, keep reading below and learn how to create restore point in Windows Server 2008 (R2) using command line and Windows Server Backup.
Method 1: Create Windows Server 2008 (R2) restore point with command line
Here you will use Wbadmin command line utility to create Windows Server 2008 (R2) restore point via command line, which is user friendly to IT technicians. But it’s complicated for most users. You can jump directly to Method 2 or Method 3 and use backup software with GUI-based interface software to achieve the same effect. The specific steps are below.
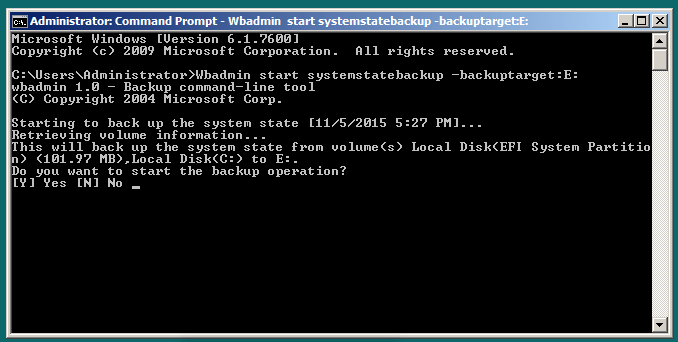
Step 1. Click Start Menu and type cmd in the search box, then run command prompt as administrator.
Step 2. Type a command based on the following syntax and press Enter to execute system state backup.
wbadmin start systemstatebackup -backuptarget:X: -quiet
X: refers to the drive letter of the partition you want to save your backup
-quiet parameter can undo the prompt before you start backup. That’s to say, if you do not type-quiet parameter, you will receive a prompt “Do you want to start the backup operation?” and you need to type Y to ensure that you want to perform this operation. To avoid it, you should add –quiet parameter at the end of command.
Method 2: Create restore point in Windows Server 2008 (R2) via Windows Server Backup
Here you will use Windows Server Backup to create system restore point in Windows 2008 (R2). It’s a fantastic built-in backup and restore software in server-based operating system.
Please note that this software is not installed by default, thus you need to manually install it using Server Manager. Also, it only backs up the volumes formatted with NTFS file system. It only supports entire drive, dedicated volume or network share instead of a folder in the local drive.
Then, without further ado, let’s get started to create a system state backup right now with the following steps.
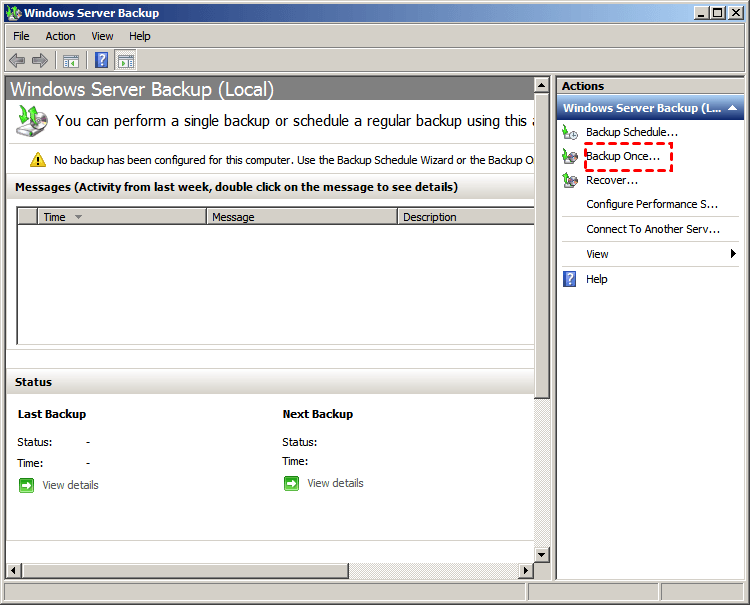
Step 1. Click Start >Administrative Tools >Windows Server Backup subsequently, then you will enter the main page of it. Click Backup Once. under the Actions tab. If you want to create system state backup regularly, you can choose Backup Schedule…option.
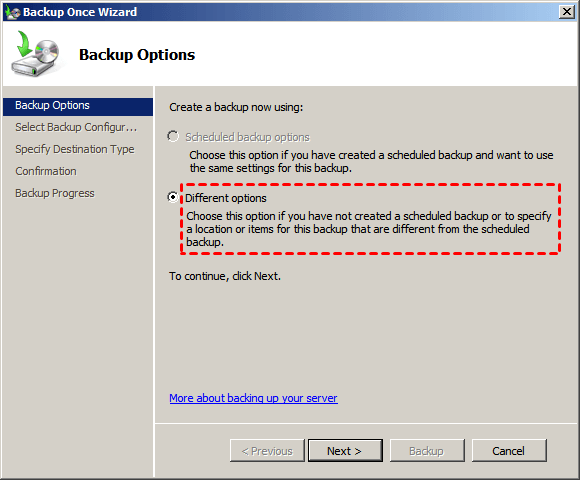
Step 2. Tick Different options and click next.
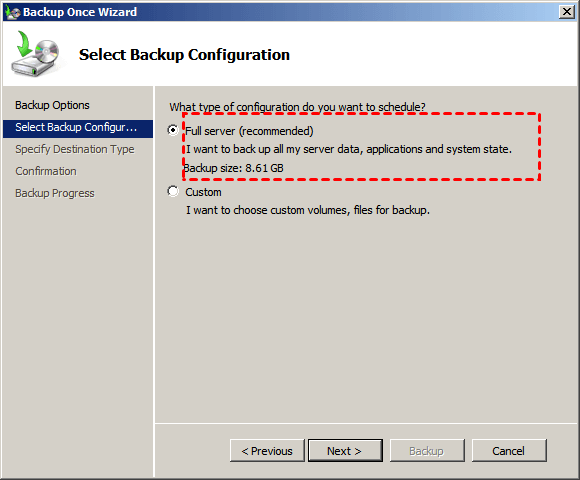
Step 3. Choose Full server option in this window and click Next. It contains all your server data, applications, and system state, so you can use it to do full system recovery together with system state recovery.
Step 4. Specify your destination path to save your backup. You can choose any local drive recognized by your computer or save to network share.
Step 5. Click the drop-down list and choose a backup destination to save the image.
Step 6. Confirm all the options and click Backup to start the process.
That’s all for how to create a system state backup in Windows Server 2008 (R2), you can use either command line or backup software with GUI-based interface. But this kind of backup only works out small failure unless you create a full server backup. And you may feel disappointed when your computer is in the event of serious problem like boot failure.
At this case, all you need is a full system backup that contains the operating system and boot-related partition(s) required to start Windows. That’s the method 3 can do for you.
Method 3: Create System Restore Point in Server 2008(R2)using AOMEI Backupper Server
AOMEI Backupper Server is a professional backup software for 2003/2008(R2)/2012(R2)/2016/2019, which can help you rescue your computer from any disaster, even the boot failure. It supports full backup solutions, so you can create system backup, disk backup, partition backup and file backup based on your needs and then restore your server computer or data on it.
With this software, you can schedule backup in daily/weekly/monthly and full/incremental/differential. Also, you can backup at a specific event with “Event Triggers” or automatically backup USB flash drive with “USB plug in” feature. In addition, it still provides users with 5 different backup scheme to manage disk space and the process is automatic without any human intervention.
Then, let’s have a closer look at how to create a restore point in server 2008(R2) with AOMEI Backupper Server. You can backup server 2008 (R2) to any device as long as it can be detected by your server computer, such as, external hard drive, network drive, cloud storage etc. Please connect the device in advance.
Step 1. Download the server backup software -AOMEI Backupper Server and install it. Then, launch it and click Backup > System Backup subsequently in the deep-blue screen. After that, it will select the system partition and boot-related partition(s) required to start windows.

Step 2. Click where the arrow point and choose the desired destination path to save the server 2008(R2) image backup.

Step 3. Click “Options” and “Schedule” to customize the backup task. Click “Scheme” to delete old image automatically. Then, confirm all options you choose and click «Start Backup«.
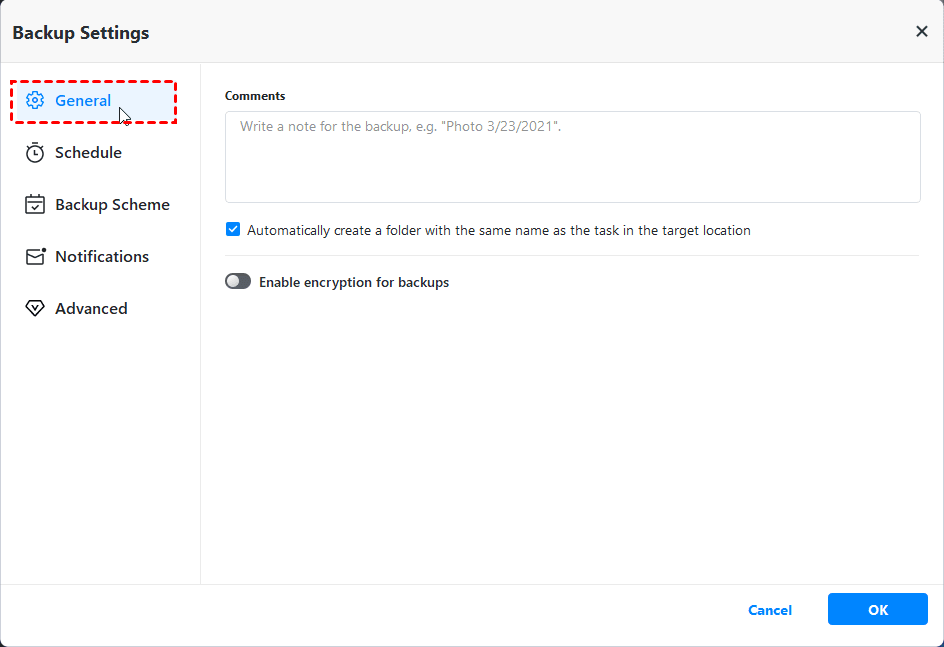
About Options:
You can comment, enable email notification and encryption for backup, set compression level, create pre/post-command etc.
About Schedule:
Daily/weekly/monthly backup: These backup settings can help you backup system regularly and track changes of the backed up files. Select daily backup, weekly backup or monthly backup according to the change frequency.
Event triggers: To backup system without interfering any of your operations, «System Shutdown» in Event triggers is recommended.
USB plug in: To automatically backup to or from USB when it’s plugged in, please set a scheduled backup task with «USB plug in» feature.
Wake the computer to run scheduled tasks: This feature help you create a system image in Windows Server 2008(R2) or other server computer during off-peak hours. It can be midnight or any other times.
Incremental or differential backup: Both features save you much backup time and disk space by backing up only changes.

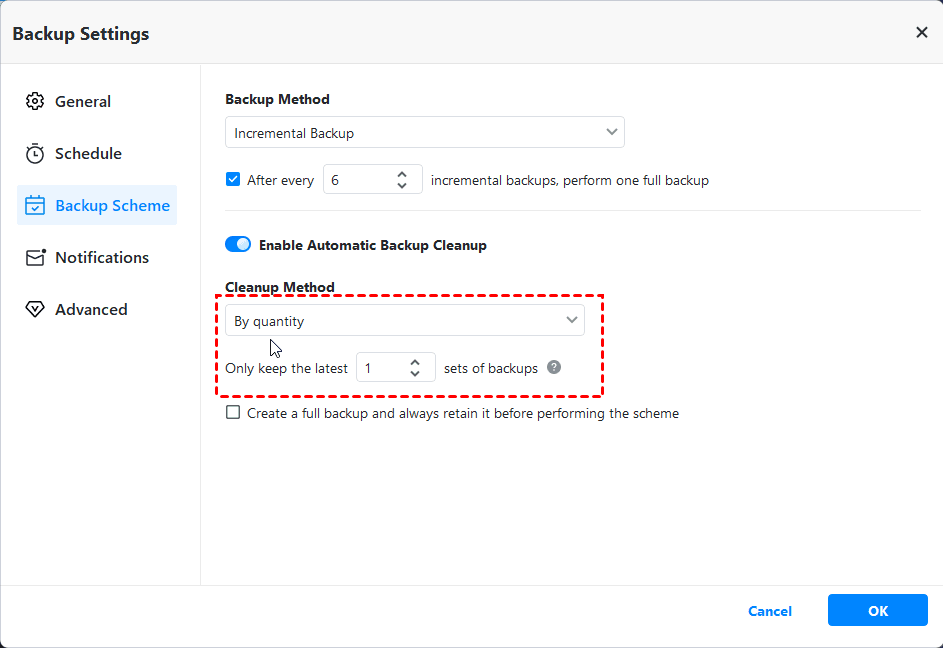
About Scheme:
This feature can greatly reduce the risk of insufficient disk space and always keep the latest backups by its 5 differential backup scheme, namely, Full Backup Scheme, Differential Backup Scheme, Incremental Backup Scheme, Space Management Scheme, Other Backup Scheme.
Please note that the backup will be perform in the way you set in scheme if you enable both schedule and scheme simultaneously. For example, if you enable differential backup and incremental backup scheme, the backup task will run as an incremental backup.
Tips:
• All the success backup task will be listed under the Home tab. If you want to make changes to a task, please select it in the Home tab and then choose corresponding options.
• It’s suggested to create a bootable USB drive with AOMEI Backupper Server. It can help you restore server 2008(R2) to previous date even when your computer refuses to boot.
• This software only supports up to 5 servers or PCs. If you want to protect unlimited PCs and servers within your company, you could consider using AOMEI Backupper Technician.
Conclusion
Although you cannot directly create a restore point in Windows Server 2008 (R2), you can create a system state backup to replace a restore point. And this feature is also available on server 2003/2012/2016/2019 and its R2 version.
Just like system restore point in Windows 7/8/10, system state backup only works when there is a small problem. If your computer fails to boot, you need a full system backup that includes everything to boot Windows. That’s what AOMEI Backupper Server can do for you.
In addition, this software is still a server cloning software to help you clone Windows Server 2008, clone server 2011 to new hard drive, clone Windows Server 2012 R2 hard drive, clone c drive in server 2019 etc. This is another form of backup and restore and it’s easier. You can simply replace hard drive and boot from it without having to restore the image first.
How to Create Restore Point in Windows Server 2012 (R2)?
A restore point allows you to restore system to the previous state. This article will show you how to create Windows Server 2012 restore point with two ways.

By AOMEI / Last Updated June 23, 2020
What Is Restore Point?
Restore points are a component of the Windows System Restore utility. Therefore, it can be called system restore point sometimes. It is actually a collection of important system files stored with a specific date and time. It’s quite necessary to create Windows Server 2012 restore point.
When a restore point is established, your computer creates a backup copy of all data at that particular time. You can save the state of the operating system and important data. If your system has a problem, you can restore the system and data back to an early point.
Can You Create Restore Point in Windows Server 2012 (R2)?
Searching for «Create a restore point» on Windows Server 2012, brings up a link that when clicked takes you to System Properties. However, there is no System Protection tab or option to create a system restore point.
As a matter of fact, there is no System Restore in Windows Server 2012. You cannot create restore point. So, what can you do if you want to create restore point in Windows Server 2012?
As above mentioned, system restore point is actually to make an Operating System backup of your computer. That is to say, creating a system restore point just likes creating a system state backup.
There happens to have a similar feature called “Windows Server Backup”. It can be used to create system image backup. This feature can be used as an alternative to restore point.
Create System Image Backup Using Windows Server Backup Feature
Windows Server Backup is a powerful feature. By using this, you can create a single backup, schedule a periodic backup and restore system state to any point. Next, let’s see how to create Windows Server 2012 (R2) system image backup.
Actually, besides Windows Server Backup (WSB), there is another Server backup software provides an easier way to create system restore point. It lets you set daily/weekly/monthly scheduled backup tasks while WSB only allows you to create one daily backup schedule. It also offers various powerful functions to help you better manage system backup. Refer to the next part to learn more >
To use this feature, first, you should install Windows Server Backup.
Step 1. After the installation completes, press Win + R and type “wbadmin.msc” to open Windows Server Backup. Or you can use another way. Click Start and select Administrative Tools. Find Windows Server Backup and click it.
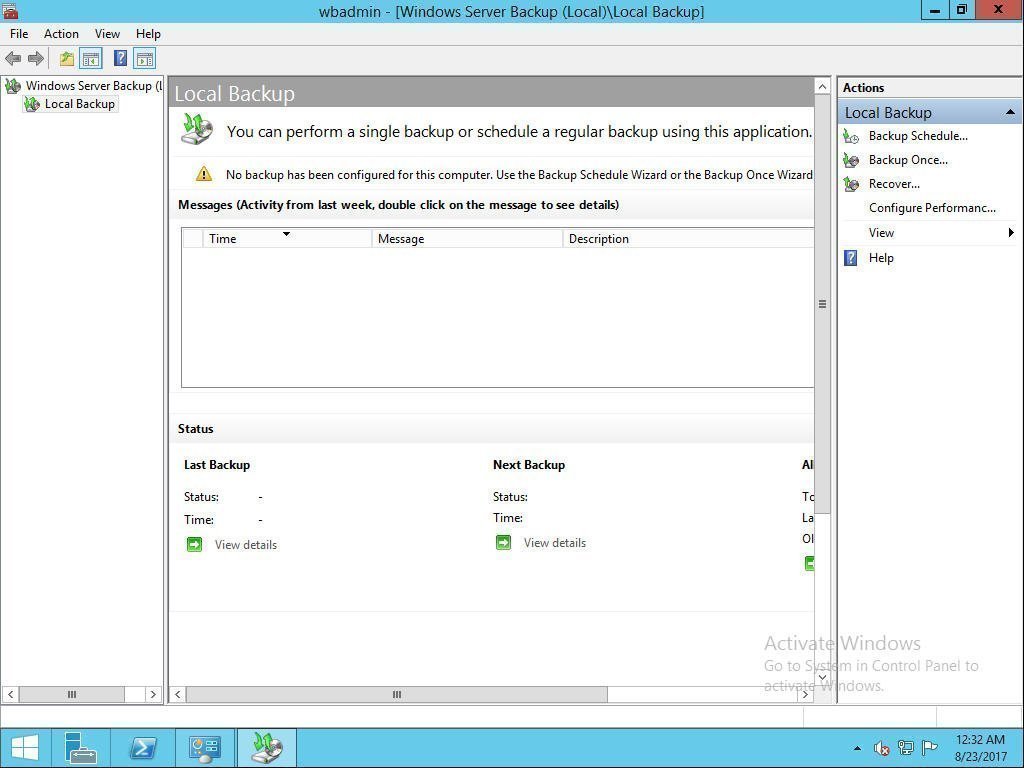
Step 2. On the Right Panel, you will find various options like Backup Schedule, Backup Once, Recover, etc., Click Backup Once option. Then you come to Backup Option. By default, it will tick create a backup now using Different options, just click Next.

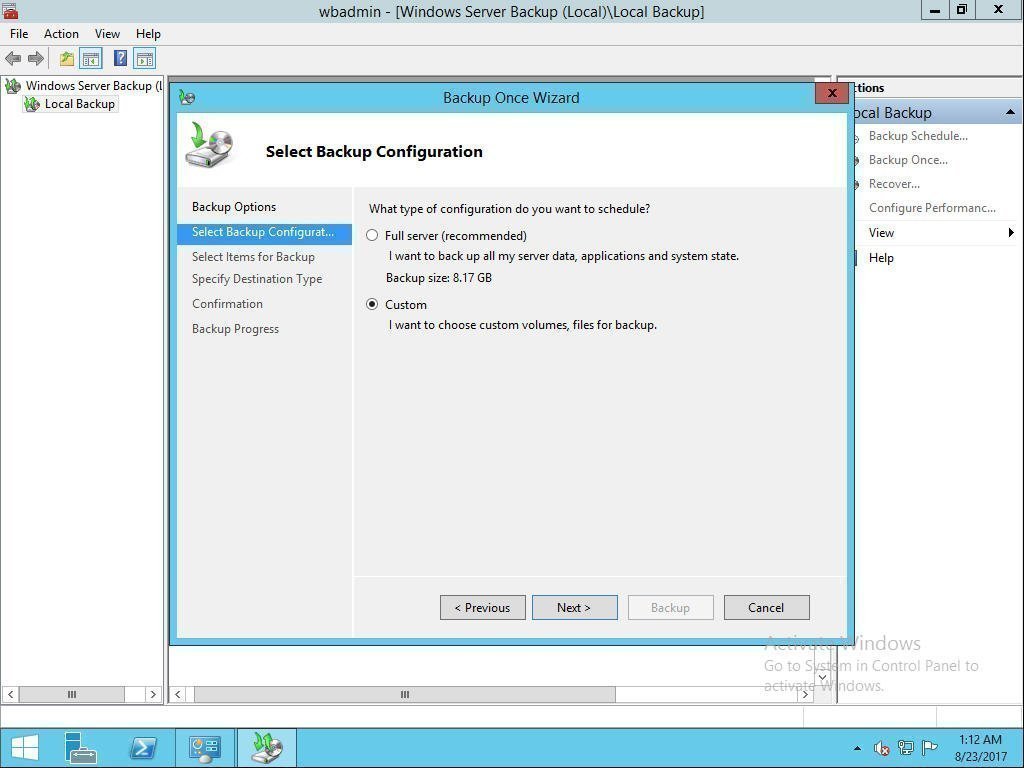
Step 3. Then you come to Select Backup Configuration. You can choose it based on your needs. Take Custom as an example. Tick Custom and click Next.
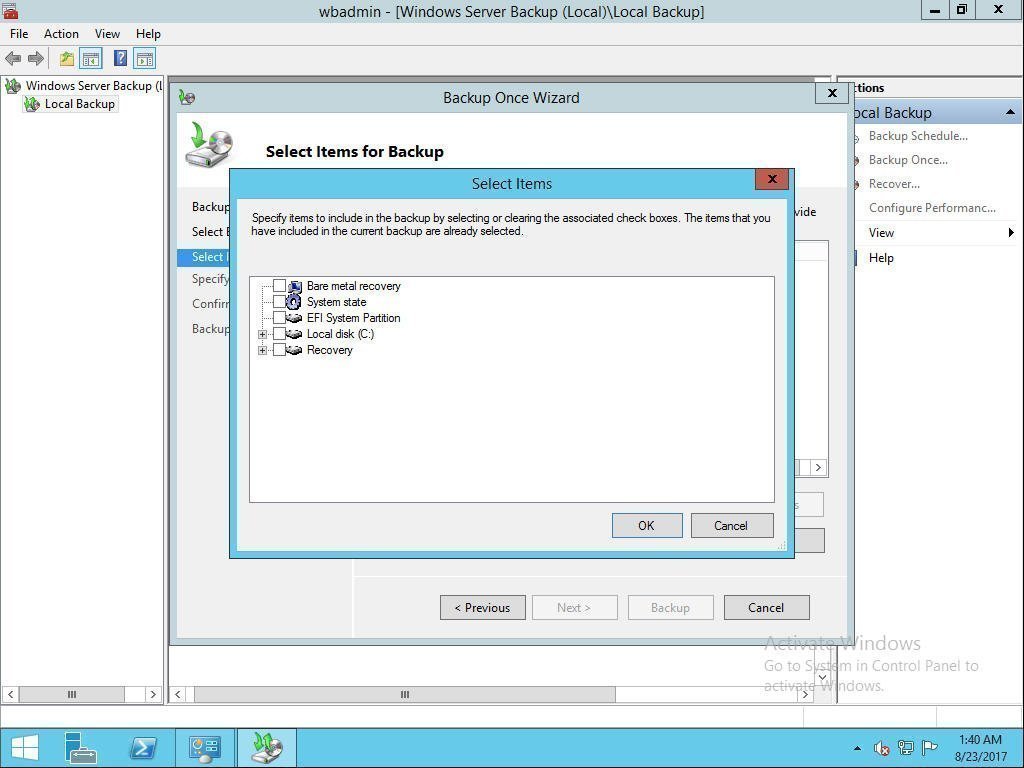
Step 4. Then come to Select Items for Backup. Click Add Items and select items you want to backup. Tick System state and click OK. Then click Next to continue.
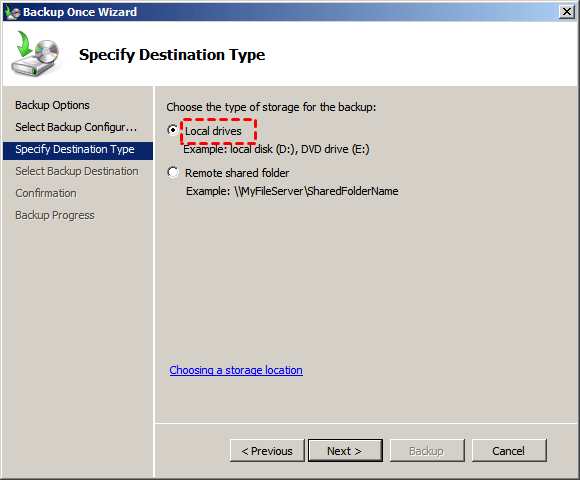
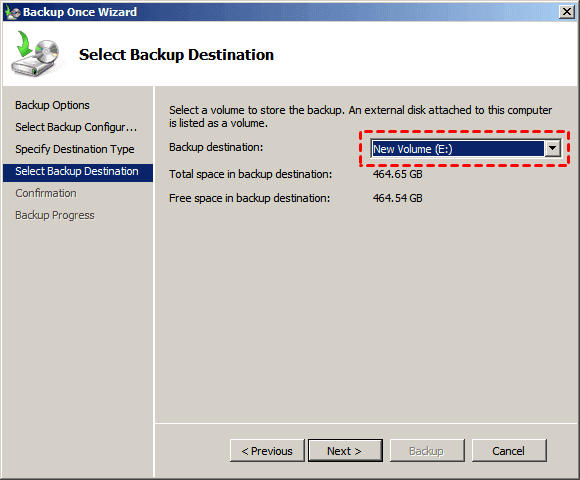
Step 5. Then choose the type of storage for the backup. There are two options: local drive and remote shared folder. Take local drive as an example. Click Next. Then choose a hard drive and click Next.

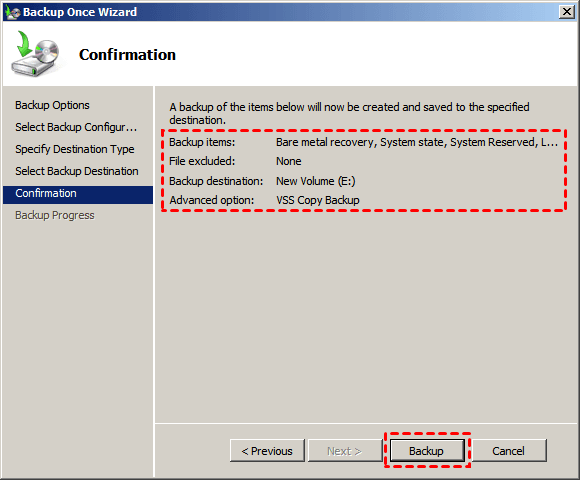
Step 6. Confirm your option and click Backup. Wait until the process completes.
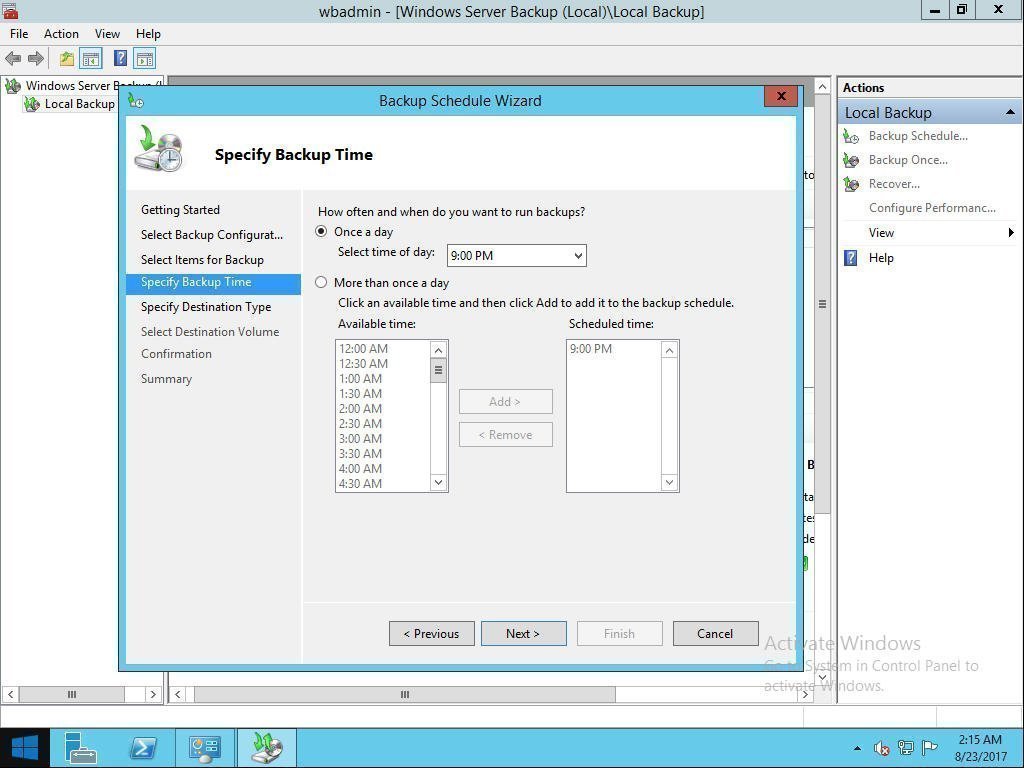
As system states may change often, it cumbersome to manually create system state backup every time when there is a change happens. In this case, you can also create a scheduled backup by clicking Backup Schedule Wizard.
This method can be also applied to create Windows Server 2012 R2 restore point. By the way, you can click to learn more about Server 2008 restore points.
Easier Way to Create System Restore Point in Windows Server 2012 R2
There is another way to create system image backup: use a third-party tool AOMEI Backupper.
AOMEI Backupper Server is a professional server backup software. It allows you to create system image backup easily and quickly. If any emergency happens to your computer, you can perform a quick recovery to the previous state.
It lets you set multiple scheduled backup tasks (daily/weekly/monthly) and also supports incremental/differential backups. The amount of space that system image backup can take up is limited. However, with this software, you can save storage space by automatically delete old backups.
Let’s take a look at how this software works to create system image backup.
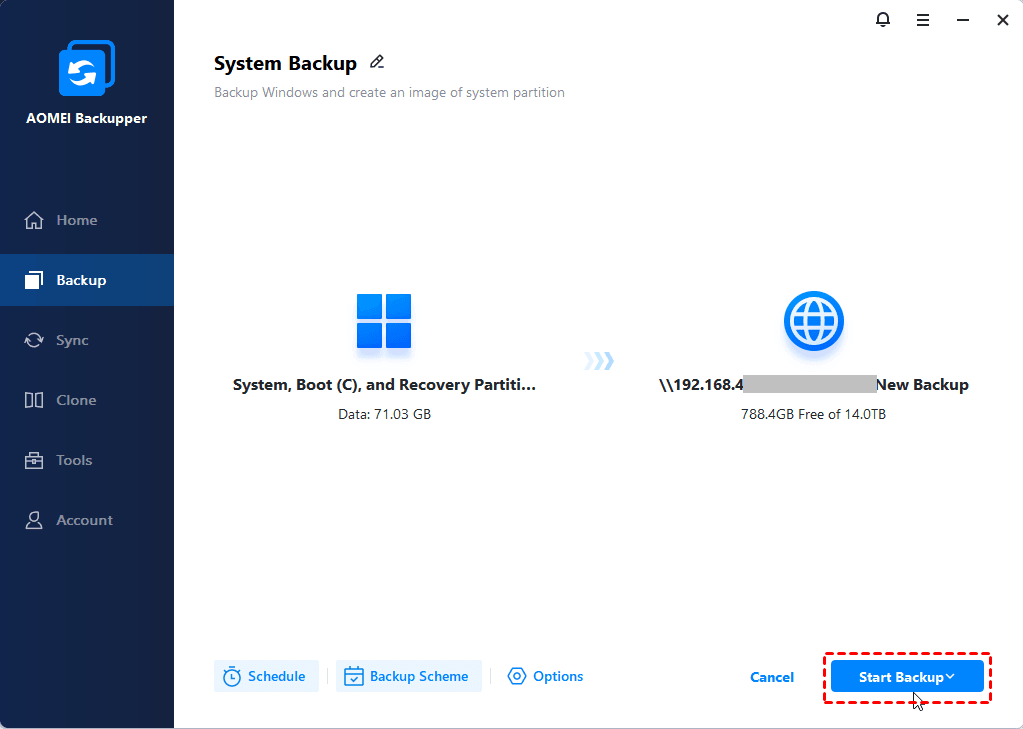
Step 1. Download AOMEI Backupper Server and open this software. Click the System Backup under the Backup tab.
Step 2. You do not have to choose a source, the software has chosen it automatically for you. Just select another location as the destination path to store your system image files. And the destination location can be verified like internal hard drive, external hard drive, and NAS.
Step 3. To automatic backup system, click «Schedule» and select one or more settings. To delete old imges, click «Scheme» to select a specific role and set the retained backup versions. Finally, click Start Backup.
Daily/weekly/monthly backup: To continuously backup system and keep the latest updates, newly installed apps, added or deleted files, you could try daily backup, weekly backup or monthly backup.
Event triggers: To backup system without any interfering of your operations, «System Shutdown» in Event triggers is recommended.
Wake the computer to run scheduled tasks: To backup system during off-peak hours, you can set the backup time to midnight or any other times, then tick «Wake the computer to run scheduled tasks».
Incremental or differential backup: To save backup time and disk space, both features are available, because they only backup the changed content.
After creating system image backup, you can restore Windows Server 2012 (R2) from the backup very easily if there is any bad happen to your computer. Besides Windows Server 2012, AOMEI Backupper Server can also support Windows Server 2012 R2/2008/2008 R2/2003/2003 R2/2016 and Windows 7/8/8.1/10/XP/Visa.
Conclusion
Basically, there are two alternative ways to create Windows Server 2012 restore point. You can choose one based on your own preferences. Or if you prefer an easier method, then AOMEI Backupper Server is the way to go. It also offers more functions compared to WSB. By the way, besides system backup, it also can help you backup disk or important files as per your needs.
If you want to protect unlimited PCs and servers within your company, you may choose AOMEI Backupper Technician Plus. It offers unlimited billable technical services to clients. It also enables you to copy installation directory for portable version creation.


