- Resize Images with Right Click on Ubuntu and Other Linux Distributions [Quick Tip]
- Quickly resize images with right click in Linux
- Quickly resize images in elementary OS
- Shell script to resize image, convert image format in Linux
- ImageMagick
- Convert Image Format
- Resize Image
- Sample Shell Script
- How the script works?
- Batch Resize Images using Linux Command Line and Imagemagick
- Batch Resize Images using Linux Command Line and Imagemagick
- Batch Resize Images with Linux with Imagemagick
- How To Resize Image Files On Linux
- Install ImageMagick
- Ubuntu
- Debian
- Arch Linux
- Fedora
- OpenSUSE
- Other Linuxes
- Compress Images With Convert
- Compress Multiple Images
- Resizing Script
- Leave a Reply Cancel reply
Resize Images with Right Click on Ubuntu and Other Linux Distributions [Quick Tip]
Last updated April 15, 2020 By Abhishek Prakash 75 Comments
Brief: A Quick tip that shows how to resize images with right click menu in Linux quickly. The trick should work on any Linux distribution that uses Nautilus file manager.
How do you resize an image on Linux? Do you use GIMP or Shutter? Or perhaps you use ImageMagick in the terminal.
As I often need to resize the image before uploading them on It’s FOSS, Shutter was my favorite tool for this task until now. Shutter is an excellent screenshot tool that allows some quick editing features. However, if you just need to change the size, length and width of an image, opening an entire tool and going through menu options can be saved by using a nifty Nautilus plugin.
What’s Nautilus? Nautilus is a file manager used by GNOME and several other desktop environments. This is where you visually see your files. It’s equivalent to Windows Explorer in Linux.
There are several Nautilus plugins available that enhance its capability. They are not installed by default as they server specific purpose and users can choose to install them as per their needs.
One such Nautilus plugin is called Image Manipulator and it allows you to rotate or resize images by right-clicking on an image and choosing the option of rotating or resizing.
Quickly resize images with right click in Linux
Before you try to install the Nautilus plugin for quickly resizing images, I advise that you verify if your Linux system uses Nautilus file manager or not. To check that, use the command below:
If you get an output with version numbers, you have Nautilus file manager on your system. Else, your Linux distribution is using some other file manager.

You would also need ImageMagick because this plugin uses basically uses ImageMagick for image manipulation:
Once you have made sure that you have Nautilus file manager on your system, you can install the plugin using the command below:

If you are using Fedora, Arch or other non-Debian Linux, you can use your distribution’s package installing command.
Once installed, restart Nautilus using the command below:
Now if you right click on an image, you’ll see two new options of resize and rotate in the context menu.

You can choose the resize option to resize the image right from the right-click menu quickly. It will present you a few options for resizing the image.
As far as the custom size goes, though it doesn’t show, it retains the aspect ratio based on the width. So if you have a 1000×500 px image and you are trying to assign it a custom size of 800×300, the converted image will be 800×400, maintaining the original 2:1 ratio.

By default, it adds “.resized” to the name of the original image. This way your original image is not impacted and you get an additional resized imaged. You can change this behavior by choosing the ‘Resize in place’ option and the resized image will replace the original image.
It might not be a path-breaking trick but it does save you a few clicks.
To remove the plugin, you can use the command below:
And then restart the Nautilus. Simple!
Quickly resize images in elementary OS
This article inspired It’s FOSS reader Peter Uithoven to create a similar plugin for elementary OS users. You can get it from elementary OS app center.
I hope you liked this quick tip. If you know some neat little trick, do share with rest of us.
Like what you read? Please share it with others.
Источник
Shell script to resize image, convert image format in Linux
Table of Contents
All of us download photos from our phones and cameras. Before we e-mail an image or post it to the Web, we may need to resize image or perhaps change the format of image. We can use scripts to perform batch image resize and other tasks using ImageMagick
In this article we will use a script to perform below tasks in bulk
- change image size
- convert image format
ImageMagick
ImageMagick is a free and open-source software suite for displaying, converting, and editing raster image and vector image files. It can read and write over 200 image file formats.
Before we go to our shell script, I will show some examples related to ImageMagick
Convert Image Format
To convert image format we will use covert tool from ImageMagick.
Here we are converting JPG format image to PNG.
Resize Image
We can resize an image by specifying the scale percentage or the width and height of the output image. To resize an image by specifying WIDTH or HEIGHT, use this:
If either WIDTH or HEIGHT is missing, then whatever is missing will be automatically calculated to preserve the image aspect ratio:
Sample Shell Script
Let us jump to our shell script to resize image in a batch.
The batch_image_resize.sh script accepts these arguments:
- -source: This specifies the source directory of the images.
- -dest: This specifies the destination directory of the converted image files. If -dest is not specified, the destination directory will be the same as the source directory.
- -ext: This specifies the target file format for conversions.
- -percent: This specifies the percentage of scaling.
- -scale: This specifies the scaled width and height.
- Both the -percent and -scale parameters may not appear.
- The script starts by checking the number of command arguments. Either four, six, or eight parameters are valid.
Now let us execute the batch_image_rezize.sh script to resize image based on percentage. Before calling the script below is the size of all my images
I will create a new directory where I will store my resized images
Now execute the script to resize image to 80%
Now verify the new size which we see that the size of image is reduced to 80% of the original size.
How the script works?
- The command line is parsed with a while loop and the case statement and values are assigned to appropriate variables.
- $# is a special variable that contains the number of arguments. The shift command shifts the command arguments one position to the left. With this, every time the shifting happens, we can access the next command argument as $1 rather than using $1, $2, $3, and so on.
- The case statement is like a switch statement in the C programming language. When a case is matched, the corresponding statements are executed. Each match statement is terminated with ;; . Once all the parameters are parsed into the variables percent , scale , source_dir , ext , and dest_dir , a for loop iterates through each file in the source directory and the file is converted.
- Several tests are done within the for loop to fine-tune the conversion.
- If the variable ext is defined (if -ext is given in the command argument), the extension of the destination file is changed from source_file.extension to source_file.$ext .
- If the -dest parameter is provided, the destination file path is modified by replacing the directory in the source path with the destination directory.
- If -scale or -percent are specified, the resize parameter ( -resize widthx or -resize perc% ) is added to the command.
Related searches: linux resize image photo. linux image converter. script to resize image. magick resize. convert resize. imagemagick reduce file size. imagick png compression. batch downsize images. resize jpeg batch. linux convert image format from png to jpg.
Источник
Batch Resize Images using Linux Command Line and Imagemagick

Large images means a large page size which means slow WordPress page load times for users. The most common culprit is image size or lack of compression. If you never had any image size restrictions or automatic resizing on your site, it can be extremely convenient to batch resize those images in Linux.
This guide shows you how to batch resize jpg and png files using Imagemagick on Ubuntu or Debian. If you want to install Imagemagick on CentOS see this guide.
Batch Resize Images using Linux Command Line and Imagemagick
First we need to install Imagemagick from the repository on Debian or Ubuntu
We can use the identify command to get the width ( %w ) and height ( %h )
You will see the resolution, width is first then height.
You can resize the image if it is larger than the specified dimensions. This will automatically preserve the aspect ratio of the image too.
Note that this overwrites your original image!
Check the image was resized
Now we can move on to batch resizing
Batch Resize Images with Linux with Imagemagick
Create the following script
Paste the script below, remember to change the FOLDER variable!
FOLDER is the absolute path to your image folder
WIDTH is the max width and HEIGHT is the max height.
It will overwrite your original images so make sure you have a backup before running this!
Ctrl+X, Y and Enter to save and exit.
Check the folder size
Check output size
Screen will ensure the batch command keeps on running even if your SSH session is terminated.
Create a new screen session, press space or enter at the intro screen
Execute the script
Detach the screen with Ctrl+A and pressing D (detach).
You can use the top command and look for jpegoptim processes once in a while.
Reattach the screen like so
Check the folder size again
You should see an improvement
Make sure to compress your images with lossless (guide) or lossy compression (guide).
If you need to do some more advanced find commands that use regex this should help.
Источник
How To Resize Image Files On Linux
Jun 25, 2018
Comment
Image files can be exceptionally large. Even if you’re dealing with JPEGs, the file sizes can and do exceed 2 and even 5 MB in size. If you have a RAW file, it’s going to be bigger. If you need to keep a large library of images on your Linux PC, you’ll need to learn how to save space. One of the best ways to save space with files is by resizing them. If you have a large photo library, you can resize image files and shrink your photo library’s size.
Resizing image files is a tricky thing as too much of it can really ruin the quality. That’s why in this guide we’ll go over how to resize image files the right way.
Install ImageMagick
The Linux operating system has a lot of quirky, unique tools. One such tool is Convert. It’s a simple little app bundled inside of ImageMagick that can manipulate image files through the command line. To get access to the Convert tool, you’ll need to install ImageMagick. Most Linux distributions have this installed, though if yours doesn’t, you can install it easily enough.
To install the ImageMagick package, open up a terminal window and enter the following command listed under your OS.
Ubuntu
Debian
Arch Linux
Fedora
OpenSUSE
Other Linuxes
As stated earlier, ImageMagick is a critical component of how a lot of programs display and manipulate images in programs on Linux. That being said, your distribution may be using an alternative. Look in your operating system’s package manager for “ImageMagick” and install it. Once installed, you’ll have access to Convert.
Compress Images With Convert
Compressing images can often reduce their quality. For good looking, smaller image files it’s best to re-size them. Going this route can help keep the overall quality of the image while keeping the file size much smaller.
To resize with Convert, open up a terminal window, find an image file you’d like to manipulate and then use the CD command to move the terminal to its location. In this example, picture files will be in /home/username/pictures/.
Use the convert command to resize. Try to resize the image by about 20%, as this gives you a good balance of quality and file size. If you need to go lower than 20%, try 25%, 30%, or 40%. Keep in mind that quality of the image decreases the more it is resized.
Convert works with different file types, aside from the JPG used in the example. To resize, modify this command with the correct file extension and new size. Be sure that you specify both the original file name and an output filename.
Compress Multiple Images
Convert is excellent at manipulating and compressing one image at a time, but it’s tedious to compress images one by one. the good news is that Convert can be manipulated with bash to parse and work with multiple image files at once.
Note: batch compressing image files with multiple file names likely won’t work. Only batch convert files with the same file type.
Batch converting is easy, and it starts out by creating a folder to work in. Having a folder for all of these image files you plan to convert is good, otherwise, dozens of image files will litter your file system. Using the mkdir command, create a working directory.
Then, open the file manager app, find the newly created folder and move all of the image files you plan to convert to this folder. After moving the files, use the CD command in a terminal to move into the new folder as well.
In the terminal, type out this command. It will tell Convert to resize multiple files at once, creating output files with “resize” at the end. In the code, the command will look for JPG images. If you’re working with PNG files or another format supported by the Convert app, change *.jpg to *.png, etc.
Resizing Script
The batch resizing command is nice, as it works very well. However, having to type out a long command and tweak it every time can be annoying. To shorten the work, consider making it into a script. Open up a terminal window, and use the touch command to create a new file. This file will hold the code for our conversion script.
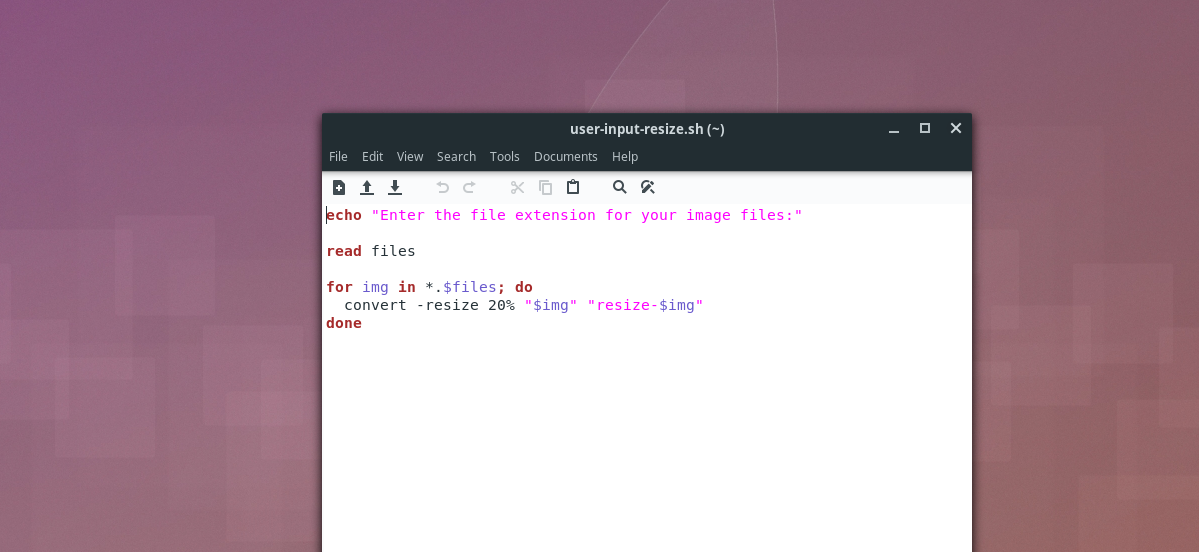
Next, open up the Nano text editor.
Paste the following code inside of the script file:
# Catch user input for file type.
echo «Enter the file extension for your image files:»
# Store user input in $files.
for img in *.$files; do
convert -resize 20% «$img» «resize-$img»
done
Save the resize script in Nano by pressing Ctrl + O. Close the editor with Ctrl + X.
Update the permissions of the script so it runs. Don’t skip this part, or the script won’t work correctly!
To use the script, place all image files you’d like to convert in
/Pictures/Convert-Images/. Then CD in and execute the script. When entering the file extension (like JPG, PNG and etc) don’t use a period, or the script will break!
Leave a Reply Cancel reply
This site uses Akismet to reduce spam. Learn how your comment data is processed.
Источник


