- How to Remove Watermark in Windows 10, 7
- How can I remove Windows 8.1 and Windows 10 watermark?
- 1. Replace shell32.dll.mui and basebrd.dll.mui files
- 2. Use Registry Editor
- 3. Change your Ease of Access settings
- 4. Use Command Prompt
- 5. Change your background image
- Easiest way to remove the Windows watermark from your screen
- Leave a Reply Cancel reply
- 78 thoughts on “ Easiest way to remove the Windows watermark from your screen ”
How to Remove Watermark in Windows 10, 7


Having a watermark on the lower right corner of your Windows 8.1 and Windows 10 every time you start your computer can get really annoying and it messes your desktop picture.
Luckily for us, there are some methods that you can do in order to completely remove your Windows 8.1 watermark and it will not take you more than a couple of minutes to do it.
Also, you will need to be aware that you cannot use the same method to remove the Microsoft Confidential watermark in Windows 8.1 and Windows 10.
This tutorial is specifically made to remove only the Windows 8.1 Preview and Windows 10 watermark.
Read the following lines below for a detailed and very quick explanation on how to remove Windows 8.1 and Windows 10 watermark.
How can I remove Windows 8.1 and Windows 10 watermark?
Windows 10 watermark can be somewhat annoying, and in this article we’ll cover the following topics:
- Windows 10 remove watermark registry – There are several ways to remove Windows 10 watermark, and the simplest one might be by modifying your registry.
- Remove watermark Windows 10 Test Mode – Many users tend to use Windows 10 Test mode, but this mode comes with the Test Mode watermark in the bottom. However, you can easily remove the watermark by using one of our solutions.
- Remove watermark windows Education, Technical preview – If you’re using Education version or a Technical preview of Windows 10, you should be able to remove the watermark by using one of our solutions.
1. Replace shell32.dll.mui and basebrd.dll.mui files
Before we start, we have to mention that this process can cause stability issues if you’re not careful.
Therefore, it’s a great idea to create a backup before trying out this solution. Since this solution requires you to replace system files, keep in mind that you’re using it at your own risk.
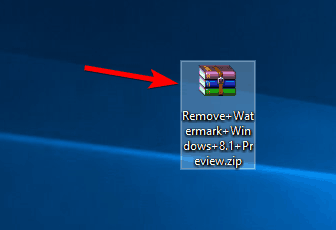
- You will need to download the little zip file from the link below in order to start the removing process. Download zip file here.
- Once you download the file, open it and extract its contents to your PC.

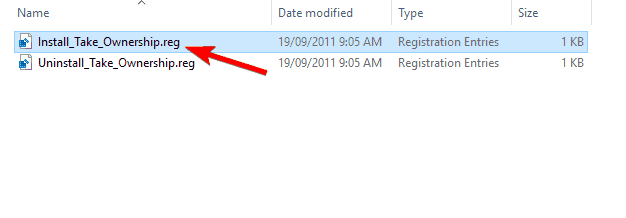
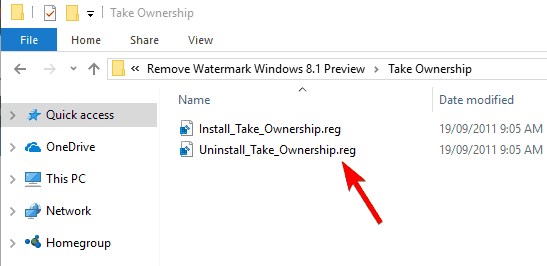
- Open the extracted directory and navigate to Take Ownership directory. Locate Install_Take_Ownership.reg file and double click it.
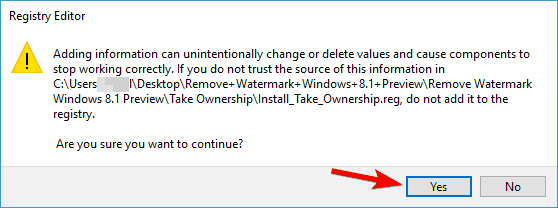
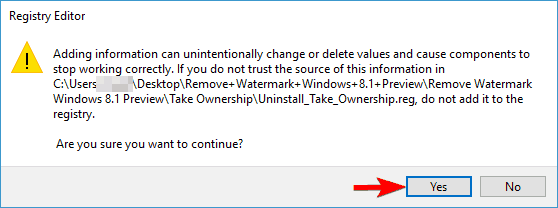
- Registry Editor window will pop up and you will need to left click on Yes to proceed with the operation.
Once you run this .reg file, you should be able to take ownership of any directory or file with just two clicks. In the following steps, we’ll modify some system files.
These steps can be potentially dangerous and cause stability issues, so keep in mind that you’re following these steps at your own risk. You can take ownership of the system files by doing the following:
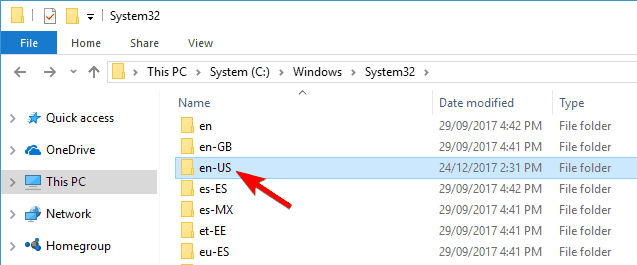
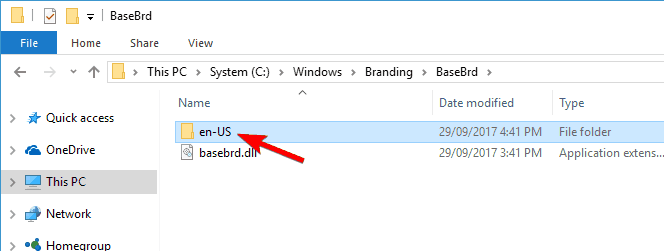
- Navigate to C:WindowsSystem32en-US directory.
- Now in the en-US folder look for shell32.dll.mui. After you find it right click on it and select Take Ownership. Before you take ownership, it’s a good idea to make a copy of this file and save it to your Desktop in case anything goes wrong.
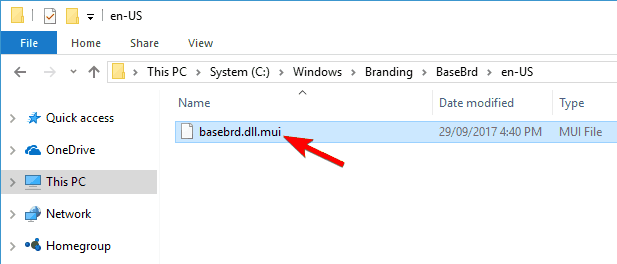
- After doing that, navigate to C:WindowsBrandingBaseBrden-US directory.
- Locate basebrd.dll.mui, right click it and select Take Ownership from the menu. Before you take ownership, be sure to copy the file to your Desktop and use it as a backup in case anything goes wrong.
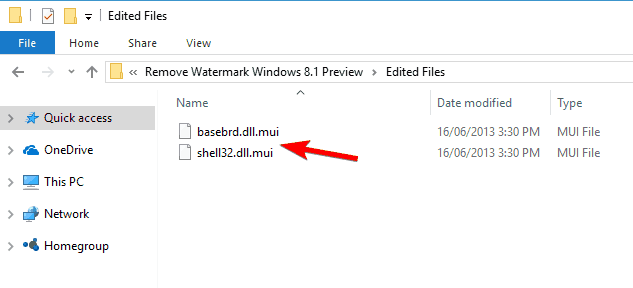
- Now go back to the folder you extracted in Step 2 above. Navigate to Edited files folder and copy basebrd.dll.mui to C:WindowsBrandingBaseBrden-US and shell32.dll.mui to C:WindowsSystem32en-US directory.

After replacing these files, you just need to run a single command from Command Prompt. To do that, follow these steps:
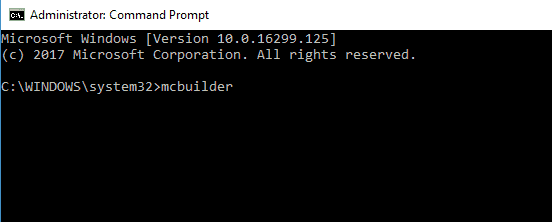
- Open Command Prompt as administrator. You can do that by pressing Windows Key + X and choosing Command Prompt (Admin) from the menu. If Command Prompt isn’t available, you can use PowerShell (Admin) instead.
- When Command Prompt opens, enter mcbuilder and press the Enter key on your keyboard to run the command.
- After the mcbuilder finishes, you can close the Command Prompt window and reboot the Windows 8.1 or the Windows 10 device.

Once your PC restarts, the watermark in should be gone. Now, you need to remove take ownership feature. To do that, follow these steps:
- Navigate to Take Ownership directory and double click on Uninstall_Take_Ownership.reg.
- Left click on the Yes button when the Registry Editor window pops up.
Keep in mind that this solution can be potentially dangerous, and we’re not responsible for any stability issues and file loss that can occur after using this solution.
2018 Update: Unfortunately, the link from the beginning of this solution is no longer available. The tool cannot be downloaded, and in this case, we have searched for another tool to help you removing watermarks.
After several hours of research, we have concluded that the best alternative is Universal Watermark Disabler. Download the tool from its website and try to disable the watermark by using it.
2. Use Registry Editor
According to users, you can remove the Insider’s watermark simply by making a couple of changes in your registry. To do that, follow these steps:
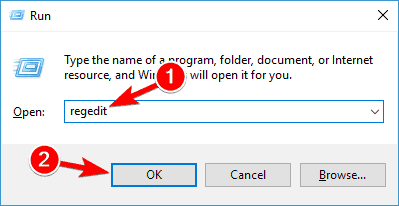
- Press Windows Key + R and enter regedit. Press Enter or click OK.
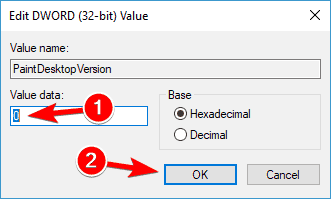
- When Registry Editor opens, in the left pane navigate to ComputerHKEY_CURRENT_USERControl PanelDesktop. In the right pane double click on PaintDesktopVersion.
- Set the Value data to 0 and click on OK to save changes.

After doing that, restart your PC and the watermark should be gone.
3. Change your Ease of Access settings
According to users, you can remove your build number watermark in Windows 10 simply by changing Ease of Access settings.
This is a simple workaround that will remove background images as well as your watermark. To do that, follow these steps:
- Press Windows Key + S and enter control panel. Select Control Panel from the list of results.
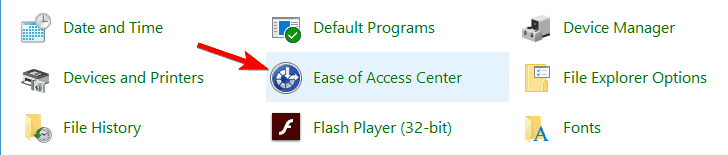
- Select Ease of Access Center from the list.
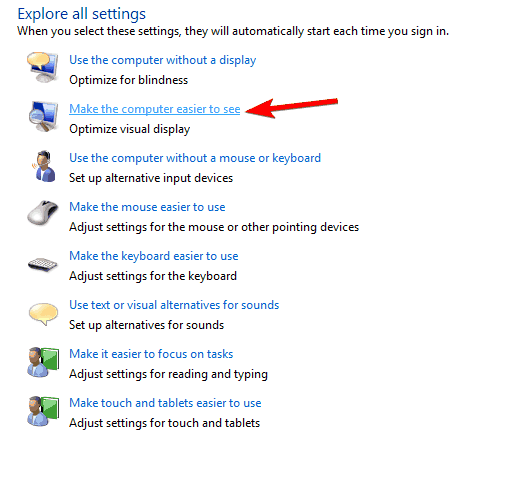
- Click on Make the computer easier to see.
- Check Remove background images (where available) and click on Apply and OK to save changes.
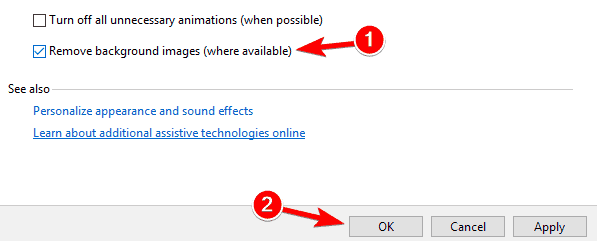
After doing that, your background should disappear, but the watermark will be gone as well. This is a crude workaround, but it works according to users, so feel free to try it out.
4. Use Command Prompt
If you’re using Windows 10 in Test Mode, you should see the watermark in the bottom right corner. However, there’s a way to remove test watermark in Windows 10 by using Command Prompt.
This process is rather simple and you can do it by following these steps:
- Open Command Prompt or PowerShell as administrator.
- When CommandPrompt starts, enter the following commands:
- bcdedit.exe -set loadoptions ENABLE_INTEGRITY_CHECKS
- bcdedit.exe -set TESTSIGNING OFF
- Close Command Prompt and restart your PC.
Now the watermark should disappear when you enter Test Mode. Keep in mind that this solution works only for Test Mode and it won’t work in normal mode.
5. Change your background image
According to users, you can remove Evaluation copy watermark simply by making a few changes to your background image. To do that, you need to do the following:
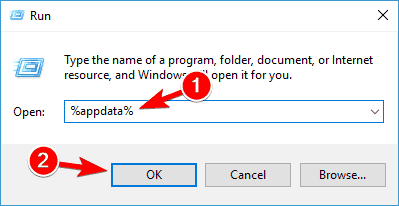
- Press Windows Key + R and enter %appdata%. Press Enter or click OK.
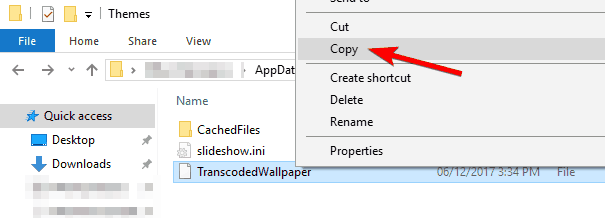
- Navigate to RoamingMicrosoftWindowsThemes directory.
- Create a copy of TranscodedWallpaper in Themes directory.
- Go to the View tab and check File name extensions.
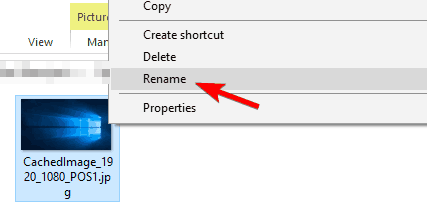
- Open CachedFiles directory, right click the available image and choose Rename from the menu. Be sure to copy the entire name of the image. In our example it’s CachedImage_1920_1080_POS1.jpg but it will be different on your PC.
- Go back to Themes directory. Rename TranscodedWallpaper – Copy to CachedImage_1920_1080_POS1.jpg. Keep in mind that you need to use the file name that you got in Step 5. Don’t use the same file name as we used since it might not work for you.
- Copy CachedImage_1920_1080_POS1.jpg to CachedFiles directory. You should see Replace or Skip File dialog. Choose Replace the file in the destination.

After doing that, your Evaluation copy watermark should disappear completely.
As you can see, removing the Evaluation watermark is rather simple and you can do it easily with one of our solutions.
If your watermark says that you need to activate Windows, be sure to purchase Windows 10 license and activate it.
If you already have a genuine license, you might have to contact Microsoft to see how to activate your copy of Windows.
So you can follow the steps above to remove your Windows 8.1 or Windows 10 watermark and have your desktop clean as a whistle in no time.
Also, if something in the article above is unclear or it hasn’t worked for you please write us below in the comments section and we will help you as soon as possible.
Easiest way to remove the Windows watermark from your screen

After reading many instructions on the internet, I realize that the authors are using the same method, which is to edit registry to remove the Windows watermark on the bottom-right corner of the screen. You might not know, registry is like the heart of a Windows system. Honestly, intervention in registry is very risky and not recommend. There is a better way and not generally known, which is activate your Windows using a 180-day trial license. In this post today, we will move in this direction.
Time needed:В 1 minute.
Remove the Windows watermark using KMS client key.
- Get the KMS client product key from Microsoft homepage.
I wrote a detailed instruction about this step before. It’s here.
Open command prompt as admin.
Please follow instructions here to run it with admin rights.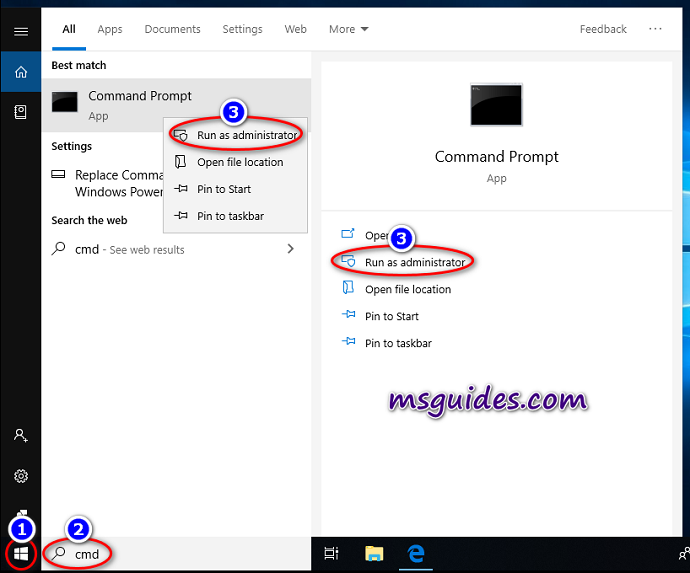
Install the key you got above. Type the command then press Enter.
In this example, I am using Windows 10 Professional so the client key here is “W269N-WFGWX-YVC9B-4J6C9-T83GX“.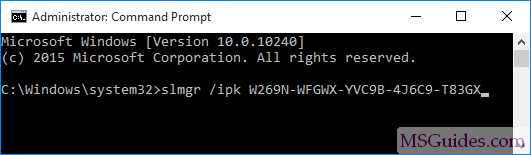
kms8 is one of servers I have managed. You can also use other public servers on the Net if they are from a credible source.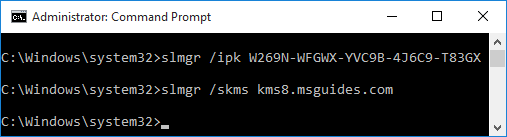
Activate your Windows using “ato” command.
Once your Windows is activated successfully, the watermark will be removed automatically.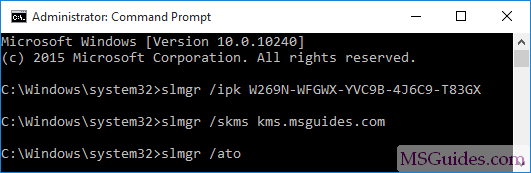
Note: After following the steps above, if the watermark is not removed, it means your Windows is not activated successfully. In this case, you can create a ticket in the community or email me.
If you would have any questions or concerns, please leave your comments. I would be glad to explain in more details. Thank you so much for all your feedback and support!
Who am I ?
I am Guang, a third year college student. I’m currently managing two channels (Next Level ‘n’ Always Smile).
Leave a Reply Cancel reply
78 thoughts on “ Easiest way to remove the Windows watermark from your screen ”
Is it mandatory to use the domain kms.msguides.com?
Help I am getting the non-core edition error.
HI Guang,
After following the step and typing the ato command, the watermark was still there.
I got an error message: software licensing service reported that the computer could not be activated.
No key management service(KMS) could be contacted.
Each command showed successful except the ato command. I use windows 10 enterprise
Kindly assist. Thank you
Hi, After ato command, I am getting below error message :
Error:0xC004F074 The Software Licensing reported that the computer could not be activated. No key Management Service (KMS) could be contacted. Please see the Application Event Log for additional information
.
my watermark doesn’t remove help me
my watermark doesn’t remove help me
Thanks a lot Guang! Not only for the steps that led me to finally activating my pc, but also for taking the time to explain and differentiate the different types of activation methods. Thanks a bunch!
To anybody encountering an error, consider the following fixes…?:
– Check if you opened cmd as an admin
– Check if you’re connected to the internet ***You have to be connected to the internet
– Try switching between kms8.msguides.com and kms.msguides.com as your main KMS server
– Check if you used the license key for your windows version
Using the above fixes, I was able to get rid of my error. So sorry I cannot remember the exact error. I hope I was able to contribute anything to your activation, Goodluck рџ™‚
Oh yes! it worked like a charm.
Thanks a lot Anthony.
As you suspected, when the first kms server (kms.msguides.com) does not respond, I should try the kms8.msguides.com server. So, after switching among kms servers I reissued the ato command for activation. and it works! Thank you Guang for you help!
i followed the steps but my windows is still not activate
is is showing Error:0x80070002 the system cannot find the specified (SWbemObjectEx)
i followed the steps but my windows is still not activate
is is showing Error:0x80070002 the system cannot find the specified (SWbemObjectEx)
Hello! I am following the steps you gave in order to activate my windows 10 Home but at the end, an error appears saying “no KMS could be contacted”. I would be very pleased if you can help me! Thank you
Hi. Can you answer me please… Actually, can i connect two computers with same internet and router on the same kms address? Any conflict because of that? Should i using different kms addresses or same kms address will be just fine?
Hwidgen is used to create a valid and genuine digital license obtained directly from Microsoft Retail Activation Servers, which can be used to activate Windows 10. It’s actually pretty simple and doesn’t mess with system files and leaks.Hdwidgen is such an amazing software.
Mason
patchhere.com
how i can activate my window 10
It says for me. Can u help me?
‘/ato’ is not recognized as an internal or external command,
operable program or batch file.
spelling mistake or not using KMs method with admin right online.
this cmd doesn t work, the watermark doesn t remove.
The only way success the cmd file must run with admin right online.
yes i did it as admin but i have this message “server execution failed”
Your computer system is affected by viruses, damaging files, and items. So make sure that every once in a while, you scan and clean your computer with an antivirus program.
this cmd trick is not working even if it works for 1 day but next day the water mark appears again tried many times thing. after reappearing it never goes back with this CMD trick.
This post only work for windows 10 pro version.
Thank you. It’s work perfectly. I love you :3
You are awesome! \o/
So after activating using KMS Key, it will renew it’s license every 7 days automatically forever?
it will renew Its license every 180 days back to 180 days.
Will it renew automatically? No need to redo the process manually?
Yes, automatic renew. Even you pass 180 days, when you online, will do activation again.
All update from Microsoft, just like use retail key for activation.
Hello!
If I activate Windows 10 LTSC in this way, will it be for 180 days?
Windows 10 2019 LTSC cannot be activated with that, as it requires the Server 2019 KMS key.
is there any way to get access of pluralsight?
even you use retail key, won’t get access of pluralsight.


