- How to erase my hard drive and start over
- Erasing the hard drive and reinstalling Windows
- Windows 10
- Windows 8
- Windows 7 and Vista
- Windows XP and 2000
- Earlier versions of Windows and DOS
- Formatting the drive
- Windows NT 4.0
- Windows 95 with a backup CD
- (3 Free Methods) How to Remove or Delete Partition Windows 10
- Method 1. Remove Windows 10В Partition with Disk Management
- Method 2. Delete Partition Windows 10 in Diskpart
- Method 3. Delete Partition Windows 10 with Free Hard Drive Partitioning Software
- Bonus TipВ — Can’t Delete Partition During Windows 10 Installation
How to erase my hard drive and start over

Most computers have a system restore disc or built-in restore process on the hard drive to reset the computer to the original settings, also known as a factory reset. Resetting, formatting, or restoring, a computer helps eliminate issues with computer software, including corrupt program files and virus infections. Instructions on how to restore your computer back to the original software are provided below.
Restoring your computer erases all the information on the hard drive and makes it like new. Once the steps below are completed, you cannot restore any lost data. Back up any files you do not want to lose before proceeding with the restore process.
If you have an OEM computer (e.g., Acer, ASUS, Dell, or HP), you likely have a hidden system recovery partition and don’t need a disc to restore your computer.
Erasing the hard drive and reinstalling Windows
To erase your hard drive and reinstall Windows, follow the steps below for your version of Windows.
If you’re erasing everything and reinstalling Windows, an administrator login name or password isn’t needed.
Windows 10
Follow these instructions to erase or uninstall and reinstall Windows 10.
- Open the Start menu.
- Select the Settings option (looks like a gear).
- In the Settings window, select the Update & security option.
- Select the Recovery option in the left navigation pane.
- Click the Get Started button in the «Reset this PC» section.
- Choose either the Keep my files or Remove everything option, depending on if you want to preserve your files or delete everything and start over.
- Follow the prompts to begin the recovery process.
Windows will be reset, either keeping your files intact or erasing everything, depending on the option you selected.
Windows 8
Follow these instructions to erase and reinstall Windows 8.
- Press the Windows key + C to open the Charms menu.
- Select the Search option and type reinstall in the Search text field (do not press Enter ).
- Select the Settings option.
- On the left side of the screen, select Remove everything and reinstall Windows.
- On the «Reset your PC» screen, click Next.
- On the «Do you want to fully clean your drive» screen, select Just remove my files to do a quick deletion or select Fully clean the drive to have all files erased.
- On the «Ready to reset your PC» screen, click Reset.
The hard drive will be erased, and Windows 8 will be reinstalled.
Windows 7 and Vista
To restore a Windows 7 or Vista computer, you must have a set of restore discs for the computer or an original Windows 7 or Vista installation disc. If you do not have a set of restore discs, contact the computer manufacturer to order a new set or restore discs.
Before following the steps below, make sure the computer is set to boot from the CD-ROM drive.
- How to boot from a CD or DVD in a computer.
- Insert the Windows 7 or Vista installation CD in the CD-ROM drive and restart the computer.
- When you see the message «Press any key to boot from CD,» press a key on the keyboard.
- Press Enter at the Windows Setup welcome screen.
- When prompted, press any key on your keyboard.
- On the «Install Windows» page, select your preferred language and other preferences, then click Next.
- On the License Agreement page, accept the terms and agreements and click Next.
- On the Installation Type screen, choose the Custom option.
- Select the Drive Options (advanced) option.
- For Disk 0, delete all partitions. When all partitions are deleted, a single entry named «Unallocated space» should be seen.
- Click Disk 0 and select Next.
The Windows installation process starts by creating a new partition, formatting the partition, and installing Windows on the hard drive. The formatting process erases the hard drive before installing Windows.
Windows XP and 2000
To restore a Windows XP or 2000 computer, you must have a set of restore discs for the computer or an original Windows XP or 2000 installation disc. If you do not have a set of restore discs, contact the computer manufacturer to order a new set or restore discs.
Before following the steps below, make sure the computer is set to boot from the CD-ROM drive.
- How to boot from a CD or DVD in a computer.
- Insert the Windows XP/2000 installation CD in the CD-ROM drive and restart the computer.
- When you see the message «Press any key to boot from CD,» press a key on the keyboard.
- Press the Enter key at the Windows XP Setup welcome screen, then press F8 to accept the Terms and Agreements.
- Follow the on-screen instructions to select a hard drive partition to format and install Windows XP on.
- After formatting the hard drive, which erases all data, see our steps for reinstalling Windows.
- How to install the Microsoft Windows operating system.
Earlier versions of Windows and DOS
Follow these instructions to erase and reinstall MS-DOS 5.0+, Windows 3.x, 95, 98, ME, or NT 4.0.
Formatting the drive
- Place the bootable diskette or disc inside the computer and reboot to get to the DOS prompt. In some cases, you may need to boot the computer with CD-ROM support or press a key to boot from the disk.
- At the MS-DOS prompt type, format c: /s
If the «format c: /s» command does not work, you may need to download the format.com file to your boot disk.
- The computer asks you «Are you sure you want to erase everything on drive c:»
- If you are ok with doing this, press «Y» for yes and press Enter .
- After doing this, the computer begins the formatting process. While the computer is formatting, make sure no errors are encountered.
- I’m getting bad sectors, clusters, or missing allocations.
- Once the format process is completed successfully, at the MS-DOS prompt, type «fdisk /mbr» and press Enter . After entering this command, it should return you to the MS-DOS prompt with no message. This step is not required, but recommended.
- Do you have additional information on fdisk /mbr?
- Once back at the MS-DOS prompt, reboot the computer with the boot disk still inserted and follow the steps below to reinstall Windows on the hard drive.
Windows NT 4.0
Windows NT can be installed in different ways. We recommend Windows NT be installed using the steps below as we feel that these steps by far are the easiest way to install Windows NT 4.0.
First, we recommend all users wanting to install Windows NT use the /b switch, which allows the users to not need to create the diskettes. We do, however, recommend the user create the emergency recover diskettes if they have not already been created after the installation of Windows NT.
Finally, before the installation of Windows NT, we recommend you run smartdrv, which helps the installation of Windows NT run a lot faster.
- Place the CD into the computer.
- Type X: (where x is the CD-ROM drive, often this is D:).
- Once at the appropriate drive, type cd winnt and press Enter to get into the Windows 95 directory.
- Once at X:\WINNT> type winnt /b.
- Follow the on-screen instructions to complete the installation.
Windows 95 with a backup CD
- Place the CD into the computer.
- Type X: (where x is the CD-ROM drive, often this is D:).
- Once at the appropriate drive, type cd win95 and press Enter to get into the Windows 95 directory.
- Once at X:\WIN95> type setup to begin the installation.
- Follow the on-screen instructions to complete the installation.
If you are encountering issues during the setup process, you can add additional switches to the setup command line. These switches are on our Windows 95 setup switches page.
(3 Free Methods) How to Remove or Delete Partition Windows 10
The Windows operating system allows users to manage partitions by themselves. Therefore, users can delete one partition and expand another partition. In this article, we’d like to introduce three free and easy methods to delete partitions on Windows 10.
The common demands for deleting a partition in Windows 10 are usually as follows:
- Delete a data storage partition that is unnecessary
- Delete a recovery partition on a computer or laptop
- Delete EFI system partition in Windows 10
- Delete a partition during Windows 10 installation
- Delete the unallocated partition in Windows 10/8/7
Whenever you need to remove a partitionВ in Windows 10, you can start with any one of the three ways within this page: [1] Windows Disk Management; [2] Diskpart command and [3] EaseUS hard drive partitioning software.
Note: All methods mentioned will erase the data stored in the partition. Back up your important data before proceeding. Then, follow the step-by-step guide to remove any unwanted partition and reallocate your Windows 10 disk space.
Method 1. Remove Windows 10В Partition with Disk Management
Applies to: remove data storage drive like D, E, F in a Windows 10 computer; delete one partition each time
To remove partitions in Windows 10 using Disk Management, follow the steps below:
Step 1: Search «Disk Management» at the Start Menu.
Step 2: Right-click the drive or partition by clicking «Delete Volume» in the Disk Management panel.
Step 3: Select «Yes» to continue the removal process. Then you’ve successfully deleted or removed your Windows 10 disk.

After doing so, the deleted partition becomes unallocated space. You can apply further operations to the unallocated space.
Method 2. Delete Partition Windows 10 in Diskpart
Applies to: delete data partition, recovery partition, or EFI partition in Windows 10 (require a recovery disk); delete all partitions one time
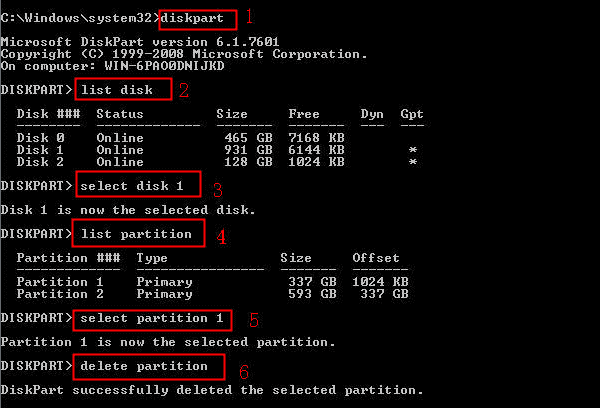
Here is the step-by-step guide for deleting partition in Diskpart:
Step 1: Press the «Windows» + «R» keyВ simultaneously to bring up the Run box. Type cmd and hit Enter.
Step 2: Type the following commands each after to delete a partition from your computer.
- diskpart
- list disk
- selected disk #
- list partition
- select partition #
- delete partition
Step 3: Type exit to close the Command Prompt window.
Method 3. Delete Partition Windows 10 with Free Hard Drive Partitioning Software
Applies to: delete data partition, recovery partition, or EFI partition in Windows 10; delete all partitions one time
If you delete the partition in order to expand other partitions. Then the free hard drive partitioning software — EaseUS Partition Master would be a better choice. It is an all-in-one partition management tool that supports users to delete and resize partitions with ease. Compared with the diskpart method, it’s able to delete one or more partitions at a time, yet is more user-friendly, without requiring a solid computer skill.
Now download EaseUS Partition Master and follow the detailed guide below.
Guide: How to delete partition in Windows 10
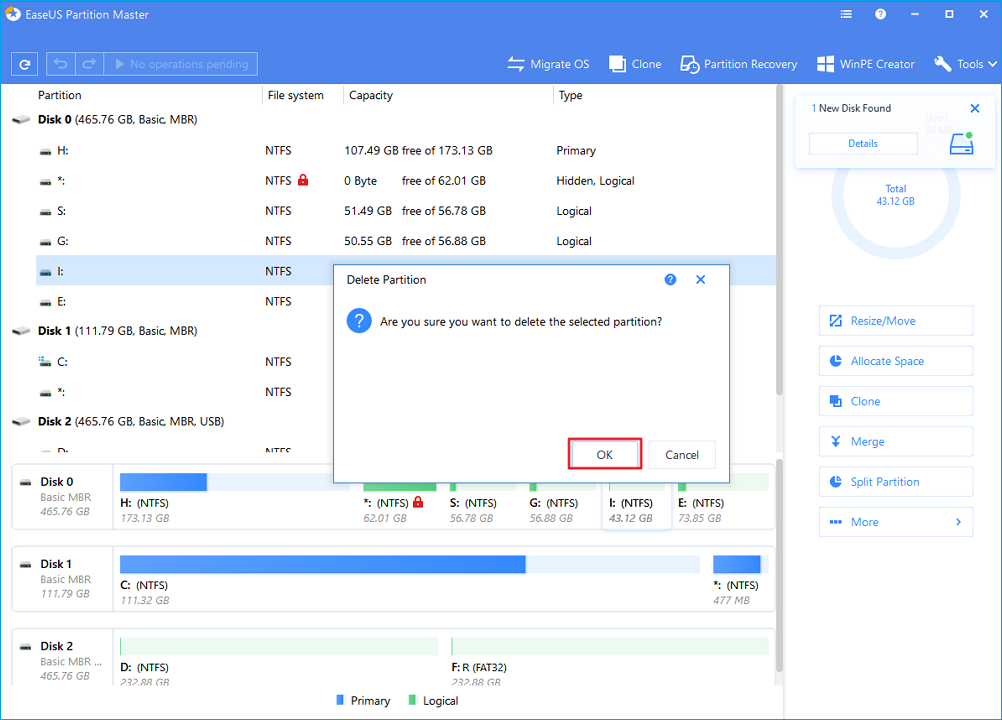
Step 1.В Launch EaseUS Partition Master on your computer. Which partition do you want to delete? Right-click on it and choose «Delete. «.
Make sure that you’ve backed up the important data on the selected partition because this manner will compeletely erase data there.

Step 2. Click «OK» to confirm the deletion.
Step 3. Click «Execute xx Operation» on the top menu and then click «Apply» to save the change.
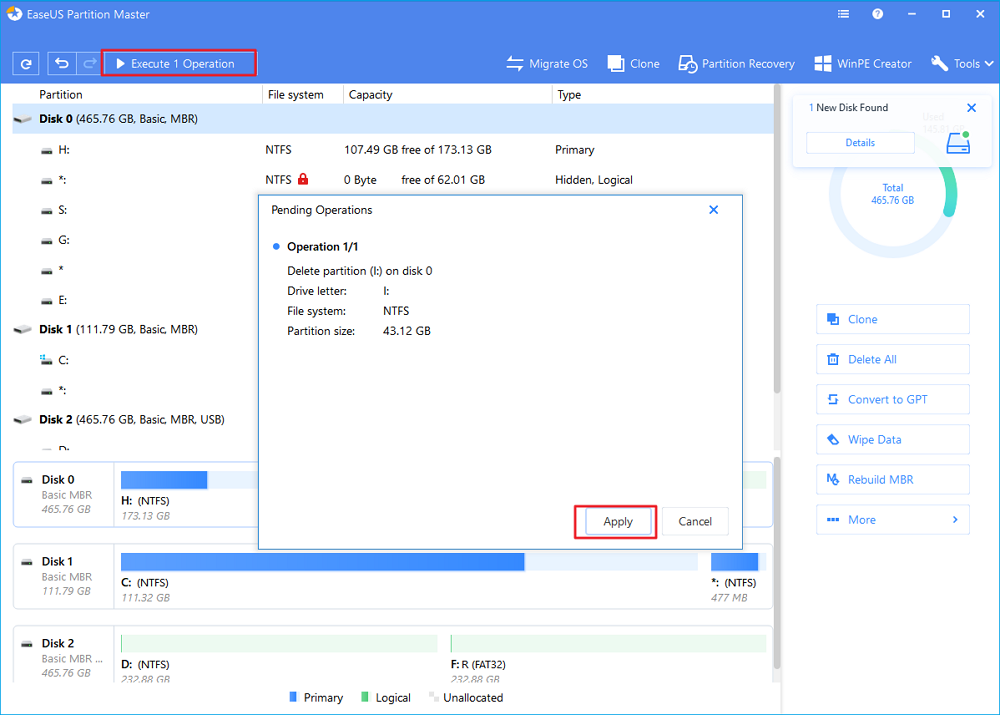
After doing so, you can enlarge other disks or do more operations using EaseUS Partition Master for free.
The following video tutorial shows how to partition a hard drive with EaseUS Partition Master, including how toВ resize, create, delete a partition and extend the C drive.В
Bonus TipВ — Can’t Delete Partition During Windows 10 Installation
Can’t delete a partition in Windows 10? It’s because you’re attempting to delete a protected partition using the default Disk Management, like a C drive, boot drive, recovery drive, or an OEM partition. When you can’t delete a partition Windows 10 install, you can try solutions as follows.
Step 1: Boot up with Windows installation media (USB/DVD).
Step 2: On the first screen. Press SHIFT + F10 and type the below commands:
Step 3: Continue with Installation, select custom, select the unallocated partition then click Next (Do not create partition/format. Let Windows create the needed partitions.
Step 4: When prompted for a product key. Click on «I don’t have the product key» or «Skip this step».
Was This Page Helpful?
Gemma is member of EaseUS team and has been committed to creating valuable content in fields about file recovery, partition management, and data backup etc for many years. She loves to help users solve various types of computer related issues.
Brithny is a technology enthusiast, aiming to make readers’ tech life easy and enjoyable. She loves exploring new technologies and writing technical how-to tips. On her spare time, she loves sharing things about her favorite singer — Taylor Swift on her Facebook or Twitter.
I love that the changes you make with EaseUS Partition Master Free aren’t immediately applied to the disks. It makes it way easier to play out what will happen after you’ve made all the changes. I also think the overall look and feel of EaseUS Partition Master Free makes whatever you’re doing with your computer’s partitions easy.
Partition Master Free can Resize, Move, Merge, Migrate, and Copy disks or partitions; convert to local, change label, defragment, check and explore partition; and much more. A premium upgrade adds free tech support and the ability to resize dynamic volumes.
It won’t hot image your drives or align them, but since it’s coupled with a partition manager, it allows you do perform many tasks at once, instead of just cloning drives. You can move partitions around, resize them, defragment, and more, along with the other tools you’d expect from a cloning tool.
Daisy/2021/04/16
Brithny/2021/04/16
Gemma/2021/04/16
Tracy King/2021/01/22
About EaseUS Partition Master
All-round disk & partition management software for personal and commercial use. Let it manage your storage drive: resize, format, delete, clone, convert, etc.


