- How To Remove ‘Get Windows 10’ Notification and Its Icon From The Taskbar
- Method 1: Uninstall the Updates
- Method 2: Delete GWX Folder
- Method 3: DisableGWX
- Method 4: Using GWX Control Panel
- How to remove old notification icons from the notification area in Windows 10
- Remove old notification icons in Windows 10
- How can I permanently remove an icon from the notification area?
How To Remove ‘Get Windows 10’ Notification and Its Icon From The Taskbar
We all know that Windows 10 is the latest operating system from Microsoft and Microsoft sure is pushing its users to get the Windows 10. That is why, if you are a user of Windows 7, you will see the notifications/pop-ups of Get Windows 10 in the taskbar. This isn’t a huge problem but it might be annoying for a lot of people especially if they aren’t planning on moving to Windows 10. Also, this pop-up will keep appearing until you install the Windows 10. So, it can make your Windows 7 experience really annoying.
Basically, this PUP (Potentially Unwanted Program) gets installed with the KB3035583 update. So, every Windows user who installed the latest updates, or at least the KB3035583 update, is going to get this Windows program that will show up these pop-ups continuously. The GWX.exe executable is related to this program and you will be able to see it in the task manager as well. As long as this GWX.exe is running, this program will continue to run and show the pop-ups.
So, there are a few ways that can help you stop this program or disable it or completely delete it from the Windows. There are also some methods to just uninstall the update that brings this program. Go through each method listed below and check which one works for you.
If you don’t want to get into too many details then you can follow the steps given below to turn off the Get Windows 10 notification. However, this is a temporary solution and the notifications will be back after the restart. So, you will need to do this on every restart of your computer.
- Press CTRL, ALT and DELETE key simultaneously (CTRL + ALT + DELETE)
- Select Start Task Manager
- Click the Processes tab
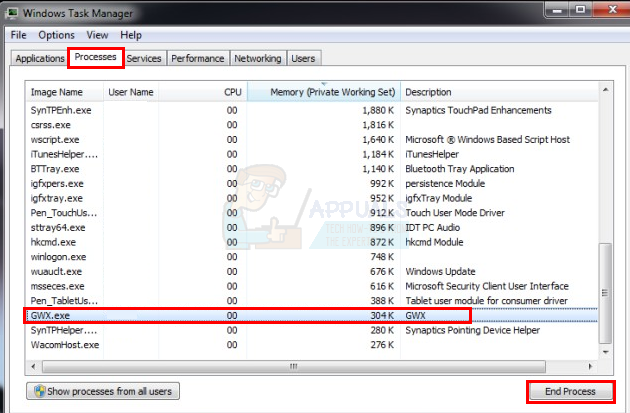
- Locate the process called exe
- Right click GWX.exe and click Stop
Method 1: Uninstall the Updates
The first thing you should do is to uninstall the update from your machine. The update that brings this pop-up program is the KB3035583. So, all you have to do is locate this from the installed updates and uninstall it.
Steps for uninstalling KB3035583 are given below
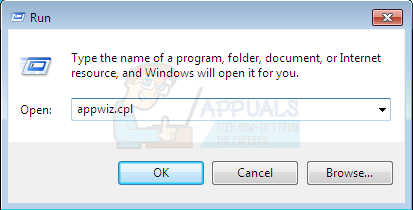
- Hold Windows key and press R
- Type appwiz.cpl and press Enter
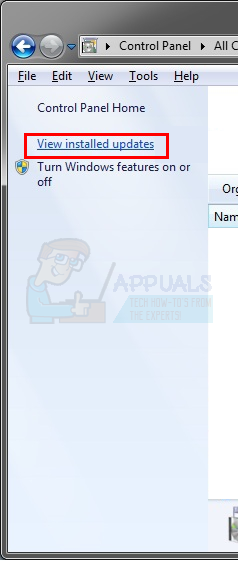
- Click View installed updates from the left top
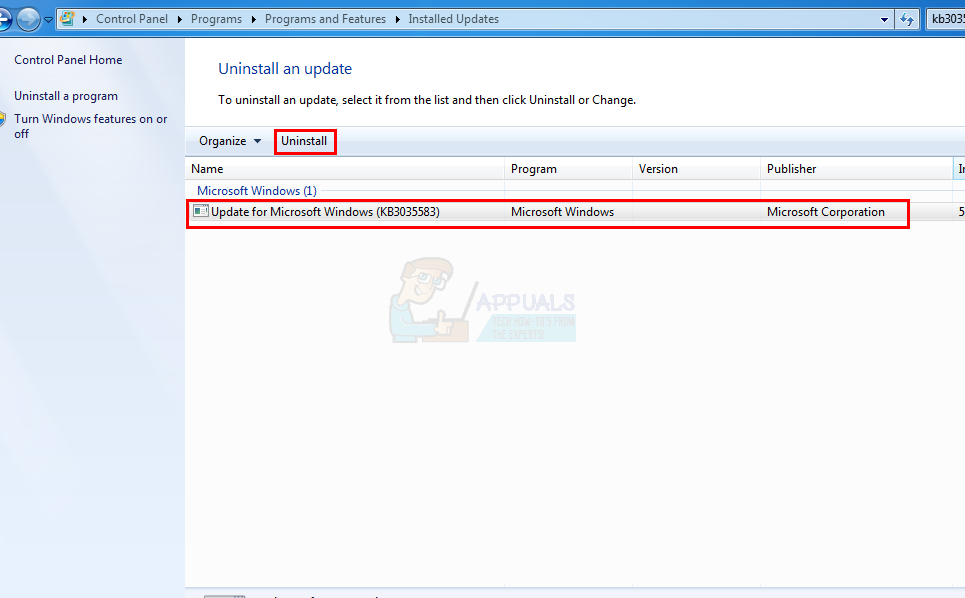
- Now go through these updates and locate the KB3035583 update
- Select KB3035583 update and click Uninstall
- Follow any additional on-screen instructions
That’s it. You should restart your PC for the changes to take place. So, reboot your system and the update should be gone once your computer reboots. However, the update might get installed again if your Windows Updates are on automatic settings. There also are cases where this specific update is packaged with other updates (This isn’t confirmed but there are chances) so installing other update isn’t safe as well.
So, once you are done with following the above steps, follow the steps given below to make sure the update doesn’t get installed again.
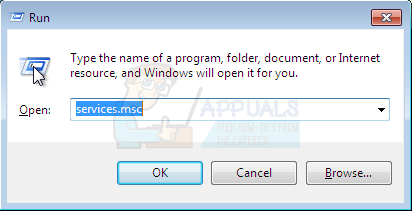
- Hold Windows key and press R
- Type services.msc and press Enter
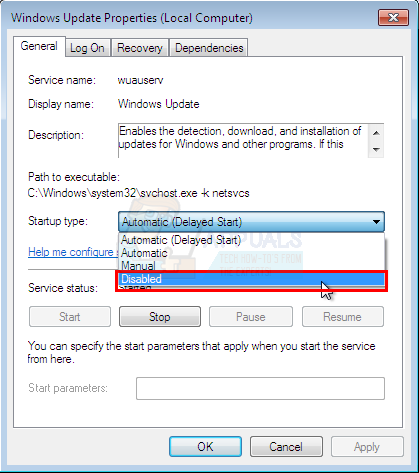
- Locate Windows Update service and double click it
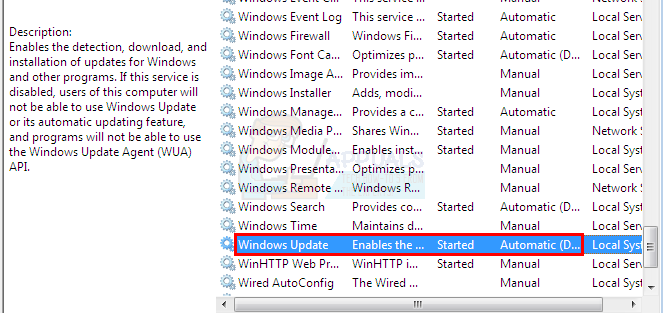
- Select either Manual or Disabled from the drop down menu in Startup Type section
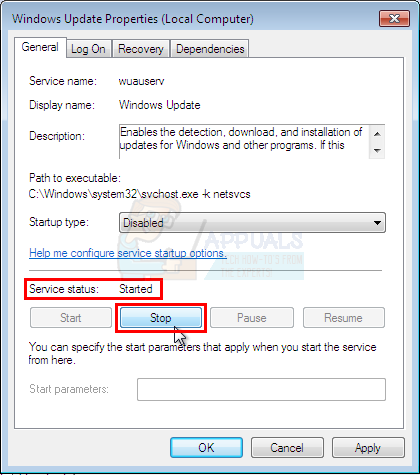
- Click Stop if the Service Status is Running
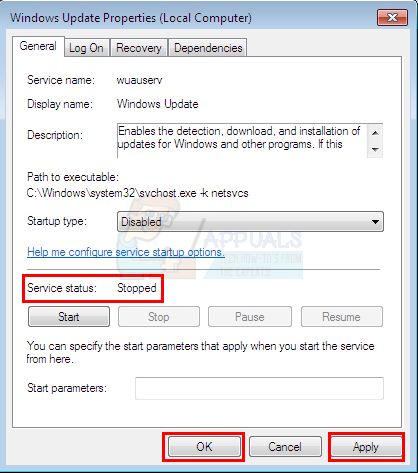
- Click Apply then Ok
This should prevent any further Windows Updates from getting installed on your system. If you want to install updates then just follow the above given steps and select Automatic from the drop down menu in step 4. But, keep in mind that the update KB3035583 might get installed again which will bring back the pop-ups.
Method 2: Delete GWX Folder
You also have the option to delete the GWX folder (which contains the GWX.exe that gives this pop up). However, this method requires you to take the ownership because Windows won’t let you delete the folder without proper permissions.
Before deleting the GWX folder, we need to stop the GWX.exe from the task manager as well. This is because Windows doesn’t delete any program that is in the running state.
So, here are the steps to locate and delete the GWX folder
- Press CTRL, ALT and DELETE key simultaneously (CTRL + ALT + DELETE)
- Select Start Task Manager
- Click the Processes tab
- Locate the process called exe
- Right click GWX.exe and click End Process
- Now, close the Task Manager
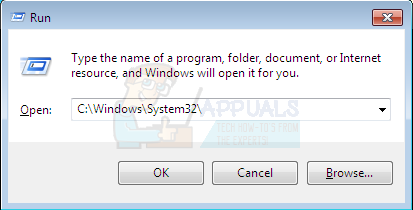
- Hold Windows key and press R
- Type C:\Windows\System32\ and press Enter
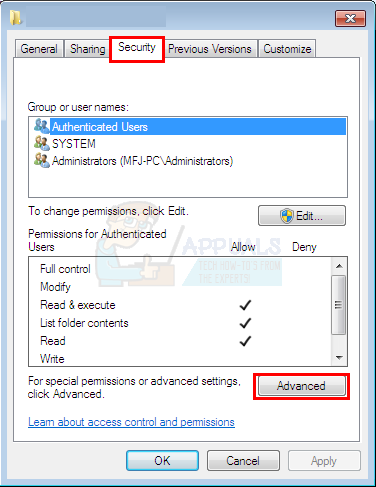
- Locate, right click the folder GWX and select Properties
- Select Security tab
- Select Advanced
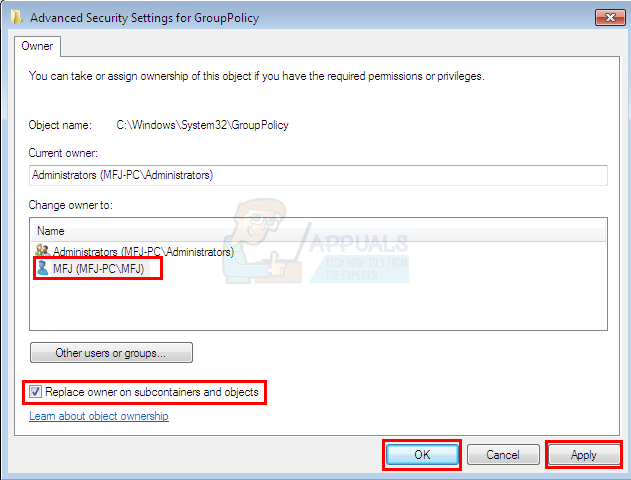
- Select the Owner tab
- Click Edit
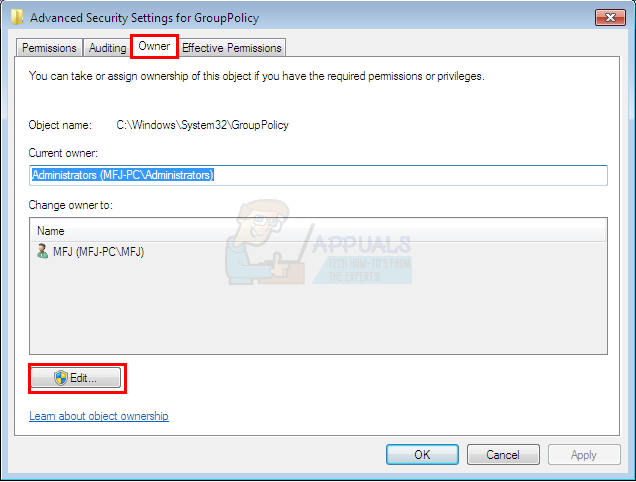
- Select your user account
- Check the box that says Replace owner on subcontainers and objects
- Click Apply then Ok
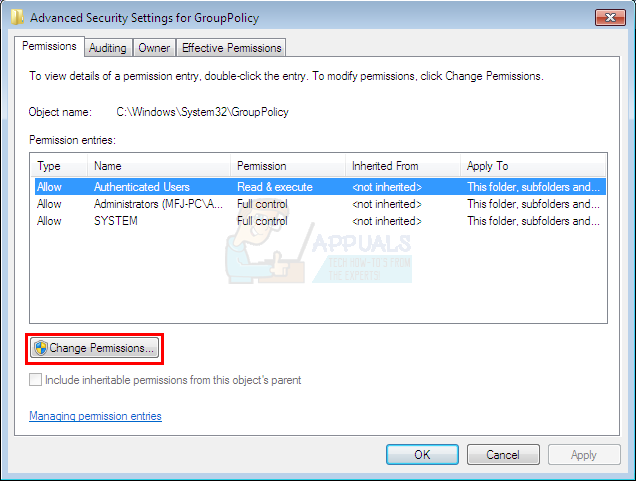
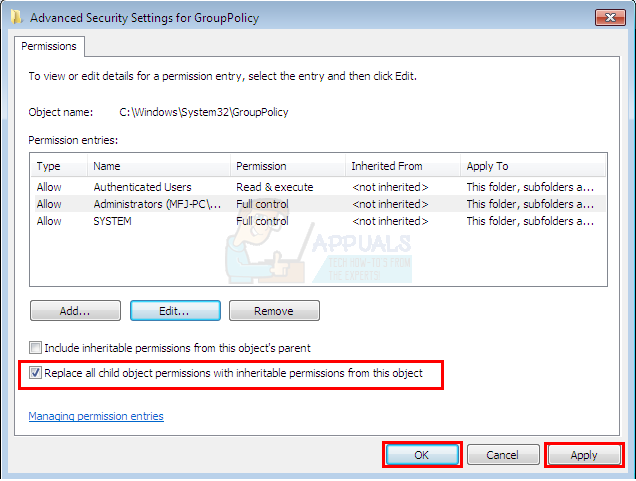
- Now, you should be back at the Advanced security settings window. Select the Permissions tab
- Click Change permissions
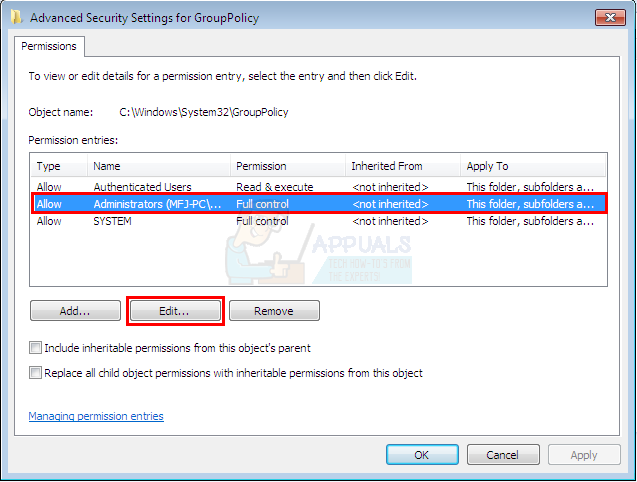
- Select your user account from the list
- Select Edit
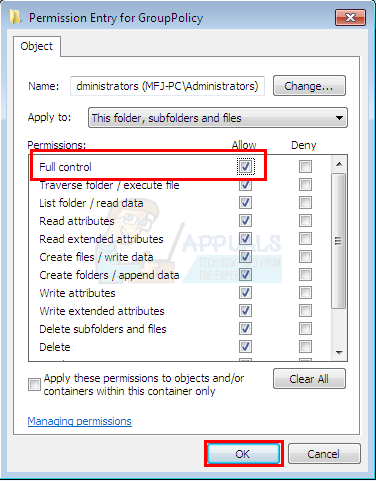
- Check the box that says Full Control
- Click Ok. Click Ok again if a confirmation dialog appears
- Check the option Replace all child object permissions with inheritable permissions from this object
- Click Apply then Ok
- Now, you should be able to delete the GWX
- Close the Properties window
- Right click GWX from the System32 folder and select Delete. Confirm the action and it should easily delete now.
Note: If you still can’t delete the GWX folder then follow the steps from 1-6 (given above) to stop the GWX.exe and perform steps 7-27 again.
Method 3: DisableGWX
If you can’t or simply don’t want to delete the GWX folder then you also have the option to disable the GWX. Disabling GWX will prevent it from running on your windows which, therefore, will stop the pop-ups.
You can disable the GWX from the Windows Registry. So, here are the steps for disabling GWX
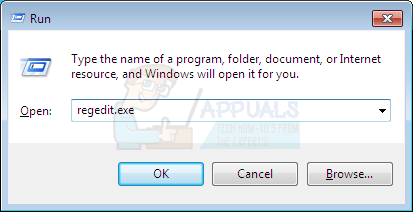
- Hold Windows key and press R
- Type regedit.exe and press Enter
- Now, go to the HKEY_LOCAL_MACHINE\SOFTWARE\Policies\Microsoft\Windows If you don’t know how to navigate to this position then follow the steps given below
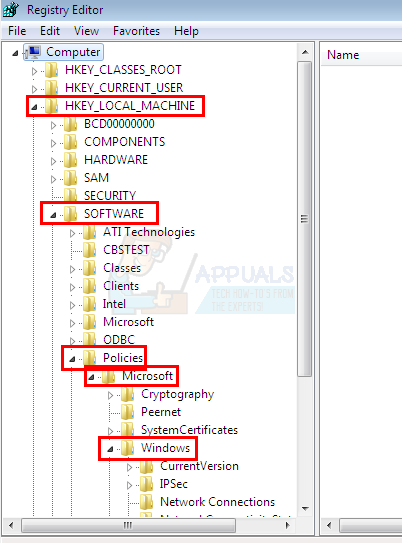
- Double click HKEY_LOCAL_MACHINE from the left pane
- Double click SOFTWARE from the left pane
- Double click Policies from the left pane
- Double click Microsoft from the left pane
- Double click Windows from the left pane
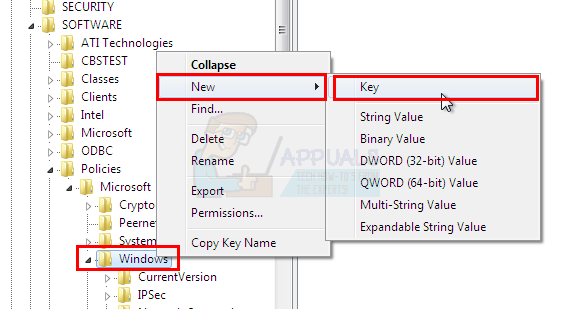
- Right click Windows from the left pane and select New then select Key
- Name the newly create key “GWX” (without quotes) and press Enter
- Now, click GWX
- Right click on an empty space (in the right pane) and select New then select DWORD (32 bit) Value
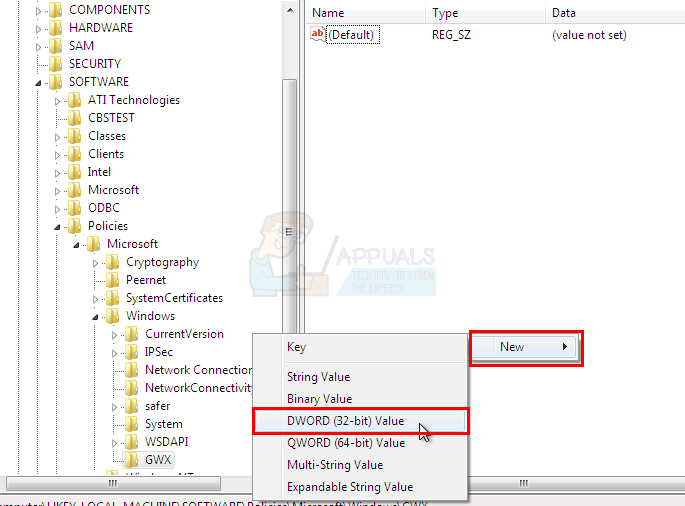
- Name the newly created DWORD value “DiableGWX” (without quotes) and press Enter
- Now, Right click the newly create DisableGWX entry and select Modify
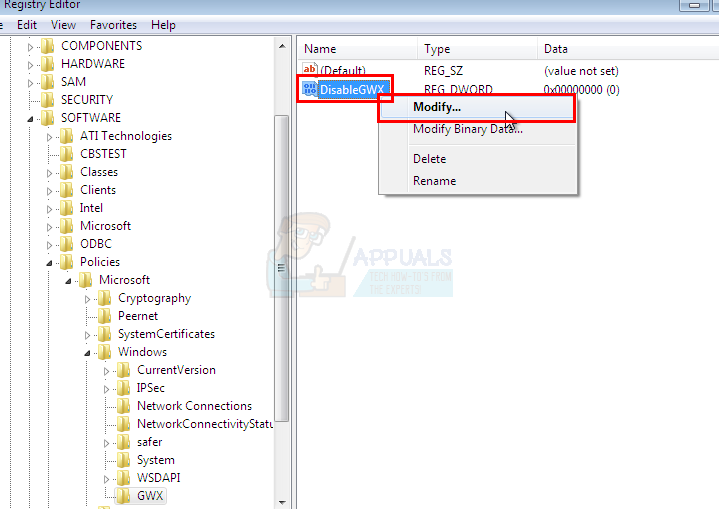
- Type 1 in its Value Data section and press Ok
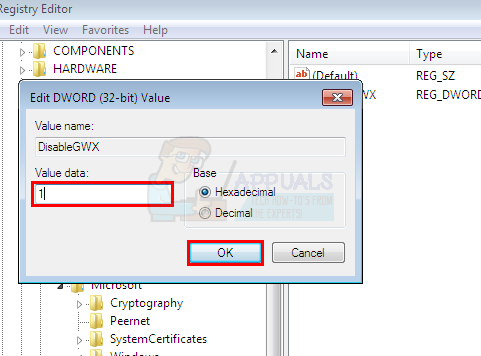
That’s it, you can now close the Windows Registry and the GWX won’t work anymore.
Method 4: Using GWX Control Panel
If you don’t want to do any technical stuff to prevent Windows 10 notifications then you have another option as well. If you don’t mind using a third party tool to control the Windows 10 and its pop-ups then GWX Control Panel is for you. Basically, this is a software that you can use to block Windows 10 related pop-ups and updates. It’s simpler than other methods because you don’t have to anything except for clicking a few buttons. However, it is a third party tool so use it on your own risk.
- Go here, scroll down and click the Download GWX Control Panel button.
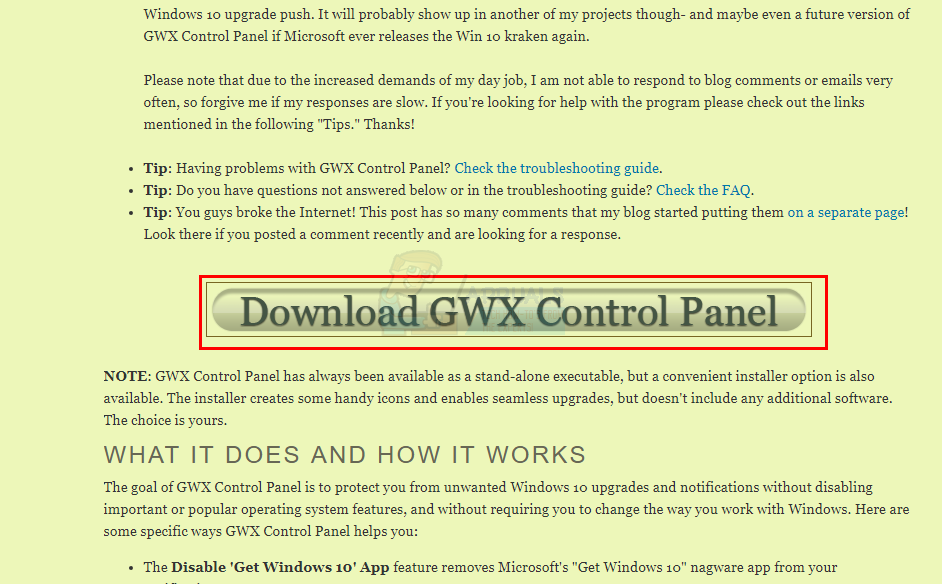
- Once downloaded, simply run the GWX Control Panel exe and you are good to go
- You can check the status of the Windows 10 updates from the GWX Control Panel.
- Check the Is ‘Get Windows 10’ Icon app running, Is ‘Get Windows 10’ Icon app enabled and Are Windows 10 upgrades allowed These sections can be found on the top left corner of the GWX Control Panel screen. None of these should be yes, if any one of these is yes then click any of the relevant button on the GWX Control Panel. For example, if your Is ‘Get Windows 10’ Icon app running status is yes then click Click to Disable ‘Get Windows 10’ App (icon remove)
You can also read about the GWX Control Panel from their page as well.
How to remove old notification icons from the notification area in Windows 10
The notification area or the system tray is located on the right side of the Windows taskbar. It displays icons of some programs which are currently active on your PC, and notifications if any.
To show or hide system icon, typically, in Windows 10, you have to open Settings > Personalization > Taskbar and click on Turn system icons on or off link. In the panel which opens up, you can toggle the switch to show or hide the system icons.
In Windows 7/8, to remove an icon from the notification area, you open Taskbar and Start Menu Properties > Appearance and Personalization > Taskbar and Start Menu. Under the Taskbar tab, click on Customize. Here you can choose to hide the notification area icons that you do not wish to see.
But this only hides but does not remove the icons. Many times, even when you uninstall a program, the icon for that program remains, although it may or may not get displayed. Windows may not remove the program icon of the uninstalled program icon from Notification Area Icons Control Panel applet.
Remove old notification icons in Windows 10
You can clear or remove past or old icons from the notification area or system tray in Windows 10/8/7 by following the procedure laid down in this post. You can carry out a Registry tweak or use freeware to delete or clear past icons in the system tray or notification area.
Run regedit and navigate to the following registry key:
Delete the ‘Icon Streams‘ and ‘Past Icons Stream‘ values.
Alternatively, you can also use freeware CCleaner to do the job easily.
Your clutter would have cleared up.
How can I permanently remove an icon from the notification area?
Every time I boot up an icon consisting of the white numeral «9» in a black field appears in the Notification Area of my desktop tool bar.
Every time I boot up, I «customize» the tool bar and «hide» the icon. It always comes back.
Apparently, it performs no function. Right clicking on it, hoping to find a «discard» option, produces no response.
How can I eliminate the icon?
My operating system is Windows Vista 64 bit Home Premium.
Hi,
Steps to remove unused items from the notification area:
1. Click Start -> Run then type regedit in the box that appears and click ok
2. From the registry editor directory tree, browse to
3. Delete Icon Streams and PasteIconStreams from the list
4. Exit the registry editor, restart your computer and the items in the notification area should now be gone.
Modifying REGISTRY settings incorrectly can cause serious problems that may prevent your computer from booting properly. Microsoft cannot guarantee that any problems resulting from the configuring of REGISTRY settings can be solved. Modifications of these settings are at your own risk.
Remove icons from the notification area (system tray)
2. How to get rid of malware —
Amritha-Microsoft Support.
Visit our Microsoft Answers Feedback Forum and let us know what you think.


