- Red Hat Enterprise Linux 8 GNOME and display server changes
- RHEL 8 GNOME Shell Interface
- RHEL 8 GNOME Classic interface
- Display server options
- Tweaking GNOME
- Red Hat Customer Portal
- Log in to Your Red Hat Account
- Red Hat Account
- Customer Portal
- Select Your Language
- Chapter 3. Installing applications in GNOME
- 3.1. The GNOME Software application
- 3.2. Installing an application using GNOME Software
- 3.3. Installing an application to open a file type
- 3.4. Installing an RPM package in GNOME
- 3.5. Installing an application from the application search in GNOME
- Red Hat Customer Portal
- Log in to Your Red Hat Account
- Red Hat Account
- Customer Portal
- Select Your Language
- Chapter 6. Configuring GNOME at low level
- 6.1. Introduction to configuring GNOME
- 6.2. Managing user and system GNOME settings
- 6.3. Displaying GSettings values for desktop applications
- 6.4. Using dconf profiles
- 6.4.1. Introduction to dconf profiles
- 6.4.2. Selecting a dconf profile
- 6.5. Configuring custom default values
- 6.6. Locking down specific settings
- 6.7. Storing user settings over NFS
- 6.8. Setting GSettings keys properties
- 6.9. Working with GSettings keys on command line
- 6.9.1. Setting key value
- 6.9.2. Monitoring key changes
- 6.9.3. Checking whether key is writable
- 6.9.4. Checking key valid values
- 6.9.5. Checking description of valid key values
- 6.9.6. Querying key value
- 6.9.7. Resetting key value
- 6.9.8. Resetting schema
- 6.9.9. Listing installed non-relocatable schemas
- 6.9.10. Listing schema keys
- 6.9.11. Listing schema children
- 6.9.12. Listing schema’s keys and values
- 6.10. Acknowledgements
Red Hat Enterprise Linux 8 GNOME and display server changes
Red Hat Enterprise Linux 8 contains some important changes regarding the GNOME graphical interface and the default display server. If you are using a graphical desktop in RHEL 8, the most visible change will be that, by default, the GNOME Shell interface is used. This interface has a different appearance and operation compared to GNOME Classic, the default graphical interface in RHEL 7.
Here, we will cover an overview of the GNOME Shell interface in RHEL 8, and also how to switch to the GNOME Classic interface that is similar to the default interface on RHEL 7. We will also cover the new default display server, Wayland, and how to switch the display server to X.org X11 if needed. Another notable change in RHEL 8 is that the KDE Plasma interface has been removed.
RHEL 8 GNOME Shell Interface
When you log in to a graphical interface in RHEL 8, and start an application, you will see something similar to this:

If this is your first time seeing the GNOME Shell interface, you might notice several differences compared to previous versions of RHEL, including: there is no window list at the bottom showing open applications and there are no minimize or maximize buttons on the open application.
The GNOME Shell has been designed to be simple and easy to use, and therefore might be a little different than what you are currently familiar with. However, I would encourage everyone to give it a try for a few days and you might find that you prefer it. If not, later in the post, we will cover how to switch to GNOME Classic.
You can launch applications and also see a list of currently running applications, as well as your favorite applications by accessing the Activities menu. There are three ways to bring up the activities menu:
Click the activities button in the upper left corner of the screen with the left mouse button.
Bring your mouse pointer to the upper left corner of the screen.
Press the super key on your keyboard (which is usually the key between the left CTRL and ALT keys).
Once you use one of these methods to access the Activities menu, several things will happen. Your currently running applications will be tiled on the screen and you can click on any of them to bring it to the foreground. You will also see a Type to search. input box at the top of the screen. You can start typing an application name and GNOME will show you the results of what it found. If the correct application is selected, you can press enter. This makes it very quick to start an application from the keyboard. For example, you can press the super key, type firefox, press enter, and the Firefox web browser will start.
Once you access the Activities menu, you will also see a menu on the left, referred to as the dash. This will show a list of applications that have been marked as «favorites» and also show any other applications that are currently running. You can tell if the application is running because it has a small blue mark below its icon in the dash if it is running (notice the small blue bar under the calculator icon on the left in the next screenshot):
 You can also click on the nine dots at the bottom of the dash to bring up a list of other applications that are available (there are buttons at the bottom to toggle between Frequent applications and All applications).
 In addition, you can right click on any of these applications and select Add to Favorites to add it to the dash menu on the left.
When you access Activities, you will also see small boxes on the right side of the screen. If you bring the mouse over this section, the boxes are enlarged, and you’ll see the workspace selector. Workspaces act like virtual monitors and allow you to place applications in different workspaces. You can then switch between the workspaces to see different applications.
One way to move an application to a different workspace is to simply drag and drop it onto a different workspace in the workspace selector (which is visible after you access Activities). Additional workspaces are automatically created as needed and, if you right click on the title bar of an application, you can select Always on Visible Workspace to make that application visible on all workspaces.
 You can switch workspaces from the workspace selector, or you can press the super key, plus the page up or page down keys to switch workspaces from the keyboard.
The upper right drop-down menu gives you the ability to shutdown or restart the system, as well as the ability to manage network interfaces, and log off the system.
RHEL 8 GNOME Classic interface
It is possible to switch to the GNOME Classic interface (which is the default on RHEL 7), by first logging out. To log out, go to the upper right drop-down menu, click on your username, and click Log Out.
From the login screen, click on your username, then click on the gear to the left of the Sign In button:
 The next step is to select the Classic (Wayland display server) option, and click the login button. Once logged in, you will see the GNOME Classic interface:

Display server options
In RHEL 8, the default display server is now Wayland, which is designed to have a stronger security model than X11, improved multi-monitor handling, and improved user interface scaling.
It is recommended that you use the Wayland display server whether you are using the GNOME Shell or GNOME Classic interfaces, however, it is possible to switch to the X.org X11 display server if needed. For example, it is possible you might run into a third party application that doesn’t work properly under Wayland, in which case you might want to try the application under the X.org X11 display server.
To switch to the X.org X11 display server, simply log off and, from the login screen, click on your username. At this point, click on the gear to the left of the Sign In button, and select either Standard (X11 display server) on Xorg, or Classic (X11 display server) to login to the GNOME Shell or GNOME Classic interfaces, respectively, with the X.org X11 display server.
Tweaking GNOME
It is possible to customize GNOME by installing the gnome-tweaks package with the yum install gnome-tweaks command.
Once installed, press the activities button, type tweaks, and press Enter to launch the application.
This tool allows the user to make many GNOME customizations. Personally, I use the GNOME Shell interface, but enable these options within gnome-tweaks :
Enable minimize and maximize buttons by clicking on Windows, then toggle on Maximize and Minimize under Titlebar Buttons.
Enable a window list at the bottom of the screen to show running applications, by selecting Extensions, then toggling on Window list.
This is what my customized environment looks like (notice the minimize/maximize buttons and the window list at the bottom).
Источник
Red Hat Customer Portal
Log in to Your Red Hat Account
Your Red Hat account gives you access to your profile, preferences, and services, depending on your status.
If you are a new customer, register now for access to product evaluations and purchasing capabilities.
Need access to an account?
If your company has an existing Red Hat account, your organization administrator can grant you access.
Red Hat Account
Customer Portal
For your security, if you’re on a public computer and have finished using your Red Hat services, please be sure to log out.
Select Your Language
Chapter 3. Installing applications in GNOME
This section describes various approaches that you can use to install a new application in GNOME 3.
Prerequisites
- You have administrator permissions on the system.
3.1. The GNOME Software application
GNOME Software is a utility that enables you to install and update applications and GNOME Shell extensions through a graphical environment.
GNOME Software is based on the PackageKit technology, which serves as its back end. GNOME Software offers mainly the desktop applications, which are the applications that include the *.desktop file. The available applications are grouped into multiple categories according to their purpose.
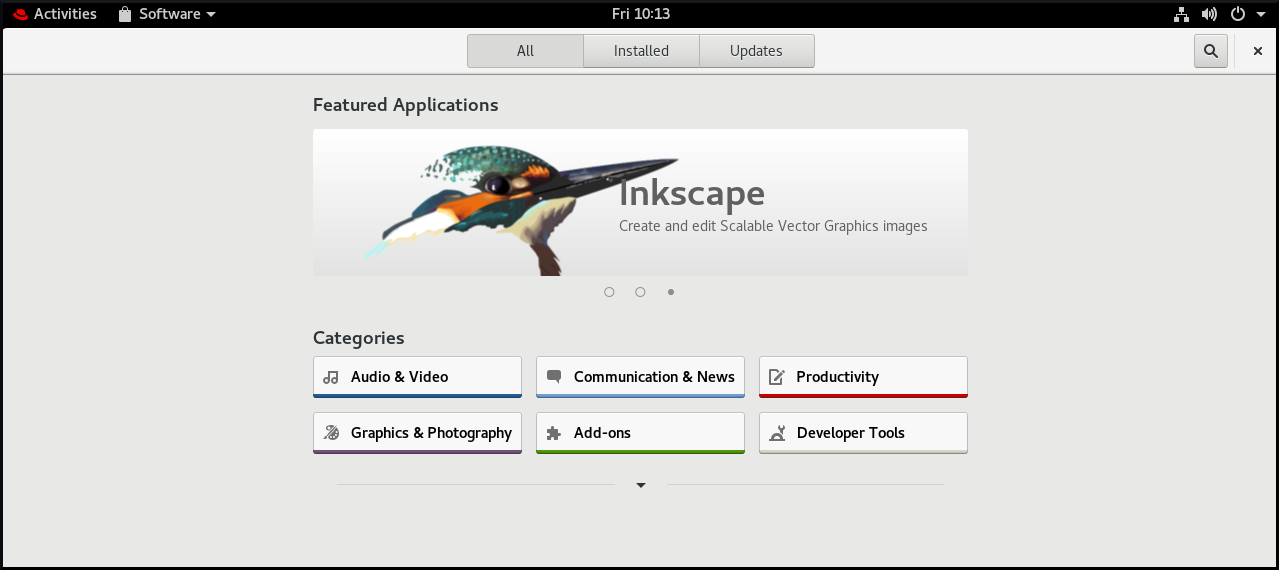
3.2. Installing an application using GNOME Software
This procedure installs a graphical application using the GNOME Software installer.
Procedure
- Launch the GNOME Software application.
Find the application to be installed in the available categories:
- Audio & Video
- Communication & News
- Productivity
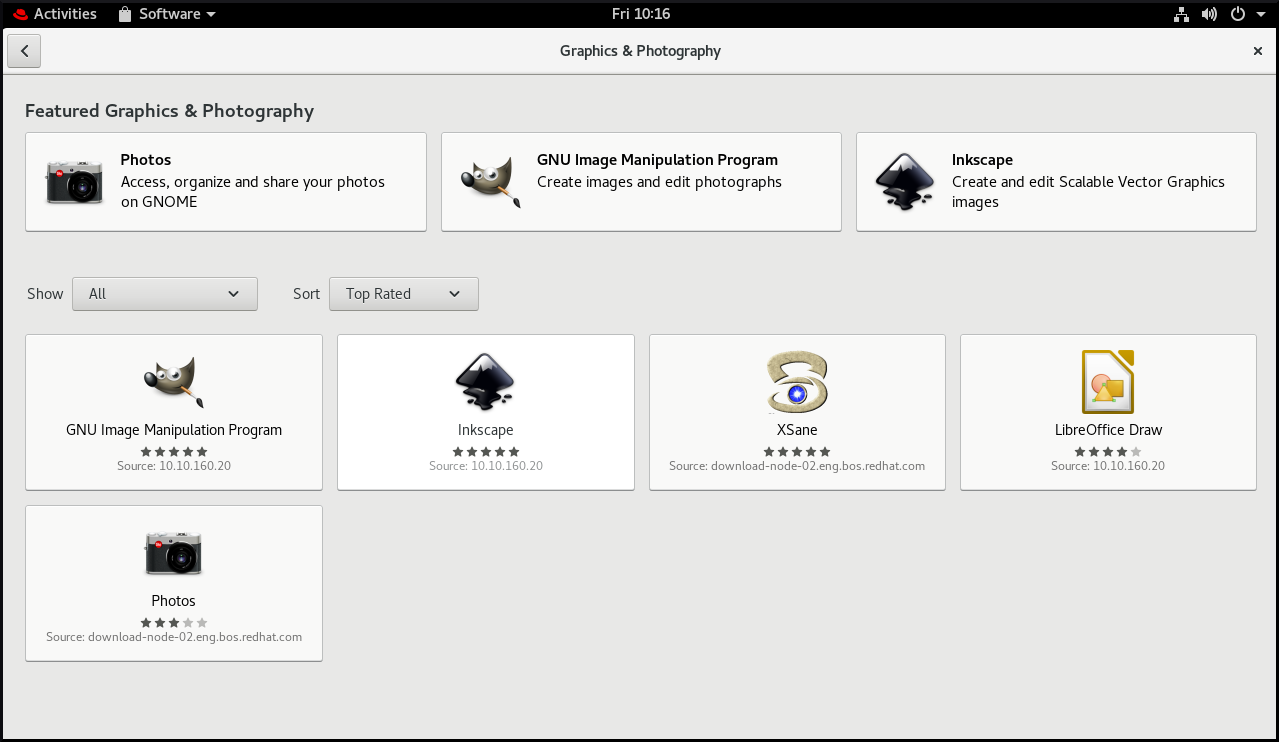
- Graphics & Photography
Add-ons include for example GNOME Shell extensions, codecs, or fonts.
Click the selected application.
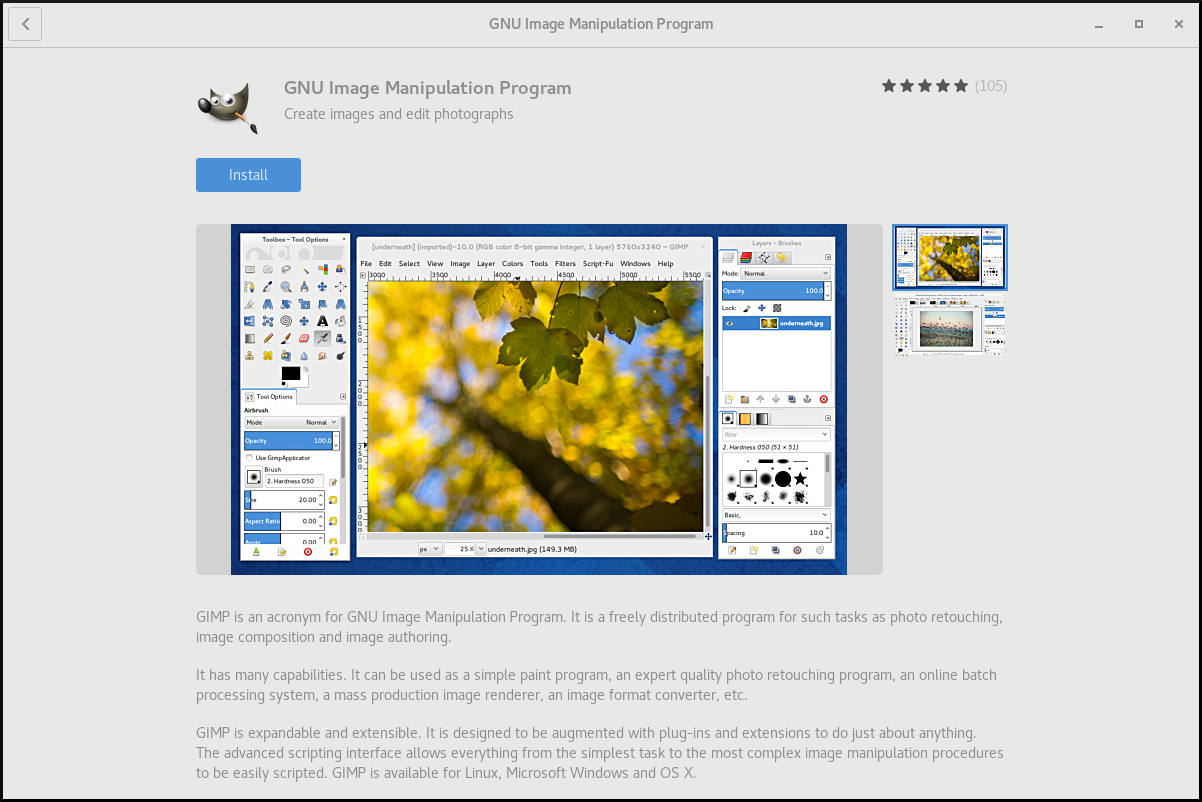
Click the Install button.

3.3. Installing an application to open a file type
This procedure installs an application that can open a given file type.
Procedure
- Try opening a file that is associated with an application that is currently not installed on your system.
- GNOME automatically identifies the suitable application that can open the file, and offers to download the application.
3.4. Installing an RPM package in GNOME
This paragraph is the procedure module introduction: a short description of the procedure.
Procedure
- Download the required RPM package.
In the Files application, open the directory that stores the downloaded RPM package.
By default, downloaded files are stored in the /home/ user /Downloads/ directory.
3.5. Installing an application from the application search in GNOME
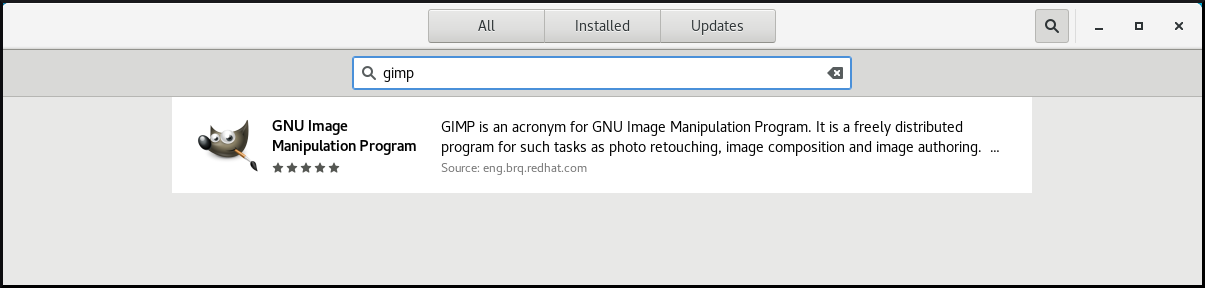
This procedure installs a graphical application that you find in the GNOME application search.
Procedure
- Open the Activities Overview screen.
Start typing the name of the required application in the search entry.

GNOME automatically finds the application in a repository, and displays the application’s icon.
Click the application’s icon to open GNOME Software .
Click the icon of the application again.
Источник
Red Hat Customer Portal
Log in to Your Red Hat Account
Your Red Hat account gives you access to your profile, preferences, and services, depending on your status.
If you are a new customer, register now for access to product evaluations and purchasing capabilities.
Need access to an account?
If your company has an existing Red Hat account, your organization administrator can grant you access.
Red Hat Account
Customer Portal
For your security, if you’re on a public computer and have finished using your Red Hat services, please be sure to log out.
Select Your Language
Chapter 6. Configuring GNOME at low level
6.1. Introduction to configuring GNOME
To be able to configure the GNOME Desktop Environment, you need to understand these basic terms:
dconf has two different meanings.
Firstly, dconf is a key-based Binary Large Object (BLOB) database for storing GNOME configurations. dconf manages user settings such as GDM, application, and proxy settings, and serves as the back end for GSettings .
Secondly, dconf is a command-line utility which is used for reading and writing individual values or entire directories from and to a dconf database.
GSettings is a high-level API for application settings which serves as the front end for dconf.
gsettings is a command-line tool which is used to view and change user settings.
6.2. Managing user and system GNOME settings
dconf allows system administrators and users several levels of control over GNOME configuration:
- Administrators can define default settings that apply to all users.
- Users can override the defaults with their own settings.
- Administrators can also lock settings to prevent users from overriding them.
6.3. Displaying GSettings values for desktop applications
Viewing and editing of the GSettings values can be achieved with one of the following tools:
- dconf-editor GUI tool
- gsettings command-line utility
The dconf-editor application and gsettings utility have the following in common:
- allow browsing and changing options for system and application preferences
- allow to change preferences
- can be run by regular users, because both tools are intended to browse and modify the current user’s GSettings database
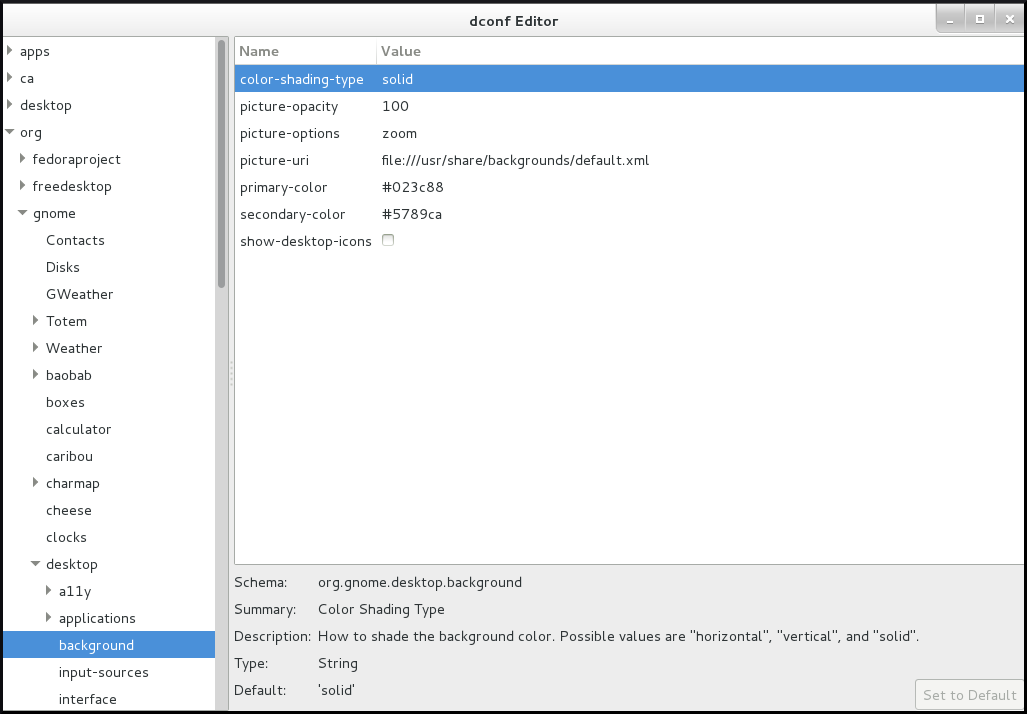
The dconf-editor provides a GUI for browsing the settings and their editing. It presents the hierarchy of settings in a tree-view and also displays additional information about each setting, including the description, type and default value.
The gsettings utility can be used to display and set dconf values. gsettings utility supports Bash completion for commands and settings. This tools also allows you to automate configuration in shell scripts.
Figure 6.1. dconf-editor showing org.gnome.destop.background GSettings keys
Prerequisites
The dconf-editor is not installed on the system by default. To install it, run the following command as the root user:
Procedure
- To list GSettings values in the GUI, open the dconf-editor application.
To list a specific GSettings value on the command line, use the following command:
Additional resources
- For more information on the dconf-editor tool, see the dconf-editor(1) man page and the dconf-editor Project documentation.
- For more information on the gsettings utility, see the gsettings(1) man page.
6.4. Using dconf profiles
The dconf system stores configuration in several different databases. You can configure dconf profiles, which specify the databases that dconf uses.
6.4.1. Introduction to dconf profiles
A dconf profile is a list of system’s hardware and software configuration databases, which the dconf system collects.
The dconf profiles allow you to compare identical systems to troubleshoot hardware or software problems.
The dconf system stores its profiles in the text files which can be located either within the /etc/dconf/profile/ directory or elsewhere. The $DCONF_PROFILE environment variable can specify a relative path to the file from /etc/dconf/profile/ , or an absolute path, such as in a user’s home directory.
Note that key pairs which are set in a dconf profile override the default settings.
6.4.2. Selecting a dconf profile
On startup, dconf consults the $DCONF_PROFILE environment to find the name of the dconf profile to open. The result depends on whether the variable is set or not:
- If set, dconf attempts to open the profile named in the variable and aborts if this step fails.
- If not set, dconf attempts to open the profile named user and uses an internal hard-wired configuration if this step fails.
Each line in a dconf profile specifies one dconf database.
The first line indicates the database used to write changes. The remaining lines show read-only databases.
The following is a sample profile stored in /etc/dconf/profile/user :
In this example, the dconf profile specifies three databases. user is the name of the user database which can be found in
/.config/dconf , and local and site are system databases, located in /etc/dconf/db/ .
To apply a new dconf user profile to the user’s session, you need to log out and log in, because the dconf profile for a session is determined at login.
As a user or application developer, do not manipulate dconf directly. To manipulate dconf, always use the dconf-editor or the gsettings utility. The only exception to use dconf directly is when setting system-wide default configurations, because the aforementioned tools do not allow to manipulate such configurations.
6.5. Configuring custom default values
Machine-wide default settings can be set by providing a default for a key in a dconf profile. These defaults can be overridden by the user.
Prerequisites
- the user profile exists
- the value for the key was added to a dconf database
Procedure
For example, to set the default background:
Create the user profile in /etc/dconf/profile/user :
where local is the name of a dconf database.
Create a keyfile for the local database in /etc/dconf/db/local.d/01-background , which contains the following default settings:
In the default setting of the keyfile, the following GSettings keys are used:
Table 6.1. org.gnome.desktop.background schemas GSettings Keys
| Key Name | Possible Values | Description |
|---|---|---|


