- RecordMyDesktop
- Contents
- Installation
- Usage
- Troubleshooting
- Audio record is lagging
- Audio record lags and is out of sync
- Audio record is distorted (slower/graver)
- No sound with PulseAudio
- recordMyDesktop — запись видео и звука с рабочего стола в Linux
- Скриншоты
- Описание recordMyDesktop
- Сильные стороны recordMyDesktop:
- Слабые стороны recordMyDesktop:
- Установка
- RecordMyDesktop: запись происходящего на экране
- recordmydesktop(1) — Linux man page
- Synopsis
- Description
- Exit Status
- Options
- Usage
- Environment
- Notes
RecordMyDesktop
recordMyDesktop is screencasting software for X. It can record audio through ALSA, OSS or the JACK audio server. It is able capture through jack and thus is important for pro-audio video tutorials. recordMyDesktop only outputs to Ogg using Theora for video and Vorbis for audio.
recordMyDesktop is a CLI tool but there are two GUI interfaces available, gtk-recordmydesktop and qt-recordmydesktop.
Contents
Installation
Usage
The basic usage is not too hard and it provides a man page. Here is a simple example using jack for audio capture:
Troubleshooting
Current versions behave weird and need strange parameters to work properly. Try this for non-choppy capture:
Audio record is lagging
If it appears that you have lags (error message when starting from the shell: Broken pipe: Overrun occurred) in your audio record (often with Intel onboard cards) then it might help to change the audio device. This can be done in two ways.
1. Assuming that the terminal version is used then recordmydesktop should be started with:
2. If a GUI is used then you can change the device from DEFAULT to plughw:0,0 in the audio tab of the settings.
More information on this issue can be found here.
Audio record lags and is out of sync
Using the plughw:0,0 device as described above may work partially for some Intel cards. You might try:
It seems the trick was to specify the correct number of channels generated by the input source (in this case, a stereo mic).
Audio record is distorted (slower/graver)
This happens at least with Rode Podcaster USB Microphone, and can be fixed by setting the frequency to 45000 :
No sound with PulseAudio
This is pretty simple, but should be better explained. If recordmydesktop exits like this:
Install the package alsa-plugins and then run it like:
Источник
recordMyDesktop — запись видео и звука с рабочего стола в Linux

Программа recordMyDesktop позволяет захватывать видео с вашего рабочего стола или его части. Программа очень проста в использовании и в большей части будет полезна блоггерам, которые делают видеоподкасты. Программа recordMyDesktop позволяет записать видео с рабочего стола в свободный формат OGV.
К программе есть графическая оболочка как для Gnome (gtk-recordMyDesktop) так и для KDE (qt-recordMyDesktop), что позволяет ее использовать практически в любом графическом окружении.
Скриншоты


Описание recordMyDesktop
Сильные стороны recordMyDesktop:
- Программа записывает видео и звук с рабочего стола и записывает полученный результат.
- recordMyDesktop позволяет производить захват видео выбранной части рабочего стола.
- Можно задать качество видеопотока и звука.
- Захватить видео с рабочего стола можно как Compiz-эффекты, так и 3D-приложения запущенные через Wine.
- Можно организовать сжатие видео на лету.
- Есть возможность указать частоту дискретизации записываемого звука.
- При записи видео можно скрыть указатель мыши.
Слабые стороны recordMyDesktop:
В результате сохраненное видео немного быстрее чем в оригинале.
Это решается отключением, в настройках программы, опцию кодирование на лету. Почему так происходит? Непонятно, но это работает. Видео записывается с нормальной скоростью.

Установка
- Скачать исходный код recordMyDesktop и версии пакетов для большинства дистрибутивов можно с официального сайта проекта .
- recordMyDesktop установить в Ubuntu можно командой:
Идеальный телефонный разговор, как подсчитали ученые, должен длиться 9 минут 36 секунд. За это время разговора Вы не обидите человека, а включенная система записи телефонных разговоров, если это нужно, сможет зафиксировать телефон надоевшего Вам хулигана.
Во время идеального телефонного разговора Вы успеете осветить как минимум 8 тем.
- callidus #
6 мая, 20:23
Прикольная прога, спасибо. Очень хороший сайт у Вас. Можно подсмотреть что надо когда подзабыл.
Давненько у меня стоит эта прога
вот только формат выходного файла ogv не очень устраивает так как не получается его потом отредактировать как хочется (там нарезать, в другой формат перевезти) не в kdenlive не в Open Movie Editor файл не открывается 🙁 очень рассчитываю на то что программа начнет поддерживать другие форматы или что другие программы этот формат 🙂
callidus: Прикольная прога, спасибо. Очень хороший сайт у Вас. Можно подсмотреть что надо когда подзабыл.
ITS haman – для меня такое же место, все не упомнишь
Randomize: Давненько у меня стоит эта прога
вот только формат выходного файла ogv не очень устраивает так как не получается его потом отредактировать как хочется (там нарезать, в другой формат перевезти) не в kdenlive не в Open Movie Editor файл не открывается 🙁 очень рассчитываю на то что программа начнет поддерживать другие форматы или что другие программы этот формат 🙂
Xvidcap по лучше, а то эта чет записывает с тормозами…
dobs: Xvidcap по лучше, а то эта чет записывает с тормозами…
На вкус и цвет все фломастеры…
Xvidcap `ом тоже можно пользоваться.
А вот как мне записать звук одновременно с микрофона и из системы в этой программе?
ulitkus: А вот как мне записать звук одновременно с микрофона и из системы в этой программе?
Если я правильно понял, Вам нужно записать звук с включенного плеера и включенного микрофона. Если так, то у меня именно так все и работает. При записи нужно поставить галочку напротив Качество звука
а как её скачать
Очень бы хотелось делать читаемые в винде презентации в swf. жаль что не каждый linux-скринкастер на это способен. Да и работа с терминалом меня лично убивает!!
Как захватить звук со звуковухи то? Желательно без установки Jack.
Мне бы ролик по игре сделать, но он немой получаеться, а подставлять майк к колонке вообще не вариант.
помогите разобраться, как после снятого ролика отключить программу? в трее только “пауза” или “запись” и приходится постоянно в диспетчере задач её вырубать.
Источник
RecordMyDesktop: запись происходящего на экране
Дата добавления: 02 июля 2010
Программа recordmydesktop позволяет записывать происходящее на экране (или части экрана) и звук с микрофона (в зависимости от настроек) в видео файл. Такие программы обычно используются для создания презентаций программ, компьютерных курсов и для прочих целей, при которых важно видеть происходящее на экране.
Самое похвальная
Программа Recordmydesktop доступна сразу в трех вариациях!
1. Работающая из терминала, без графического интерфейса.
2. Работающая с графическим интерфейсом на GTK.
3. Работающая с графическим интерфейсом на Qt.
Это несомненно предоставляет отличный выбор для конкретного пользователя (например, мне как пользователю KDE больше подходит Qt версия, когда как пользователь GNOME наверняка установит GTK эквивалент).
Установка
Recordmydesktop может быть установлен из репозитория вашего дистрибутива.
1. Для консольной версии — пакет recordmydesktop
2. Для GTK версии — пакет gtk-recordmydesktop
3. Для Qt версии — пакет qt-recordmydesktop
Так же вы можете скачать бинарные пакеты или исходный код всех вариаций recordmydesktop с официального сайта.
Компиляция программы предельно проста:
gzip -d recordmydesktop-x.y.z.tar.gz -Разжимаем архив.
tar -xvf recordmydesktop-x.y.z.tar -Распаковываем архив.
cd qt-recordmydesktop-x.y.z -Переходим в папку с исходным кодом.
./configure —prefix=/usr/ -Конфигурируем исходный код.
make -Компилируем исходный код.
make install -Устанавливаем программу (от суперпользователя).
* Запись recordmydesktop-x.y.z следует заменять на конкретное имя полученного архива.
Использование RecordMyDesktop
Программа очень проста в использовании.
1. Для использования консольной версии откройте эмулятор терминала и запустите программу командой recordmydesktop после этого начнется запись видео со всего экрана. Для остановки записи нажмите комбинацию клавиш Ctrl+C, после этого начнется экспорт записанного в файл out.ogv.
2. Для использования графического режима запустите GTK или Qt версию recordmydesktop из меню приложений.
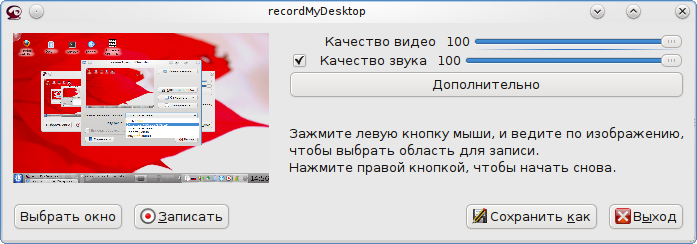
В этом окне вы можете настроить качество записи и записывать ли звук. Так же не обязательно записывать весь экран. В области предросмотра вы можете выделить мышкой только часть экрана или отдельное окно и во время записи граница будет подсвечиваться чтобы вы могли ориентироваться на результат.
Для начала записи нужно нажать кнопку «Записать». После этого окно recordmydesktop скроется и начнется запись.
Во время записи
Для паузы по время записи необходимо нажать правой кнопкой на значок программы в трее (для продолжения записи снова нажать правой кнопкой на значок программы в трее). Для остановки записи нажмите на значок левой кнопкой.
После просчета вы можете нажать «Сохранить как» для сохранения отснятого материала.
Настройки
Для входа в настройки программы нажмите в главном окне на кнопку «Дополнительно».
Там вы сможете настроить важные параметры: частота кадров в секунду (fps); кодировать на лету (советую включить эту опцию для экономии времени на кодирование); сжимать видео или нет; каналы, частота и устройство записи звука; с какого экрана записывать, вид курсора (например, можно убрать курсор вовсе), записывать обрамление окна или нет и еще много полезных настроек.
Источник
recordmydesktop(1) — Linux man page
Synopsis
recordmydesktop [ Options ]^ filename
Description
recordMyDesktop produces a file(default out.ogv) that contains a video and audio recording
of a linux desktop session. The default behavior of recording is to mark areas that have changed(through libxdamage)
and update the frame. This behavior can be changed (option —full-shots ) to produce a more accurate result
or capture windows that do not generate events on change(windows with accelerated 3d context)
but this will notably increase the workload.
recordMyDesktop doesn’t have a commandline interface.
After startup, it can be controled only through the following signals:
SIGUSR1 causes the program to pause if it’s currently recording, and vice-versa.
SIGTERM causes normal termination of the recording.
SIGINT also causes normal termination.
SIGABRT terminates the program and removes the specified output file.
This signals can also be delivered on the application, with the use of shortcuts.
See —pause-shortcut and —stop-shortcut , on the Misc. section of Options bellow.
A typical scenario of recording can be a command as simple as:
$ recordmydesktop
which will produce a fullscreen recording named out.ogv
while a command like:
$ recordmydesktop foo.ogv
will write output to foo.ogv
Since version 0.3, encoding will happen right after the recording finishes.
While this behavior saves a lot of CPU, you can revert to the old one by entering the —on-the-fly-encoding switch.
To specify a region for recording you can type this:
$ recordmydesktop -x X_pos -y Y_pos —width WIDTH —height HEIGHT -o foo.ogv
where X_pos and Y_pos specify the offset in pixels from the upper left
corner of your screen and WIDTH and HEIGHT the size of the window to be recorded(again in pixels).
If the area extends beyond your current resolution, you will be notified appropriately and nothing will happen.
Notice also, that if any option is entered you have to specify the output file with the -o switch.
If you try to save under a filename that already exists, the name will be post-fixed with a number (incremented if that name exists already)
To normally end a recording you can press ctl-c.
(which will send a SIGINT to the program).
For further manipulation of the end result look at the OPTIONS and NOTES sections.
Exit Status
The following error codes indicate the nature of the error:
1 Error while parsing the arguments.
2 Initializing the encoder failed(either vorbis or theora).
3 Could not open/configure sound card.
4 Xdamage extension not present.
5 Shared memory extension not present.
6 Xfixes extension not present.
7 XInitThreads failed.
8 No $DISPLAY environment variable and none specified as argument.
9 Cannot connect to Xserver.
10 Color depth is not 32, 24 or 16bpp.
11 Improper window specification.
12 Cannot attach shared memory to proccess.
13 Cannot open file for writting.
14 Cannot load the Jack library ( UNUSED SINCE 0.3.8 ).
15 Cannot create new client.
16 Cannot activate client.
17 Port registration/connection failure.
Options
-h or —help Print help summary and exit.
—version Print program version and exit.
—print-config Print info about options selected during compilation and exit.
—windowid id_of_window id of window to be recorded.
—display DISPLAY Display to connect to.
-x X Offset in x direction.
-y Y Offset in y direction.
—width N Width of recorded window.
—height N Height of recorded window.
—dummy-cursor color Draw a dummy cursor, instead of the normal one.Value of color can be «black» or «white».
—no-cursor Disable drawing of the cursor.
—no-shared Disable usage of MIT-shared memory extension
(Not Recommended).
—full-shots Take full screenshot at every frame(Not recomended!).
—follow-mouse When this option is enabled, the capture area follows the mouse cursor. This
is meaningfull only when the selected area is a subset of the full screen.
This option auto-enables —full-shots.
—quick-subsampling Do subsampling of the chroma planes by discarding extra pixels.
—fps N(number>0.0) A positive number denoting desired framerate.
—channels N(number>0) A positive number denoting desired sound channels in recording.
—freq N(number>0) A positive number denoting desired sound frequency.
—buffer-size N(number>0) A positive number denoting the desired sound buffer size(in frames, when using ALSA or OSS).
—ring-buffer-size N(float number>0) A float number denoting the desired ring buffer size (in seconds,when using JACK only).
The overall size of the buffer in bytes will be:
ring_buffer_size * samplerate * number_of_ports * sizeof(jack_default_audio_sample_t),
where sizeof(jack_default_audio_sample_t) is normally 4.
—device SOUND_DEVICE Sound device(default hw:0,0 or /dev/dsp, depending on whether ALSA or OSS is used).
—use-jack port1 port2. portn Record audio from the specified list of
space-separated jack ports. When using this option, all the rest audio related ones(except —no-sound) are not taken into account.
—no-sound Do not record sound.
—on-the-fly-encoding Encode the audio-video data, while recording.
—v_quality n A number from 0 to 63 for desired encoded video quality(default 63).
—v_bitrate n A number from 45000 to 2000000 for desired encoded video bitrate(default 45000).
—s_quality n Desired audio quality(-1 to 10).
—rescue path_to_data Encode cache data from a previous session, into an Ogg/Theora+Vorbis
file. The filename will be the one that was chosen initially.
Any other option specified with this one will be implicitly ignored
and recordMyDesktop will exit after the end of the encoding.
This option was added in recordMyDesktop 0.3.7 and it will not
work with cache files produced from earlier versions.
When using this option, remember that recordMyDesktop’s cache is
not safe, in respect to type-sizes and endianness.
—print-config Print compilation time options. Currently prints whether Jack capture is
enabled and if ALSA or OSS is used (may contain more information
in the future).
—no-wm-check When a 3d compositing window manager is detected the program will function as if the
—full-shots option has been specified. This option disables that
behavior alltogether.
—no-frame Normally, around the recording area, there is drawn a frame to assist
the user in identifying what does and what doesn’t get captured.
This frame will also follow around the mouse, when —follow-mouse
is used. The frame might cause problems for drag and drop. If you do
not wish this frame to appear, use this option.
—pause-shortcut MOD+KEY Shortcut that will be used for pausing or unpausing the recording.
MOD can be any combination of the following modifier keys:
Control, Shift and Mod1 to Mod5. The modifiers can be separated
with any character(
except SPACE ) or none at all. KEY can be any key defined in /usr/include/X11/keysymdef.h without the XK_ prefix.
The list of modifiers must be separated from the key with a plus(‘+’)
sign.
Default is Control+Mod1+p (Mod1 usually corresponds to left Alt).
—stop-shortcut MOD+KEY Shortcut that will be used to stop the recording.
For more, see -pause-shortcut above.
Default is Control+Mod1+s.
—compress-cache Image data are cached with a light compression.
—workdir DIR Location where a temporary directory will be created to hold project files(default /tmp).
—delay n[H|h|M|m] Number of secs(default),minutes or hours before capture starts(number can be float).
—overwrite If there is already a file with the same name, delete it.
Default action is to add a number postfix to the new file.
For example when not specifying a name, if out.ogv exists,
the new file will be out-1.ogv and if that exists too, out-2.ogv
and so on (no ad-infinitum though, more like ad-short-integer. )
-o filename Name of recorded video(default out.ogv).
If no other option is specified, filename can be given without the -o switch.
Usage
Environment
Notes
Also when using that option the -x,-y,—width and —height options are relative to the specified window area.
An easy way to find out the id of a window, is by using the xwininfo program.
Running a command like :
xwininfo | awk ‘/Window id:/
will give you only the id of the window(which should look like this: 0x4800005)
More conviniently you can put all that in the command that launches recordMyDesktop like this:
$recordmydesktop —windowid $(xwininfo | awk ‘/Window id:/
Also, the lower quality you select on a video recording (
-v_quality option), the highest CPU-power that you will need.
So if you are doing the encoding on the fly ,it’s better to start with default values and manipulate the end-result with another program.
An excellent converter is the vlc media player, which can perform a variety of transcoding
operations, either using the graphical interface, or the commandline for more flexibility.
vlc is a complex piece of software, so you should consult it’s documentation, before
using it.
Источник


