- How to Use Windows VSTs in latest REAPER 5.93 Linux-Native builds
- Windows VSTs in LinVST:
- Windows VSTs in Airwave:
- Windows VSTs in Carla:
- Reaper – аудиоредактор (DAW) для Linux
- Установка
- [Reaper] – Using Linux Native VST’s
- Recommended Native Linux VST’s
- Getting Reaper to recognize Linux VST’s
- Reaper linux vst plugins
How to Use Windows VSTs in latest REAPER 5.93 Linux-Native builds
As REAPER v5.93 introduced Linux-native builds to the popular digital audio workstation, many users are wondering how they can use their favorite Windows-based VST plug-ins in the Linux builds. Fear not, Appuals has the solution.
REAPER has no native bridge to run Windows VSTs on Linux, but there are a few third-party tools that will accomplish the job. They are:
- LinVST (Ubuntu 14.04 32-bit and Debian Stretch)
- Airwave (AMD64.deb and x86_64.pkg.tar.xz)
- Carla (ArchLinux and Debian / Ubuntu)
All of these third-party tools rely on Wine to provide OS support to the plug-ins, and your mileage is definitely going to vary. Some VST plug-ins will work flawlessly, others will be a disaster.
Please be aware that we are providing basic guides to setting up these tools – for in-depth troubleshooting, you should consult the particular tools manual.
Windows VSTs in LinVST:
- Download the LinVST version for your environment – either the embedded Window version or the standalone version, though the embedded version is likely the default choice for most users.
- Copy all of the Lin-VST-server files from the version that was installed to your /usr/bin pathway.
- Make a folder to place all of your Windows VSTs inside of.
- In LinVST’s convert folder, start the linvstconvert, and then choose the linvst.so from the version folder.
- Point linvstconvert to the folder you created that contains all of your Windows VSTs, then hit the Start (Convert) button.
- Start up REAPER DAW and add your Windows VSTs folder to the plug-ins folder in REAPER’s settings.
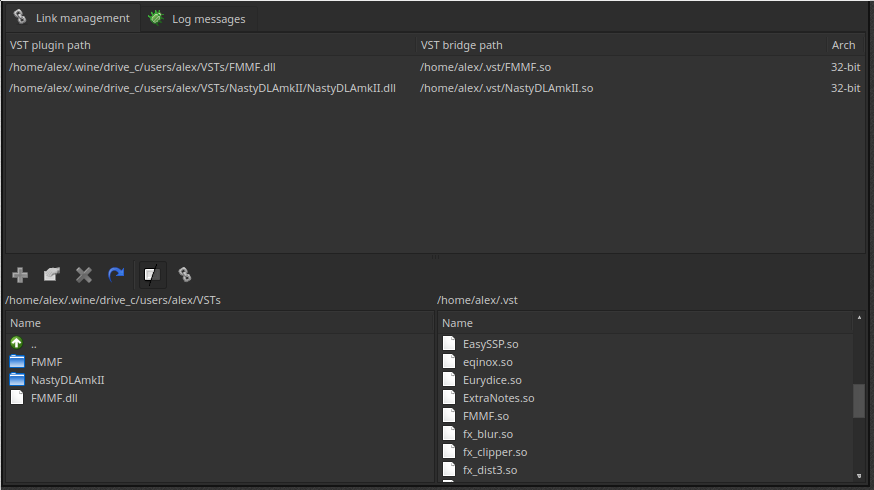
Windows VSTs in Airwave:
Install the required packages: multilib-enabled GCC, cmake, git, wine, Qt5, libmagic.
Arch Linux (x86_64) example:
Fedora 20 (x86_64) example:
Ubuntu 14.04 (x86_64) example:
Get the VST Audio Plugins SDK from Steinberg.
Unpack the VST SDK archive. Further I’ll assume that you have unpacked it in your home directory:
Clone the airwave GIT repository
Go to the airwave source directory and execute the following commands:
Of course, you can change the CMAKE_INSTALL_PREFIX as you like.
- Run the airwave-manager
- Press the “Create link” button on the toolbar.
- Select desired wine loader and wine prefix in the appropriate combo boxes.
- Enter a path to VST plugin DLL file in the “VST plugin” field (you can use the “Browse” button for convenience). Note, that the path is relative to the selected wine prefix.
- Enter a “Link location” path (the directory, where your VST host looks for the plugins).
- Enter a link name, if you don’t like the auto-suggested one.
- Select a desired log level for this link. The higher the log level, the more messages you’ll receive. The ‘default’ log level is a special value. It corresponds to the ‘Default log level’ value from the settings dialog. In most cases, the ‘default’ log level is the right choice. For maximum performance do not use a higher level than ‘trace’.
- Press the “OK” button. At this point, your VST host should be able to find a new plugin inside of the “Link location” directory.
Windows VSTs in Carla:
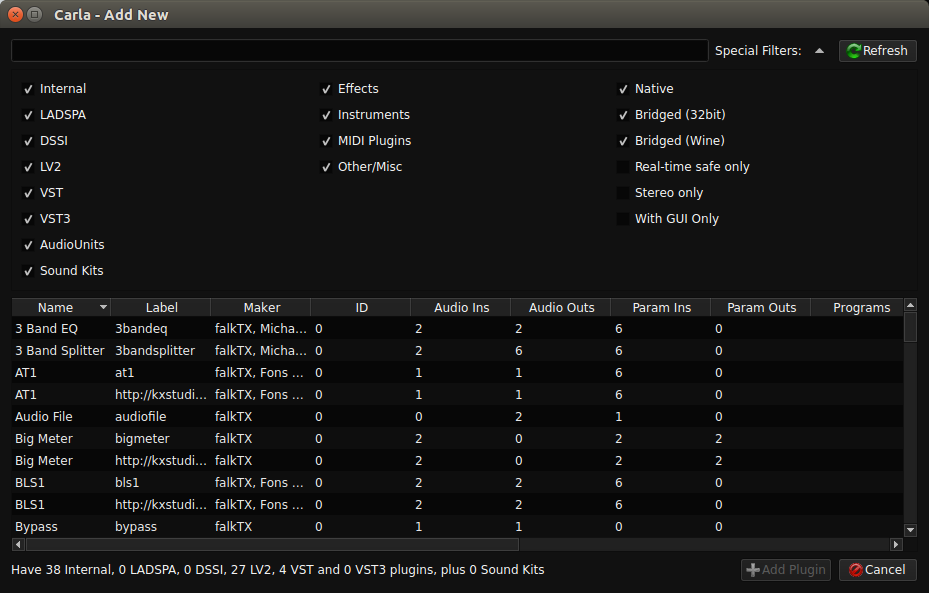
- Install Carla for your Linux version (Carla-Git seems to work best for most users).
- Install all the available Carla bridges from the package manager.
- Launch Carla as a standalone app, and click the plus button to add plug-ins.
- Using the search button, make sure that the “Windows 32” box is ticked, then scan for plug-ins. You may need to adjust the search path in Carla’s settings.
- When the plug-ins are found, close Carla, then launch REAPER.
- Add Carla as a plug-in to REAPER, and the Carla plug-in to load Windows VSTs.
Источник
Reaper – аудиоредактор (DAW) для Linux
Reaper – это профессиональная DAW, в которой можно заниматься музыкой. Сведение, мастеринг, да и просто отредактировать композицию например для телефона на звонок. Этой DAW пользуются многие музыканты, она является условно бесплатной. По сути, платная версия от бесплатной отличается лишь тем, что в бесплатной вам будет высвечиваться при запуске окошко. Буквально секунд на 5, где будет упоминаться что вы пользуетесь бесплатной версией и будут предлагать купить лицензию. Стоит так же отметить, что лицензия стоит не дорого в отличии от остальных конкурентов. Например, многим известный Cubase стоит на порядок дороже, но проигрывает в функционале Reaper. Вообще, стоит так же отметить что Reaper можно настроить на любой вкус. Все кастомизируется при помощи скриптов. Прежде чем устанавливать, советую посмотреть обзоры и почитать форумы, что бы понять, нужен ли вам Reaper или же вам хватит audacity. Приступим к установке.
Установка
Переходим на сайт производителя:
Проматываем страницу вниз

Скачиваем ту версию, которая вам нужна. Я буду показывать установку для версии Linux x86_64. Скачиваем архив, распаковываем его, и переходим в папку. В нашем случае это reaper_linux_x86_64. Тут мы увидим два файла и каталог. При желании можете полистать файл readme_linux.txt. Ну а мы пошли дальше.
Что бы начать установку нужно запустить файл install_reaper.sh. Переходим в терминал и запускаем его:
Делаем файл исполнительным командой:
Теперь запускаем установку:

Далее выбираем что нам надо из приведенного списка:

Для установки выбираем I. Далее нам предложат выбрать каталог куда установится Reaper. Рекомендую выбрать домашний каталог пользователя. То есть это будет второй пункт:

Далее у нас спросят про интеграцию с рабочим столом, тут выбор за вами. Лично я соглашусь, пусть будет. Далее так же отвечаете утвердительно, то есть ставите букву Y и нажимаете Enter.


После завершения интеграции установка завершится и вам останется проверить не возникло ли ошибок при установке Reaper.

Найти значок запуска можно будет в меню пуск. Запускаете и перед вами появится Reaper:


Теперь можно переходить к настройке. После чего можно заниматься записью, сведением, мастерингом. И все это можно сделать лишь встроенными средствами Reaper. При чем довольно таки хорошего качества. Более подробную информацию можно найти на форуме Reaper. Есть русскоязычная ветка форума: Russia Forum Reaper.
Источник
[Reaper] – Using Linux Native VST’s
Cockos has recently started making experimental builds of Reaper available for download on their website. Despite the experimental tag, I’ve found it to be astoundingly stable over the past several months of use for both video and audio editing. One downside, however, is that it does not yet support native Linux plugin formats such as LV2, DSSI, or LADSPA. Granted, there are ways that one can make these work, such as using Carla Rack or a plugin wrapper. The ways to achieve this are listed on the Reaper for Linux Wiki.
In this article, I’d like to look at installing some free VST’s from the KXStudio Repo’s that I find useful, and the simple process for getting them recognized by Reaper.
Recommended Native Linux VST’s
If you do not yet have the KXStudio repo’s added to your install, I recommend following the instructions here to do so before beginning. All the plugins that I will be listing below are available for free in that repo via your package manager(I am using Kubuntu 18.04).
To get a list of all vst’s available to your system, you can run the following command:
apt search vst
I’ve sifted through the packages and these are the ones I find myself using the most often:
- Helm: sudo apt install helm – Polyphonic synthesizer
- Dexed: sudo apt install dexed-vst – FM Plugin Synth
- TAL Plugins Collection: sudo apt install tal-plugins-vst – Togu Audio Line Plugins
- Zyn-Fusion: sudo apt install zynaddsubfx-git – Installs ZynAddSubFX with the new ZynFUsion UI.
- OBXD: sudo apt install obxd-vst – Oberheim OB-X Polyphonic analog synthesizer emulation plugin
Getting Reaper to recognize Linux VST’s
Your installed VST’s are going to reside in /usr/lib/vst/. Perform an ls on the directory to see all the VST plugins that you have installed.
Next, we will need to add the directory to Reaper so it will be scanned for plugins.
- Launch Reaper.
- Open the Preferences. Ctrl + p is the shortcut.
- Select Plugins > VST in the left hand column.
- Click on Edit > Add beside the VST plug-in paths and add /usr/lib/vst/
- Click on the Re-scan button. Once the scan is complete, click OK to close the preferences dialog.
- Click Insert > Virtual instrument on new track. Select VST in the left hand column to see effects, and VSTi to see virtual instruments. Add one to your track and make music!
Источник
Reaper linux vst plugins
I decided to try LinuxSampler and this is how I got it up and running in a basic way.
This can be confusing if the right order isn’t followed and might result in no connection errors etc and getting lost in the documentation might be easy or finding documentation about the linuxsampler vst might not be that easy.
Get linuxsampler-vst_1.0.0+svn2593-1kxstudio3_amd64.deb from https://answers.launchpad.net/
The actual vst .so file can just be found by extracting the package and then extracting the data.tar.gz file or just use dpkg to install and then the vst .so file goes to /usr/lib/vst I think.
Install linuxsampler for your distro from the LinuxSampler site.
Install Qsampler for your distro.
Start Reaper and load the linuxsampler vst and it will just sit there with no gui.
Start Qsampler and then add a channel and then set it up for sfz and load a sfz file (I used some sfz files from https://freepats.zenvoid.org/Piano/a. and-piano.html).
I had to choose MIDI all channels to get sound output with a midi track in Reaper.
Qsampler comes up in plugin mode rather than Alsa or Jack mode when the linuxsampler vst is started before Qsampler otherwise Qsampler just comes up in Alsa or Jack mode and the linuxsampler vst won’t connect.
Quit Qsampler before unloading the linuxsampler vst or quiting Reaper.
After all of that it works very well for sfz files.
Thank you. I found a german video tutorial on Youtube and I followed it to the point, watched it several times, but I didnt get instrument track to work on separate track. I want to know how its done, I want to learn and understand. He use a very old Reaper version, but it cant have changed that much.
Trial and error continues ��
From what I can make out, in the video he is creating a master track that controls things and he calls it LS.
He loads the linuxsampler vst only onto the LS track.
Midi gets done on the other newly created tracks ie midi1, midi2 etc.
Don’t do anything midi on the LS track, just leave it as it it is because it’s just a controller.
Then he creates some more tracks and routes them to the LS track.
Create a new track (midi1) and then using it’s route option, choose «Add new send» and route it to LS and select the Midi All > 1
Create a new track (midi2) and then using it’s route option, choose «Add new send» and route it to LS and select the Midi All > 2
Qsampler has sampler Channels (the sampler channels that get added from Qsampler add channel menu option) and also Midi/Input channels for each sampler Channel (pretty confusing).
In Qsampler or Fantasia, load the sfz into the sampler Channel 0
Add a new channel (Channel 1) and load another sfz into the sampler Channel 1
The Qsampler Midi/Input option should be channel 1 for the sampler Channel 0.
The Qsampler Midi/Input option should be channel 2 for the sampler Channel 1.
Usually the Midi/Input option is already like this by default when a new sampler Channel is added.
It all means that the midi1 track gets sent via the LS controller track to the sampler Channel0 Midi/Input channel 1
and that the midi2 track gets sent via the LS controller track to the sampler Channel1 Midi/Input channel 2
and the midi1 and midi2 tracks go to their respective (Qsampler/linuxsampler) sfz files via the above routing.
If effects etc are wanted on individual midi tracks (say the midi1 and midi2 tracks above) then
add some tracks say ch1 and ch2 etc
Enable the 3 and 4 outs in the LS track’s linuxsampler vst’s Plug-in pin connection
hit the LS track route option
add new send to ch1
Audio 1/2 to Audio 1/2 Midi None
add new send to ch2
Audio 3/4 to Audio 1/2 Midi None
Change Qsamplers sampler Channel1 Audio/Output Device channel to 3 and 4 (from 1 and 2).
For more tracks it’s the same thing repeated with 5/6, 6/7 etc and enable the corresponding more outs in the LS track’s linuxsampler vst’s Plug-in pin connection etc etc
Basically it connects the Qsampler/linuxsampler sampler Channel0 and Channel1 audio into the ch1 (Audio 1/2) and ch2 (Audio 3/4) tracks which can then have audio effects put on them.
This is how I’ve set it up, it seems to work ok but maybe there are better ways to do it, it’s only a quick experiment to try some possible things out.
The first track LS is the controller track (the linuxsampler vst connects to Qsampler/linuxsampler for sending and receiving) that has the linuxsampler vst loaded on it.
I’ve got 2 midi tracks, midi1 and midi2.
midi1 is going to Qsampler’s Kawai piano sfz, Qsampler’s sample Channel0.
midi2 is going to Qsampler’s AVLinux drumkit Red Zeppilin sfz, Qsampler’s sample Channel1.
The audio out from Qsampler’s Channel0 and Channel1 is being sent to the ch1 and ch2 audio tracks and audio effects can then be put on them such as reverb on the piano’s ch1 audio track and/or the drums ch2 audio track etc.
Thank you so much. I got it ��
I use Fantasia and not QSampler,it suites me better when it has built in keyboard, QSampler don’t. I couldn’t find any.
Some useful things for LinuxSampler and SFZero https://www.youtube.com/watch?v=d1UG6naZ1HQ
Separating midi notes to midi tracks, useful for putting effects on individual drums etc etc.
Using the Reaper Action «Explode MIDI note rows (pitch) to new items».
Then do as above, sync the individual midi drum tracks to Qsampler sampler Channels and the routed audio (ie ch1 ch2 as above) and put audio effects on each drum/cymbal.
EZDrummer etc can split the individual drum sounds which can then have effects put on them and also allows altering individual drum sound levels.
For sfz/sf2 this seems to work, maybe there are better ways to do it.
Split the notes of a midi drum track to individual midi tracks representing the snare, tom, etc using the Reaper Action «Explode MIDI note rows (pitch) to new items».
Then route the output of a drum sfz/sf2 loaded into SFzero (disk streaming https://github.com/osxmidi/SFZero/releases) on each midi track to a corresponding audio track which can then have audio effects put on it.
A compressor or reverb effect etc can be put on individual drum elements such as reverb only on the snare or whatever.
It’s also possible to do a similar thing with LinuxSampler as above.
So I’ve split the slayer3 midi drum file to 5 midi tracks and then I put an instance of SFzero (disk streaming) on each track and loaded them with the same sfz/sf2 file.
Then I add 5 audio tracks corresponding to the 5 midi tracks (ch1, ch2 etc) and route the audio output of each of the midi tracks with SFZero on them to each of the 5 audio tracks using audio channels 3 and 4.
So midi track1 goes to ch1 and midi track2 goes to ch2 etc
Then I can add effects onto the 5 tracks which makes it possible to put reverb on the hi-hat and/or compression on the snare etc etc.
It’s also possible to use and mix up different soundfont samples for different drums, by loading a different soundfont on the snare midi track or whatever.
Источник


