- Сжатие и распаковка файловых архивов с помощью Терминала на Mac
- Создание сжатого tar-архива
- Распаковка архива tar
- Как распаковать RAR архивы в Mac OS. Бесплатная программа
- Install command line RAR and UnRAR tools on Mac OS X (updated for Yosemite 10.10.x)
- Step 1
- Step 2
- Step 3
- For OS X up to 10.9.x (if using Yosemite, first follow instructions as indicated a little further down the page)
- For OS X 10.10.x (Yosemite)
- Step 4
- Step 5
- Using Homebrew to install UNRAR
- How can I extract .rar files on the Mac? [closed]
- 8 Answers 8
- Extracting RAR archives in the command line on Mac OS X
- Step 1
- Step 2
- Handling Passwords
- What about multi-file and batches of archives?
Сжатие и распаковка файловых архивов с помощью Терминала на Mac
При передаче папок и нескольких файлов между компьютерами может быть полезно сжать их в один архив. Это экономит место, позволяет передавать всего один объект вместо множества объектов и упрощает возобновление передачи, если задача будет по какой-либо причине приостановлена.
В Терминале можно использовать команду GNU tar для сжатия и распаковки файловых архивов. Стандартным расширением файла для сжатого архива tar является .tgz, но иногда имена файлов имеют расширение .tar.gz. Если архив не сжат, его имя оканчивается просто на .tar.
Совет. Создавать и распаковывать архивы легче в Finder (команду tar в Терминале рекомендуется использовать только в том случае, если нужно создать именно архив tar). См. Сжатие и распаковка файлов и папок.
Создание сжатого tar-архива
В приложении «Терминал»  на Mac введите команду tar и нажмите клавишу Return.
Для простого сжатия папки с именем, например LotsOfFiles, можно ввести:
Флаг z указывает на то, что архив сжимается и объединяется в один файл. Этот параметр обычно используется, но он не обязателен.
Если папка имеет большой размер, можно добавить флаг v и следить за процессом сжатия:
Распаковка архива tar
Чтобы распаковать tar-архив на Mac, выполните одно из следующих действий.
В приложении «Терминал» на Mac введите команду tar с флагом x , затем нажмите клавишу Return. Для просмотра сообщений о ходе сжатия также используйте флаг v . Например:
В Finder  на Mac дважды нажмите файл tar.
Источник
Как распаковать RAR архивы в Mac OS. Бесплатная программа

Удачно дополнить стандартный набор приложений macOS может бесплатная утилита из Mac App Store под названием The Unarchiver.
Как понятно из названия, программа позволяет работать со всеми распространенными форматами сжатия.
Странно, что в Купертино игнорируют это направление и пользователь для комфортной работы вынужден скачивать что-то из магазина приложений.
Даже в самом базовом сценарии использования компьютера рано или поздно потребуется утилита для разархивированных данных. То ли скачал архив с файлообменника, то ли знакомый прислал фото одним файлом, то ли большой объем данных был сжат для экономии трафика.
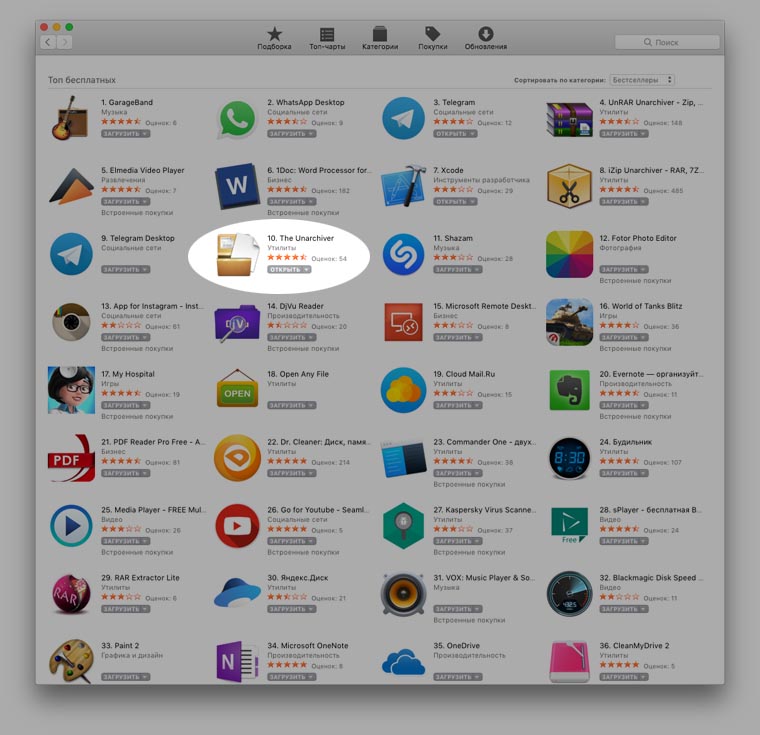
The Unarchiver давно и прочно обосновался в топе бесплатных утилит Mac App Store. Пользователей подкупает всеядность и простота программы. Здесь нет тонны настроек, тонкой подгонки под конкретные требования или глубинных параметров.
Все работает сразу после установки с минимальным вмешательством пользователя.
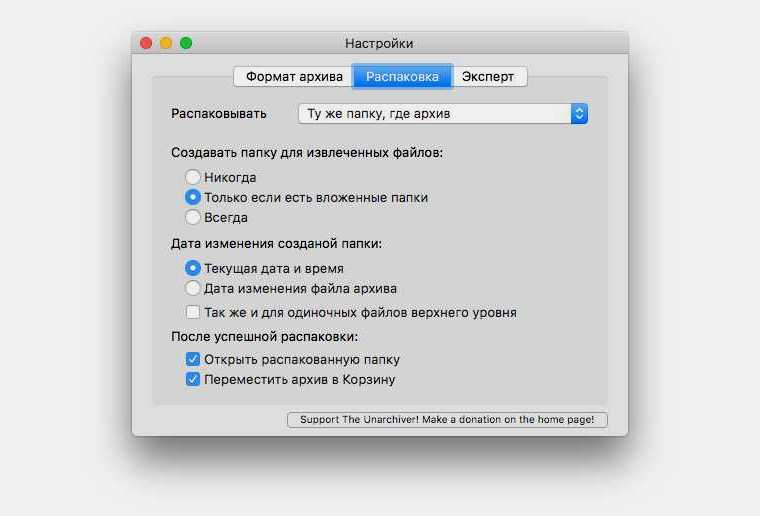
В настройках для удобства можно включить удаление архива после его распаковки и задать базовые правила сохранения файлов.
Можно указать постоянный или переменный путь сохранения, включить создание папки при наличии нескольких файлов в архиве и настроить дату создаваемой папки.
После этого об утилите забываешь и пользуешься по мере необходимости. 
Любой архив по двойному нажатию превращается в готовый к работе файл или папку с данными. Настоящий MustHave для любого маковода.
Скачать The Unarchiver можно бесплатно в Mac App Store.
Источник
Install command line RAR and UnRAR tools on Mac OS X (updated for Yosemite 10.10.x)
Here is how to install a free command line UnRAR tool (a RAR file extractor) and the RAR tool on Mac OS X. It’s simple and did I mention it’s free?
There is an image at the end of this post showing the steps taken in Terminal. Also, if you have Homebrew installed, you can use this for the installation of UNRAR. See instructions further down the page.
Step 1
Download latest RAR for OS X “RAR 5.2.1 for Mac OS X” (or a later version if there is one) from RARLab.
Assuming that file is downloaded to your
/Downloads folder, double click it to extract the files. You should now see in your
/Downloads folder a folder called
/Downloads/rarosx-5.2.1 (the number will be different if you downloaded a newer version since I late updated this post). In that folder is a /rar folder. So the full path is
If you downloaded it to some other location then your file path will be different. Whatever it is, make a note of it.
Step 2
Open Terminal.app. Just type Terminal into Spotlight (Command-Space to quickly access Spotlight). In Terminal.app type or paste the following (again remember to change the version number if you have a later version):
Step 3
For OS X up to 10.9.x (if using Yosemite, first follow instructions as indicated a little further down the page)
Now type or paste:
Whilst you’re at it, you might as well install the RAR tool too. Use this command in Terminal:
For OS X 10.10.x (Yosemite)
In Apple OS X 10.10.x (i.e. Yosemite) there is no /usr/local/bin folder by default. So you will need to first create this folder.
Now following the above instructions “For OS X up to 10.9.x”
Step 4
After you hit enter on that command Terminal will prompt you for your password. Type it in and hit enter.
Step 5
To test the installation went okay simply type unrar into Terminal. You should see a lot information appear in terminal. This is simply the details on how to use unrar and it shows that unrar is install.
Now you can UnRAR rar archives from the Command Line in Terminal.
To do an extraction use the x switch as shown below.
TIP: To save yourself typing out the full path to the RAR file, you can simply grab the file in Finder and drag it onto Terminal. Do that after you’ve typed in unrar x(space)
There you go. All done.
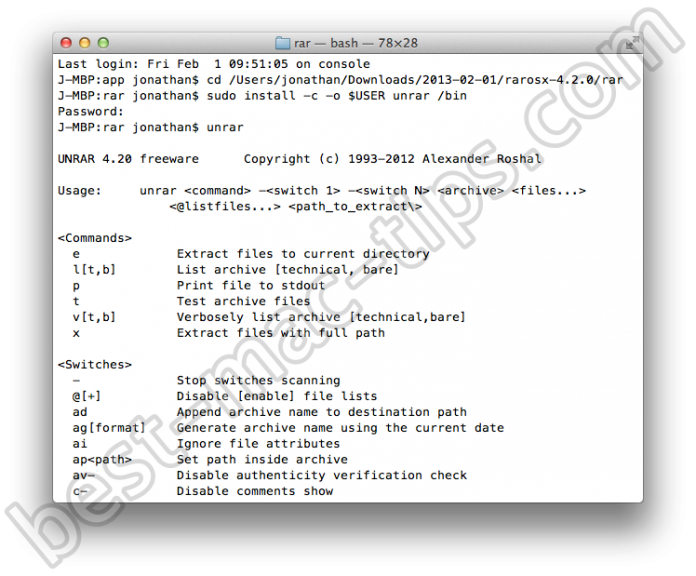
Here’s a screenshot of showing the steps taken in Terminal.app

Using Homebrew to install UNRAR
If you have Homebrew installed on your system, you can also use that to install UNRAR. Just use this command:
Note, it only installs UNRAR. If you also need RAR then you’ll have to use the instructions I posted above.
Источник
How can I extract .rar files on the Mac? [closed]
Is there anything built-in that does this? (E.g. command line tools.) Or are there any third-party apps?
Update: I like The Unarchiver, but vote up your favourite, or add it as an answer if it isn’t there.

8 Answers 8
The Unarchiver really does it’s job well (and it’s also completely free). From the site:
Supported file formats include Zip, Tar-GZip, Tar-BZip2, RAR, 7-zip, LhA, StuffIt and many other more and less obscure formats. The goal is to make The Unarchiver able to extract anything you give it. The Unarchiver uses the libxad unarchiving library to support many older, obscure formats.
Using Homebrew, in a terminal type:
to use it just navigate to your file and type
Or list files via unrar l archive.rar and extract single file: unrar e archive.rar folder/file.exe desired_location/
Just for completeness: Fink, MacPorts, Rudix and Homebrew provide versions of the command-line unrar .
The Rudix version is a binary, which means that you don’t even need XCode or GCC to install it.


Nothing built-in if I’m not mistaken (no access to a Mac now).
RAR has a command line version for Mac OS X. UnRarX is a GUI program to extract RAR files.
UPDATE: UnRarX is now deprecated and it’s site is down.

I found The Unarchiver as mentioned to be great for about 80% of the RAR files I run into. The other almost «perfect» RAR extractor would be RAR Expander My only complaint is it doesn’t automatically quit after extraction.
As far as well-regarded, RARLab’s commandline for MacOSX is the best. It is not free, but there is free (-as-in-beer) official unrar tool (source code available here) that supports all RAR formats. You may be able to find a precompiled version somewhere if you don’t want to compile it yourself.
There’s also a free-as-in-speech unrar tool but that doesn’t support the latest RAR3 format.
MacPar Deluxe will handle RAR files quite easily.
MacPAR deLuxe is a utility program that runs on the Apple Macintosh. It is useful to you if you download (or upload) binary files from internet newsgroups (a.k.a. “usenet”). Often, binary content comes in the form of sets of many files that together form a “rar” archive. MacPAR deLuxe assist you in combining these files after the download finishes. •It verifies that the file set is complete, and all files are undamaged. MacPAR deLuxe can recover missing information by processing so called «par» and «par2» files. •After the verification step, MacPAR deLuxe unpacks the data. If possible with its built-in unrar engine, or otherwise by launching the appropriate program.
The program automatically cooperates with Loek Jehee’s Split & Concat. Features •Full support for the «par 1» and «par 2» standards. •Perform verification, recovery and automatic unrar (if applicable) by just double-clicking the «.par» or «.par2» file in the Finder. •Get a clear overview of the status of all files (see example screenshots). •Create a par or par2 volume set by dragging files to the window and simply save the document. •Open a rar archive and unpack the files inside. •Can automatically start an external program to process files in the par set. •Can open multiple windows and run multiple jobs at the same time. •Alternatively, multiple jobs can be queued and processed one after the other, to save machine overhead. •Many configurable options. •Fully compatible with «other» par and rar utilities. •Extensive documentation included via the «Help» menu. •Shareware: you can make make a donation if you like the program.
If you buy Pathfinder, which is relatively costly ($39) but solves a whole different set of problems, it comes with .rar expansion thanks to StuffIt. This sounds like an absurd answer, however I can’t use my Mac without Pathfinder anymore. So I have .rar expansion built-in 🙂
Источник
Extracting RAR archives in the command line on Mac OS X
There are plenty of free and commercial tools to extract RAR archives on Mac OS X. A few names that come to mind are The Unarchiver, The Archive Browser, Archiver, and StuffIt Expander. That last one (StuffIt) is in my opinion bloated and overly expensive.
However, for those who wish to learn more about what can be done in the command line in Terminal, here are instructions on how to extract RAR archives that way.
Step 1
Implement the steps in this previous article on installing RAR and UNRAR command line tools. The instructions there have been updated for OS X up to Yosemite (10.10.x). When you finish the installation keep Terminal open ready for the next step.
Step 2
TIP: Rather than typing the path of files and folders into Terminal you can simply drag the file or folder from Finder into Terminal. Make you have you one trailing space after the command you have typed in, and then drag the file or folder to capture its path.
In Terminal type the following commands
cd changes to the directory where you want the file(s) extracted to. This is the destination. Change the path to the correct one for your situation.
/ is an abbreviation for /Users/YourUsername/ so the full path without that abbreviation would be /Users/YourUsername/Downloads/TheArchive.rar, for instance.
unrar tells unrar (the application) to execute. The x tells unrar to extract the following file into the current directory, whilst maintaining directory structure of the archive contents.
Handling Passwords
Some archives have passwords. They are easy to handle in unrar.
-pSECRET is the command -p (indicating what follows is the password) along with THEPASSWORD which should be replaced with the actual archive password.
The -y command simply tells unrar to answer yes to any yes/no questions that arise during the extraction process.
What about multi-file and batches of archives?
If the batch of files are actually just the parts of a large split RAR file, unrar will automatically go through them all. So the command for that is the same as shown above. Just select the name of the first file in the batch, which should be the one with .rar as the extension, as opposed to .00, .01, etc.
If you have a folder filed with unrelated RAR files, you could do them in one swipe with this command:
cd changes the active directory to the destination for the extracted archives.
find finds all files in the
/Downloads folder with .rar as the extension.
-exec tells Terminal to execute the following unrar command on the found files
unrar is what’s being executed to perform the extraction. After it are various switches, such as the password (this will only work if there is the same password on all the files), and -y answers YES to all questions, and -ad tells unrar to create a new folder for each archive. The folder will be the same as the name of the archive. The is used by the Find command, referring to the files just found, and \; end the command when the whole process is done.
You might like to leave unrar doing its thing if there are big archives to be extracted. When you return it is a good idea to search for any errors. With the Terminal window active (and your extraction results in there) hit Command-F to bring up the Find tool. Look for the word “error” and see if any files generated an error.
You can get a full list of the options for unrar by simply typing unrar into Terminal, and hit the Return/Enter key.
Dealing with corrupt files
If you get errors saying some of the files are corrupt, read the following two articles to determine which files are corrupt and how to potentially fix them.
Источник


