- Qt Documentation
- Contents
- Creating a Package Directory
- Creating a Configuration File
- Creating a Package Information File
- Specifying Component Information
- Specifying Installer Version
- Adding Licenses
- Selecting Default Contents
- Creating Installer Content
- Creating the Installer Binary
- Offline Qt Downloads
- Qt6 Source Packages
- Qt 6.2.0 Source Packages:
- Older Qt Versions
- Qt 5.15.x Source Packages
- 5.12.x Offline Installers
- Qt Creator
- Pre-releases
- Qt Documentation
- Contents
- Choosing Installer Type
- Promoting Updates
- Providing Content for Installers
- Кроссплатформенное приложение на Qt: Распространение
- Qt Installer Framework
- Windows
- Linux
Qt Documentation
Contents
This tutorial describes how to create a simple installer for a small project:

This section describes the following tasks that you must accomplish to create the installer:
- Create a package directory that will contain all the configuration files and installable packages.
- Create a configuration file that contains information about how to build the installer binaries and online repositories.
- Create a package information file that contains information about the installable components.
- Create installer content and copy it to the package directory.
- Use the binarycreator tool to create the installer.
The installer pages are created by using the information you provide in the configuration and package information file.
The example files are located in the examples\tutorial directory in the Qt Installer Framework repository.
Creating a Package Directory
Create a directory structure that reflects the design of the installer and allows the installer to be extended in the future. The directory must contain subdirectories called config and packages .
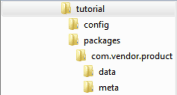
For more information about the package directory, see Package Directory.
Creating a Configuration File
In the config directory, create a file called config.xml with the following contents:
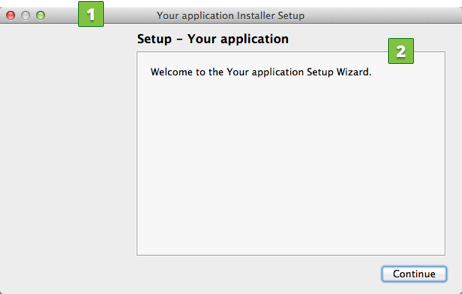
The configuration file specifies the following information that is displayed on the introduction page:
- The element specifies the installer name displayed on the title bar (1).
- The element specifies the application name that is added to the page name and introduction text (2).
The other elements are used to customize the behavior of the installer:
- The element specifies the application version number.
- The
element specifies the publisher of the software (as shown in the Windows Control Panel, for example).
For more information about the configuration file format and the available elements, see Configuration File.
Creating a Package Information File
In this easy scenario, the installer handles only one component that is called com.vendor.product . To provide the installer with information about the component, create a file called package.xml with the following contents and place it in the meta directory:
The elements in the example file are described in more detail below.
For more information about the package information file, see Package Information File Syntax.
Specifying Component Information
The information from the following elements is displayed on the component selection page:
- The element specifies the name of the component in the list of components (1).
- The element specifies the text that is displayed when the component is selected (2).

Specifying Installer Version
The element enables you to promote updates to users when they become available.
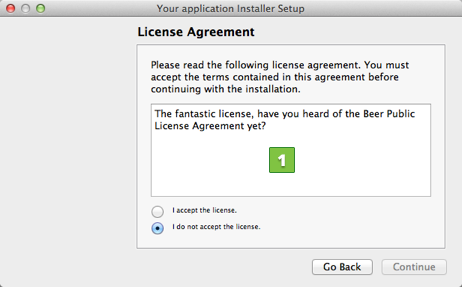
Adding Licenses
The
element specifies the name of the file that contains the text for the license agreement (1) that is displayed on the license check page:
Selecting Default Contents
The element specifies whether the component is selected by default. The value true sets the component as selected. In this example, we use the value script to resolve the value during runtime. The name of the JavaScript script file, installscript.qs, is specified in the element.
Creating Installer Content
Content to be installed is stored in the data directory of a component. As there is only one component, place the data in the packages/com.vendor.product/data directory. The example already contains a file for testing purposes, but you can place basically any files in the directory.
For more information about packaging rules and options, see Data Directory.
Creating the Installer Binary
You are now ready to create your first installer. Switch to the examples\tutorial directory on the command line. To create an installer called YourInstaller.exe that contains the packages identified by com.vendor.product, enter the following command:
The installer is created in the current directory and you can deliver it to end users.
For more information about using the binarycreator tool, see binarycreator.
Note: If an error message is displayed when you run the tutorial installer, check that you used a statically built Qt to create the installer. For more information, see Configuring Qt.
В© 2021 The Qt Company Ltd. Documentation contributions included herein are the copyrights of their respective owners. The documentation provided herein is licensed under the terms of the GNU Free Documentation License version 1.3 as published by the Free Software Foundation. The Qt Company, Qt and their respective logos are trademarks of The Qt Company Ltd in Finland and/or other countries worldwide. All other trademarks are property of their respective owners.
Источник
Offline Qt Downloads
We recommend you use the Qt Online Installer for first time installations and the Qt Maintenance Tool for changes to a current install.
- Qt6 source packages
- 5.15.x source packages
- 5.12.x Offline Installers
- Qt Creator
- Other downloads
- Pre-releases
Qt6 Source Packages
Qt 6.2.0 Source Packages:
The source code is available:
- For Windows users as a single zip file (1.0 G) ( Info )
- For Linux/macOS users as a tar.xz file (636 MB) ( Info )
You can get split source packages from here. Or visit the repository at code.qt.io.
Older Qt Versions
All older versions of Qt are available in the archive .
Qt 5.15.x Source Packages
The source code is available:
- For Windows users as a single zip file (962 MB) ( Info )
- For Linux/macOS users as a tar.xz file (560 MB) ( Info )
You can get split source packages from here. Or visit the repository at code.qt.io.
5.12.x Offline Installers
Qt offline installer is a stand-alone binary package including Qt libraries and Qt Creator.
Source packages & Other releases
The source code is available:
- For Windows users as a single zip file (831 MB) ( Info )
- For Linux/macOS users as a tar.xz file (486 MB) ( Info )
You can get split source packages from here. Or visit the repository at code.qt.io.
Qt Creator
Qt Creator 5.0.2 is released and it is available via Qt online installer. If you need a standalone installer, please select the file according to your operating system from the list below to get the latest Qt Creator for your computer.
The source code is available as a zip (69 MB) ( Info ) or a tar.gz (55 MB) ( Info ). Or visit the repository at code.qt.io.
Be sure to check if Qt is supported on your platform and read the installation notes that are located in the Qt Documentation .
Please check the individual downloads for licensing information.
Pre-releases
Looking for Qt 6.2.0 RC? Source packages are here.
Источник
Qt Documentation
Contents
The Qt Installer Framework provides a set of tools and utilities to create installers once, and deploy them across all the supported desktop Qt platforms without rewriting the source code. The installers will have the native look and feel on the platform where they are run: Linux, Microsoft Windows, and macOS.
The Qt Installer Framework tools generate installers with a set of pages that guide the users during the installation, update, or uninstallation process. You provide the installable content and specify information about it, such as the name of the product and the installer and the text for the license agreement.
You can customize the installers by adding widgets to the predefined pages or by adding whole pages to provide users with additional options. You can create scripts to add operations to the installer.
Choosing Installer Type
You can provide end users with an offline or online installer, or both, depending on your use cases.
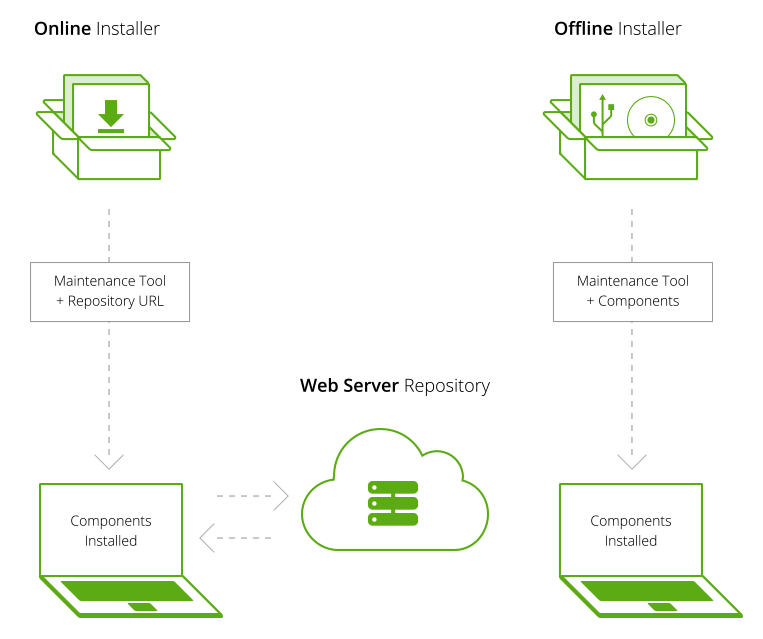
Both installers install a maintenance tool that can later be used to add, update, and remove components. Offline installers contain all the installable components and do not require network connections during the installation. Online installers only install the maintenance tool that then downloads and installs components from an online repository on a web server. Therefore, the size of an online installer binary is smaller and its download time is shorter than that of an offline installer binary. The total time spent downloading and running an online installer might also be shorter than dowloading and running an offline installer if the end users do not install all the available components.
End users can use the maintenance tool to install additional components from the server after the initial installation, as well as to receive automatic updates to content as soon as the updates are published on the server. However, this works for an offline installation only if you specify a repository address in the offline installer configuration or if end users specify the repository address themselves in the maintenance tool settings.
Create an offline installer to enable users to directly download the installation package on a media for installation on a computer later. You can also distribute the installation package on a CD-ROM or USB stick, for example.
Create an online installer to enable users to always install the latest versions of the content binaries.
Promoting Updates
Make online repositories available to promote updates to end users who install your product. The easiest way to provide an update is to recreate the repository and upload it to the web server. For large repositories, you can update only the changed components.
Providing Content for Installers
You can enable other content providers to add components to the installer as add-on components. The component providers must set up repositories that contain the installable components and deliver the URL that points to the repositories to end users. End users must then configure the URL in the installer. The add-on components are visible in the package manager.
В© 2021 The Qt Company Ltd. Documentation contributions included herein are the copyrights of their respective owners. The documentation provided herein is licensed under the terms of the GNU Free Documentation License version 1.3 as published by the Free Software Foundation. The Qt Company, Qt and their respective logos are trademarks of The Qt Company Ltd in Finland and/or other countries worldwide. All other trademarks are property of their respective owners.
Источник
Кроссплатформенное приложение на Qt: Распространение
Qt Installer Framework
Справедливости ради стоит отметить, что Qt имеет свой, разумеется кроссплатформенный, фреймворк для создания установщиков. Он позволяет создавать как обычные, так и online инсталлеры, способные докачивать дополнительные компоненты из репозитория. Также есть возможность вставлять свои виджеты, добавлять новые действия (страницы). Вы наверняка устанавливали Qt Creator, а значит видели эту систему в работе. Однако при создании установщика приходится писать xml конфиг, работать с ключами в командной строке, в общем настройка имеет довольно высокий порог вхождения, особенно по сравнению с другими решениями. При этом я так и не нашел в документации упоминания о том, как пропустить страницу выбора компонентов. В общем получился весьма специфичный продукт, минус которого еще и в том, что такой способ установки считается родным только на Windows платформе.
Windows
Соответственно и вариантов создания установщиков для этой ОС масса, но я остановился на довольно удобном open source продукте — Inno setup. Создание инсталлера в нем не сложнее, чем собственно установка «далее-далее-готово».

После прохождения мастера создания, на выходе получаем скрипт, который можно легко поменять под следующие версии своей программы.
Linux
Исторически сложилось, что софт под Linux распространяется через репозитории, причем дистрибутив каждой программы представляет собой пакет специального вида, содержащий собственно файлы программы, информацию о зависимостях, и некоторые другие метаданные. Несмотря на все попытки стандартизации, кроме мейнстримовых .deb и .rpm существует множество других форматов, специфичных для отдельных дистрибутивов Linux. Canonical экспериментирует с форматом .click, напоминающим бандлы приложений в OS X, но на сегодня рассматривать этот вариант в числе основных пока преждевременно. Раз уж Ubuntu де-факто стандарт Линукса на десктопе, я буду описывать создание пакетов именно на этой платформе. Также следует отметить, что чаще всего дистрибутив стороннего ПО несет с собой все необходимое для функционирования, потому продвинутые возможности пакетной системы остаются незадействованными.
.tar.gz
Что общего между дистрибутивами? Конечно командная оболочка! Значит будем делать скриптовый установщик, который запустится на любой системе, вне зависимости от предполагаемого формата пакетов. Для того, чтобы система «увидела», что установлена новая программа, каждый файл должен занять положенное место. Минимальный набор состоит из: иконки, исполняемого файла, и специального конфига с расширением .desktop
Иконка: Согласно спецификации, Linux не требует преобразовывать исходники иконки в какие-либо сборки, нужно просто скопировать (при установке) файлы в поддиректории вида:
/usr/share/icons/hicolor/RxR/apps, где R — разрешение иконки
или
/usr/share/icons/hicolor/scalable/apps — если вы хотите установить векторное изображение в формате .svg
содержит всю информацию о программе — название и описание приложения, его категория, название иконки и т.д.
Узнать больше можно прочитав стандарт.
Правилом хорошего тона при установке сторонних программ с нестандартным способом установки будет хранение всех своих файлов в подкаталоге /opt/myapp , куда в том числе следует положить и деинсталлер.
Итак, в итоге у меня получился следующий скрипт, который полагает, что рядом с ним лежит бинарник, файл .desktop, скрипт на удаление, папка с иконками(в ней подкаталоги по размерам):
Тут все очевидно, нужно только заметить, что полное описание начинается с пробела
c) Создать структуру каталогов, повторяющую положение файлов установленной программы в файловой системе, нечто вроде
Для того, чтобы создавать пакеты не поднимая привилегии до суперпользователя, стоит воспользоваться утилитой fakeroot, эмулирующей соответствующее окружение.
Ну и собираем пакет командой:
Если вам требуются дополнительные возможности, тут можно почитать подробный обзор.
Как говорится, есть два способа — простой и правильный.
Простой: если .deb пакет не содержит зависимостей и скриптов, то можно просто сконвертировать его, в результате наверняка получится корректно работающий пакет формата .rpm. Для этого предназначена утилита alien, которую можно установить из репозитория.
Минусом такого подхода является неработоспособность пакетов на Fedora 18 и более поздних. Насколько я понимаю, проблема вызвана разницей в правах доступа на системные каталоги, из-за чего происходит конфликт. Остается два варианта: либо исправить пакеты руками так (требуется установленная Fedora), либо собирать .rpm пакеты как положено.
Правильный: К сожалению, тут уже конфигом на три с половиной строки не отделаться, потому «Сборка rpm для чайников» — тема отдельной статьи. При этом полное руководство доступно на русском языке.
Подробнее о сборке пакетов можно почитать тут.
Как было указано выше, есть два основных метода распространения — образ диска с программой, или загрузка из каталога. Оба метода уже неплохо разобраны, стоит отметить лишь несколько принципиальных моментов.
- Создание красивого образа .dmg
- Добавление в Mac App Store
Для того, чтобы программа могла запускаться не только на системах с установленным Qt SDK, нужно использовать специализированную утилиту — macdeployqt, которая скопирует все необходимые плагины и фреймворки в бандл приложения. При добавлении ключа «-d» будет сгенерирован .dmg образ, который можно использовать как базовый для кастомизации.
- Открываем его через дисковую утилиту, конвертируем в read/write
- Открываем получившийся образ в Finder
- В меню «Вид» скрываем лишние элементы (строку статуса и т.д.)
- Добавляем ссылку на /Applicatons
- Создаем скрытую папку, копируем в нее фоновое изображение
- В «параметрах вида» (ПКМ) подстраиваем размер иконок, сетку, фон
- Конвертируем образ обратно
Оглавление цикла статей
Источник


